前言
1、uni-app
uni-app是DCloud推出的终极跨平台解决方案,是一个使用Vue.js开发所有前端应用的框架,官网:https://uniapp.dcloud.io/
2、mui
号称最接近原生APP体验的高性能前端框架,官网:https://dev.dcloud.net.cn/mui/
个人觉得,mui除了页面设计很接近原生App之外,还有一个特点就是能方便的使用App扩展规范Html5 Plus(http://www.html5plus.org/doc/h5p.html),我们能在它的源码中看到比较多的地方都有使用到
3、开发工具
使用HBuilderX开发工具写uni-app的代码,以及打包App等工作,主要的业务功能依旧是使用我们熟悉的idea开发,不过页面从webPC端风格改成了移动端风格
4、整体架构
我们采用uni-app + mui的方式,使用的是官方推荐的 uni-app原生标题栏跟导航栏 + 嵌入webview远程服务的页面,也就是说除了头部、尾部,中间的内容都是类似iframe嵌入进去
简单的说,uni-app,包括头部标题栏、底部导航栏作为App的“壳”,java后端+mui前端页面作为App的“内容”,这样选型的目的是为了方便后期的运维、升级
webview嵌入:直接升级后端服务并重新部署即可,无需重新打包、升级App
头尾使用原生组件:提升App流畅度
为方便以后查阅,特此记录
uni-app部分
我在App.vue中对uni对象进行全局赋值,这样在每个页面都调用到,这样做的目的是为了方便全局修改,比如全局该监听方法、后期需要换进度条样式、更换后端服务地址等
tabBar导航栏
底部的导航栏比较简单,在page.json进行配置就可以
page.json


{
    "pages": [
        //pages数组中第一项表示应用启动页
        {
            "path": "pages/index/index",
            "style": {
                "navigationBarTitleText": "首页",
                "titleNView": {
                    "buttons": [{
                        "type": "none",
                        "float": "left"
                    }, {
                        "type": "none",
                        "float": "right",
                        "fontSrc":"/static/fonts/mui.ttf"
                    }]
                }
            }
        }
    ],
    "globalStyle": {
        "navigationBarTextStyle": "black",
        "navigationBarTitleText": "",
        "navigationBarBackgroundColor": "#F8F8F8",
        "backgroundColor": "#F8F8F8",
        "backgroundColorTop": "#F4F5F6",
        "backgroundColorBottom": "#F4F5F6"
    },
    "tabBar": {
        "color": "#7A7E83",
        "selectedColor": "#007AFF", //#007AFF 蓝色  #f07837 橙色
        "borderStyle": "black",
        "backgroundColor": "#F8F8F8",
        "list": [{
            "pagePath": "pages/index/index",
            "iconPath": "static/image/index/index_.png",
            "selectedIconPath": "static/image/index/index.png",
            "text": "首页"
        }],
        "position": "bottom"
    }
}
监听标题栏按钮
设置进度条颜色
设置进度条颜色、监听webview的url变化判断是否需要标题栏按钮等操作全都在App.vue中进行,具体页面可以直接调用样式对象、监听方法
App.vue
<script>
    export default {
        onLaunch: function() {
            //应用加载后初始后端服务地址
            uni.phoneServiceAddress = "http://qch2.vipgz2.idcfengye.com"; //为了方便App演示,这里开了一个内网穿透

            //监听软键盘高度变化,隐藏或显示tabbar
            uni.onKeyboardHeightChange(res => {
                if (res.height > 0) {
                    uni.hideTabBar();
                } else {
                    uni.showTabBar();
                }
            })

            //全局进度条样式
            uni.webviewStyles = {
                progress: {
                    color: '#007AFF'
                }
            };

            //全局监听标题栏按钮
            uni.listenTitleButton = function(thid) {
                let webView = thid.$mp.page.$getAppWebview();

                //webView加载完成时触发,开始监听子对象的onloaded事件
                webView.onloaded = function() {
                    let wv = webView.children()[0];

                    //webView的子对象加载完成时触发
                    wv.onloaded = function() {
                        let url = wv.getURL();

                          //判断是否显示返回按钮
                        if (
                            url.indexOf("hybrid/html/error.html") >= 0 ||
                            url.indexOf("/index/index") >= 0 ||
                            url.indexOf("/login/index") >= 0
                        ) {
                            // console.log("标题栏隐藏返回按钮");
                            webView.setTitleNViewButtonStyle(0, {
                                type: 'none'
                            });
                            thid.backFun = function(object){}
                        } else {
                            // console.log("标题栏显示返回按钮");
                            webView.setTitleNViewButtonStyle(0, {
                                type: 'back'
                            });
                            thid.backFun = function(object){
                                if(object.index == 0){
                                    //回退
                                    uni.navigateBack();
                                }
                            }
                        }

                        //因为我们手动设置了一些属性,导致标题栏的title不能自动获取、设置,这里需要我们手动设置一下
                        uni.setNavigationBarTitle({
                            title: wv.getTitle()
                        });
                    }
                }

                //webView手动加载、便于触发方法
                webView.loadURL(thid.url);
            }
        },
        onShow: function() {

        },
        onHide: function() {

        }
    }
</script>

<style>
    /*每个页面公共css */
</style>
index.vue
<!-- vue单文件组件 -->
<template>
    <!-- 注意必须有一个view,且只能有一个根view。所有内容写在这个view下面 -->
    <view class="main">
        <!-- 直接嵌入页面 -->
        <web-view id="webView" :src="url" :webview-styles="webviewStyles"></web-view>
    </view>
</template>

<!-- js代码,es6语法 -->
<script>
    //外部文件导入
    import * as util from '../../common/js/util.js';

    export default {
        data() {
            return {
                //当前webview请求的url
                url: uni.phoneServiceAddress + "/index/index",
                //进度条颜色样式
                webviewStyles: uni.webviewStyles,
                //回退按钮事件,比如第一页是不需要回退按钮,点进去之后的页面才需要
                backFun:function(object){}
            }
        },
        //点击标题栏按钮,这里主要是用于回退按钮
        onNavigationBarButtonTap:function(object){
            this.backFun(object);
        },
        //页面装载完成,开始监听webview路径变化
        onReady: function(options) {
            console.log("onReady");
            // #ifdef APP-PLUS
            uni.listenTitleButton(this);
            // #endif
        },
        onLoad: function(options) {
            console.log("onLoad");
        },
        onShow: function(options) {
            console.log("onShow");
        },
        // 点击导航栏,webview重新请求this.url
        onTabItemTap: function(object) {
            // #ifdef APP-PLUS
            let wv = this.$mp.page.$getAppWebview().children()[0];
            wv.loadURL(this.url);
            // #endif
        }
    }
</script>

<!-- css样式代码 -->
<style>
    /* css外部文件导入 */
    @import "../../common/css/uni.css";
</style>
然后其他的页面跟首页差不多,只是this.url的路径不同,同时,如果标题栏还需要其他按钮(比如右边再来个分享、或者添加按钮),就再加一个按钮,然后操作不同的下标
配置错误页面


webview组件
webview组件介绍:https://uniapp.dcloud.io/component/web-view
webview网页与App的交互
1、webview调用uni-app的api,那几个路径的跳转都没有问题,postMessage说是在特定时机(后退、分享等)中才会触发,但是我一次都没有成功
需要注意:在webview网页中调uni-app的api或者是5+扩展规范,需要监听原生扩展的事件,等待plus ready
document.addEventListener('UniAppJSBridgeReady', function() {
        uni.navigateTo({
            url: 'page/index/index'
        });
});
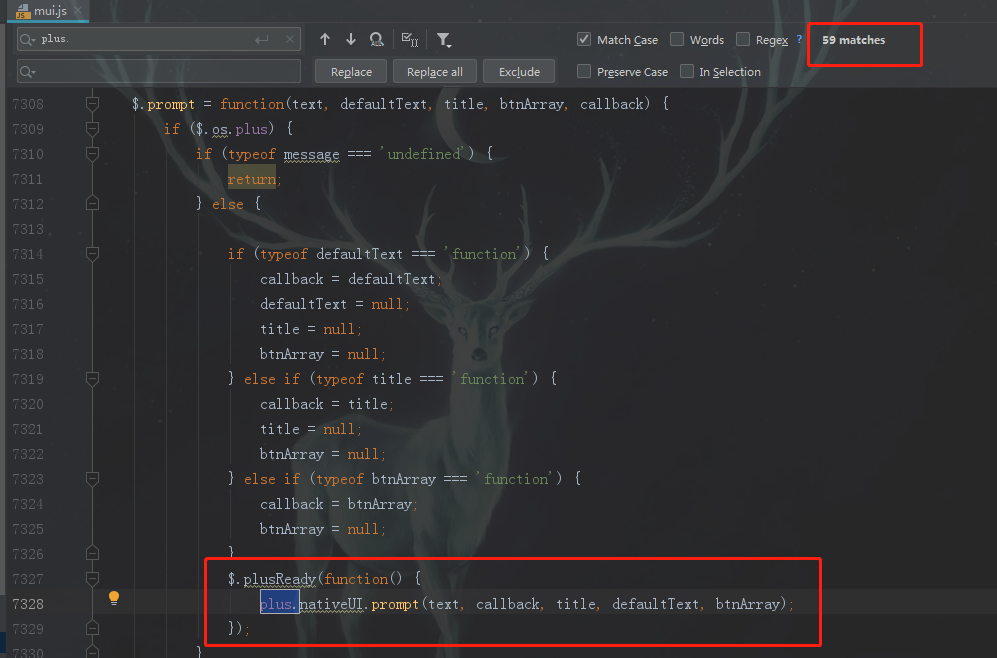
或者使用mui已经帮我们封装好了方法,所有的5+规范的api都可以调
mui.plusReady(function() {
    plus.nativeUI.toast("xxxxxxx");
});
2、uni-app调用webview网页的方法,可以直接在uni-app的代码里面使用5+规范中的webview对象的evaljs方法,将js代码发生到webview页面去执行,
api地址:http://www.html5plus.org/doc/zh_cn/webview.html#plus.webview.WebviewObject.evalJS,例如
plus.webview.currentWebview()[0].evalJS("alert('哈哈哈')");
webview页面就会弹出"哈哈哈"弹窗
但有一点要注意,比如在webview页面使用5+规范去操作uni-app原生标题栏按钮的回调事件中,我们发现,在回调方法的作用域可以访问到外面的对象,也可以是获取到dom文档里的标签、元素,但直接修改DOM文档发现时不起作用的,看文档才发现,原来webview的层级比里面的内容要高,这时候我们选择下面这样方案

mui.plusReady(function () {
    let webView = plus.webview.currentWebview();

    //webView加载完成时触发,开始监听子对象的onloaded事件
    webView.onloaded = function() {
        let wv = webView.children()[0];

        //webView的子对象加载完成时触发
        wv.onloaded = function () {

            /* 标题栏按钮 */
            webView.setTitleNViewButtonStyle(1, {
                onclick: function (event) {
                    // 将JS脚本发送到Webview窗口中运行,可用于实现Webview窗口间的数据通讯
                    wv.evalJS("show()");
                }
            });
        }
    }
});

function show() {

}
检查更新
2020-06-09更新
检查更新是App必不可少的功能,我们在App.vue的onLaunch方法中调用服务接口,查询是否有更新
App打包时,设置版本名称

如需升级,部署后台时

封装ajax.js
/**
 * 封装ajax请求
 */
function request(params, method) {
    return new Promise(function(resolve, reject) {
        uni.request({
            url: params.url,
            data: params.data,
            method: method,
            header: {
                "content-type": "application/x-www-form-urlencoded;charset=UTF-8",
                ...params.header
            },
            success(res) {
                // 成功回调
                if (res.statusCode == 200) {
                    resolve(res.data)
                } else {
                    reject(res)
                }
            },
            fail(err) {
                uni.hideLoading()
                uni.showToast({
                    title: '服务器错误',
                    icon: "none"
                })
                reject(err)
                // 失败回调
            },
            complete() {
                uni.hideLoading()
                // 无论成功或失败 只要请求完成的 回调
            }
        })
    })
};
export default {

    get(params) {
        return request(params, "GET");
    },
    post(params) {
        return request(params, "POST")
    },
    put(params) {
        return request(params, "PUT")
    },

}
引入ajax
import ajax from 'common/js/ajax.js';
查询接口,检查更新
            //检查更新
            ajax.get({
                url: uni.phoneServiceAddress + "/update",  //检查更新地址
                data: {
                    "ua": uni.getSystemInfoSync().platform,//获取ua标识  苹果 ios,安卓 android
                    "versionByApp": plus.runtime.version //获取应用版本名称
                }
            }).then(res => {
                if (res.status == "1") {
                    //提醒用户更新
                    uni.showModal({
                        title: "更新提示",
                        content: res.note,
                        success: (res) => {
                            if (res.confirm) {
                                 plus.runtime.openURL(res.url);
                            }
                        }
                    })
                }
            })
java接口
    @Value("${version}")
    private String versionByServer;//从配置文件中读取


    /**
     * 检查更新
     */
    @GetMapping("update")
    public String update(String ua,String versionByApp) {
        //是否需要更新
        String status = "0";
        //新包地址
        String url = "http://xxx.xxx.com/android.apk";
        //更新内容
        String note = "" +
                "1、修复bug1;" +
                "2、修复bug2;" +
                "";

        if(!versionByServer.equals(versionByApp)){
            status = "1";
        }

        if("ios".equals(ua)){
            url ="itms-apps://itunes.apple.com/cn/app/hello-uni-app/idxxxxxxx";
        }
        return "{"status":""+status+"","note":""+note+"","url":""+url+""}";
    }
App防二次打包
2020-06-09更新
防二次打包只限于安卓App,主要通过校验应用签名,在App.vue的onLaunch方法中调用如下代码进行校验,签名异常则弹窗提示并强制退出
//如果是安卓运行环境,校验应用签名是否正确
if (plus.os.name == 'Android') {
    //校验
    if (!checkApkSign("dd:xx:ff:dd:xx:dd:23:cc:di:x9")) {
        uni.showModal({
            title: '提示',
            content: '签名异常,请下载安装正版APK包',
            showCancel: false,
            success: function(res) {
                if (res.confirm) {
                    plus.runtime.quit();
                } else if (res.cancel) {
                    plus.runtime.quit();
                }
            }
        });
    }
}

/**
 * 通过SHA1,检查安卓APK签名
 */
function checkApkSign(value) {
    //获取应用上下文
    var context = plus.android.runtimeMainActivity();
    var PackageManager = plus.android.importClass("android.content.pm.PackageManager");
    var packageInfo = context.getPackageManager().getPackageInfo(context.getPackageName(), PackageManager.GET_SIGNING_CERTIFICATES ||
        PackageManager.GET_SIGNATURES)
    var Build = plus.android.importClass("android.os.Build");
    var signatures = null;
    //Android 28以后获取包签名信息方法改了
    if (Build.VERSION.SDK_INT >= Build.VERSION_CODES.P) {
        var signingInfo = packageInfo.plusGetAttribute('signingInfo');
        signatures = plus.android.invoke(signingInfo, "getApkContentsSigners")
    } else {
        signatures = packageInfo.plusGetAttribute('signatures');
    }
    if (signatures != null) {
        var signature;
        var byteArr;
        var currentSignature;//当前App的SHA1值
        var md = plus.android.invoke("java.security.MessageDigest", "getInstance", type);
        for (var i in signatures) {
            byteArr = plus.android.invoke(signatures[i], "toByteArray");
            plus.android.invoke(md, "update", byteArr);
            currentSignature = Bytes2HexString(plus.android.invoke(md, "digest")).toUpperCase();
            //调用方法转成16进制时没有拼接":",所以对比时value也要去掉
            if (value.replace(/:/g,"").toUpperCase() == currentSignature) {
          return true;
            }
        }
    } else {
        console.info("应用未签名");
    }
    return false;
}

//字节数组转十六进制字符串,对负值填坑
function Bytes2HexString(arrBytes) {
    var str = "";
    for (var i = 0; i < arrBytes.length; i++) {
        var tmp;
        var num = arrBytes[i];
        if (num < 0) {
            //此处填坑,当byte因为符合位导致数值为负时候,需要对数据进行处理
            tmp = (255 + num + 1).toString(16);
        } else {
            tmp = num.toString(16);
        }
        if (tmp.length == 1) {
            tmp = "0" + tmp;
        }
        str += tmp;
    }
    return str;
}
mui部分
项目工程结构就是我们之前熟悉的springboot + thymeleaf + springdata-jpa,开发起来除了页面风格(移动端)不同,其他的都还好
mui部分主要是业务页面、功能的开发,有时候也需要调用5+规范的api,比如调用手机相机、文件管理、系统通知等,需要用到的时候就看api:http://www.html5plus.org/doc/h5p.html
页面开发主要就参考mui的新手文档(https://dev.dcloud.net.cn/mui/getting-started/)、官网演示(https://www.dcloud.io/mui.html)、文档(https://dev.dcloud.net.cn/mui/ui/)等,同时也参考别人的App页面设计(QQ、微信、支付宝、京东等)
封装弹窗
比如类似京东他们的这种弹窗,我认为比较好看,比较具有通用性
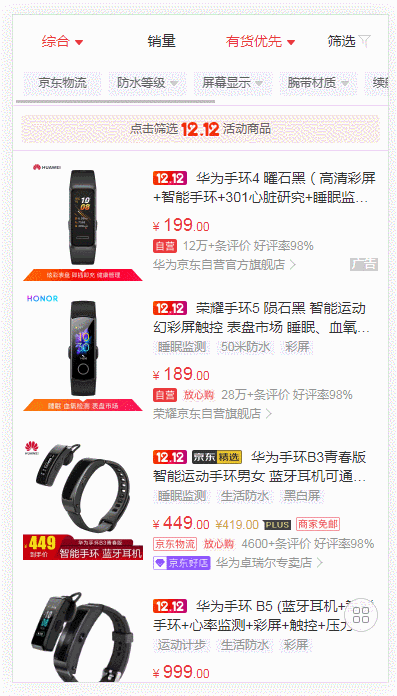

所以也基于mui封装了自己的一套弹窗效果
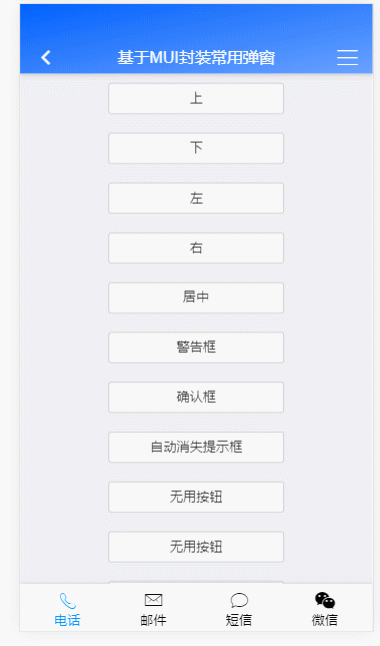
先看下演示

代码
css
封装在common.css中
/* 封装自定义弹窗 上右下左,居中 */
.huanzi-dialog {
    position: fixed;
    background-color: white;
    z-index: -1;
    overflow: hidden;
}

.huanzi-dialog-top {
    width: 100%;
    top: -100%;
    border-radius: 0 0 13px 13px;
}

.huanzi-dialog-right {
    width: 85%;
    top: 0;
    right: -85%;
    bottom: 0;
    border-radius: 13px 0 0 13px;
}

.huanzi-dialog-bottom {
    width: 100%;
    bottom: -100%;
    border-radius: 13px 13px 0 0;
}

.huanzi-dialog-left {
    width: 85%;
    top: 0;
    left: -85%;
    bottom: 0;
    border-radius: 0 13px 13px 0;
}

.huanzi-dialog-center {
    border-radius: 13px;
    opacity: 0;
    /* 方案一 */
    /*margin: auto;
    left: 0;
    right: 0;
    bottom: 0;
    top: 0;*/

    /* 方案二 */
    top: 50%;
    left: 50%;
    transform: translate3d(-50%, -50%, 0) scale(1.185);
}
js
封装在common.js中
/* 封装自定义弹窗 */
var HuanziDialog = {
    mask: null,//mui遮阴层对象
    showSpeed: 300,//弹出速度
    hideSpeed: 100,//隐藏速度
    removeFlag: true,//close内部是否执行操作
    /**
     * 隐藏弹窗,内部方法
     * @param select jq元素选择器,#xxx、.xxx等,如果为空,则隐藏所有
     * @param callback 回调方法
     * @param speed 速度
     */
    hideFun: function (select, callback, speed) {
        let $huanziDialog = select ? $(select) : $(".huanzi-dialog");
        speed = speed ? speed : HuanziDialog.hideSpeed;

        //上右下左,居中
        $huanziDialog.each(function () {
            let dialog = $(this);
            let clazz = dialog.attr("class");
            if (clazz.indexOf("huanzi-dialog-top") > -1) {
                dialog.animate({top: '-100%'}, speed);
            } else if (clazz.indexOf("huanzi-dialog-right") > -1) {
                dialog.animate({right: '-85%'}, speed);
            } else if (clazz.indexOf("huanzi-dialog-bottom") > -1) {
                dialog.animate({bottom: '-100%'}, speed);
            } else if (clazz.indexOf("huanzi-dialog-left") > -1) {
                dialog.animate({left: '-85%'}, speed);
            } else if (clazz.indexOf("huanzi-dialog-center") > -1) {
                dialog.animate({opacity: 0}, speed);
            }
            setTimeout(function () {
                dialog.css("z-index", "-1");
            }, speed)
        });

        callback && callback();
    },

    /**
     * 显示弹窗,内部方法
     * @param select jq元素选择器,#xxx、.xxx等,如果为空,则显示所有
     * @param callback 回调方法
     * @param speed 速度
     */
    showFun: function (select, callback, speed) {
        let $huanziDialog = select ? $(select) : $(".huanzi-dialog");
        speed = speed ? speed : HuanziDialog.hideSpeed;

        //上右下左,居中
        $huanziDialog.each(function () {
            let dialog = $(this);
            dialog.css("z-index", "999");

            let clazz = dialog.attr("class");
            if (clazz.indexOf("huanzi-dialog-top") > -1) {
                dialog.animate({top: '0%'}, speed);
            } else if (clazz.indexOf("huanzi-dialog-right") > -1) {
                dialog.animate({right: '0%'}, speed);
            } else if (clazz.indexOf("huanzi-dialog-bottom") > -1) {
                dialog.animate({bottom: '0%'}, speed);
            } else if (clazz.indexOf("huanzi-dialog-left") > -1) {
                dialog.animate({left: '0%'}, speed);
            } else if (clazz.indexOf("huanzi-dialog-center") > -1) {
                dialog.animate({opacity: 1}, speed);
            }
        });
        HuanziDialog.removeFlag = true;
        callback && callback();
    },

    /**
     * 初始化mui遮阴层对象
     */
    init: function () {
        HuanziDialog.mask = mui.createMask();

        /**
         * 重写close方法
         */
        HuanziDialog.mask.close = function () {
            if (!HuanziDialog.removeFlag) {
                return;
            }
            //方法直接在这里执行
            HuanziDialog.hideFun();
            //调用删除
            HuanziDialog.mask._remove();
        };
    },

    /**
     * 显示弹窗,供外部调用(参数同内部方法一致)
     */
    show: function (select, callback, speed) {
        HuanziDialog.showFun(select, callback, speed);
        HuanziDialog.mask.show();//显示遮罩
    },

    /**
     * 隐藏弹窗,供外部调用(参数同内部方法一致)
     */
    hide: function (select, callback, speed) {
        HuanziDialog.hideFun(select, callback, speed);
        HuanziDialog.mask.close();//关闭遮罩
    },

    /**
     * 警告框
     * @param title 标题
     * @param message 内容
     * @param callback 点击确认的回调
     */
    alert: function (title, message, callback) {
        let $html = $("<div class="mui-popup mui-popup-in" style="display: block;">" +
            "<div class="mui-popup-inner">" +
            "   <div class="mui-popup-title">" + title + "</div>" +
            "   <div class="mui-popup-text">" + message + "</div>" +
            "</div>" +
            "<div class="mui-popup-buttons">" +
            "<span class="mui-popup-button mui-popup-button-bold confirm-but">确定</span>" +
            "</div>" +
            "</div>");
        $html.find(".confirm-but").click(function () {
            HuanziDialog.removeFlag = true;
            HuanziDialog.mask.close();
            $html.remove();
            callback && callback();
        });
        HuanziDialog.mask.show();//显示遮罩
        HuanziDialog.removeFlag = false;
        $("body").append($html);
    },

    /**
     * 确认消息框
     * @param title 标题
     * @param message 内容
     * @param callback 点击确认的回调
     */
    confirm: function (title, message, callback) {
        let $html = $("<div class="mui-popup mui-popup-in" style="display: block;">" +
            "<div class="mui-popup-inner">" +
            "   <div class="mui-popup-title">" + title + "</div>" +
            "   <div class="mui-popup-text">" + message + "</div>" +
            "</div>" +
            "<div class="mui-popup-buttons">" +
            "<span class="mui-popup-button mui-popup-button-bold cancel-but" style='color: #585858;'>取消</span>" +
            "<span class="mui-popup-button mui-popup-button-bold confirm-but">确定</span>" +
            "</div>" +
            "</div>");
        $html.find(".cancel-but").click(function () {
            HuanziDialog.removeFlag = true;
            HuanziDialog.mask.close();
            $html.remove();
        });
        $html.find(".confirm-but").click(function () {
            $html.find(".cancel-but").click();
            callback && callback();
        });

        HuanziDialog.mask.show();//显示遮罩
        HuanziDialog.removeFlag = false;
        $("body").append($html);
    },

    /**
     * 自动消失提示弹窗
     * @param message 内容
     * @param speed 存在时间
     */
    toast: function (message, speed) {
        speed = speed ? speed : 2000;
        let $html = $("<div class="huanzi-dialog huanzi-dialog-center" style=" 45%;height: 20%;opacity: 1;z-index: 999;background-color: #5a5a5ad1;">" +
            "    <p style=" position: relative; top: 50%; left: 50%; transform: translate3d(-50%, -50%, 0) scale(1); color: #e0e0e0; font-size: 20px; ">" + message + "</p>" +
            "</div>");
        $("body").append($html);
        setTimeout(function () {
            $html.remove();
        }, speed);
    }
};

//先初始化自定义弹窗
HuanziDialog.init();
html
测试页面
<!DOCTYPE html>
<html xmlns:th="http://www.thymeleaf.org">
<head>
    <meta charset="UTF-8">
    <meta name="viewport" content="width=device-width, initial-scale=1">
    <title>基于MUI封装常用弹窗</title>
    <!-- jquery -->
     <script th:src="@{/webjars/jquery/3.1.1/jquery.min.js}"></script>

    <!-- 引入mui框架 -->
    <link rel='stylesheet' th:href="@{/common/mui/css/mui.css}"/>
    <script th:src="@{/common/mui/js/mui.js}"></script>

    <!-- 最后引入公用代码 -->
    <link rel='stylesheet' th:href="@{/common/common.css}"/>
    <script th:src="@{/common/common.js}"></script>

    <style>
        body{
            text-align: center;
        }

        .mui-btn{
            width: 50%;
            margin: 10px auto;
        }
    </style>
</head>
<body>
    <h4>基于MUI封装常用弹窗</h4>

    <button class="mui-btn" onclick="HuanziDialog.show('#top')">上</button>
    <button class="mui-btn"  onclick="HuanziDialog.show('#bottom')">下</button>
    <button class="mui-btn"  onclick="HuanziDialog.show('#left')">左</button>
    <button class="mui-btn"  onclick="HuanziDialog.show('#right')">右</button>
    <button class="mui-btn"  onclick="HuanziDialog.show('#center')">居中</button>
    <button class="mui-btn"  onclick="HuanziDialog.alert('系统提示','我是警告框!',function() {console.log('你已确认警告!')})">警告框</button>
    <button class="mui-btn"  onclick="HuanziDialog.confirm('系统提示','确认要XXX吗?',function() {HuanziDialog.toast('很好,你点击了确认!');console.log('很好,你点击了确认!')})">确认框</button>
    <button class="mui-btn"  onclick="HuanziDialog.toast('提交成功')">自动消失提示框</button>

    <!-- 上 -->
    <div id="top" class="huanzi-dialog huanzi-dialog-top" style="height: 500px">
        <h5>我从上边弹出</h5>
    </div>

    <!-- 下 -->
    <div id="bottom" class="huanzi-dialog huanzi-dialog-bottom" style="height: 500px">
        <h5>我从下边弹出</h5>
    </div>

    <!-- 左 -->
    <div id="left" class="huanzi-dialog huanzi-dialog-left">
        <h5>我从左边弹出</h5>
    </div>

    <!-- 右 -->
    <div id="right" class="huanzi-dialog huanzi-dialog-right">
        <h5>我从右边弹出</h5>
    </div>

    <!-- 居中 -->
    <div id="center" class="huanzi-dialog huanzi-dialog-center" style=" 65%;height: 30%">
        <h5>我从中间弹出</h5>
    </div>

</body>
</html>
其实后面的警告框、确认框的样式就是mui的5+端样式,那我们为什么还要封装呢?在开发中我们发现,在PS端浏览器将调试模式改成手机端,mui的封装的弹窗是上面的效果,但到真机上运行它又变成原生的弹窗样式,原来mui底层有进行了判断,安卓、苹果、5+等样式都不一样,这里我们为了弹窗风格的统一,同时也是为了方便后期的统一调整,因此再进行了一层封装
封装头部尾部
这里的封装其实就是文末补充的另一种方案,基于mui的标题栏、底部导航栏,进行简单封装
common.css
/* 自定义头部,系统状态栏的高度暂时写死30px */
.huanzi-header{
    position: fixed;
    top:0;
    right: 0;
    left: 0;
    background-image: linear-gradient(to bottom right, #0061ff, #6aa2ff);
    box-shadow: 0 1px 6px #ccc;
    height: 74px;
}

.huanzi-header  .statusbar {
    height: 30px;
    width: 100%;
}

.huanzi-header .titlebar{
    padding-right: 10px;
    padding-left: 10px;
    border-bottom: 0;
}

.huanzi-header .titlebar a {
    margin: 15px 5px;
}

.huanzi-header .titlebar * {
    color: white;
}

.huanzi-header .mui-title{
    line-height: 55px !important;
    right: 100px;
    left: 100px;
    display: inline-block;
    overflow: hidden;
    width: auto;
    margin: 0;
    text-overflow: ellipsis;
}

.huanzi-content {
    position: absolute;
    top: 74px;
    bottom: 50px;
}


/* 自定义页脚(底部导航栏) */
.huanzi-footer{
    position: fixed;
    right: 0;
    left: 0;
    bottom: 0;
    background-color: white;
    box-shadow: 0 1px 6px #ccc;
    height: 50px;
    padding: 5px;
}

.huanzi-footer .huanzi-footer-buttom{
    height: 50px;
    float: left;
    color: black;
    /* 宽度为:100/按钮个数 */
    width: 25%;
}

.huanzi-footer .huanzi-footer-buttom > p{
    color: black;
}

.huanzi-footer .select{
    color: #0091fb;
}

.huanzi-footer .select > p{
    color: #0091fb;
}
common.js
//底部按钮点击切换颜色
$(document).on("click",".huanzi-footer-buttom", function (e) {
    $(".huanzi-footer-buttom").each(function () {
        $(this).removeClass("select");
    });
    $(this).addClass("select");
});
自定义弹窗例子
需要在head.html中引入jquery、mui、common的js、css
<!DOCTYPE html>
<html xmlns:th="http://www.thymeleaf.org">
<head>
    <meta charset="UTF-8">
    <meta name="viewport" content="width=device-width, initial-scale=1">
    <title>基于MUI封装常用弹窗</title>
    <script th:replace="common/head::static"></script>
    <style>
        body{
            text-align: center;
        }

        .mui-btn{
            width: 50%;
            margin: 10px auto;
        }
    </style>
</head>
<body>
<!-- 头部 -->
<header class="huanzi-header">
    <div class="statusbar"></div>
    <div class="titlebar">
        <a class="mui-action-back mui-icon mui-icon-left-nav mui-pull-left"></a>
        <h1 class="mui-title">基于MUI封装常用弹窗</h1>
        <a class="mui-icon mui-icon-bars mui-pull-right"></a>
    </div>
</header>

<!-- 内容(可滑动区域) -->
<div class="huanzi-content mui-scroll-wrapper">
    <div class=" mui-scroll">
        <button class="mui-btn" onclick="HuanziDialog.show('#top')">上</button>
        <button class="mui-btn"  onclick="HuanziDialog.show('#bottom')">下</button>
        <button class="mui-btn"  onclick="HuanziDialog.show('#left')">左</button>
        <button class="mui-btn"  onclick="HuanziDialog.show('#right')">右</button>
        <button class="mui-btn"  onclick="HuanziDialog.show('#center')">居中</button>
        <button class="mui-btn"  onclick="HuanziDialog.alert('系统提示','我是警告框!',function() {console.log('你已确认警告!')})">警告框</button>
        <button class="mui-btn"  onclick="HuanziDialog.confirm('系统提示','确认要XXX吗?',function() {HuanziDialog.toast('你点击了确认!');console.log('很好,你点击了确认!')})">确认框</button>
        <button class="mui-btn"  onclick="HuanziDialog.toast('提交成功')">自动消失提示框</button>

        <button class="mui-btn">无用按钮</button>
        <button class="mui-btn">无用按钮</button>
        <button class="mui-btn">无用按钮</button>
        <button class="mui-btn">无用按钮</button>
        <button class="mui-btn">无用按钮</button>
        <button class="mui-btn">无用按钮</button>
        <button class="mui-btn">无用按钮</button>
    </div>
</div>
<!-- 例如弹窗等内容,需要放在外面 -->
<div>
    <!-- 上 -->
    <div id="top" class="huanzi-dialog huanzi-dialog-top" style="height: 500px">
        <h5>我从上边弹出</h5>
    </div>

    <!-- 下 -->
    <div id="bottom" class="huanzi-dialog huanzi-dialog-bottom" style="height: 500px">
        <h5>我从下边弹出</h5>
    </div>

    <!-- 左 -->
    <div id="left" class="huanzi-dialog huanzi-dialog-left">
        <h5>我从左边弹出</h5>
    </div>

    <!-- 右 -->
    <div id="right" class="huanzi-dialog huanzi-dialog-right">
        <h5>我从右边弹出</h5>
    </div>

    <!-- 居中 -->
    <div id="center" class="huanzi-dialog huanzi-dialog-center" style=" 65%;height: 30%">
        <h5>我从中间弹出</h5>
    </div>

</div>

<!-- 底部导航栏 -->
<footer class="huanzi-footer">
    <div class="huanzi-footer-buttom select">
        <i class="mui-icon mui-icon-phone"></i>
        <p>电话</p>
    </div>
    <div class="huanzi-footer-buttom">
        <i class="mui-icon mui-icon-email"></i>
        <p>邮件</p>
    </div>
    <div class="huanzi-footer-buttom">
        <i class="mui-icon mui-icon-chatbubble"></i>
        <p>短信</p>
    </div>
    <div class="huanzi-footer-buttom">
        <i class="mui-icon mui-icon-weixin"></i>
        <p>微信</p>
    </div>
</footer>
</body>
</html>
效果演示
2020-03-04更新
问题:按照前面的想法,我们每个页面都要加入头部、尾部,但这样跳转页面时会造成“白屏”的情况,严重影响浏览效果
解决办法:我们创建一个main主页面,只有主页面有头部、尾部,中间内容嵌入iframe内容子页面(子页面正常html页面),如果在当前页面进行跳转操作,也是在iframe中进行跳转,而如果点击尾部按钮切换模块、页面,那就切换iframe标签的src进行更新url,这样我们在跳转页面时,头部、尾部都不会刷新,浏览效果更佳,而且还可以减少重复代码
common.js
其他的都不变,尾部按钮点击事件需要修改一下,同时加入iframe标签的load事件处理
//省略其他内容


//底部按钮点击事件
$(document).on("click", ".huanzi-footer-buttom", function (e) {
    //iframe跳转新页面
    $("#mainIframe")[0].src = ctx + $(this).data("url");

    //切换颜色
    $(".huanzi-footer-buttom").each(function () {
        $(this).removeClass("select");
    });
    $(this).addClass("select");
});

//mainIframe onload事件
function mainIframeLoadFun(mainIframe) {
    //自适应高度
    mainIframe.height = $('.huanzi-content')[0].scrollHeight;

    //修改标题

    //子页面与父页面同源获取方法
    // let title = document.getElementById('mainIframe').contentWindow.document.title;//iframe中子页面的title
    let $mainFrame=$('#mainIframe');
    let title = $mainFrame.contents().attr("title");

    $("title").text(title);
    $(".mui-title").text(title);
}
main.html
主页面,主要分为头部、中间内容、尾部,中间内容改成iframe标签,在onload事件中进行高度自适应
<!DOCTYPE html>
<html xmlns:th="http://www.thymeleaf.org">
<head>
    <meta charset="UTF-8">
    <meta name="viewport" content="width=device-width, initial-scale=1">
    <title></title>
    <script th:replace="common/head::static"></script>
    <style>
        body{
            text-align: center;
        }
    </style>
</head>
<body>
<!-- 头部 -->
<header class="huanzi-header">
    <div class="statusbar"></div>
    <div class="titlebar">
        <a class="mui-action-back mui-icon mui-icon-left-nav mui-pull-left"></a>
        <h1 class="mui-title"></h1>
        <a class="mui-icon mui-icon-bars mui-pull-right"></a>
    </div>
</header>

<!-- 内容(可滑动区域) -->
<div class="huanzi-content mui-scroll-wrapper">
    <div class=" mui-scroll">
        <!-- 直接嵌入iframe,且自适应宽高 -->
        <iframe id="mainIframe" src="/test1" width="100%" onload="mainIframeLoadFun(this)"></iframe>
    </div>
</div>

<!-- 底部导航栏 -->
<footer class="huanzi-footer">
    <div class="huanzi-footer-buttom select" data-url="/test1">
        <i class="mui-icon mui-icon-phone"></i>
        <p>页面1</p>
    </div>
    <div class="huanzi-footer-buttom" data-url="/test2">
        <i class="mui-icon mui-icon-email"></i>
        <p>页面2</p>
    </div>
    <div class="huanzi-footer-buttom" data-url="/test3">
        <i class="mui-icon mui-icon-chatbubble"></i>
        <p>页面3</p>
    </div>
    <div class="huanzi-footer-buttom" data-url="/test4">
        <i class="mui-icon mui-icon-weixin"></i>
        <p>页面4</p>
    </div>
</footer>
</body>
</html>
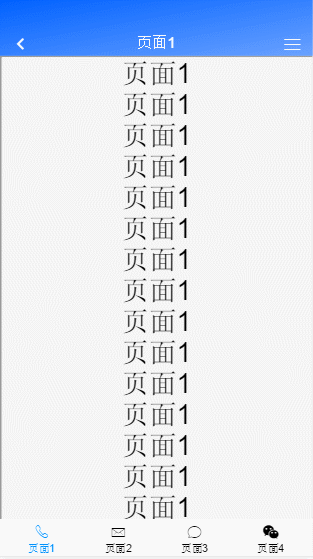
test1.html - test5.html(这几个页面内容都差不多,贴出一个就可以了,不同的是里面的值,还有就是test4.html页面里面有个跳转test5.html的按钮)
<!DOCTYPE html>
<html xmlns:th="http://www.thymeleaf.org">
<head>
    <meta charset="UTF-8">
    <meta name="viewport" content="width=device-width, initial-scale=1">
    <title>页面4</title>
    <script th:replace="common/head::static"></script>
    <style>
        body{
            text-align: center;
        }
    </style>
</head>
<body>
    <button class="mui-btn" onclick="window.location.href = ctx + '/test5'">跳转页面5</button>
    <h1>页面4</h1>
    <h1>页面4</h1>
    <h1>页面4</h1>
    <h1>页面4</h1>
    <h1>页面4</h1>
    <h1>页面4</h1>
    <h1>页面4</h1>
    <h1>页面4</h1>
    <h1>页面4</h1>
    <h1>页面4</h1>
    <h1>页面4</h1>
    <h1>页面4</h1>
    <h1>页面4</h1>
    <h1>页面4</h1>
    <h1>页面4</h1>
    <h1>页面4</h1>
    <h1>页面4</h1>
    <h1>页面4</h1>
    <h1>页面4</h1>
    <h1>页面4</h1>
    <h1>页面4</h1>
    <h1>页面4</h1>
    <h1>页面4</h1>
    <h1>页面4</h1>
    <h1>页面4</h1>
    <h1>页面4</h1>
    <h1>页面4</h1>
    <h1>页面4</h1>
    <h1>页面4</h1>
    <h1>页面4</h1>
    <h1>页面4</h1>
    <h1>页面4</h1>
    <h1>页面4</h1>
    <h1>页面4</h1>
    <h1>页面4</h1>
    <h1>页面4</h1>
    <h1>页面4</h1>
    <h1>页面4</h1>
    <h1>页面4</h1>
    <h1>页面4</h1>
    <h1>页面4</h1>
    <h1>页面4</h1>
    <h1>页面4</h1>
    <h1>页面4</h1>
    <h1>页面4</h1>
    <h1>页面4</h1>
    <h1>页面4</h1>
    <h1>页面4</h1>
    <h1>页面4</h1>
</body>
</html>
controller
控制器控制页面跳转(代码几乎一模一样,我就只贴一个就好了)
    //跳转主页面
    @GetMapping("main")
    public ModelAndView main() {
        ModelAndView modelAndView = new ModelAndView();
        modelAndView.setViewName("main");
        return modelAndView;
    }
效果演示
App调试、打包
运行 -> 运行到手机或模拟器
需要安装个模拟器(我的是雷电)、或者直接用USB数据先连接进行调试(PS:我的模拟器连接经常会断开,不知道是什么回事,有时候调试调试着就断开了,检查了也没有其他应用占用adb)
App打包是在:发行 - > 原生App-云打包
开发阶段,使用Dcloud公司的公用证书云打包就可以了,正式上线就需要自己的证书去打包
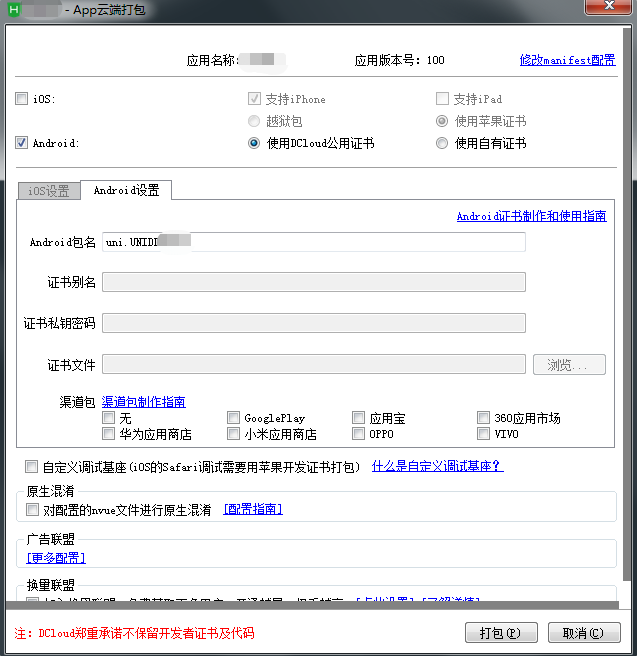
打包成功后控制台就会返回下载链接
后记
移动端App uni-app + mui 开发暂时先记录到这,后续再补充;由于是公司的App,就不方便演示,等有空了再做个demo把完整的一套东西再做完整演示;
另一种方案
虽然官方推荐尽量使用原生导航。甚至有时需要牺牲一些不是很重要的需求。但有时候我们就是想自定义原生标题栏,特别是我们是webview嵌入的方式
    "globalStyle": {
        //隐藏原生标题栏,主意事项请查阅官网:https://uniapp.dcloud.io/collocation/pages?id=customnav
        "navigationStyle":"custom"
    },
如果要自定义导航栏,有哪些主要的点,官方在这里已经说得很清楚了:https://uniapp.dcloud.io/collocation/pages?id=customnav,但如果我们采用的是webview嵌入的方式,就要注意了,<web-view> 组件默认铺满全屏并且层级高于前端组件,如果我们按照文档中操作,发现还是会顶到系统状态栏
因此占高div我们最好也写在webview里面,系统状态栏的高度可以动态获取:http://www.html5plus.org/doc/zh_cn/navigator.html#plus.navigator.getStatusbarHeight
mui.plusReady(function(){
    //获取系统状态栏的高度,单位为像素(px),值为Webview中的逻辑高度单位
    let statusbarHeight = plus.navigator.getStatusbarHeight();
    alert(statusbarHeight)
});
自己写标题栏的话可以直接用mui的这个,或者基于它,我们自己再封装一个自己的标题栏
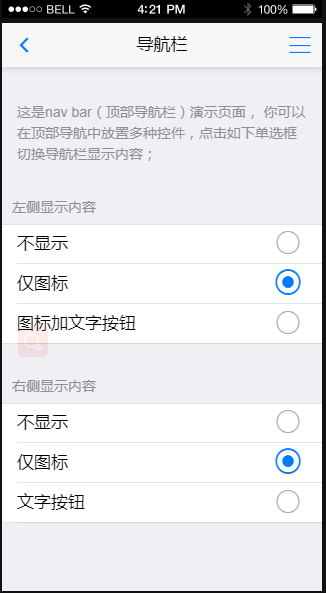
但是这样对代码的书写规范有一定的要求,页面统一分为头部、内容、尾部,中间的内容是可滑动区域,例如:
<body>
    <!-- 头部 -->
    <header id="header" class="mui-bar mui-bar-nav">
        <!-- 系统状态栏占高div -->
        <div></div>

        <a class="mui-action-back mui-icon mui-icon-left-nav mui-pull-left"></a>
        <h1 class="mui-title">头部导航栏</h1>
        <a class="mui-icon mui-icon-bars mui-pull-right"></a>
    </header>

    <!-- 内容(可滑动区域) -->
    <div class="mui-scroll-wrapper">
        <div class=" mui-scroll">
            <p>这里是内容</p>
        </div>
    </div>

    <!-- 底部(如有需要,可扩展尾部导航栏) -->
</body>
当然,我们可以进行统一封装,使用thymeleaf的替换,或者使用js去追加,这样可以减少每个页面的代码量,方便维护,但是视觉上就会有闪烁效果,因为每个页面的头部可能不一样,需要用js去追加,这个就需要权衡利弊选择合适的方式
注:封装代码在前面mui封装部分
补充
2020-02-25补充:自定义tabbar + webview解决方案
uniapp原生头尾+webview组合,底部的TabBar按钮需要根据登录角色的权限来动态控制数量,但目前官方并不支持动态修改TabBar隐藏或显示某一项,因此我们选用uniapp自定义TabBar实现(用的是这个插件:自定义动态TabBar;图片上传七牛云、阿里OSS;),同时配合Storage模块(http://www.html5plus.org/doc/zh_cn/storage.html)在webview页面进行存储登录角色权限,登录成功后跳转uniapp固定页面,进行读取判断动态控制tabbar
但webview组件默认全屏显示,会覆盖底部的tabbar按钮,而且webview组件的webview-styles并不支持设置高度,需要使用APP扩展插件5+plus来控制(http://www.html5plus.org/doc/zh_cn/webview.html),但当我们调用setStyle设置百分比高度发现并没有生效,原因不明,很奇怪
无奈,只能用5+plus动态创建webview组件,创建时传入style样式控制高度,这样就解决自定义tabbar按钮被覆盖的问题
            //动态创建,控制高度
            var w=plus.webview.create(this.url,'index',{height:'93%'});
            w.show();
2020-06-09更新
我们已经尝试过了以下三种方案
1、原生标题栏 + 原生tabbar
2、自定义标题栏(webview) + 原生tabbar
3、自定义标题栏(webview) + 自定义tabbar(uniapp)
但我们有时就是想整个页面都是从服务端返回,包括标题栏、tabbar,即自定义标题栏(webview)+ 自定义tabbar(webview),详情请看另一篇博客:SpringBoot系列——基于mui的H5套壳APP开发web框架
iOS上架App Store
Android的打好apk包后我们可以随便安装,但iOS的ipa却不行,除了测试证书打的测试包,并且是添加过UUID的手机才能安装测试包,用发布证书打的ipa包是不能直接安装的,只能通过App Store安装
下面简单记录一下iOS打包、发布流程,没有苹果电脑,可以用这个Appuploader工具来生成证书、以及上传ipa:http://blog.applicationloader.net/blog/zh/72.html
1、iOS证书(.p12)和描述文件(.mobileprovision)、以及发布推送证书申请(账号权限要有证书相关权限,具体步骤查看官网文档:https://ask.dcloud.net.cn/article/152)
2、使用发布证书云打包ipa
3、在iTunes Connect创建APP,上传ipa(账号要有管理App权限)
4、设置APP各项信息提交审核(上传过程可以先设置App信息)
(2019最详细iOS APP上架App Store流程:https://www.jianshu.com/p/6f50130b6950)
注意点:
1、App图标有要求,提供的app store图标需要是png图片,且不透明即没有alpha,(修改后按点击“自动生成所有图标并替换”重新生成应用图标,并重新打包上传,记得改版本号,不改上传不了)
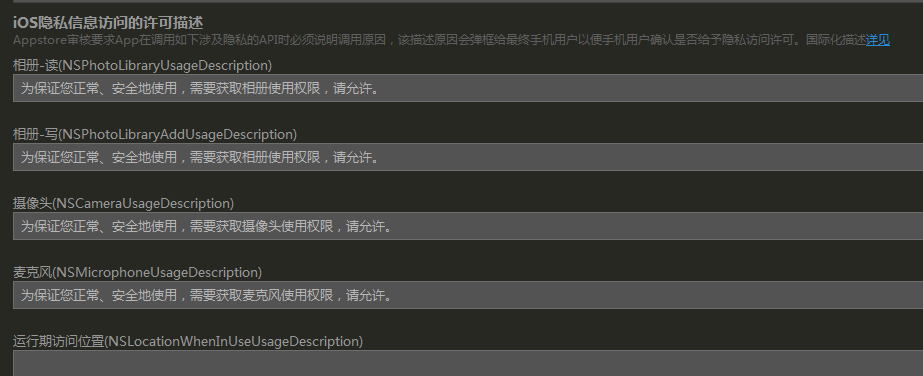
2、要在manifest.json配置隐私权限
3、如果App没有注册功能,一定要说明没有注册功能的原因,让审核人员相信不是内部应用,并提供测试账号
4、App截图也不能忽略,打测试包在不同机型的真机上安装进行截图,最后让美工PS一下,类似这样

代码开源
代码已经开源、托管到我的GitHub、码云: