摘要:NanoDet 是一个速度超快和轻量级的移动端 Anchor-free 目标检测模型。
前言
YOLO、SSD、Fast R-CNN等模型在目标检测方面速度较快和精度较高,但是这些模型比较大,不太适合移植到移动端或嵌入式设备;轻量级模型 NanoDet-m,对单阶段检测模型三大模块(Head、Neck、Backbone)进行轻量化,目标加检测速度很快;模型文件大小仅几兆(小于4M)。
NanoDet作者开源代码地址:https://github.com/RangiLyu/nanodet (致敬)
基于NanoDet项目进行小裁剪,专门用来实现Python语言、PyTorch 版本的代码地址:https://github.com/guo-pu/NanoDet-PyTorch
下载直接能使用,支持图片、视频文件、摄像头实时目标检测
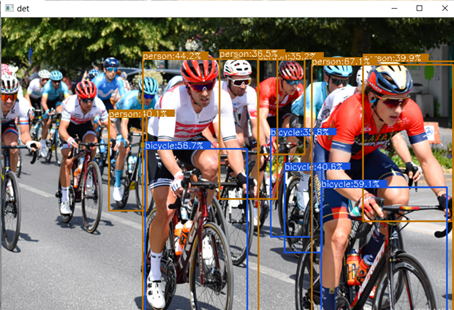
先看一下NanoDet目标检测的效果:
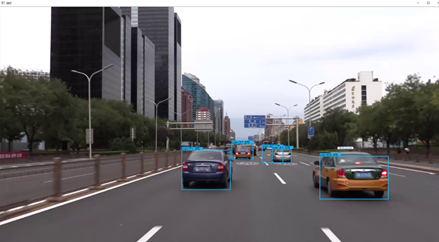
同时检测多辆汽车:

查看多目标、目标之间重叠、同时存在小目标和大目标的检测效果:
NanoDet 模型介绍
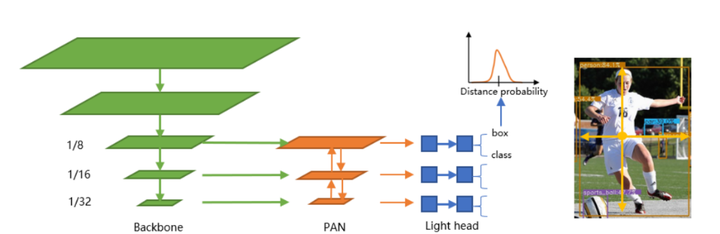
NanoDet 是一种 FCOS 式的单阶段 anchor-free 目标检测模型,它使用 ATSS 进行目标采样,使用 Generalized Focal Loss 损失函数执行分类和边框回归(box regression)。
1)NanoDet 模型性能
NanoDet-m模型和YoloV3-Tiny、YoloV4-Tiny作对比:

备注:以上性能基于 ncnn 和麒麟 980 (4xA76+4xA55) ARM CPU 获得的。使用 COCO mAP (0.5:0.95) 作为评估指标,兼顾检测和定位的精度,在 COCO val 5000 张图片上测试,并且没有使用 Testing-Time-Augmentation。
NanoDet作者将 ncnn 部署到手机(基于 ARM 架构的 CPU 麒麟 980,4 个 A76 核心和 4 个 A55 核心)上之后跑了一下 benchmark,模型前向计算时间只要 10 毫秒左右,而 yolov3 和 v4 tiny 均在 30 毫秒的量级。在安卓摄像头 demo app 上,算上图片预处理、检测框后处理以及绘制检测框的时间,NanoDet 也能轻松跑到 40+FPS。
2)NanoDet 模型架构
3)NanoDet损失函数
NanoDet 使用了李翔等人提出的 Generalized Focal Loss 损失函数。该函数能够去掉 FCOS 的 Centerness 分支,省去这一分支上的大量卷积,从而减少检测头的计算开销,非常适合移动端的轻量化部署。
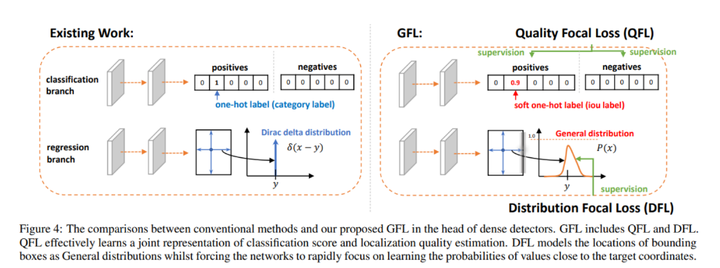
详细请参考:Generalized Focal Loss: Learning Qualified and Distributed Bounding Boxes for Dense Object Detection
4)NanoDet 优势
NanoDet 是一个速度超快和轻量级的移动端 Anchor-free 目标检测模型。该模型具备以下优势:
- 超轻量级:模型文件大小仅几兆(小于4M——nanodet_m.pth);
- 速度超快:在移动 ARM CPU 上的速度达到 97fps(10.23ms);
- 训练友好:GPU 内存成本比其他模型低得多。GTX1060 6G 上的 Batch-size 为 80 即可运行;
- 方便部署:提供了基于 ncnn 推理框架的 C++ 实现和 Android demo。
基于PyTorch 实现NanoDet
基于NanoDet项目进行小裁剪,专门用来实现Python语言、PyTorch 版本的代码地址:
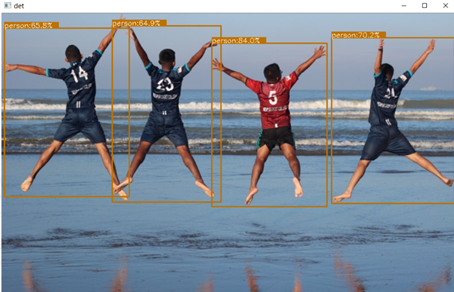
1)NanoDet目标检测效果
同时检测出四位少年
在复杂街道中,检测出行人、汽车:
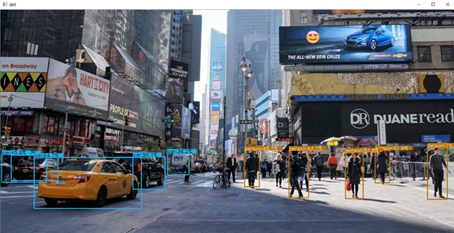
通过测试发现NanoDet确实很快,但识别精度和效果比YOLOv4差不少的。
2)环境参数
测试环境参数
系统:Windows 编程语言:Python 3.8 整合开发环境:Anaconda
深度学习框架:PyTorch1.7.0+cu101 (torch>=1.3 即可) 开发代码IDE:PyCharm
开发具体环境要求如下:
- Cython
- termcolor
- numpy
- torch>=1.3
- torchvision
- tensorboard
- pycocotools
- matplotlib
- pyaml
- opencv-python
- tqdm
通常测试感觉GPU加速(显卡驱动、cudatoolkit 、cudnn)、PyTorch、pycocotools相对难装一点
Windows开发环境安装可以参考:
安装cudatoolkit 10.1、cudnn7.6请参考 https://blog.csdn.net/qq_41204464/article/details/108807165
安装PyTorch请参考 https://blog.csdn.net/u014723479/article/details/103001861
安装pycocotools请参考 https://blog.csdn.net/weixin_41166529/article/details/109997105
3)体验NanoDet目标检测
下载代码,打开工程
先到githug下载代码,然后解压工程,然后使用PyCharm工具打开工程;
githug代码下载地址:https://github.com/guo-pu/NanoDet-PyTorch
说明:该代码是基于NanoDet项目进行小裁剪,专门用来实现Python语言、PyTorch 版本的代码
NanoDet作者开源代码地址:https://github.com/RangiLyu/nanodet (致敬)
使用PyCharm工具打开工程
选择开发环境】
文件(file)——>设置(setting)——>项目(Project)——>Project Interpreters 选择搭建的开发环境;
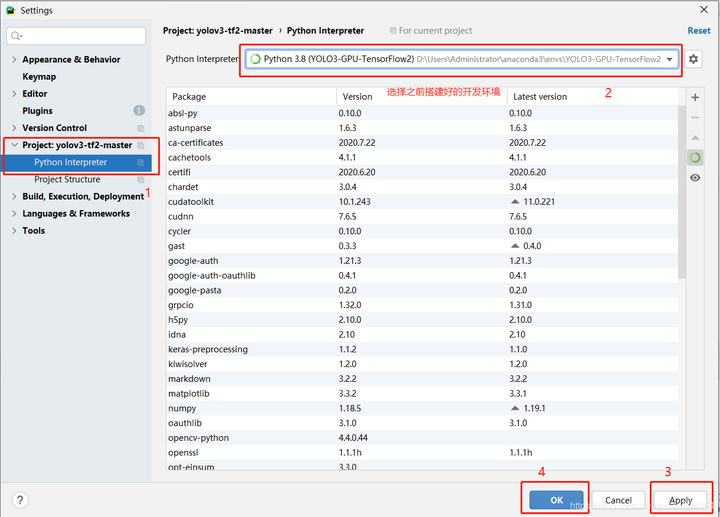
然后先点击Apply,等待加载完成,再点击OK;
进行目标检测
具体命令请参考:
'''目标检测-图片'''
python detect_main.py image --config ./config/nanodet-m.yml --model model/nanodet_m.pth --path  street.png

'''目标检测-视频文件'''
python detect_main.py video --config ./config/nanodet-m.yml --model model/nanodet_m.pth --path  test.mp4

'''目标检测-摄像头'''
python detect_main.py webcam --config ./config/nanodet-m.yml --model model/nanodet_m.pth --path  0
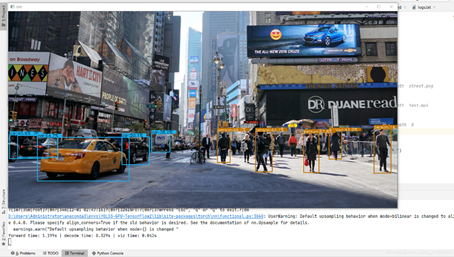
【目标检测-图片】
【目标检测-视频文件】
检测的是1080*1920的图片,很流畅毫不卡顿,就是目前识别精度不太高
4)调用模型的核心代码
detect_main.py 代码:
import cv2
import os
import time
import torch
import argparse
from nanodet.util import cfg, load_config, Logger
from nanodet.model.arch import build_model
from nanodet.util import load_model_weight
from nanodet.data.transform import Pipeline

image_ext = ['.jpg', '.jpeg', '.webp', '.bmp', '.png']
video_ext = ['mp4', 'mov', 'avi', 'mkv']

'''目标检测-图片'''
# python detect_main.py image --config ./config/nanodet-m.yml --model model/nanodet_m.pth --path  street.png

'''目标检测-视频文件'''
# python detect_main.py video --config ./config/nanodet-m.yml --model model/nanodet_m.pth --path  test.mp4

'''目标检测-摄像头'''
# python detect_main.py webcam --config ./config/nanodet-m.yml --model model/nanodet_m.pth --path  0

def parse_args():
    parser = argparse.ArgumentParser()
    parser.add_argument('demo', default='image', help='demo type, eg. image, video and webcam')
    parser.add_argument('--config', help='model config file path')
    parser.add_argument('--model', help='model file path')
    parser.add_argument('--path', default='./demo', help='path to images or video')
    parser.add_argument('--camid', type=int, default=0, help='webcam demo camera id')
    args = parser.parse_args()
    return args


class Predictor(object):
    def __init__(self, cfg, model_path, logger, device='cuda:0'):
        self.cfg = cfg
        self.device = device
        model = build_model(cfg.model)
        ckpt = torch.load(model_path, map_location=lambda storage, loc: storage)
        load_model_weight(model, ckpt, logger)
        self.model = model.to(device).eval()
        self.pipeline = Pipeline(cfg.data.val.pipeline, cfg.data.val.keep_ratio)

    def inference(self, img):
        img_info = {}
        if isinstance(img, str):
            img_info['file_name'] = os.path.basename(img)
            img = cv2.imread(img)
        else:
            img_info['file_name'] = None

        height, width = img.shape[:2]
        img_info['height'] = height
        img_info['width'] = width
        meta = dict(img_info=img_info,
                    raw_img=img,
                    img=img)
        meta = self.pipeline(meta, self.cfg.data.val.input_size)
        meta['img'] = torch.from_numpy(meta['img'].transpose(2, 0, 1)).unsqueeze(0).to(self.device)
        with torch.no_grad():
            results = self.model.inference(meta)
        return meta, results

    def visualize(self, dets, meta, class_names, score_thres, wait=0):
        time1 = time.time()
        self.model.head.show_result(meta['raw_img'], dets, class_names, score_thres=score_thres, show=True)
        print('viz time: {:.3f}s'.format(time.time()-time1))


def get_image_list(path):
    image_names = []
    for maindir, subdir, file_name_list in os.walk(path):
        for filename in file_name_list:
            apath = os.path.join(maindir, filename)
            ext = os.path.splitext(apath)[1]
            if ext in image_ext:
                image_names.append(apath)
    return image_names


def main():
    args = parse_args()
    torch.backends.cudnn.enabled = True
    torch.backends.cudnn.benchmark = True

    load_config(cfg, args.config)
    logger = Logger(-1, use_tensorboard=False)
    predictor = Predictor(cfg, args.model, logger, device='cuda:0')
    logger.log('Press "Esc", "q" or "Q" to exit.')
    if args.demo == 'image':
        if os.path.isdir(args.path):
            files = get_image_list(args.path)
        else:
            files = [args.path]
        files.sort()
        for image_name in files:
            meta, res = predictor.inference(image_name)
            predictor.visualize(res, meta, cfg.class_names, 0.35)
            ch = cv2.waitKey(0)
            if ch == 27 or ch == ord('q') or ch == ord('Q'):
                break
    elif args.demo == 'video' or args.demo == 'webcam':
        cap = cv2.VideoCapture(args.path if args.demo == 'video' else args.camid)
        while True:
            ret_val, frame = cap.read()
            meta, res = predictor.inference(frame)
            predictor.visualize(res, meta, cfg.class_names, 0.35)
            ch = cv2.waitKey(1)
            if ch == 27 or ch == ord('q') or ch == ord('Q'):
                break


if __name__ == '__main__':
    main()
本文分享自华为云社区《目标检测模型NanoDet(超轻量,速度很快)介绍和PyTorch版本实践》,原文作者:一颗小树x。