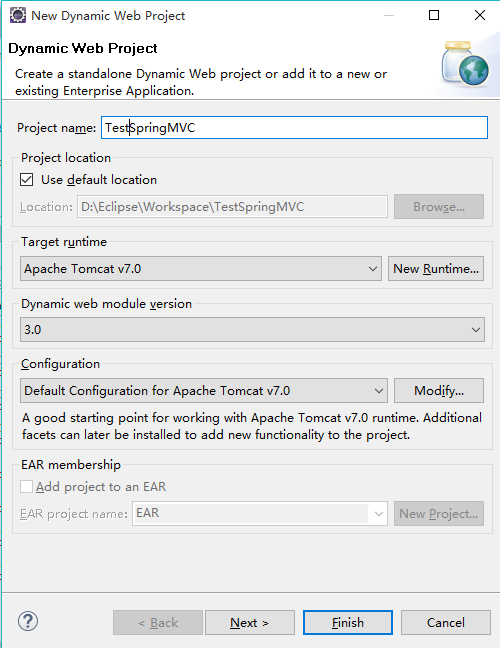
第一步:使用配置Tomcat服务器的Eclipse新建一个名为“TestSpringMVC”的web项目
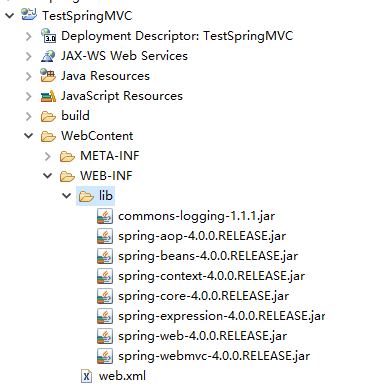
第二步:将所使用的jar包复制到WEB-INF/lib目录下
第三步:在web.xml中配置DispatcherServlet
DispatcherServlet就是SpringMVC的入口,SpringMVC的本质就是一个Servlet
 1 <?xml version="1.0" encoding="UTF-8"?>
 2 <web-app xmlns:xsi="http://www.w3.org/2001/XMLSchema-instance" xmlns="http://java.sun.com/xml/ns/javaee" xsi:schemaLocation="http://java.sun.com/xml/ns/javaee http://java.sun.com/xml/ns/javaee/web-app_3_0.xsd" id="WebApp_ID" version="3.0">
 3
 4     <!--配置DispatcherServlet  -->
 5     <servlet>
 6         <servlet-name>springDispatcherServlet</servlet-name>
 7         <servlet-class>org.springframework.web.servlet.DispatcherServlet</servlet-class>
 8
 9         <init-param>
10             <param-name>contextConfigLocation</param-name>
11             <param-value>classpath:springmvc.xml</param-value>
12             <!-- 配置DispatcherServlet的一个初始化参数 -->
13         </init-param>
14         <load-on-startup>1</load-on-startup>
15     </servlet>
16     <!-- Map all requests to the DispatcherServlet for handling -->
17     <servlet-mapping>
18         <servlet-name>springDispatcherServlet</servlet-name>
19         <url-pattern>/</url-pattern>
20     </servlet-mapping>
21 </web-app>
web.xml中load-on-startup的含义:标记容器是否在启动的时候就加载这个servlet。
当值为0或者大于0时,表示容器在应用启动时就加载这个servlet;
当是一个负数时或者没有指定时,则指示容器在该servlet被选择时才加载。
正数的值越小,启动该servlet的优先级越高。
Servlet中的url-pattern:
当浏览器发起一个url请求后,该请求发送到servlet容器的时候,容器先会将请求的url减去当前应用上下文的路径作为servlet的映射url,比如url是http://10.43.11.143/myapp/kata/detail.html,其应用上下文是myapp,容器会将http://10.43.11.143/myapp去掉,剩下的/kata/detail.html部分拿来做servlet的映射匹配。这个映射匹配过程是有优先顺序的(具体的优先顺序规则后面介绍),而且当有一个servlet匹配成功以后,就不会去理会剩下的servlet了。
如果<url-pattern>配置成如下两种的任意一种
<url-pattern>/</url-pattern>
<url-pattern>/*</url-pattern>
则所有的url都可以被匹配上。其中/*是路径匹配,只是路径就是/。
第四步:创建SpringMVC的配置文件
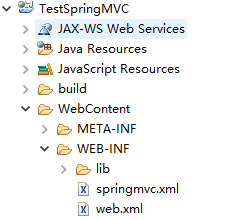
在WEB-INF下新建一个名为“springmvc”的xml文件
<beans xmlns="http://www.springframework.org/schema/beans"
    xmlns:xsi="http://www.w3.org/2001/XMLSchema-instance"
    xmlns:context="http://www.springframework.org/schema/context"
    xmlns:cache="http://www.springframework.org/schema/cache"
    xmlns:p="http://www.springframework.org/schema/p"
    xsi:schemaLocation="http://www.springframework.org/schema/beans
            http://www.springframework.org/schema/beans/spring-beans-4.0.xsd
            http://www.springframework.org/schema/context
            http://www.springframework.org/schema/context/spring-context-4.0.xsd
            http://www.springframework.org/schema/mvc
            http://www.springframework.org/schema/mvc/spring-cache-4.0.xsd">

    <!-- 配置自定义扫描的包 -->
    <context:component-scan base-package="com.java.springmvc"></context:component-scan>
    <!-- 配置视图解析器:如何把handler方法解析为实际的物理视图 -->
    <bean class ="org.springframework.web.servlet.view.InternalResourceViewResolver">
        <property name="prefix" value="/WEB-INF/views/"></property>
        <property name="suffix" value=".jsp"></property>
    </bean>
</beans>
第五步:创建处理请求的处理器
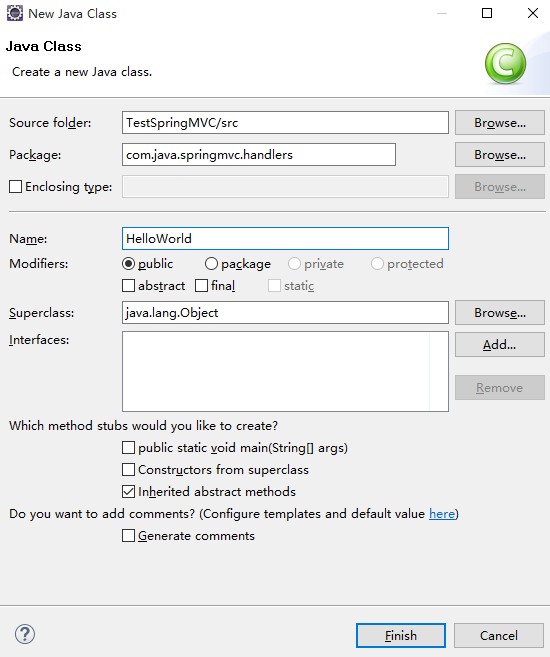
在Java Resource下新建一个类作为处理器
package com.java.springmvc.handlers;

import org.springframework.stereotype.Controller;
import org.springframework.web.bind.annotation.RequestMapping;

@Controller
public class HelloWorld {
    /**
     * 使用@RequestMapping 注解映射请求的URL
     * 返回值会通过视图解析器返回为实际的物理视图
     * @return
     */
    @RequestMapping("/helloworld")
    public String hello(){
        System.out.println("hello world");
        return "success";
    }
}
第六步:创建视图
在WEBContent下创建一个名为“index”的jsp文件
<%@ page language="java" contentType="text/html; charset=ISO-8859-1"
    pageEncoding="ISO-8859-1"%>
<!DOCTYPE html PUBLIC "-//W3C//DTD HTML 4.01 Transitional//EN" "http://www.w3.org/TR/html4/loose.dtd">
<html>
<head>
<meta http-equiv="Content-Type" content="text/html; charset=ISO-8859-1">
<title>Insert title here</title>
</head>
<body>
    <a href="helloworld">Hello World</a>
</body>
</html>
在WEB-INF下创建一个名为views大的文件夹,然后在该文件下创建一个名为success的jsp文件
<%@ page language="java" contentType="text/html; charset=ISO-8859-1"
    pageEncoding="ISO-8859-1"%>
<!DOCTYPE html PUBLIC "-//W3C//DTD HTML 4.01 Transitional//EN" "http://www.w3.org/TR/html4/loose.dtd">
<html>
<head>
<meta http-equiv="Content-Type" content="text/html; charset=ISO-8859-1">
<title>Insert title here</title>
</head>
<body>
    <h4>Success page</h4>
</body>
</html>
创建完毕后WebContent下的结构图如图所示
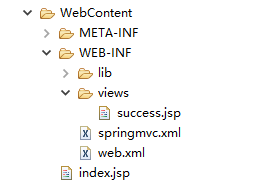
最后编译后部署到Tomcat运行该工程:

点击“Hello World”之后
