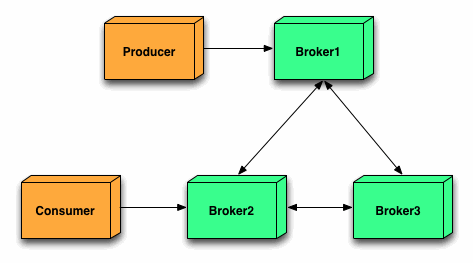
上一篇介绍了基于Networks of Borkers的2节点HA方案,这一篇继续来折腾Networks of Brokers,当应用规模日渐增长时,2节点的broker可能仍然抗不住访问压力,这时候就需要多加一些broker,弄一个更大规模的Broker集群,但是怎么合理设置broker之间的网络桥接,却是有讲究的,先来看一种不太好的设计:

这个架构看上去没瑕疵,没毛病,3个broker之间两两互通,整体可用性极高,但是从消息的路由角度来看,却不是一个好的设计,当producer向broker1发送一条消息时,Consumer得到消息的路径可能有如下2条:
a) producer -> broker1 -> broker2
b) producer -> broker1 -> broker3 -> broker2
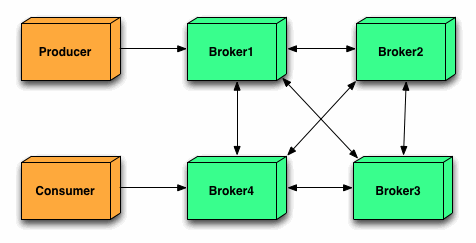
当broker更多时,情况会更复杂,比如下面这张图:

消息的路由途径将会更多:
a) producer -> broker1 -> broker4
b) producer -> broker1 -> broker2 -> broker4
c) producer -> broker1 -> broker2 -> broker3 -> broker4
d) producer -> broker1 -> broker3 -> broker4
不难想像,每多经过一个节点,消息处理的延时将会增加一些,如果Broker越多,情况越复杂,最终系统对外表现为消息处理有时很快,有时很慢,整体性能很不稳定,所以实际生产中,不要采用所有Broker之间两两互连的方案。
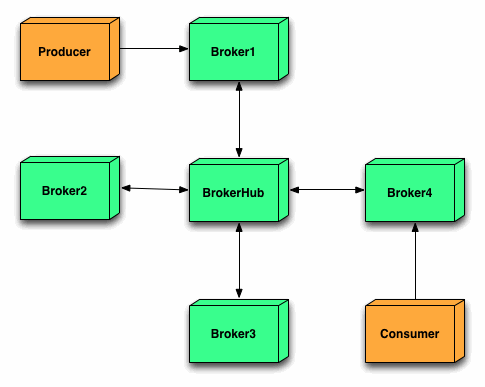
合理的方案如下:

这张图的灵感,应该来自组建局域网中的星形网络,在中心放置一个Borker充当Hub,与其它所有Broker互连,这样不管Consumer连接到外围的哪个Broker,消息的路由途径都比较稳定(最多经过3个Broker),这种架构性能虽然稳定了,但是中心的Hub就变成单点隐患,如果中间的DockerHub挂了,整个系统也就废了。
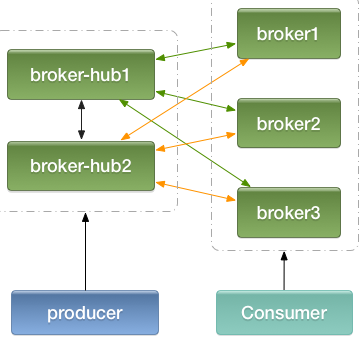
改进后的架构如下:

本质上仍然是一个星形网络,只不过将hub弄成二个互备,然后每个hub都与其它外围的broker相连,消费者连接到broker1/broker2/broker3,生产者(Producer)连接到hub1/hub2,消息的最长路径不超过3个broker (注:生产者也可以连接到broker1/2/3,与消费者一样,但是消息经过的最长路径会变成4)
如果以后要扩张,比如增加了Broker4,Broker5...,直接修改hub1/2上的配置,增加与新的broker的连接即可,不影响消息的路由途径长度。
最后,在本机演练一把,给出一些配置示例:
1、端口规划
|
1
2
3
4
5
|
activemq1: 61616 (broker1)activemq2: 61626 (broker2)activemq3: 61636 (broker3)activemq4: 61646 (broker-hub1)activemq5: 61656 (broker-hub2) |
共5个activemq实例,端口61616、61626、61636为broker1、broker2、broker3,61645、61656为broker-hub1、broker-hub2
2、activemq.xml配置
以boker1为例,配置文件内容如下:

<beans
xmlns="http://www.springframework.org/schema/beans"
xmlns:xsi="http://www.w3.org/2001/XMLSchema-instance"
xsi:schemaLocation="http://www.springframework.org/schema/beans http://www.springframework.org/schema/beans/spring-beans.xsd
http://activemq.apache.org/schema/core http://activemq.apache.org/schema/core/activemq-core.xsd">
<bean class="org.springframework.beans.factory.config.PropertyPlaceholderConfigurer">
<property name="locations">
<value>file:${activemq.conf}/credentials.properties</value>
</property>
</bean>
<broker xmlns="http://activemq.apache.org/schema/core" brokerName="broker1">
<persistenceAdapter>
<kahaDB directory="${activemq.data}/kahadb"/>
</persistenceAdapter>
<transportConnectors>
<transportConnector name="openwire"
uri="tcp://0.0.0.0:61616?maximumConnections=1000&wireFormat.maxFrameSize=104857600"/>
</transportConnectors>
</broker>
<import resource="jetty.xml"/>
</beans>
broker2及broker3,大家参考该配置修改端口号及brokerName即可。
broker-hub1的配置:

<beans
xmlns="http://www.springframework.org/schema/beans"
xmlns:xsi="http://www.w3.org/2001/XMLSchema-instance"
xsi:schemaLocation="http://www.springframework.org/schema/beans http://www.springframework.org/schema/beans/spring-beans.xsd
http://activemq.apache.org/schema/core http://activemq.apache.org/schema/core/activemq-core.xsd">
<bean class="org.springframework.beans.factory.config.PropertyPlaceholderConfigurer">
<property name="locations">
<value>file:${activemq.conf}/credentials.properties</value>
</property>
</bean>
<broker xmlns="http://activemq.apache.org/schema/core" brokerName="broker-hub1">
<networkConnectors>
<networkConnector uri="static:(tcp://127.0.0.1:61656,tcp://127.0.0.1:61616,tcp://127.0.0.1:61626,tcp://127.0.0.1:61636)" duplex="true"/>
</networkConnectors>
<persistenceAdapter>
<kahaDB directory="${activemq.data}/kahadb"/>
</persistenceAdapter>
<transportConnectors>
<transportConnector name="openwire"
uri="tcp://0.0.0.0:61646?maximumConnections=1000&wireFormat.maxFrameSize=104857600"/>
</transportConnectors>
</broker>
<import resource="jetty.xml"/>
</beans>
broker-hub2的配置:

<beans
xmlns="http://www.springframework.org/schema/beans"
xmlns:xsi="http://www.w3.org/2001/XMLSchema-instance"
xsi:schemaLocation="http://www.springframework.org/schema/beans http://www.springframework.org/schema/beans/spring-beans.xsd
http://activemq.apache.org/schema/core http://activemq.apache.org/schema/core/activemq-core.xsd">
<bean class="org.springframework.beans.factory.config.PropertyPlaceholderConfigurer">
<property name="locations">
<value>file:${activemq.conf}/credentials.properties</value>
</property>
</bean>
<broker xmlns="http://activemq.apache.org/schema/core" brokerName="broker-hub2">
<networkConnectors>
<networkConnector uri="static:(tcp://127.0.0.1:61616,tcp://127.0.0.1:61626,tcp://127.0.0.1:61636)" duplex="true"/>
</networkConnectors>
<persistenceAdapter>
<kahaDB directory="${activemq.data}/kahadb"/>
</persistenceAdapter>
<transportConnectors>
<transportConnector name="openwire"
uri="tcp://0.0.0.0:61656?maximumConnections=1000&wireFormat.maxFrameSize=104857600"/>
</transportConnectors>
</broker>
<import resource="jetty.xml"/>
</beans>
3、java代码中spring配置文件
a) 生产者

<bean id="jmsFactory" class="org.apache.activemq.pool.PooledConnectionFactory" destroy-method="stop">
<property name="connectionFactory">
<bean class="org.apache.activemq.ActiveMQConnectionFactory">
<!--broker服务的地址-->
<property name="brokerURL" value="failover:(tcp://localhost:61646,tcp://localhost:61656)"/>
<!--默认值为1000,如果不需要这么大,可以调小-->
<property name="maxThreadPoolSize" value="100"/>
<!--<property name="userName" value="system"/>-->
<!--<property name="password" value="manager"/>-->
</bean>
</property>
</bean>
b) 消费者

<bean id="jmsFactory" class="org.apache.activemq.pool.PooledConnectionFactory" destroy-method="stop">
<property name="connectionFactory">
<bean class="org.apache.activemq.ActiveMQConnectionFactory">
<!--broker服务的地址-->
<property name="brokerURL" value="failover:(tcp://localhost:61616,tcp://localhost:61626,tcp://localhost:61636)"/>
<!--默认值为1000,如果不需要这么大,可以调小-->
<property name="maxThreadPoolSize" value="100"/>
<!--<property name="userName" value="system"/>-->
<!--<property name="password" value="manager"/>-->
</bean>
</property>
</bean>
参考文章:
http://www.jakubkorab.net/2011/11/understanding-activemq-broker-networks.html
