参考:https://www.cnblogs.com/liwenzhou/p/9030211.html
一 auth使用django默认的user表
1 auth常用方法
1. authenticate()
2. login()
3. create_user()
4. create_superuser()
5. logout()
6. check_password()
7. set_password()
2 利用auth来实现登录和注册功能
登录例子:
在登录之前,在settings.py里面必须先设置
LOGIN_URL = '/login/' # 这里配置成你项目登录页面的路由
否则登录的时候默认会跳到http://127.0.0.1:8000/accounts/login/
from django.contrib import auth # 必须先导入auth


# 登录
def login(request):
    if request.method == "GET":
        return render(request, "login.html")
    else:
        next_url = request.GET.get("next")
        print(next_url)
        username = request.POST.get("username")
        pwd = request.POST.get("password")
        user_obj = auth.authenticate(request, username=username, password=pwd)
        if user_obj:
            auth.login(request, user_obj)  # # 给该次请求设置了session数据,并在响应中回写cookie
            if next_url:
                return redirect(next_url)
            else:
                return redirect("/book_list/")
        else:
            return render(request, "login.html", {"error_msg": "用户名或密码错误"})
html页面


 1 <!DOCTYPE html>
 2 <html lang="en">
 3 <head>
 4     <meta charset="UTF-8">
 5     <title>Title</title>
 6 </head>
 7 <body>
 8 <h1>登陆</h1>
 9 <a href="/reg/">注册</a>
10 <form action="" method="post">
11     {% csrf_token %}
12     <p>
13         <input type="text" name="username">
14     </p>
15     <p>
16         <input type="password" name="password">
17     </p>
18     <p>
19         <input type="submit">
20         <span>{{ error_msg }}</span>
21     </p>
22 </form>
23
24 </body>
25 </html>
# 注册
from django.contrib.auth.models import User  # 创建用户auth自带


def reg(request):
    if request.method == "GET":
        return render(request, "reg.html")
    else:
        username = request.POST.get("username")
        pwd = request.POST.get("password")
        user_obj = User.objects.create_user(username=username, password=pwd)  # 用auth自带的去创建用户,这里用的是数据库自带的user表
        return redirect("/login/")
装饰器
要想用auth装饰器需要先导入:
from django.contrib.auth.decorators import login_required
然后在你想要装饰的页面上面加上  @login_required

二  auth使用自己定义的表
1 setting.py设置
AUTH_USER_MODEL="fault_reporting.Userinfo" # 告诉djanjo用我自己定义的用户表,点前面的是django的项目名字,点后面的是表名
2 models.py设置,增加两个字段
1. 必须继承AbstractUser
from django.contrib.auth.models import AbstractUser
class UserInfo(AbstractUser):
    phone=models.CharField(max_length=11)
    avatar=models.FileField(upload_to="avatars/",default="avatars/default.png")
3 运行两条创建的命令
python manage.py makemigrations --> 将models.py的改动记录在小本本上

python manage.py migrate
4 根据这个表去写个CMS项目
目录结构:
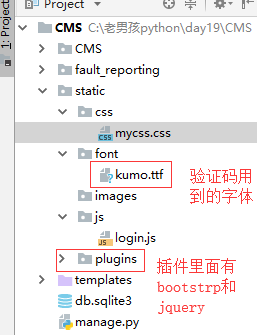
4.1登录--验证码功能
注意:在使用验证码之前必须安装pillow模块,pip install pillow,安装的时候如果报错就where pip查看你的pip安装在哪里,然后进去相应的目录再次安装即可
urls.py
  url(r'^login/$', views.LoginView.as_view()),
    url(r'^index/$', views.index),
    url(r'^vcode/$', views.vcode),   #验证码目录
views.py
 1 from django.shortcuts import render, redirect, HttpResponse
 2 from django import views
 3 from django.contrib import auth
 4 import random
 5
 6
 7 # Create your views here.
 8 class LoginView(views.View):
 9     def get(self, request):
10         return render(request, "login.html")
11
12     def post(self, request):
13         next_url = request.GET.get("next","/index/")
14         username = request.POST.get("username")
15         pwd = request.POST.get("password")
16         v_code=request.POST.get("vcode","").upper()  #如果用户不写验证码就是空
17         if v_code==request.session.get("v_code"):
18
19             user_obj = auth.authenticate(username=username, password=pwd)
20             if user_obj:
21                 auth.login(request, user_obj)  # auth认证登录
22                 return redirect(next_url)
23             else:
24                 return render(request, "login.html", {"error_msg": "用户名或密码错误"})
25         else:
26             return render(request, "login.html", {"error_msg": "验证码错误"})
27
28
29 # 首页
30 def index(request):
31     return render(request, "index.html")
32
33
34 # 验证码路径
35 def vcode(request):
36     from PIL import Image, ImageDraw, ImageFont  # 导入绘图模块
37     # 定义一个生成随机颜色代码的函数
38     def random_color():
39         return random.randint(0, 255), random.randint(0, 255), random.randint(0, 255)
40
41     # 创建一个随机背景颜色的图片对象
42     image_obj = Image.new(
43         "RGB",
44         (250, 35),  # 背景图片的长和宽
45         random_color()
46     )
47     # 在该图片对象上生成一个画笔对象
48     draw_obj = ImageDraw.Draw(image_obj)
49     # 加载一个字体对象
50     font_obj = ImageFont.truetype('static/font/kumo.ttf', 28)  # 字体大小
51     tmp = []
52     for i in range(5):
53         l = chr(random.randint(97, 122))  # 生成随机的小写字母
54         u = chr(random.randint(65, 90))  # 生成随机的大写字母
55         n = str(random.randint(0, 9))  # 生成一个随机的数字
56         # 从上面三个随机选一个
57         r = random.choice([l, u, n])
58         # 将选中过的那个字符写到图片上
59         draw_obj.text((40 * i + 30, 0), r, fill=random_color(), font=font_obj)  # text指定的是从那开始写位置,fill是字体颜色
60         tmp.append(r)
61
62         v_code = "".join(tmp).upper()
63         # 将生成的验证码保存
64         request.session["v_code"] = v_code
65
66         # 直接在内存中保存图片替代io操作
67     from io import BytesIO
68     f1 = BytesIO()
69     image_obj.save(f1, format="PNG")  # 将背景图片保存到f1里面
70     img_data = f1.getvalue()  # 去f1取图片
71     return HttpResponse(img_data, content_type="image/png")
login.html
 1 <!DOCTYPE html>
 2 <html lang="en">
 3 <head>
 4     <meta charset="UTF-8">
 5     <title>登录</title>
 6     <link rel="stylesheet" href="/static/plugins/bootstrap-3.3.7/css/bootstrap.min.css">
 7     <link rel="stylesheet" href="/static/css/mycss.css">
 8 </head>
 9 <body>
10
11
12 <div class="container">
13     <div class="row">
14         <div class="col-md-6 col-sm-offset-3 login-box">
15             <h3>登录页面</h3>
16             <form action="" method="post">
17                 {% csrf_token %}
18                 <div class="form-group">
19                     <label for="id_username">用户名</label>
20                     <input type="text" class="form-control" id="id_username" name="username" placeholder="用户名">
21                 </div>
22                 <div class="form-group">
23                     <label for="id_password">密码</label>
24                     <input type="password" class="form-control" id="id_password" name="password" placeholder="密码">
25                 </div>
26                 <div class="form-group">
27                     <label for="id_vcode" style="display: block">验证码</label>
28                     <input type="text" class="form-control" id="id_vcode" name="vcode" placeholder="验证码" style=" 250px;display: inline-block">
29                     <img src="/vcode/" id="v-code-img" style=" 250px;height: 35px;display: inline-block;float: right">
30                 </div>
31                 <button type="submit" class="btn btn-success" id="login-button">登陆</button>
32                 <p class="login-error">{{ error_msg }}</p>
33
34             </form>
35         </div>
36     </div>
37 </div>
38 <script src="/static/plugins/jquery-3.3.1.min.js"></script>
39 <script src="/static/js/login.js"></script>
40
41 </body>
42 </html>
login.js内容:
// 设置错误信息鼠标点击input自动消失
$(".login-box input").focus(function () {
    $(".login-error").text("");

    }
);

// 设置验证码点击变化
$("#v-code-img").click(function () {
    this.src+="?"

});
关于验证码的额外功能:加干扰线和干扰点
# # 加干扰线
    # width = 250  # 图片宽度(防止越界)
    # height = 35
    # for i in range(5):
    #     x1 = random.randint(0, width)
    #     x2 = random.randint(0, width)
    #     y1 = random.randint(0, height)
    #     y2 = random.randint(0, height)
    #     draw_obj.line((x1, y1, x2, y2), fill=random_color())
    #
    # # 加干扰点
    # for i in range(40):
    #     draw_obj.point([random.randint(0, width), random.randint(0, height)], fill=random_color())
    #     x = random.randint(0, width)
    #     y = random.randint(0, height)
    #     draw_obj.arc((x, y, x+4, y+4), 0, 90, fill=random_color())