初学JDBC,看了看书,自己动手的时候还是有很多地方有问题,最终终于解决了实现了数据库的连接。现将整个步骤描述如下:
环境:mySQL5.1.26(win 32bit), Eclipse JavaEE IDE
1 mySQL的安装:
最新版本是5.1.26,在官网上下载适合自己电脑系统的版本,我用的是win32bit的,注意要下载windows install版本的才能和其他windows程序一样安装,可以只安装自己需要的,如本程序只需Java版本的即可。然后再安装过程进行配置,设置root用户的密码等一系列配置(大多是默认的就好)。安装好之后,打开MySQL的command line输入如下代码,即可建立一个最基本的数据库diary:
DROP DATABASE IF EXISTS diary;      //如果存在diary则先删除
CREATE DATABASE diary;        //创建数据库
USE diary;               //使用

CREATE TABLE diary (                              //建立第一个表
 id int(11) NOT NULL auto_increment,
 title varchar(64) NOT NULL default '无标题',
 content text NOT NULL,
 authorname varchar(32) NOT NULL default '',
 time datetime NOT NULL default '0000-00-00 00:00:00',
 PRIMARY KEY (id)                                //设立主键
) ENGINE=InnoDB DEFAULT CHARSET=utf8 ROW_FORMAT=REDUNDANT;
这样我们就在MySQL里边建立了一个数据库diary,等待和eclipse的程序连接。
2 打开Eclipse,建立工程diary。
jdbc驱动是mySQL的文件目录下的一个jar包,将它添加在工程内即可实现其功能。
右键点击diary--->build Path--->add external Archiver...选择jdbc驱动,点击确定

加载好应如上图所示![]() 。
。
3 已经加载好了驱动,接下来就是写程序验证是否能成功连接数据库。
首先向数据库diary中插入一组符合格式的数据:(注意:将代码中的数据库名称,密码改成自己设置的)
    public static void testInsert() {

        try {
            Class.forName("com.mysql.jdbc.Driver"); // 加载MYSQL JDBC驱动程序
            System.out.println("Success loading Mysql Driver!");
        } catch (Exception e) {
            System.out.print("Error loading Mysql Driver!");
            e.printStackTrace();
        }
        try {
            Connection connect = DriverManager.getConnection(            //连接的url ,后两个参数是用户和密码
                    "jdbc:mysql://localhost:3306/diary", "root", "root");

            PreparedStatement Statement = connect
                    .prepareStatement("INSERT INTO diary VALUES(?,?,?,?,now())");
            Statement.setInt(1, 5);
            Statement.setString(2, "123");
            Statement.setString(3, "12345");
            Statement.setString(4, "fly");
            Statement.executeUpdate();
            System.out.println("Insert successfully");

        } catch (SQLException e) {
        }
    }
插入后再数据库中显示所有的数据:
public static void testSelect() {
        try {
            Class.forName("com.mysql.jdbc.Driver"); // 加载MYSQL JDBC驱动程序
            // Class.forName("org.gjt.mm.mysql.Driver");
            System.out.println("Success loading Mysql Driver!");
        } catch (Exception e) {
            System.out.print("Error loading Mysql Driver!");
            e.printStackTrace();
        }
        try {
            Connection connect = DriverManager.getConnection(
                    "jdbc:mysql://localhost:3306/diary", "root", "root");
            // 连接URL为 jdbc:mysql//服务器地址/数据库名 ,后面的2个参数分别是登陆用户名和密码

            System.out.println("Success connect Mysql server!");
            Statement stmt = connect.createStatement();
            ResultSet rs = stmt.executeQuery("select * from diary");
            // user 为你表的名称
            while (rs.next()) {
                System.out.println(rs.getString("id"));
            }
        } catch (Exception e) {
            System.out.print("get data error!");
            e.printStackTrace();
        }
    }
输出结果为:
Success loading Mysql Driver!
Success loading Mysql Driver!
Success connect Mysql server!
5
输出类似以上结果,则说明与数据库连接成功。(本文章中的程序比较低级,只是为了实现最基本最基础的操作)
4 在MySQL指令器中查看刚才插入的数据库
mysql->use diary;   //使test为当前要操作的数据库
mysql->select *from diary;     //查看当前表的所有信息
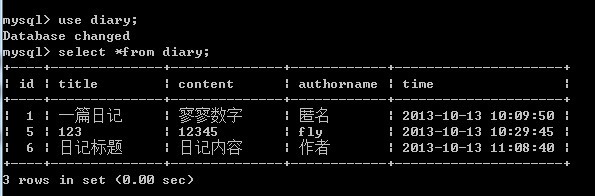
如上图所示,可以看出已经看到第二项就是我们刚才插入的结果(其他的两项是我做其他测试时出现的,不影响本次的结果)。
注意:如果不能正常连接你的数据库,请检查你代码中,驱动、用户名、密码、表等信息是否对应无误。
这样,我们就成功利用jdbc把eclipse和mySQL连接了起来,可以通过java代码来控制数据库内的数据了。