Git常用命令笔记
Git图形化界面用的还可以,但是命令太多有些不太会了,索性做一个笔记跟大家一起学习下Git命令的用法...
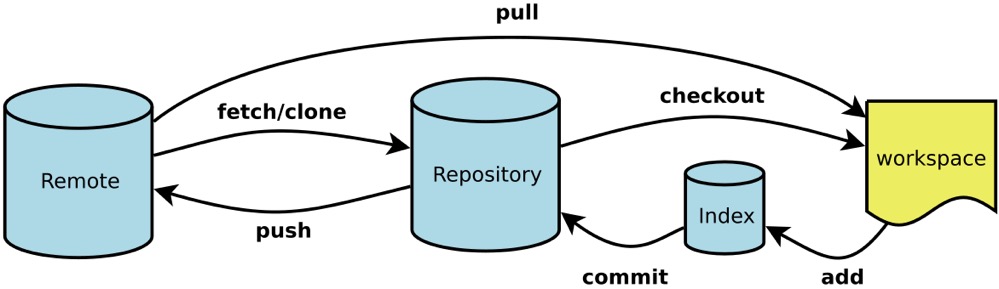
一般来说,日常使用只要记住下图6个命令,就可以了。但是熟练使用,恐怕要记住60~100个命令。
下面是我整理的常用 Git 命令清单。几个专用名词的译名如下。
- Workspace:工作区
- Index / Stage:暂存区
- Repository:仓库区(或本地仓库)
- Remote:远程仓库
一、新建代码库
- # 在当前目录新建一个Git代码库
- $ git init
- # 新建一个目录,将其初始化为Git代码库
- $ git init [项目名称]
- # 下载一个项目和它的整个代码历史
- $ git clone [项目地址]
二、配置
Git的设置文件为.gitconfig,它可以在用户主目录下(全局配置),也可以在项目目录下(项目配置)。
- # 显示当前的Git配置
- $ git config --list
- # 编辑Git配置文件
- $ git config -e [--global]
- # 设置提交代码时的用户信息
- $ git config [--global] user.name "[name]"
- $ git config [--global] user.email "[email address]”
- # git 修改当前的project的用户名的命令为:
- $ git config user.name 你的目标用户名;
- # git修改当前的project提交邮箱的命令为:
- $ git config user.email 你的目标邮箱名;
- # 如果你要修改当前全局的用户名和邮箱时,需要在上面的两条命令中添加一个参数,–global,代表的是全局。
- # 命令分别为:
- $ git config --global user.name 你的目标用户名;
- $ git config --global user.email 你的目标邮箱名;
三、增加/删除文件
- # 添加指定文件到暂存区
- $ git add [file1] [file2] ...
- # 添加指定目录到暂存区,包括子目录
- $ git add [dir]
- # 添加当前目录的所有文件到暂存区
- $ git add .
- # 添加每个变化前,都会要求确认
- # 对于同一个文件的多处变化,可以实现分次提交
- $ git add -p
- # 删除工作区文件,并且将这次删除放入暂存区
- $ git rm [file1] [file2] ...
- # 停止追踪指定文件,但该文件会保留在工作区
- $ git rm --cached [file1]
- # 改名文件,并且将这个改名放入暂存区
- $ git mv [file-original] [file-renamed]
四、代码提交
- # 提交暂存区到仓库区
- $ git commit -m [message]
- # 提交暂存区的指定文件到仓库区
- $ git commit [file1] [file2] ... -m [message]
- # 提交工作区自上次commit之后的变化,直接到仓库区
- $ git commit -a
- # 提交时显示所有diff信息
- $ git commit -v
- # 使用一次新的commit,替代上一次提交
- # 如果代码没有任何新变化,则用来改写上一次commit的提交信息
- $ git commit --amend -m [message]
- # 重做上一次commit,并包括指定文件的新变化
- $ git commit --amend [file1] [file2] ...
五、分支
- # 列出所有本地分支
- $ git branch
- # 列出所有远程分支
- $ git branch -r
- # 列出所有本地分支和远程分支
- $ git branch -a
- # 新建一个分支,但依然停留在当前分支
- $ git branch [branch-name]
- # 新建一个分支,并切换到该分支
- $ git checkout -b [branch]
- git checkout -b appoint_box(别名) origin/feature/20181128_1491627_appoint_box_1(分支名)
- # 新建一个分支,指向指定commit
- $ git branch [branch] [commit]
- # 新建一个分支,与指定的远程分支建立追踪关系
- $ git branch --track [branch] [remote-branch]
- # 切换到指定分支,并更新工作区
- $ git checkout [branch-name]
- # 切换到上一个分支
- $ git checkout -
- # 建立追踪关系,在现有分支与指定的远程分支之间
- $ git branch --set-upstream [branch] [remote-branch]
- # 合并指定分支到当前分支
- $ git merge [branch]
- # 选择一个commit,合并进当前分支
- $ git cherry-pick [commit]
- # 删除分支
- $ git branch -d [branch-name]
- # 删除远程分支
- $ git push origin --delete [branch-name]
- $ git branch -dr [remote/branch]
六、标签
- # 列出所有tag
- $ git tag
- # 新建一个tag在当前commit
- $ git tag [tag]
- # 新建一个tag在指定commit
- $ git tag [tag] [commit]
- # 删除本地tag
- $ git tag -d [tag]
- # 删除远程tag
- $ git push origin :refs/tags/[tagName]
- # 查看tag信息
- $ git show [tag]
- # 提交指定tag
- $ git push [remote] [tag]
- # 提交所有tag
- $ git push [remote] --tags
- # 新建一个分支,指向某个tag
- $ git checkout -b [branch] [tag]
七、查看信息
- # 显示有变更的文件
- $ git status
- # 显示当前分支的版本历史
- $ git log
- # 显示commit历史,以及每次commit发生变更的文件
- $ git log --stat
- # 搜索提交历史,根据关键词
- $ git log -S [keyword]
- # 显示某个commit之后的所有变动,每个commit占据一行
- $ git log [tag] HEAD --pretty=format:%s
- # 显示某个commit之后的所有变动,其"提交说明"必须符合搜索条件
- $ git log [tag] HEAD --grep feature
- # 显示某个文件的版本历史,包括文件改名
- $ git log --follow [file1]
- $ git whatchanged [file1]
- # 显示指定文件相关的每一次diff
- $ git log -p [file1]
- # 显示过去5次提交
- $ git log -5 --pretty --oneline
- # 显示所有提交过的用户,按提交次数排序
- $ git shortlog -sn
- # 显示指定文件是什么人在什么时间修改过
- $ git blame [file1]
- # 显示暂存区和工作区的代码差异
- $ git diff
- # 显示暂存区和上一个commit的差异
- $ git diff --cached [file1]
- # 显示工作区与当前分支最新commit之间的差异
- $ git diff HEAD
- # 显示两次提交之间的差异
- $ git diff [first-branch]...[second-branch]
- # 显示今天你写了多少行代码
- $ git diff --shortstat "@{0 day ago}"
- # 显示某次提交的元数据和内容变化
- $ git show [commit]
- # 显示某次提交发生变化的文件
- $ git show --name-only [commit]
- # 显示某次提交时,某个文件的内容
- $ git show [commit]:[filename]
- # 显示当前分支的最近几次提交
- $ git reflog
- 可以得到cimmit id
- # 从本地master拉取代码更新当前分支:branch 一般为master
- $ git rebase [branch]
八、远程同步
- $ git remote update --更新远程仓储
- # 下载远程仓库的所有变动
- $ git fetch [remote]
- # 显示所有远程仓库
- $ git remote -v
- # 显示某个远程仓库的信息
- $ git remote show [remote]
- # 增加一个新的远程仓库,并命名
- $ git remote add [shortname] [url1]
- # 取回远程仓库的变化,并与本地分支合并
- $ git pull [remote] [branch]
- # 上传本地指定分支到远程仓库
- $ git push [remote] [branch]
- # 强行推送当前分支到远程仓库,即使有冲突
- $ git push [remote] --force
- # 推送所有分支到远程仓库
- $ git push [remote] --all
九、撤销
- # 恢复暂存区的指定文件到工作区
- $ git checkout [file1]
- # 恢复某个commit的指定文件到暂存区和工作区
- $ git checkout [commit] [file1]
- # 恢复暂存区的所有文件到工作区
- $ git checkout .
- # 重置暂存区的指定文件,与上一次commit保持一致,但工作区不变
- $ git reset [file1]
- # 重置暂存区与工作区,与上一次commit保持一致
- $ git reset --hard
- # 重置当前分支的指针为指定commit,同时重置暂存区,但工作区不变
- $ git reset [commit]
- # 重置当前分支的HEAD为指定commit,同时重置暂存区和工作区,与指定commit一致
- $ git reset --hard [commit]
- # 重置当前HEAD为指定commit,但保持暂存区和工作区不变
- $ git reset --keep [commit]
- # 新建一个commit,用来撤销指定commit
- # 后者的所有变化都将被前者抵消,并且应用到当前分支
- $ git revert [commit]
- # 暂时将未提交的变化移除,稍后再移入
- $ git stash
- $ git stash pop
十、其他
- # 生成一个可供发布的压缩包
- $ git archive
- 上传本地项目到远程仓库
- 1、(先进入项目文件夹)通过命令 git init 把这个目录变成git可以管理的仓库
- git init
- 2、把文件添加到版本库中,使用命令 git add .添加到暂存区里面去,不要忘记后面的小数点“.”,意为添加文件夹下的所有文件
- git add .
- 3、用命令 git commit告诉Git,把文件提交到仓库。引号内为提交说明
- git commit -m 'first commit'
- 4、关联到远程库
- git remote add origin 你的远程库地址
- 如:
- git remote add origin https://github.com/githubusername/demo.git
- 5、获取远程库与本地同步合并(如果远程库不为空必须做这一步,否则后面的提交会失败)
- git pull --rebase origin master
- 6、把本地库的内容推送到远程,使用 git push命令,实际上是把当前分支master推送到远程。执行此命令后会要求输入用户名、密码,验证通过后即开始上传。
- git push -u origin master
- 7、状态查询命令
- git status
fetch vs pull
git fetch是将远程主机的最新内容拉到本地,用户在检查了以后决定是否合并到工作本机分支中。
而git pull 则是将远程主机的最新内容拉下来后直接合并,即:git pull = git fetch + git merge,这样可能会产生冲突,需要手动解决。