今天终于开始学习了三大框架的其中一个框架,Hibernate框架,在这里不去讲Hibernate框架的一些基础概念了,直接切入代码,带大家了解一下Hibernate能干什么,
Hibernate的人们案例:
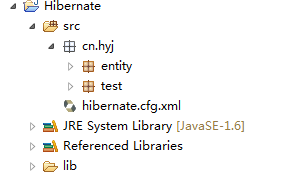
一.首先建立一个Java Project项目:
Hibernate他是一个负责将对象数据保存到数据库中,或从数据库中读取数据并封装到对象的工作,所有我们在这里就要设计到一个实体类

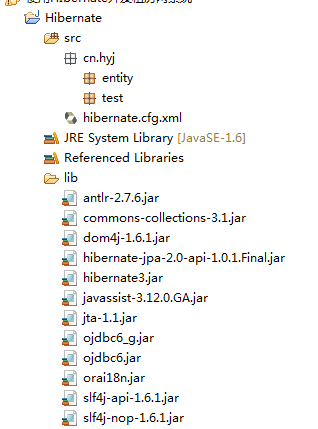
在上面这个图中我们可以看到有一个lib文件夹,这个是对项目点右键建的一个文件夹。
1.lib中该放什么文件:
首先要jar包,Hibernate的jar包可以从官方网站下载得到,官方网址:http://www.hibernate.org
另外大家嫌麻烦也可以去我的百度云下载:http://pan.baidu.com/s/1jIhPbDW
下载完后大家会看到一个这样的压缩文件:
hibernate-distribution-3.6.10.Final-dist.zip

那么lib文件夹目录下方的是:
lib equired目录下的jar包

因为我们要连接Oracle数据库,所以为们还要一个Oracle的jdbc驱动jar包,其实这个jar包可以在你的Oracl安装目录中找到
D:apphyjproduct11.2.0dbhome_1jdbclib

这里我们一般选择ojdbc5.jar就行了。
我们把jar包拷到lib文件夹下(拷到lib文文件夹别忘了右键jar包Biuld Path ------》》Add to Biuld Path):

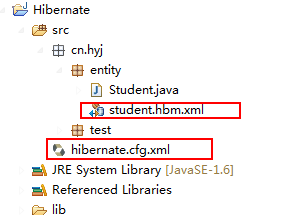
二.在src目录上创建Hibernate配置文件hibernate.cfg.xml
<?xml version='1.0' encoding='utf-8'?>
<!DOCTYPE hibernate-configuration PUBLIC
        "-//Hibernate/Hibernate Configuration DTD 3.0//EN"
        "http://www.hibernate.org/dtd/hibernate-configuration-3.0.dtd">

<hibernate-configuration>

    <session-factory>

        <!-- Database connection settings -->
        <property name="connection.driver_class">oracle.jdbc.driver.OracleDriver</property>
        <property name="connection.url">jdbc:oracle:thin:@localhost:1521:orcl</property>
        <property name="connection.username">hyj</property>
        <property name="connection.password">123</property>


        <!-- SQL dialect -->
        <property name="dialect">org.hibernate.dialect.Oracle10gDialect</property>
        <!-- Echo all executed SQL to stdout -->
        <property name="show_sql">true</property>

        <!-- Drop and re-create the database schema on startup -->
        <property name="hbm2ddl.auto">update</property>
        <!-- 格式化sql -->
        <property name="format_sql">true</property>
        <property name="hbm2ddl.auto">update</property>

        <mapping resource="cn/hyj/entity/student.hbm.xml" />

    </session-factory>
三.在实体类所在的包中创建映射文件,映射文件通常以".hbm.xml"作为后缀。

<?xml version="1.0"?>
<!DOCTYPE hibernate-mapping PUBLIC
"-//Hibernate/Hibernate Mapping DTD 3.0//EN"
"http://www.hibernate.org/dtd/hibernate-mapping-3.0.dtd">
<!-- package Student实体类所在的包 -->
<hibernate-mapping package="cn.hyj.entity">
<!-- name:包名 table:表名 -->
<class name="Student" table="STUDENT">
<!-- name:stuNo对应 表中的一列,一般是主键列-->
<id name="stuNo">
<generator class="native" />
</id>
<property name="stuName" type="string" column="stuName" />
<property name="stuAge" column="stuAge"/>
</class>
</hibernate-mapping>
四.
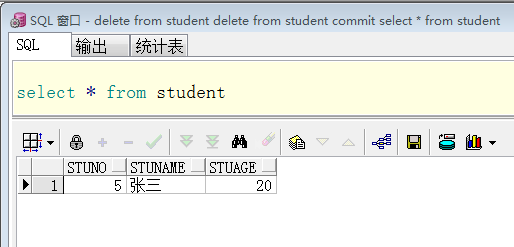
创建添加测试类
package cn.hyj.test;

import org.hibernate.SessionFactory;
import org.hibernate.Transaction;
import org.hibernate.cfg.Configuration;
import org.hibernate.classic.Session;

import cn.hyj.entity.Student;

public class Result {

    /**
     * @param args
     */
    public static void main(String[] args) {
        // 1.0准备学生对象
        Student stu = new Student();
        stu.setStuName("张三");
        stu.setStuAge(20);

        // 1.1读取hibernate.cfg.xml配置文件,获取要连接的数据库信息
        Configuration cfg = new Configuration().configure();
        // 1.2创建SessionFactory
        SessionFactory factory = cfg.buildSessionFactory();
        // 1.3打开Session
        Session session = factory.openSession();
        // 1.4开启事务
        Transaction tx = session.beginTransaction();
        // 1.5保存到数据库
        session.save(stu);
        // 1.6提交事务
        tx.commit();
        // 1.7关闭session
        session.close();
        System.out.println("sava scuess!");

    }

}

创建更新的测试类
package cn.hibernate.Test;

import org.hibernate.SessionFactory;
import org.hibernate.Transaction;
import org.hibernate.cfg.Configuration;
import org.hibernate.classic.Session;

import cn.hibernate.entity.Student;

public class Up {

    public static void main(String[] args) {
        //1.读取大配置文件,获取要连接的数据库信息
        Configuration conf=new Configuration().configure();
        //2.创建SessionFactory
        SessionFactory factory =conf.buildSessionFactory();
        //3加工session
        Session session = factory.openSession();
        Transaction tx=session.beginTransaction();
        //获取对象
        Student stu =new Student();
        stu.setSid(2);
        stu.setName("李四");
        stu.setAge(20);
        //4.Hibernate    保存
        session.update(stu);
        //提交事务
        tx.commit();
        System.out.println("更新成功");

    }

}
创建删除的测试类
package cn.hibernate.Test;

import org.hibernate.SessionFactory;
import org.hibernate.Transaction;
import org.hibernate.cfg.Configuration;
import org.hibernate.classic.Session;

import cn.hibernate.entity.Student;

public class Del {

    public static void main(String[] args) {
        //1.读取大配置文件,获取要连接的数据库信息
        Configuration conf=new Configuration().configure();
        //2.创建SessionFactory
        SessionFactory factory =conf.buildSessionFactory();
        //3加工session
        Session session = factory.openSession();

        Transaction tx=session.beginTransaction();
        //获取对象
        Student stu =new Student();
        stu.setSid(1);
        //4.Hibernate    保存
        session.delete(stu);
        //提交事务
        tx.commit();
        System.out.println("删除成功");
    }

}