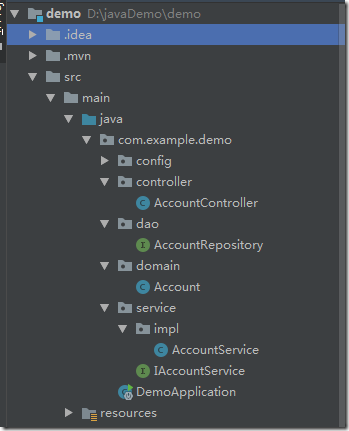
项目结构图:
一、 添加mysql 配置
1 在pom.xml中添加 maven依赖
<!--mysql--> <dependency> <groupId>mysql</groupId> <artifactId>mysql-connector-java</artifactId> <scope>runtime</scope> </dependency> |
2 在appliation.properties 文件中添加 配置项
#DB Configuration:
spring.datasource.driverClassName = com.mysql.jdbc.Driver
spring.datasource.url = jdbc:mysql://localhost:3306/dbtest?characterEncoding=utf8&useSSL=false
spring.datasource.username = root
spring.datasource.password = 123456
|
二 、添加 jpa maven依赖
<!--jpa--> |
在 appliation.properties 文件中添加 配置项
#JPA Configuration |
三 、 新建实体类 Account
package com.example.demo.domain; import javax.persistence.Entity; import javax.persistence.GeneratedValue; import javax.persistence.GenerationType; import javax.persistence.Id; @Entity public class Account { public long getId() { return id; } public void setId(long id) { this.id = id; } public String getLogin_name() { return login_name; } public void setLogin_name(String login_name) { this.login_name = login_name; } public String getLogin_pwd() { return login_pwd; } public void setLogin_pwd(String login_pwd) { this.login_pwd = login_pwd; } public String getReal_name() { return real_name; } public void setReal_name(String real_name) { this.real_name = real_name; } @Id @GeneratedValue(strategy = GenerationType.AUTO) private long id; private String login_name; private String login_pwd; private String real_name; } |
@entity 实体标记注解
@Id id主键标记注解
四、创建AccountRepository 接口 继承自JPARepository
package com.example.demo.dao; import com.example.demo.domain.Account; import org.springframework.data.jpa.repository.JpaRepository; import java.util.List; public interface AccountRepository extends JpaRepository<Account,Long> { List<Account> findAllByOrderByIdDesc(); } |
JPA 会自动生成AccountRepository 的实现类
五、 创建IAccountService 服务接口及实现类
IAccountService.java 接口
package com.example.demo.service; |
AccountService 实现类 ,服务类,必须标记@Service 注解,通过@autowired 自动注入 accountRepository 接口
package com.example.demo.service.impl; import com.example.demo.dao.AccountRepository; import com.example.demo.domain.Account; import com.example.demo.service.IAccountService; import org.springframework.beans.factory.annotation.Autowired; import org.springframework.stereotype.Service; import java.util.List; @Service public class AccountService implements IAccountService { @Autowired AccountRepository accountRepository ; @Override public List<Account> findAll() { return this.accountRepository.findAllByOrderByIdDesc(); } @Override public Account findAccountByName(String login_name) { return null; } @Override public void Create(Account model) { this.accountRepository.save(model); } } |
六、 AccountController 类
package com.example.demo.controller; import com.example.demo.dao.AccountRepository; import com.example.demo.domain.Account; import com.example.demo.service.IAccountService; import io.swagger.annotations.Api; import io.swagger.annotations.ApiOperation; import io.swagger.annotations.ApiParam; import org.springframework.beans.factory.annotation.Autowired; import org.springframework.web.bind.annotation.RequestBody; import org.springframework.web.bind.annotation.RequestMapping; import org.springframework.web.bind.annotation.RequestMethod; import org.springframework.web.bind.annotation.RestController; import java.util.List; @Api(value = "Account api",description ="api of account") @RestController @RequestMapping("/account") public class AccountController { @Autowired IAccountService accountService ; @ApiOperation(value="account index list", notes = "账户列表信息") @RequestMapping(value = "/index",method = RequestMethod.GET) public List<Account> index(){ return this.accountService.findAll(); } @ApiOperation(value="create a account", notes = "a account name") @RequestMapping(value = "/create",method = RequestMethod.POST) public void create( @ApiParam( name="model",value = "input a account entity") @RequestBody Account model) { this.accountService.Create(model); } } |
http://localhost:8080/account/index 访问所有账号,返回结果:
[{"id":7,"login_name":"admin","login_pwd":"admin","real_name":"jack"}]
http://localhost:8080/account/create 接口post 创建账号,返回结果: (这里应该做一个统一的包装类进行返回)
