Toast: http://developer.android.com/reference/android/widget/Toast.html
在部分手机中如果当把编辑完的消息发送完成之后,通常在手机下方会出现:”消息发送成功“的提示消息或相类似的提示消息,并且通常会短暂的停留之后会自动消失;那么这个就是一个典型的Toast应用;
消息提示框的种类有多种比如说:Dialog(在以后章节中会介绍)。而Toast与Dialog不同:Dialog是以独占的方式显示的,换句话说就是:如果不关闭它Dialog会一直显示于当前界面,而Toast则会短暂的停留之后自动关闭;
实现Toast其实很简单,在这里介绍三种方式:
- 直接使用静态方法:makeText(Context, int/CharSequence,int);
-
Toast toast = Toast.makeText(UsingIntent.this, "Some thing you want to show", Toast.LENGTH_LONG);
toast.show();
-
调用makeText方法,会以文本的方式来进行显示,因为它默认载入一个TextView,而第三参数可以通过:Toast的二个静态域LENGTH_LONG/LENGTH_SHORT来进行设置; 之所以返回一个Toast是为了方便扩展,比如调用setDuration方法;
2. 添加一些自己想要的效果,个人觉得有点像重写makeText方法的味道
// LayoutInflater inflater = (LayoutInflater) YouAcvity.this.getSystemService(Context.LAYOUT_INFLATER_SERVICE); A
                                     View view = getLayoutInflater().inflate(your_layout_file,null); //B :A,B二者中选其一即可,在这里只是提供二种途径
                                     Toast toast = new Toast(YouActivity.this);
                                     toast.setDuration(Toast.LENGTH_LONG);
                                     toast.setView(view);
                                     toast.show(); //别忘记invoke show方法
3. Toast消息提示框会在一定时间后自动消失,如果想永远停留该怎么办呢?能不能做得到呢?
首先告诉你永远停留是可以做得到的,可怎么去实现呢?
查看源码后获知,Toast.show方法是采用队列来进行显示,系统会依次取出一个Toast并显示,等到一定的时间后它会自动消失,系统再会取出下一Toast,直接在整个队列中没有Toast为止;在Toast类有个私有的静态内部类叫作:TN;因为TN是私有,那么该如何访问呢? 答案是反射。
 1 try {
 2  Field field =toast.getClass().getDeclaredField("mTN");
    field.setAccessible(true); Object object = field.get(toast);
 3  Method method=object.getClass().getDeclaredMethod("show",null);
 5  //object 最后定义在类里面,这样方面多次使用,比如关闭Toast
 4  method.invoke(object,new Object[0]);
 6  //new Object[0]可以用null代替,但是因为是可变参数,所以最好使用new Object[0]
 7  } catch (Exception e)
 8  {
 9   e.printStackTrace();
10  }
如果有关闭Toast,可以使用(//method =object.getClass().getDeclaredMethod("hide",null););同时Toast提供一个其它的方法比如:setGravity方法;
Notification: http://developer.android.com/reference/android/app/Notification.html
- 理论基础:
- 状态条与状态栏:用图说明可能会更清楚,请见下图!
- 状态条:

- 状态栏:
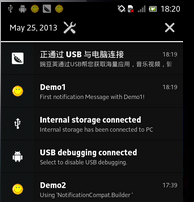 ,需要执行下拉动作,才可以查看整个状态栏具体信息。
 - 关系:状态栏包含状态条!
- 状态条:
- Notification 有这些组件:
-
- 内容标题
- 大图标 : 通常显示在左侧
- 内容文本
- Content info: 译为备注信息应该会好点,Anyway ,you can believe your choice.
- 小图标
- 时间戳
- 状态条与状态栏:用图说明可能会更清楚,请见下图!
- 如何运用Notification
- 获取NotificationManager对象
- 获得Notification对象
- 设置Notification属性
- 设置PendingIntent
- Invoke notify方法

 ,需要执行下拉动作,才可以查看整个状态栏具体信息。
总体分这五步!!!
Notification设计哲学是:管理通知对象,通知实体对象,Build对象(内部类),以及PendingIntent!
管理通知对象:NotificationManager: 拥有发布,更新,取消等通知功能。
通知实体对象:拥有多个实体属性
Build对象:用于创建通知实体对象以及设置相关属性
PendingIntent: 如果要启动新的Activity通常是调用startActivity,startActivityForResult;而PendingIntent是对Intent的进一步封装,以便当我们查看Notification执行相应动作时转入对应的Activity.
在Andorid 3.0以下创建通知对象通常是直接利用:Notification的构建函数进行,而伴随的Android os的更新升级,更多时候是使用另外二个支持类(内部类):NotificationCompat.Builder,Notification.Builder 这二者功能类似,主要区别在于:NotificationCompat.Builder可以兼容API level 4,并且它是由:SupportLibrary提供。
实码演练:这时提供一个小Demo。
Layout file:


 1 <?xml version="1.0" encoding="utf-8"?>
 2 <LinearLayout xmlns:android="http://schemas.android.com/apk/res/android"
 3     android:orientation="vertical" android:layout_width="fill_parent"
 4     android:layout_height="fill_parent">
 5
 6     <Button
 7         android:id="@+id/notification_demo1"
 8         android:layout_width="match_parent"
 9         android:layout_height="wrap_content"
10         android:text="@string/notification_btn_string1"
11         />
12     <Button
13         android:id="@+id/notification_demo2"
14         android:layout_width="match_parent"
15         android:layout_height="wrap_content"
16         android:text="@string/notification_btn_string2"
17         />
18     <Button
19         android:id="@+id/notification_demo2_1"
20         android:layout_width="match_parent"
21         android:layout_height="wrap_content"
22         android:text="@string/notification_btn_string2_1"
23         />
24     <Button
25         android:id="@+id/notification_demo3"
26         android:layout_width="match_parent"
27         android:layout_height="wrap_content"
28         android:text="@string/notification_btn_string3"
29         />
30     <Button
31         android:id="@+id/notification_demo4"
32         android:layout_width="match_parent"
33         android:layout_height="wrap_content"
34         android:text="@string/notification_btn_string4"
35         />
36     <Button
37         android:id="@+id/notification_demo5"
38         android:layout_width="match_parent"
39         android:layout_height="wrap_content"
40         android:text="@string/notification_btn_string5"
41         />
42 </LinearLayout>
Code
  1 package com.ringcentral.wolf.ch04;
  2
  3
  4 import com.ringcentral.wolf.R;
  5 import com.ringcentral.wolf.ch03.UsingIntent;
  6
  7 import android.app.Activity;
  8 import android.app.Notification;
  9 import android.app.NotificationManager;
 10 import android.app.PendingIntent;
 11 import android.content.Intent;
 12 import android.os.Bundle;
 13 import android.support.v4.app.NotificationCompat;
 14 import android.support.v4.app.TaskStackBuilder;
 15 import android.view.View;
 16 import android.view.View.OnClickListener;
 17 import android.widget.Button;
 18
 19 public class NotificationTest extends Activity implements OnClickListener {
 20     private NotificationManager nManager;
 21     private Button demo1;
 22     private Button demo2;
 23     private Button demo2_1;
 24     private Button demo3;
 25     private Button demo4;
 26     private Button demo5;
 27
 28     NotificationCompat.Builder builder;
 29     @Override
 30     public void onCreate(Bundle savedInstanceState    ){
 31         super.onCreate(savedInstanceState);
 32         setContentView(com.ringcentral.wolf.R.layout.notification);
 33         nManager = (NotificationManager) getSystemService(NOTIFICATION_SERVICE);
 34         demo1 = (Button) findViewById(R.id.notification_demo1);
 35         demo2 = (Button) findViewById(R.id.notification_demo2);
 36         demo2_1= (Button) findViewById(R.id.notification_demo2_1);
 37         demo3 = (Button) findViewById(R.id.notification_demo3);
 38         demo4 = (Button) findViewById(R.id.notification_demo4);
 39         demo5 = (Button) findViewById(R.id.notification_demo5);
 40         builder = new NotificationCompat.Builder(this);
 41
 42
 43         demo1.setOnClickListener(this);
 44         demo2.setOnClickListener(this);
 45         demo3.setOnClickListener(this);
 46         demo4.setOnClickListener(this);
 47         demo5.setOnClickListener(this);
 48         demo2_1.setOnClickListener(this);
 49     }
 50
 51     @SuppressWarnings("deprecation")
 52     private void demo1(int id){
 53         /**
 54          * 也可以调用构造方法,设置属性
 55          */
 56         Notification notification = new Notification();
 57         notification.icon = R.drawable.smile;
 58         notification.number = 2<<2;
 59         notification.when = System.currentTimeMillis();
 60         notification.tickerText="You have a new message!! Come from Demo1";
 61         notification.defaults=Notification.DEFAULT_SOUND;
 62         //notification.flags =Notification.FLAG_NO_CLEAR;
 63         notification.flags=Notification.FLAG_ONGOING_EVENT;
 64
 65         PendingIntent pendingIntent = PendingIntent.getActivity(this, 0, getIntent(), 0);
 66         notification.setLatestEventInfo(this, "Demo1", "First notification Message with Demo1!", pendingIntent);
 67
 68         nManager.notify(id,notification);
 69
 70     }
 71
 72     private void demo2(int id){
 73         builder.setSmallIcon(R.drawable.smile)
 74         .setContentTitle("Demo2")
 75         .setContentText("Using 'NotificationCompat.Builder '");
 76         builder.setDefaults(Notification.DEFAULT_VIBRATE).setTicker("You have a new message!! Come from Demo2");
 77
 78         Intent intent = new Intent(this,UsingIntent.class);
 79
 80         TaskStackBuilder stackBuilder = TaskStackBuilder.create(this);
 81         stackBuilder.addParentStack(UsingIntent.class);
 82         stackBuilder.addNextIntent(intent);
 83
 84         PendingIntent pendingIntent = stackBuilder.getPendingIntent(0,PendingIntent.FLAG_UPDATE_CURRENT);
 85
 86         builder.setContentIntent(pendingIntent);
 87         nManager.notify(id, builder.build());
 88     }
 89     private void demo2_1(int id){
 90         builder.setSmallIcon(R.drawable.smile)
 91         .setContentTitle("Demo2_1")
 92         .setContentText("Using 'getActivity '");
 93         builder.setDefaults(Notification.DEFAULT_VIBRATE).setTicker("You have a new message!! Come from Demo2_1");
 94
 95         Intent intent = new Intent(this,UsingIntent.class);
 96         intent.setFlags(Intent.FLAG_ACTIVITY_NEW_TASK|Intent.FLAG_ACTIVITY_CLEAR_TASK );
 97
 98         PendingIntent pendingIntent = PendingIntent.getActivity(this, 0, intent, PendingIntent.FLAG_UPDATE_CURRENT);
 99         builder.setContentIntent(pendingIntent);
100         nManager.notify(id, builder.build());
101     }
102     private void clear1(int id){
103         nManager.cancel(id);
104     }
105     private void clearAll(){
106         nManager.cancelAll();
107     }
108     /**
109      * 如果要更新通知,简单:保持 id 不变,进行重新绘制;新产生的通知会自动覆盖旧通知!!!
110      */
111     private void update(int id){
112         builder.setContentTitle("Update Demo2");
113         builder.setContentText("Update Demo");
114         builder.setDefaults(Notification.DEFAULT_VIBRATE).setTicker("Updte a new message!! Come from Demo2");
115         Intent intent = new Intent(this,UsingIntent.class);
116
117         TaskStackBuilder stackBuilder = TaskStackBuilder.create(this);
118         stackBuilder.addParentStack(UsingIntent.class);
119         stackBuilder.addNextIntent(intent);
120
121         PendingIntent pendingIntent = stackBuilder.getPendingIntent(0,PendingIntent.FLAG_UPDATE_CURRENT);
122         builder.setContentIntent(pendingIntent);
123         nManager.notify(id, builder.build());
124
125     }
126     @Override
127     public void onClick(View v) {
128         switch (v.getId()) {
129         case R.id.notification_demo1:
130             demo1(R.id.notification_demo1);
131             break;
132         case R.id.notification_demo2:
133             demo2(R.id.notification_demo2);
134             break;
135         case R.id.notification_demo2_1:
136             demo2_1(R.id.notification_demo2);
137             break;
138         case R.id.notification_demo3:
139             clear1(R.id.notification_demo1);
140             break;
141         case R.id.notification_demo4:
142             clearAll();
143             break;
144         case R.id.notification_demo5:
145             update(R.id.notification_demo2);
146             break;
147         default:
148             break;
149         }
150
151     }
152
153 }
如果要有震动效果,请在manifest file中设置:
<uses-permission android:name="android.permission.VIBRATE"/>
备注:这只是提供Demo代码,并不能直接复制,如果要练习,要本地化;另外UsingIntent类很简单就是一Activity,因为在这里就没有提供。
如果是android 4.1及以后本版,还可以使用BigView,考虑到普及率不高,这里不于解释,感兴趣的同学可以直接上官网。
利用PendingIntent设置Activity比较重要,它有二种方式:
- 创建后台推栈基于Intent启动的Activity
- 先创建Intent对象
- TaskStackBuilder.create()来创建一个任务栈
- 调用addParentStack()把后台推栈添加到栈中,调用addNextIntent()来添加Intent对象
- 用TastStackBuilder对象调用getPendingIntent()获得一个PendingIntent。
- 最后调用:setContentIntent把PendingIntent对象作为参数。
- 不创建后台推栈,可以设置一个专用的Activity
- 第一步也是先创建Intent对象
- 设置Flags:
intent.setFlags(Intent.FLAG_ACTIVITY_NEW_TASK|Intent.FLAG_ACTIVITY_CLEAR_TASK );
- PendingIntent.getActivity(.....)
- 最后调用:setContentIntent把PendingIntent对象作为参数。
Demo程序主界面:
