安装包
dotnet add package AspNet.Security.OAuth.QQ
申请过程不介绍了,申请者资料,个人也是可以申请成功的。
这时候有二个参数就是clientid clientsecret
APP ID:xxxx
APP Key:xxxxxx
其中平台信息,这个申请审核通过后,不要修改,千万不要随便修改,一修改就要重新审核。
网站回调域:可以随便修改,并且可以写多个,中间用英文逗号分隔即可。
比如,网站地址填的:https://api.igeekfan.cn,下面如果是localhost,是可以的,但如果是域名,便只能是https://api.igeekfan.cn这个域名下的路径。
网站回调域配置,后台是运行在https://localhost:5001端口上。
https://api.igeekfan.cn/signin-qq;https://localhost:5001/signin-qq
接口介绍
server-side模式,是OAuth2.0认证的一种模式,又称Web Server Flow;
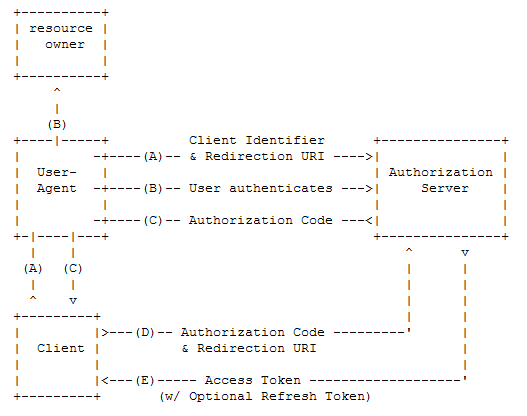
获取Authorization Code
https://graph.qq.com/oauth2.0/authorize
通过Authorization Code获取Access Token
https://graph.qq.com/oauth2.0/token
获取用户OpenID_OAuth2.0
https://graph.qq.com/oauth2.0/me
获取用户个人信息
https://graph.qq.com/user/get_user_info
使用Authorization_Code获取Access_Token
接入流程如下:
- 先获取Authorization Code;
- 通过Authorization Code获取Access Token
1.Step1:获取Authorization Code
GET
具体参数可查看官网。
state由用户自己创建一个随机数,以防止CSRF攻击。
如果用户成功登录并授权,则会跳转到指定的回调地址,并在redirect_uri地址后带上Authorization Code和原始的state值。如:
https://localhost:5001/signin-qq?code=B6D497755EACE4635115FC82BE24F280&state=123abc
后台先根据state验证是自己发出的请求,判断是否相同,不相同,则代表非本项目发出的授权登录请求。
- 根据code获取access_token
GET
这时候你会得到
access_token=1B6E45FA99BA3D6B347713440C9BCEFE&expires_in=7776000&refresh_token=8DB1D48D95C85D3EF593936B8ACE5EE0
获取用户OpenID_OAuth2.0
GET
https://graph.qq.com/oauth2.0/me?access_token=1B6E45FA99BA3D6B347713440C9BCEFE
openid是此网站上唯一对应用户身份的标识
callback( {"client_id":"101867513","openid":"951560F5C7A5AA9E5E599CF9B4ECFFB2"} );
获取用户的其他信息
用户信息
{
"ret": 0,
"msg": "",
"is_lost":0,
"nickname": "、天上有木月OvO",
"gender": "xxx",
"gender_type": 1,
"province": "xxx",
"city": "xxx",
"year": "2019",
"constellation": "",
"figureurl": "http://qzapp.qlogo.cn/qzapp/101867513/951560F5C7A5AA9E5E599CF9B4ECFFB2/30",
"figureurl_1": "http://qzapp.qlogo.cn/qzapp/101867513/951560F5C7A5AA9E5E599CF9B4ECFFB2/50",
"figureurl_2": "http://qzapp.qlogo.cn/qzapp/101867513/951560F5C7A5AA9E5E599CF9B4ECFFB2/100",
"figureurl_qq_1": "http://thirdqq.qlogo.cn/g?b=oidb&k=bjXoWmdlu8fk1m80MCkibMg&s=40&t=1559108425",
"figureurl_qq_2": "http://thirdqq.qlogo.cn/g?b=oidb&k=bjXoWmdlu8fk1m80MCkibMg&s=100&t=1559108425", "figureurl_qq": "http://thirdqq.qlogo.cn/g?b=oidb&k=bjXoWmdlu8fk1m80MCkibMg&s=640&t=1559108425"
}
代码
services.AddAuthentication(xxx)
.AddGitHub(xxx)
加上AddQQ的配置项
.AddQQ(options =>
{
   options.ClientId = Configuration["Authentication:QQ:ClientId"];
   options.ClientSecret = Configuration["Authentication:QQ:ClientSecret"];
})
appsettings.json中配置项
  "Authentication": {
   //下面为新增项
   "QQ": {
     "ClientId": "xx",
     "ClientSecret": "xxx"
   }
 }
对,没错,QQ登录,已经结束了。接下来就是把这些用户的信息保存到数据库,生成token的过程。
这里
[HttpGet("signin-callback")]
public async Task<IActionResult> Home(string provider, string redirectUrl = "")
{

   AuthenticateResult authenticateResult = await _contextAccessor.HttpContext.AuthenticateAsync(provider);
   if (!authenticateResult.Succeeded) return Redirect(redirectUrl);
   var openIdClaim = authenticateResult.Principal.FindFirst(ClaimTypes.NameIdentifier);
   if (openIdClaim == null || string.IsNullOrWhiteSpace(openIdClaim.Value))
       return Redirect(redirectUrl);


   ClaimsPrincipal principal=authenticateResult.Principal;
   //根据provider,处理用户的基础信息,

   long id =SaveQQAsync(principal, openIdClaim.Value)

   //xxx

}
openIdClaimopenIdClaim是唯一值
lin_user表
| 字段 | 类型 | 备注 |
|---|---|---|
| Id | long | 主键 |
| Username | varchar(50) | 用户名 |
| Avatar | varchar(50) | 头像 |
lin_user_identity表
用户授权信息表,用于存储不同登录类型的用户信息,如手机号、邮件、用户名、第三方应用(微信、QQ、GitHub)的登录
| 字段 | 类型 | 备注 |
|---|---|---|
| Id | long | 主键 |
| IdentityType | varchar(50) | 认证类型,如 Password,GitHub、QQ、WeiXin等 |
| Identifier | varchar(24) | 认证者,例如 用户名(PassWord认证类型),授权得到的昵称(QQ),授权得到的用户名(唯一,GitHub) |
| Credential | varchar(50) | 凭证,例如 密码,存OpenId、Id,同一IdentityType的OpenId的值是唯一的 |
| CreateUserId | long | 绑定的用户Id |
根据openId,判断lin_user_identity表中是否存在这一第三方授权信息,如果存在,则返回当前用户lin_user表中的id,如果不存在,则创建一个新的用户信息,插入lin_user、lin_user_identity表中。
public async Task<long> SaveQQAsync(ClaimsPrincipal principal, string openId)
{
   string nickname = principal.FindFirst(ClaimTypes.Name)?.Value;
   string gender = principal.FindFirst(ClaimTypes.Gender)?.Value;
   string picture = principal.FindFirst(QQAuthenticationConstants.Claims.PictureUrl)?.Value;
   string picture_medium = principal.FindFirst(QQAuthenticationConstants.Claims.PictureMediumUrl)?.Value;
   string picture_full = principal.FindFirst(QQAuthenticationConstants.Claims.PictureFullUrl)?.Value;
   string avatar = principal.FindFirst(QQAuthenticationConstants.Claims.AvatarUrl)?.Value;
   string avatar_full = principal.FindFirst(QQAuthenticationConstants.Claims.AvatarFullUrl)?.Value;

    Expression<Func<LinUserIdentity, bool>> expression = r =>
               r.IdentityType == LinUserIdentity.QQ&& r.Credential == openId;

   LinUserIdentity linUserIdentity =await _userIdentityRepository.Where(expression).FirstAsync();

   long userId = 0;
   if (linUserIdentity == null)
   {
       LinUser user = new LinUser
       {
           Avatar = avatar_full,
           Nickname = nickname,
           Username = "",
           LinUserIdentitys = new List<LinUserIdentity>()
           {
               new LinUserIdentity
               {
                   CreateTime = DateTime.Now,
                   Credential = openId,
                   IdentityType = LinUserIdentity.GitHub,
                   Identifier = nickname,
               }
           }
       };
       await _userRepository.InsertAsync(user);
       userId = user.Id;
   }
   else
   {
       userId = linUserIdentity.CreateUserId;
   }
   return userId;
}
上文中的CreateToken,直接将 authenticateResult.Principal.Claims.ToList(),生成token值,会缺少一些系统需要的值,比如键为ClaimTypes.NameIdentifier,应为用户的id,用户的其他信息,如角色/分组,昵称。不同平台的授权登录,键有所不同,所以这里需要二次处理。
[HttpGet("signin-callback")]
public async Task<IActionResult> Home(string provider, string redirectUrl = "")
{

    //xxx


    ClaimsPrincipal principal=authenticateResult.Principal;

    List<Claim> authClaims = principal.Claims.ToList();

    long id =SaveQQAsync(principal, openIdClaim.Value)

    LinUser user =await _userRepository.Select.IncludeMany(r => r.LinGroups)
        .WhereCascade(r => r.IsDeleted == false).Where(r => r.Id == id).FirstAsync();

    List<Claim> claims = new List<Claim>()
    {
        new Claim(ClaimTypes.NameIdentifier,user.Id.ToString()),
        new Claim(ClaimTypes.GivenName,user.Nickname??""),
        new Claim(ClaimTypes.Name,user.Username??""),
    };

    user.LinGroups?.ForEach(r =>
    {
        claims.Add(new Claim(LinCmsClaimTypes.Groups, r.Id.ToString()));
    });

    claims.AddRange(authClaims);
    string token = this.CreateToken(claims);
    return Redirect($"{redirectUrl}?token={token}#login-result");
 }
前台login-result路由,解析到token值,并保存起来,与用户密码登录后的流程相同。