一 前期准备
1.1 地址规划
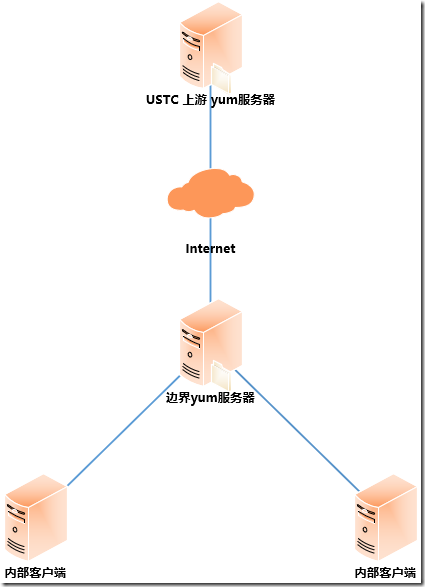
1.2 架构示意图
建议关闭防火墙及SELinux。
二 部署步骤
2.1 创建相应目录
  1 [root@mirrors ~]# mkdir -p /rpm/centos/7/os/x86_64/Packages
  2 [root@mirrors ~]# mkdir -p /rpm/centos/7/updates/x86_64/Packages
  3 [root@mirrors ~]# mkdir -p /rpm/centos/7/extras/x86_64/Packages
  4 [root@mirrors ~]# mkdir -p /rpm/centos/7/centosplus/x86_64/Packages
提示:参考现有repo文件,创建yum服务器用于保存rpm文件的目录。
2.2 安装httpd组件
1 [root@mirrors ~]# yum -y install httpd http-devel
2.3 配置虚拟主机
1 [root@mirrors ~]# cp /usr/share/doc/httpd-2.4.6/httpd-vhosts.conf /etc/httpd/conf.d/mirrors-vhost.conf
  1 [root@mirrors ~]# vi /etc/httpd/conf.d/mirrors-vhost.conf
  2 <VirtualHost *:80>
  3 ServerAdmin mirrors-server
  4     DocumentRoot "/rpm"
  5     ServerName mirrors.example.com
  6     ServerAlias www.mirrors.example.com
  7     ErrorLog "/var/log/httpd/mirrors.example.com-error_log"
  8     CustomLog "/var/log/httpd/mirrors.example.com-access_log" common
  9         <Directory /rpm>
 10                 Options Indexes FollowSymLinks
 11                 AllowOverride All
 12                 Require all granted
 13         </Directory>
 14 </VirtualHost>
2.4 启动服务
  1 [root@mirrors ~]# systemctl start httpd
  2 [root@mirrors ~]# systemctl enable httpd
2.5 同步rpm包
  1 [root@mirrors ~]# yum -y install rsync			#安装同步rsync软件
  2 [root@mirrors ~]# rsync -avz --delete rsync://mirrors.ustc.edu.cn/centos/7/os/x86_64/Packages/  /rpm/centos/7/os/x86_64/Packages
  3 [root@mirrors ~]# rsync -avz --delete rsync://mirrors.ustc.edu.cn/centos/7/extras/x86_64/Packages/
  4 /rpm/centos/7/extras/x86_64/Packages
  5 [root@mirrors ~]# rsync -avz --delete rsync://mirrors.ustc.edu.cn/centos/7/updates/x86_64/Packages/
  6 /rpm/centos/7/updates/x86_64/Packages
  7 [root@mirrors ~]# rsync -avz --delete rsync://mirrors.ustc.edu.cn/centos/7/centosplus/x86_64/Packages/
  8 /rpm/centos/7/centosplus/x86_64/Packages
提示:rsync更多使用方式见《001.Rsync备份》。
2.6 同步GPG文件
1 [root@mirrors ~]# wget -P /rpm/centos/ http://mirrors.ustc.edu.cn/centos/RPM-GPG-KEY-CentOS-7
三 创建仓库
3.1 安装创建仓库所需包
1 [root@mirrors ~]# wget -P /rpm/centos/ http://mirrors.ustc.edu.cn/centos/RPM-GPG-KEY-CentOS-7
3.2 创建仓库
  1 [root@mirrors ~]# createrepo -o /rpm/centos/7/os/x86_64
  2 /rpm/centos/7/os/x86_64/Packages/
  3 [root@mirrors ~]# createrepo -o /rpm/centos/7/extras/x86_64
  4 /rpm/centos/7/extras/x86_64/Packages/
  5 [root@mirrors ~]# createrepo -o /rpm/centos/7/updates/x86_64
  6 /rpm/centos/7/updates/x86_64/Packages/
  7 [root@mirrors ~]# createrepo -o /rpm/centos/7/centosplus/x86_64
  8 /rpm/centos/7/centosplus/x86_64/Packages/
四 验证确认
4.1 客户端配置
  1 [root@client ~]# vi /etc/hosts
  2 172.24.8.71 mirrors.example.com
提示:本环境方便测试,将服务器地址添加至hosts,生产环境在有DNS情况下可跳过。
  1 [root@client ~]# vi /etc/yum.repos.d/CentOS-Base.repo		#修改yum配置文件
  2 [base]
  3 name=CentOS-$releasever - Base - example.com
  4 baseurl=http://mirrors.example.com/centos/$releasever/os/$basearch/
  5 gpgcheck=1
  6 gpgkey=http://mirrors.example.com/centos/RPM-GPG-KEY-CentOS-7
  7
  8 [updates]
  9 name=CentOS-$releasever - Updates - example.com
 10 release=$releasever&arch=$basearch&repo=updates
 11 baseurl=http://mirrors.example.com/centos/$releasever/updates/$basearch/
 12 gpgcheck=1
 13 gpgkey=http://mirrors.example.com/centos/RPM-GPG-KEY-CentOS-7
 14
 15 [extras]
 16 name=CentOS-$releasever - Extras - example.com
 17 baseurl=http://mirrors.example.com/centos/$releasever/extras/$basearch/
 18 gpgcheck=1
 19 gpgkey=http://mirrors.example.com/centos/RPM-GPG-KEY-CentOS-7
 20
 21 [centosplus]
 22 name=CentOS-$releasever - Plus - example.com
 23 baseurl=http://mirrors.example.com/centos/$releasever/centosplus/$basearch/
 24 gpgcheck=1
 25 enabled=0
 26 gpgkey=http://mirrors.example.com/centos/RPM-GPG-KEY-CentOS-7
 27 [root@client ~]# yum clean all
 28 [root@client ~]# yum repolist
  1 [root@client ~]# yum clean all
  2 [root@client ~]# yum repolist
五 优化配置
5.1 定时同步
若需要定时同步互联网最新yum源,可将同步任务添加至contab定时任务。
同步更新之后,需要更新仓库:
  1 [root@mirrors ~]# createrepo --update /rpm/centos/7/os/x86_64
  2 [root@mirrors ~]# createrepo --update /rpm/centos/7/extras/x86_64
  3 [root@mirrors ~]# createrepo --update /rpm/centos/7/updates/x86_64
  4 [root@mirrors ~]# createrepo --update /rpm/centos/7/centosplus/x86_64
5.2 其他同步方式
由于rsync只能支持开启rsync协议的镜像,推荐USTC。可使用reposync同步其他站点,相关参考命令如下:
  1 reposync -r base -p /rpm/centos/7/os/x86_64/Packages/
  2 createrepo --update /rpm/centos/7/os/x86_64
  3 OPTIONS:
  4 -h, --help				#显示帮助
  5 -c CONFIG, --config=CONFIG		#默认配置文件为/etc/yum.conf
  6 -a ARCH, --arch=ARCH		#按照指定的arch执行, 默认是当前机器的arch
  7 --source				#也同步src.rpm包
  8 -r REPOID, --repoid=REPOID		#同步远程的repo ID. 默认是所有enable的repo
  9 -e CACHEDIR, --cachedir CACHEDIR	#执行存储metadata的目录
 10 -t, --tempcache			#使用一个临时目录存储yum-cache
 11 -d, --delete			#删除远程仓库不存在的本地包
 12 -p DESTDIR, --download_path=DESTDIR	#下载包的存储目录, 默认是当前目录
 13 --norepopath                        #不在本地增加名为远程repo ID的目录. 只download一个repo的时候使用. 默认是增加目录
 15 -g, --gpgcheck			#删除package如果GPGkey检查失败.
 16 提示:可以使用rpm --import /etc/pki/rpm-gpg/RPM-GPG-KEY-redhat-release 或者yum install package 来避免
 17 -u, --urls				#只显示下载的url, 不下载
 18 -l, --plugins			#开启yum插件支持
 19 -m, --downloadcomps			#同时下载comps.xml.
 20 -n, --newest-only                   #直下载最新的package, 一个包有多个版本在一个仓库中, 可以只选择下载最新的packages
 22 -q, --quiet				#最简输出.

