ROS入门(七)——Rviz的使用与建图导航
iwehdio的博客园:https://www.cnblogs.com/iwehdio/
1、Rviz
-
Rviz可以与实物或者Gazebo中的模型进行联合使用。在https://www.cnblogs.com/iwehdio/p/12763361.html中,我们看到,机器人模型可以在Rviz中显示,而且相机的图像、激光雷达的扫描结果也能显示。
-
那我们就想要,在Rviz中对https://www.cnblogs.com/iwehdio/p/12774226.html中自建小车进行显示。
-
使用Gazebo打开仿真模型后,如果直接打开Rviz,添加话题或者可视化组件,都会报错而无法显示。如报错小车车体 “No transform from [chassis] to [map]”。这是因为Rviz没有收到车体的坐标转换信息即 tf。
-
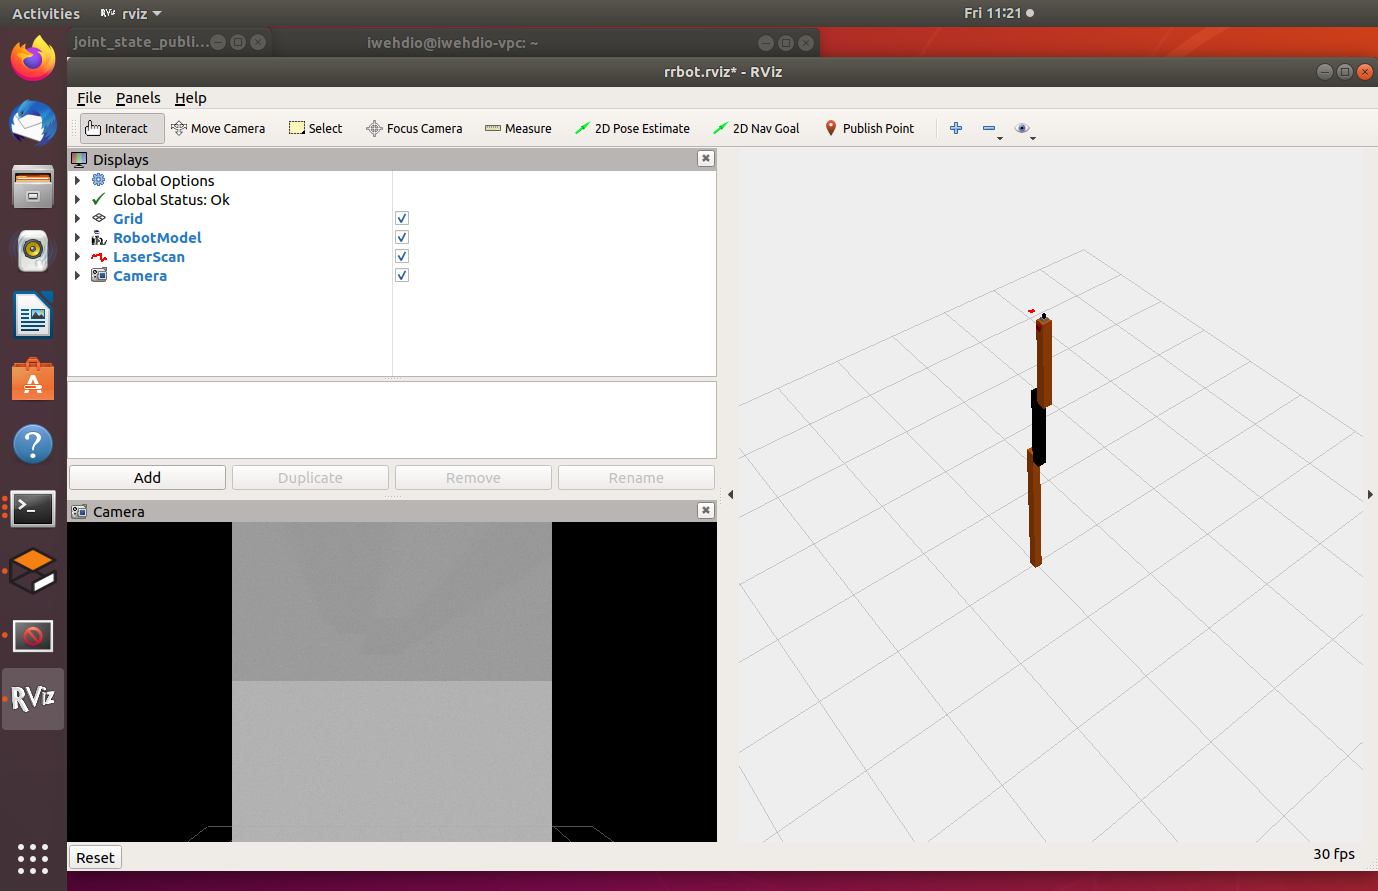
不妨从RRbot是怎样做到在Rviz中显示的看起。启动RRbot示例,可以看到,图像和激光雷达以及机器人模型都是正常显示的:
-
查看坐标转换 tf 中 包含了那些内容:
$ rostopic echo /tf
$ rostopic echo /tf_static
/tf 话题下,发布了link直接的坐标转换关系。
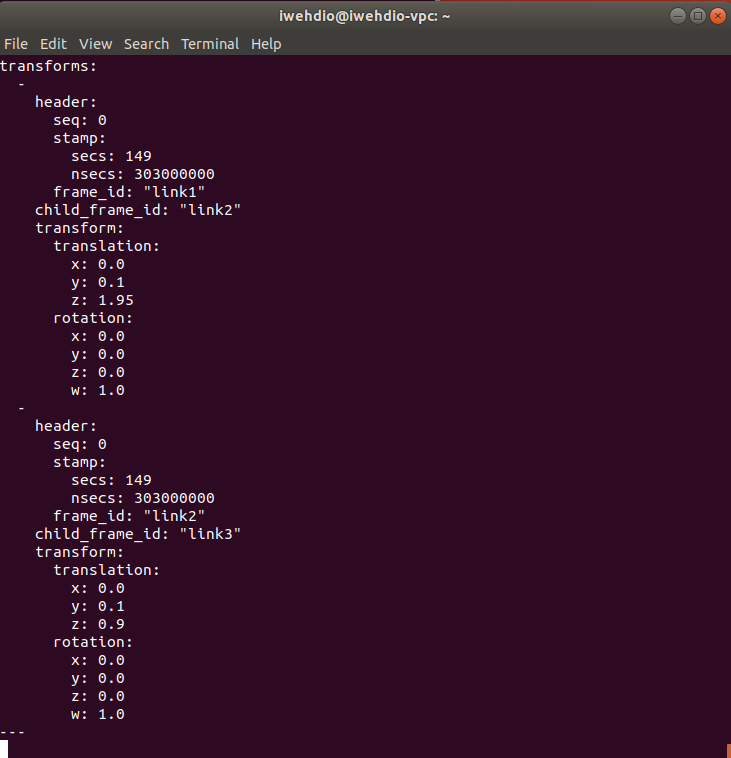
/tf_static 话题下,发布了机器人与世界、相机、激光雷达之间的坐标转换关系。

-
更清楚的,可以看一下tf树的结构:
$ rosrun rqt_tf_tree rqt_tf_tree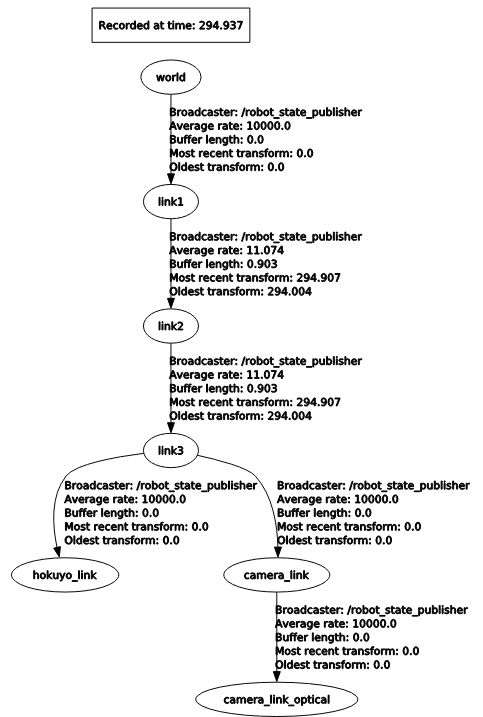
即坐标转换使得机器人的每个组件,最终都能查询到各自之间的坐标转换关系。
-
回到我们的自建小车上来,同样的,启动Gazebo模型,再查询tf树:
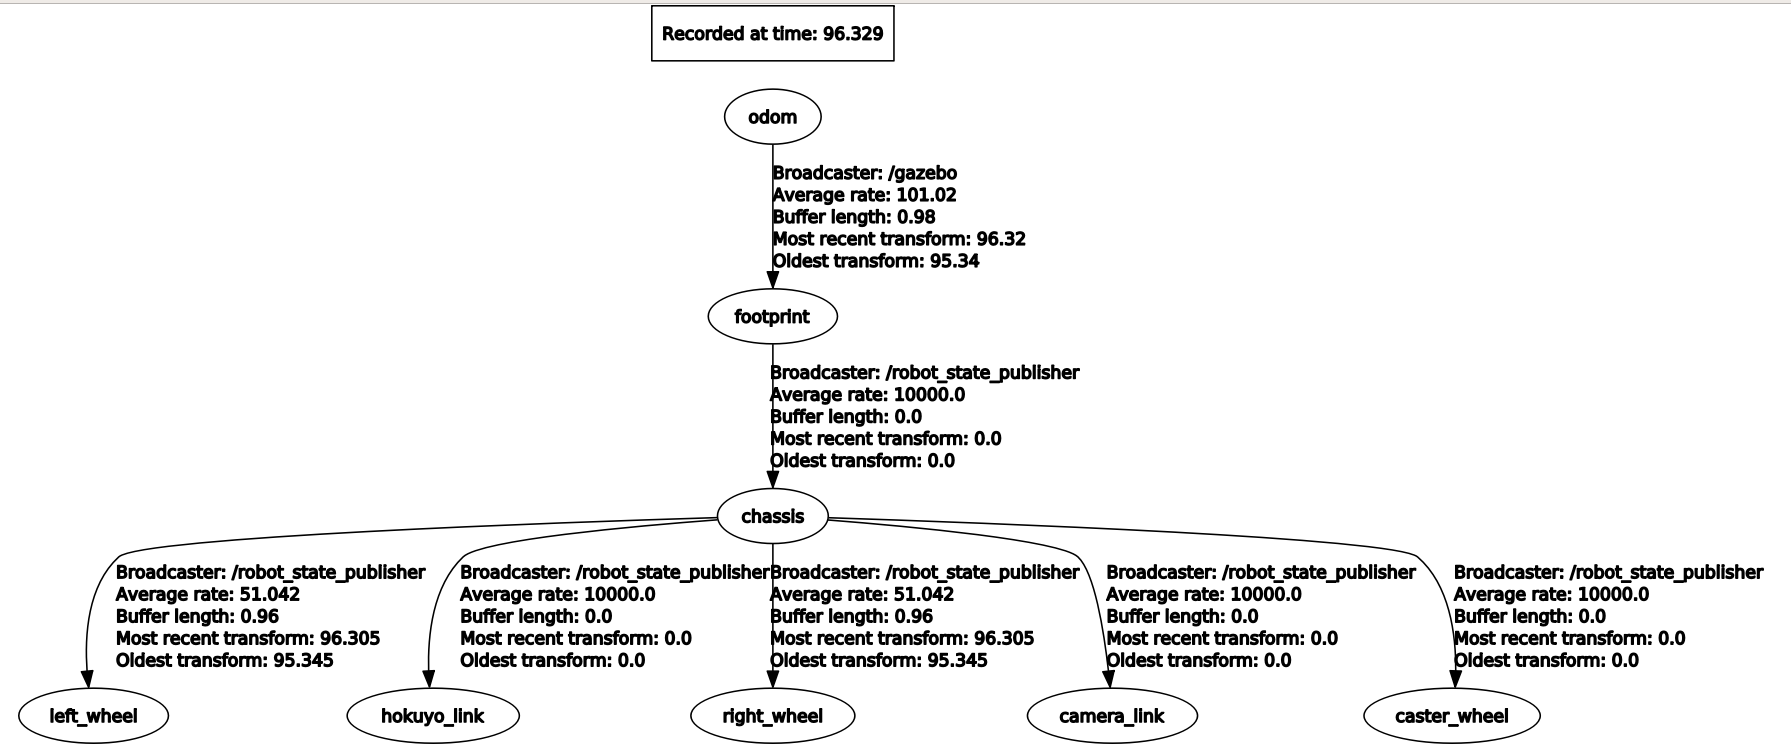
可以看到,机器人内部的tf都是构造好了的。
-
但是打开Rviz后,这些话题都不见了。
-
查找原因,注意到上图的tf树中,除了odom是/gazebo发布的,其他都是由/robot_state_publisher发布的。这是由于,启动mycar_world.launch时,同时也include了mycar_control.launch文件,在这个文件中启动了/robot_state_publisher节点。而mycar_rviz.launch中又一次启动了/robot_state_publisher节点,覆盖了之前的发布。
-
所以,我们要做的就是,发布/map与/odom的tf,删除并且不再启动/robot_state_publisher节点。
<!-- 加入 --> <node pkg="tf" type="static_transform_publisher" name="odem_broadcaster" args="0 0 0 0 0 0 1 map odom 50" /> <!-- 删除 --> <node name="robot_state_publisher" pkg="robot_state_publisher" type="robot_state_publisher"/> -
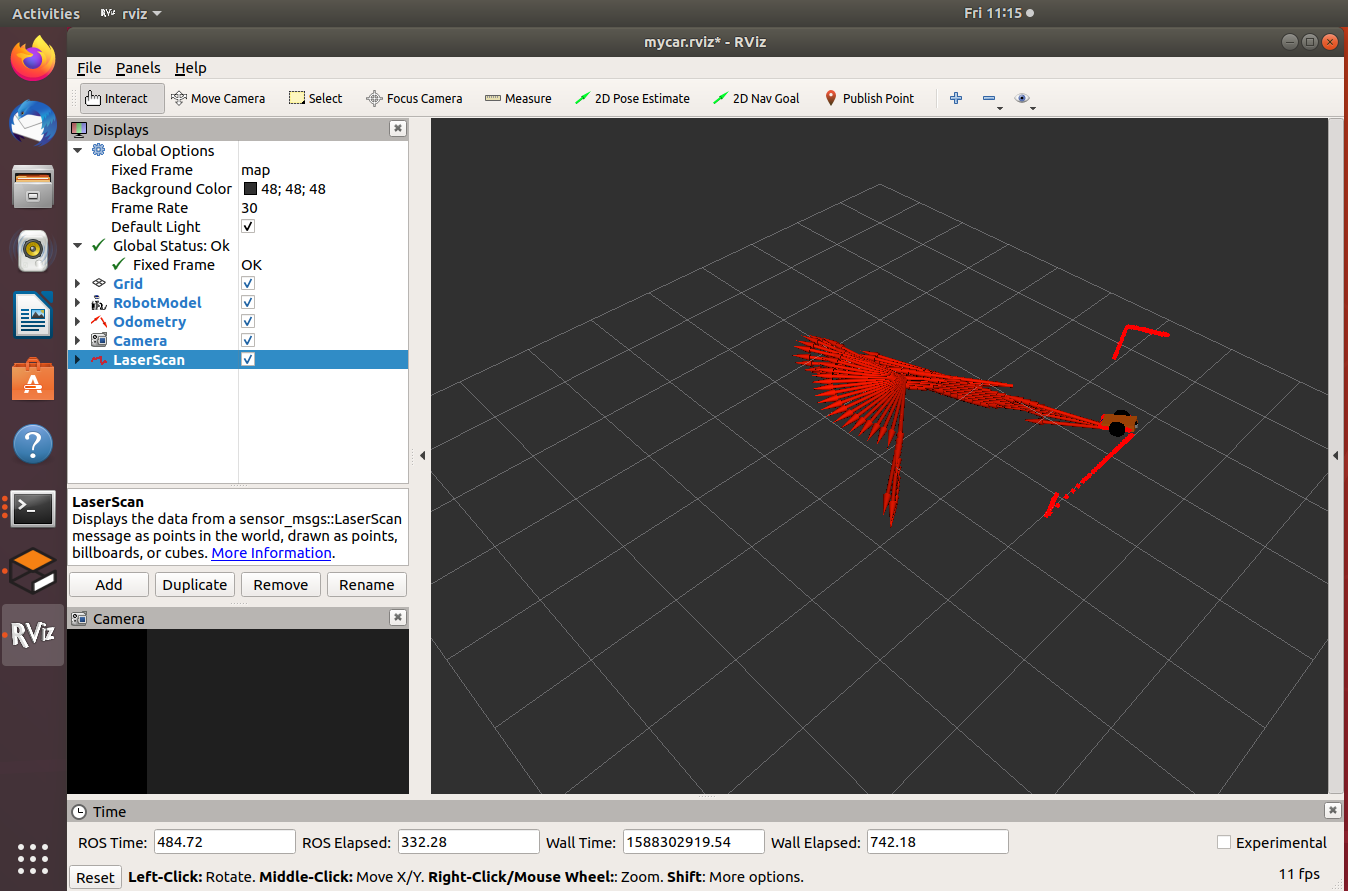
再次打开Rviz,添加RobotModel、Odometry、Camera和LaserScan,并且保存配置。在mycar_rviz.launch中加入:
<!-- Show in Rviz   -->
  <node name="rviz" pkg="rviz" type="rviz" args="-d $(find mycar_description)/launch/mycar.rviz"/>
启动Rviz配置文件,即可在Rviz中显示。
2、建图与导航
-
在ROS中,进行导航需要使用到的三个包是:
(1) move_base:根据参照的消息进行路径规划,使移动机器人到达指定的位置;
(2) gmapping:根据激光数据(或者深度数据模拟的激光数据)建立地图;
(3) amcl:根据已经有的地图进行定位。 -
首先是 gmapping,gmapping 订阅和发布的话题如下:
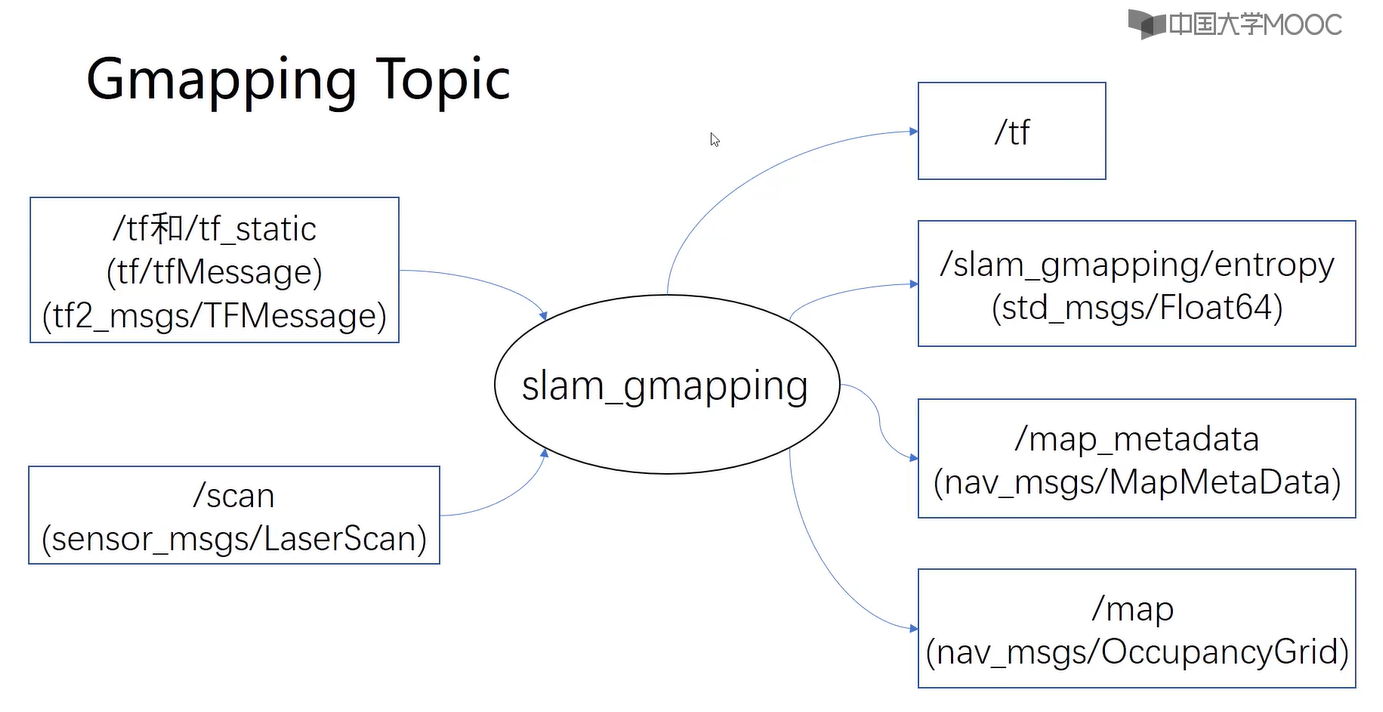
接收了坐标系之间的转换关系(odom与base_link)和激光雷达的数据,发布了map与odom之间的坐标转换,进行机器人的定位和建立的地图数据。
-
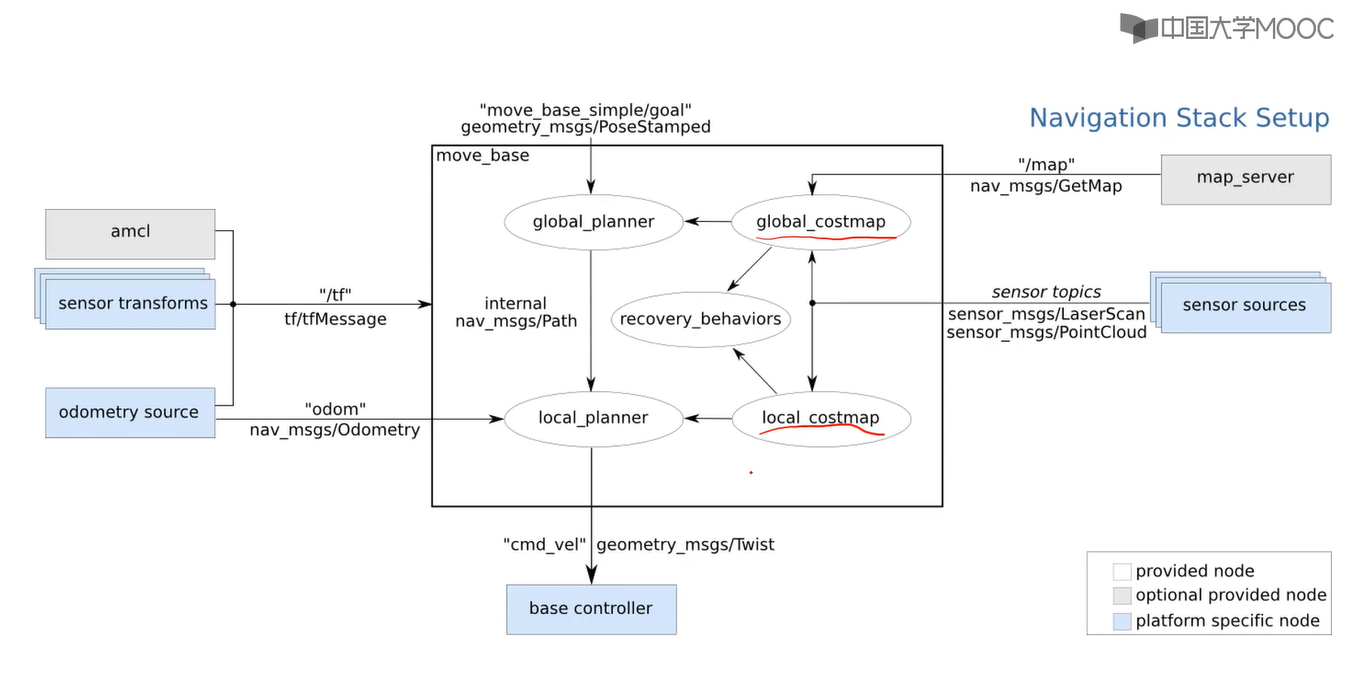
然后是move_base,它接收了地图数据等,通过代价地图等进行路径规划:
-
最后是AMCL,通过已有的数据进行定位:
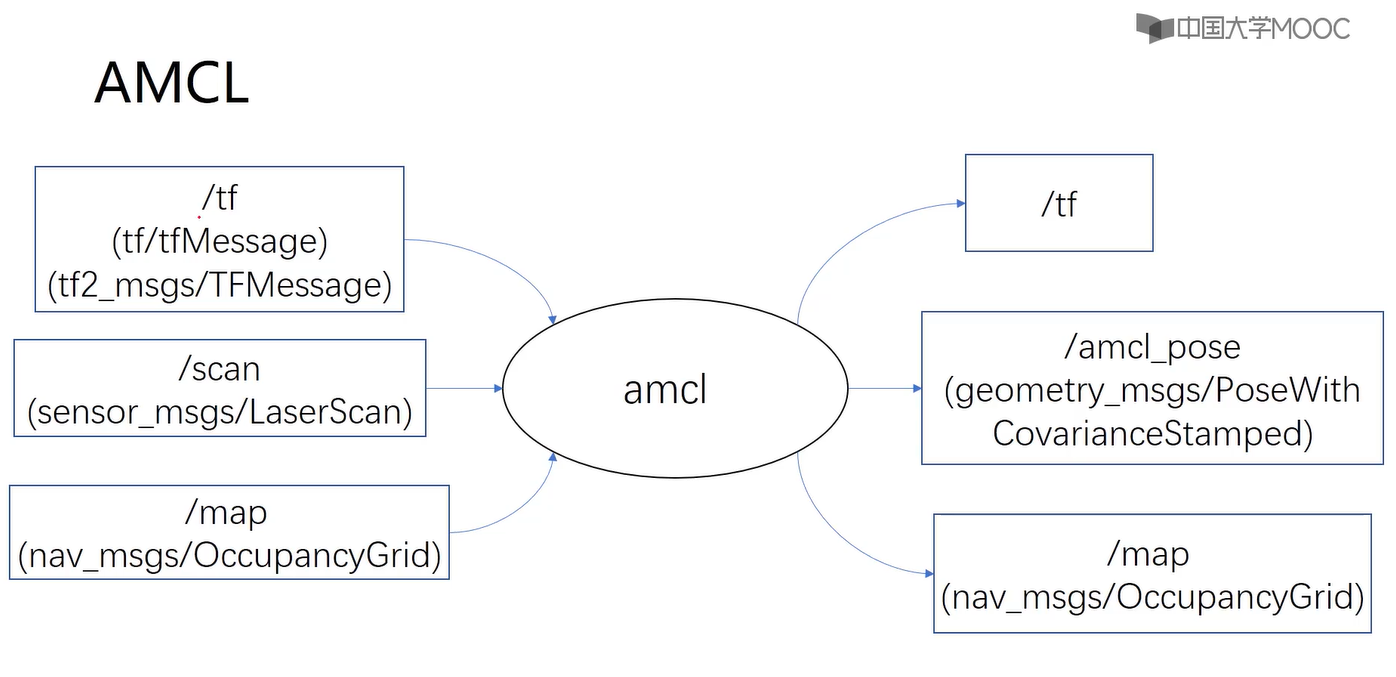
接收了激光雷达、地图数据和坐标系之间的转换关系,输出修正后的定位数据。
-
gampping 的配置:
-
gmapping 配置文件:主要是修改最上方的,激光雷达话题、base_link的框架名、odom的框架名。下方的其他数据主要是与实际建图效果有关的参数配置。
<launch> <arg name="scan_topic" default="mycar/laser/scan" /> <arg name="base_frame" default="footprint"/> <arg name="odom_frame" default="odom"/> <node pkg="gmapping" type="slam_gmapping" name="slam_gmapping" output="screen"> <param name="base_frame" value="$(arg base_frame)"/> <param name="odom_frame" value="$(arg odom_frame)"/> <param name="map_update_interval" value="1.0"/> <param name="maxUrange" value="20.0"/> <param name="maxRange" value="25.0"/> <param name="sigma" value="0.05"/> <param name="kernelSize" value="1"/> <param name="lstep" value="0.05"/> <param name="astep" value="0.05"/> <param name="iterations" value="5"/> <param name="lsigma" value="0.075"/> <param name="ogain" value="3.0"/> <param name="lskip" value="0"/> <param name="minimumScore" value="200"/> <param name="srr" value="0.01"/> <param name="srt" value="0.02"/> <param name="str" value="0.01"/> <param name="stt" value="0.02"/> <param name="linearUpdate" value="0.5"/> <param name="angularUpdate" value="0.436"/> <param name="temporalUpdate" value="-1.0"/> <param name="resampleThreshold" value="0.5"/> <param name="particles" value="80"/> <param name="xmin" value="-25.0"/> <param name="ymin" value="-25.0"/> <param name="xmax" value="25.0"/> <param name="ymax" value="25.0"/> <param name="delta" value="0.05"/> <param name="llsamplerange" value="0.01"/> <param name="llsamplestep" value="0.01"/> <param name="lasamplerange" value="0.005"/> <param name="lasamplestep" value="0.005"/> <remap from="scan" to="$(arg scan_topic)"/> </node> </launch> -
启动gmapping的launch文件。
<launch>
  <include file="$(find mycar_slam)/launch/include/robot_gmapping.launch.xml"/>

 <include file="$(find mycar_navigation)/launch/include/move_base.launch.xml"/>

</launch>
不用move_base也可以用键盘控制节点代替。
-
运行效果:
-
move_base的配置:
-
move_base的启动文件:
<!--
    ROS navigation stack with velocity smoother and safety (reactive) controller
-->
<launch>
  <!--include file="$(find navigation_sim_demo)/launch/include/velocity_smoother.launch.xml"/-->
  <!--include file="$(find navigation_sim_demo)/launch/include/safety_controller.launch.xml"/-->

  <arg name="odom_frame_id"   default="odom"/>
  <arg name="base_frame_id"   default="footprint"/>
  <arg name="global_frame_id" default="map"/>
  <arg name="odom_topic" default="/odom" />
  <arg name="laser_topic" default="/mycar/laser/scan" />

  <node pkg="move_base" type="move_base" respawn="false" name="move_base" output="screen">
    <rosparam file="$(find mycar_navigation)/param/costmap_common_params.yaml" command="load" ns="global_costmap" />
    <rosparam file="$(find mycar_navigation)/param/costmap_common_params.yaml" command="load" ns="local_costmap" />
    <rosparam file="$(find mycar_navigation)/param/local_costmap_params.yaml" command="load" />
    <rosparam file="$(find mycar_navigation)/param/global_costmap_params.yaml" command="load" />
    <rosparam file="$(find mycar_navigation)/param/dwa_local_planner_params.yaml" command="load" />
    <rosparam file="$(find mycar_navigation)/param/move_base_params.yaml" command="load" />
    <rosparam file="$(find mycar_navigation)/param/global_planner_params.yaml" command="load" />
    <rosparam file="$(find mycar_navigation)/param/navfn_global_planner_params.yaml" command="load" />

    <!-- reset frame_id parameters using user input data -->
    <param name="global_costmap/global_frame" value="$(arg global_frame_id)"/>
    <param name="global_costmap/robot_base_frame" value="$(arg base_frame_id)"/>
    <param name="local_costmap/global_frame" value="$(arg odom_frame_id)"/>
    <param name="local_costmap/robot_base_frame" value="$(arg base_frame_id)"/>
    <param name="DWAPlannerROS/global_frame_id" value="$(arg odom_frame_id)"/>

    <remap from="odom" to="$(arg odom_topic)"/>
    <remap from="scan" to="$(arg laser_topic)"/>
    <remap from="cmd_vel" to="/mycar/cmd_vel"/>

  </node>
</launch>
主要是显示更改odom、map和base_link的框架名,然后更改odom和激光雷达的话题名。下面读入了move_base的配置文件。最后要主要将链接的控制话题进行重映射,连接到本机器人的控制。
-
move_base的配置文件:
costmap_common_params.yaml:主要是要更改所读入的传感器的数据类型和话题,其他参数进行适当调节。
max_obstacle_height: 2.40  # assume something like an arm is mounted on top of the robot

# Obstacle Cost Shaping (http://wiki.ros.org/costmap_2d/hydro/inflation)
robot_radius: 0.25  # distance a circular robot should be clear of the obstacle (kobuki: 0.18)
# footprint: [[x0, y0], [x1, y1], ... [xn, yn]]  # if the robot is not circular

map_type: voxel

voxel_layer:
  enabled:              true
  max_obstacle_height:  2.2
  origin_z:             0.0
  z_resolution:         0.1
  z_voxels:             22
  unknown_threshold:    15
  mark_threshold:       0
  combination_method:   1
  track_unknown_space:  true    #true needed for disabling global path planning through unknown space
  obstacle_range: 2.5
  raytrace_range: 3.0
  publish_voxel_map: true
  observation_sources:  scan
  scan:
    data_type: LaserScan
    topic: /mycar/laser/scan
    marking: true
    clearing: true
    min_obstacle_height: 0.1
    max_obstacle_height: 0.3

#cost_scaling_factor and inflation_radius were now moved to the inflation_layer ns
inflation_layer:
  enabled:              true
  cost_scaling_factor:  2.58  # exponential rate at which the obstacle cost drops off (default: 10)
  inflation_radius:     1.0  # max. distance from an obstacle at which costs are incurred for planning paths.

static_layer:
  enabled:              true
dwa_local_planner_params.yaml:对参数进行适当调节。
DWAPlannerROS:

# Robot Configuration Parameters
  max_vel_x: 0.5
  min_vel_x: 0.0

  max_vel_y: 0.0
  min_vel_y: 0.0

  # The velocity when robot is moving in a straight line
  max_trans_vel:  0.55
  min_trans_vel:  0.1
  trans_stopped_vel: 0.1

  max_rot_vel: 5.0
  min_rot_vel: 0.8
  rot_stopped_vel: 0.8

  acc_lim_x: 1.0
  acc_lim_theta: 2.0
  acc_lim_y: 0.0

# Goal Tolerance Parametes
  yaw_goal_tolerance: 0.3
  xy_goal_tolerance: 0.15
  # latch_xy_goal_tolerance: false

# Forward Simulation Parameters
  sim_time: 4.0
  vx_samples: 20
  vy_samples: 0
  vtheta_samples: 40

# Trajectory Scoring Parameters
  path_distance_bias: 32.0
  goal_distance_bias: 24.0
  occdist_scale: 0.1
  forward_point_distance: 0.325
  stop_time_buffer: 0.2
  scaling_speed: 0.25
  max_scaling_factor: 0.2

# Oscillation Prevention Parameters
  oscillation_reset_dist: 0.05

# Debugging
  publish_traj_pc : true
  publish_cost_grid_pc: true
  global_frame_id: odom
global_costmap_params.yaml:更改全局和base_link的框架名称,其他参数进行适当调节。
global_costmap:
   global_frame: /map
   robot_base_frame: /footprint
   update_frequency: 2.0
   publish_frequency: 0.5
   static_map: true
   rolling_window: false
   transform_tolerance: 0.5
   plugins:
     - {name: static_layer,            type: "costmap_2d::StaticLayer"}
     - {name: voxel_layer,             type: "costmap_2d::VoxelLayer"}
     - {name: inflation_layer,         type: "costmap_2d::InflationLayer"}
global_planner_params.yaml:对参数进行适当调节。
GlobalPlanner:                                  # Also see: http://wiki.ros.org/global_planner
  old_navfn_behavior: false                     # Exactly mirror behavior of navfn, use defaults for other boolean parameters, default false
  use_quadratic: true                           # Use the quadratic approximation of the potential. Otherwise, use a simpler calculation, default true
  use_dijkstra: false                            # Use dijkstra's algorithm. Otherwise, A*, default true
  use_grid_path: false                          # Create a path that follows the grid boundaries. Otherwise, use a gradient descent method, default false

  allow_unknown: true                           # Allow planner to plan through unknown space, default true
                                                #Needs to have track_unknown_space: true in the obstacle / voxel layer (in costmap_commons_param) to work
  planner_window_x: 0.0                         # default 0.0
  planner_window_y: 0.0                         # default 0.0
  default_tolerance: 0.0                        # If goal in obstacle, plan to the closest point in radius default_tolerance, default 0.0

  publish_scale: 100                            # Scale by which the published potential gets multiplied, default 100
  planner_costmap_publish_frequency: 0.0        # default 0.0

  lethal_cost: 253                              # default 253
  neutral_cost: 50                              # default 50
  cost_factor: 3.0                              # Factor to multiply each cost from costmap by, default 3.0
  publish_potential: true                       # Publish Potential Costmap (this is not like the navfn pointcloud2 potential), default true
local_costmap_params.yaml:更改全局和base_link的框架名称,其他参数进行适当调节。
local_costmap:
   global_frame: /map
   robot_base_frame: /footprint
   update_frequency: 5.0
   publish_frequency: 2.0
   static_map: false
   rolling_window: true
    4.0
   height: 4.0
   resolution: 0.05
   origin_x: 5.0
   origin_y: 0
   transform_tolerance: 0.5
   plugins:
    - {name: voxel_layer,      type: "costmap_2d::VoxelLayer"}
    - {name: inflation_layer,     type: "costmap_2d::InflationLayer"}
move_base_params.yaml:对参数进行适当调节。
# Move base node parameters. For full documentation of the parameters in this file, please see
#
#  http://www.ros.org/wiki/move_base
#
shutdown_costmaps: false

controller_frequency: 5.0
controller_patience: 3.0


planner_frequency: 1.0
planner_patience: 5.0

oscillation_timeout: 10.0
oscillation_distance: 0.2

# local planner - default is trajectory rollout
base_local_planner: "dwa_local_planner/DWAPlannerROS"

base_global_planner: "navfn/NavfnROS" #alternatives: global_planner/GlobalPlanner, carrot_planner/CarrotPlanner
navfn_global_planner_params.yaml:对参数进行适当调节。
NavfnROS: visualize_potential: false #Publish potential for rviz as pointcloud2, not really helpful, default false allow_unknown: true #Specifies whether or not to allow navfn to create plans that traverse unknown space, default true #Needs to have track_unknown_space: true in the obstacle / voxel layer (in costmap_commons_param) to work planner_window_x: 0.0 #Specifies the x size of an optional window to restrict the planner to, default 0.0 planner_window_y: 0.0 #Specifies the y size of an optional window to restrict the planner to, default 0.0 default_tolerance: 0.0 #If the goal is in an obstacle, the planer will plan to the nearest point in the radius of default_tolerance, default 0.0 #The area is always searched, so could be slow for big values -
主要是在costmap_common_params.yaml中配置传感器发布的话题。以及在其他文件中配置map、base_link的框架名。
-
在gmapping中配置move_base的效果就是,可以进行路径规划,使用2D Nav goal指定所要到达的目标。
-
-
AMCL的配置:
-
amcl 的配置文件:更改激光雷达话题名,和odom、base_link和map的框架名。对其他参数进行适当调节。
<launch> <arg name="use_map_topic" default="true"/> <arg name="scan_topic" default="/mycar/laser/scan"/> <arg name="initial_pose_x" default="0.0"/> <arg name="initial_pose_y" default="0.0"/> <arg name="initial_pose_a" default="0.0"/> <arg name="odom_frame_id" default="odom"/> <arg name="base_frame_id" default="footprint"/> <arg name="global_frame_id" default="map"/> <node pkg="amcl" type="amcl" name="amcl"> <param name="use_map_topic" value="$(arg use_map_topic)"/> <!-- Publish scans from best pose at a max of 10 Hz --> <param name="odom_model_type" value="diff"/> <param name="odom_alpha5" value="0.1"/> <param name="gui_publish_rate" value="10.0"/> <param name="laser_max_beams" value="810"/> <param name="laser_max_range" value="-1"/> <param name="min_particles" value="500"/> <param name="max_particles" value="5000"/> <param name="kld_err" value="0.05"/> <param name="kld_z" value="0.99"/> <param name="odom_alpha1" value="0.2"/> <param name="odom_alpha2" value="0.2"/> <!-- translation std dev, m --> <param name="odom_alpha3" value="0.2"/> <param name="odom_alpha4" value="0.2"/> <param name="laser_z_hit" value="0.5"/> <param name="laser_z_short" value="0.05"/> <param name="laser_z_max" value="0.05"/> <param name="laser_z_rand" value="0.5"/> <param name="laser_sigma_hit" value="0.2"/> <param name="laser_lambda_short" value="0.1"/> <param name="laser_model_type" value="likelihood_field"/> <!-- <param name="laser_model_type" value="beam"/> --> <param name="laser_likelihood_max_dist" value="2.0"/> <param name="update_min_d" value="0.1"/> <param name="update_min_a" value="0.2"/> <param name="odom_frame_id" value="$(arg odom_frame_id)"/> <param name="base_frame_id" value="$(arg base_frame_id)"/> <param name="global_frame_id" value="$(arg global_frame_id)"/> <param name="resample_interval" value="1"/> <!-- Increase tolerance because the computer can get quite busy --> <param name="transform_tolerance" value="1.0"/> <param name="recovery_alpha_slow" value="0.0"/> <param name="recovery_alpha_fast" value="0.0"/> <param name="initial_pose_x" value="$(arg initial_pose_x)"/> <param name="initial_pose_y" value="$(arg initial_pose_y)"/> <param name="initial_pose_a" value="$(arg initial_pose_a)"/> <remap from="scan" to="$(arg scan_topic)"/> </node> </launch> -
launch启动文件:引入Map server已经建立的地图,指定初始位置并启动move_base。
<launch> <!-- Map server--> <arg name="map_file" default="$(find slam_sim_demo)/maps/Software_Museum.yaml"/> <node name="map_server" pkg="map_server" type="map_server" args="$(arg map_file)" /> <!-- Localization --> <arg name="initial_pose_x" default="0.0"/> <arg name="initial_pose_y" default="0.0"/> <arg name="initial_pose_a" default="0.0"/> <arg name="custom_amcl_launch_file" default="$(find mycar_navigation)/launch/include/robot_amcl.launch.xml"/> <include file="$(arg custom_amcl_launch_file)"> <arg name="initial_pose_x" value="$(arg initial_pose_x)"/> <arg name="initial_pose_y" value="$(arg initial_pose_y)"/> <arg name="initial_pose_a" value="$(arg initial_pose_a)"/> </include> <!-- Move base --> <include file="$(find mycar_navigation)/launch/include/move_base.launch.xml"/> </launch> -
地图的格式是 .pgm 格式,配置文件为 .yaml格式:
image: Software_Museum.pgm resolution: 0.050000 origin: [-25.000000, -25.000000, 0.000000] negate: 0 occupied_thresh: 0.65 free_thresh: 0.196 -
AMCL的运行效果:

-
3、利用rosbag记录地图
-
在启动Gazebo和Rviz以及相关的建图程序后,执行以下命令激励激光雷达(更改为自己发布的激光雷达话题)和tf话题发布的所有消息:
$ rosbag record -o data.bag /tf /mycar/laser/scan /tf_static -
使用rosbag play回放数据,--clock 表示时间信息:
$ rosbag play --clock data_2018-08-10-18-27-20.bag -
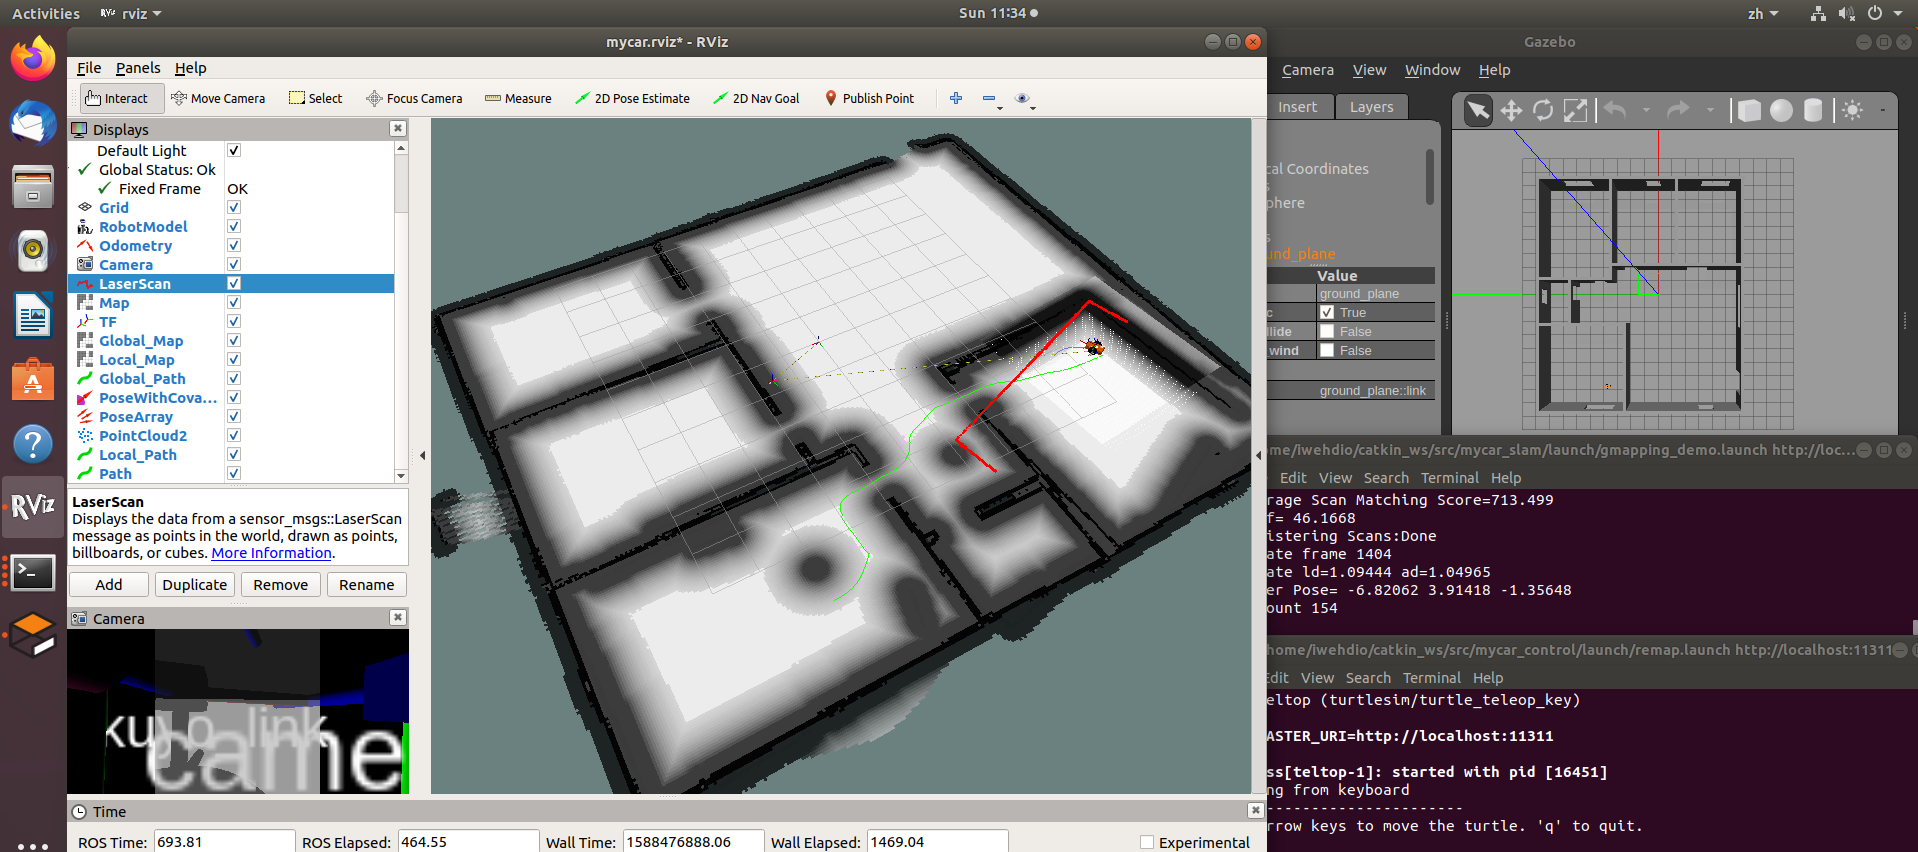
利用回放的数据建图(这里使用gmapping时,一定要将激光雷达的话题和底盘和tf配置为自己设置的):
$ rosparam set use_sim_time true $ roslaunch mycar_slam gmapping_demo.launch -
保存建好的地图:
$ rosrun map_server map_saver -
发布地图话题:
$ rosrun map_server map_server map.yaml -
然后就可以在Rviz中订阅/map话题了。
参考:中科院软件所-机器人操作系统入门(ROS入门教程):https://www.bilibili.com/video/BV1mJ411R7Ni?p=44
iwehdio的博客园:https://www.cnblogs.com/iwehdio/