React Native之通知栏消息提示(android)
一,需求分析与概述
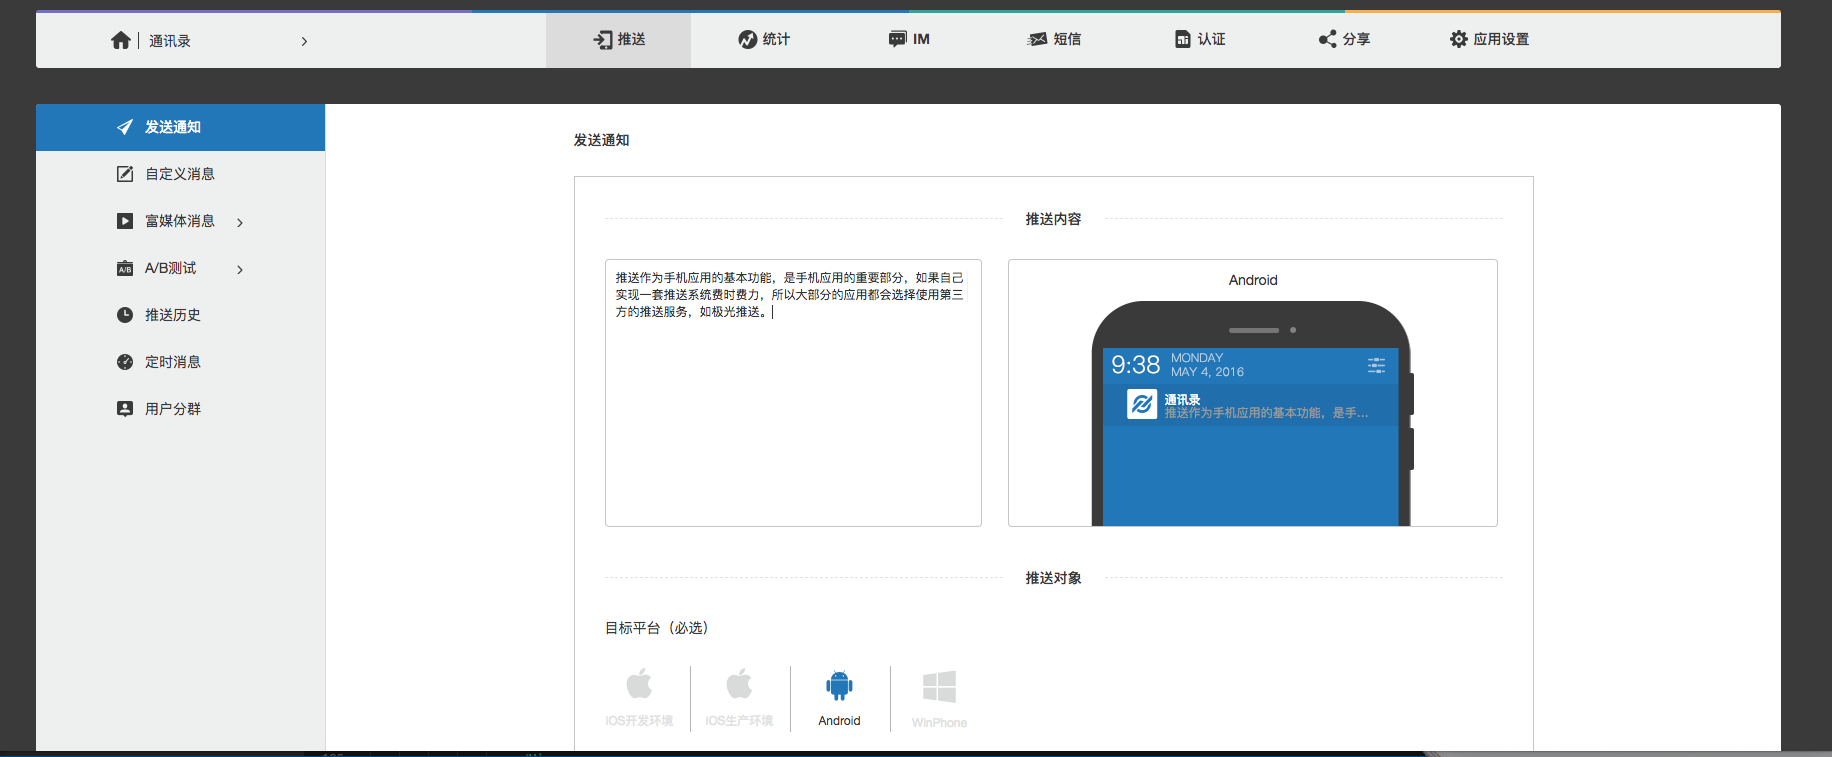
1.1,推送作为手机应用的基本功能,是手机应用的重要部分,如果自己实现一套推送系统费时费力,所以大部分的应用都会选择使用第三方的推送服务,如极光推送。
1.2,jpush-react-native 是极光推送官方开发的 React Native 版本插件,可以快速集成推送功能。现在最新版本的 JPush SDK 分离了 JPush 及 JCore,让开发者可以分开集成 JMessage 及 JPush(以前 JMessage 包含了 JPush)。
API:
 1 #初始化JPush 必须先初始化才能执行其他操作(only android)
 2 initPush
 3
 4 getInfo
 5
 6 #执行该方法后,无法接收到通知
 7 stopPush
 8
 9 #stopPush后,执行该方法,可接收通知(only android)
10 resumePush
11
12 #参数是func,func的参数是registrationId
13 getRegistrationID
14
15 #设置标签
16 setTags
17
18 #添加标签
19 addTags
20
21 #删除标签
22 deleteTags
23
24 #检查标签的状态
25 checkTagBindState
26
27 #清除所有标签
28 cleanTags
29
30 #设置别名
31 setAlias
32
33 #删除别名
34 deleteAlias
35
36 #获取别名
37 getAlias
38
39 #通知栏样式:Basic
40 setStyleBasic
41
42 #通知栏样式:Custom
43 setStyleCustom
1.3,推送通知可以及时地提醒用户.
二,极光推送注册与集成
2.1,注册
首先,登录极光官网系统,如果还没有账号可以注册一个,登录成功我们就可以创建和管理我们的应用了。


2.2,集成(android)
第一步:安装
打开终端,进入项目根目录文件夹下,执行以下命令:
1  npm install jpush-react-native --save
2  jpush-react-native 1.4.2 版本以后需要同时安装 jcore-react-native
3  npm install jcore-react-native --save
第二步:配置
自动关联配置
1 # 针对性的link,避免之前手动配置的其它插件重复配置造成报错
2  react-native link jpush-react-native
3  react-native link jcore-react-native
执行完 link 项目后可能会出现报错,这没关系,需要手动配置一下 build.gradle 文件。如自动配置没有成功或没有完善,可根据手动配置检查
手动配置
(1),检查 android 项目下的 settings.gradle 配置有没有包含以下内容(project/android/settings.gradle):
1 include ':jcore-react-native'
2 project(':jcore-react-native').projectDir = new File(rootProject.projectDir, '../node_modules/jcore-react-native/android')
3
4 include ':jpush-react-native'
5 project(':jpush-react-native').projectDir = new File(rootProject.projectDir, '../node_modules/jpush-react-native/android')
(2),project/android/app/build.gradle:
 1 android {
 2     ...
 3     defaultConfig {
 4         applicationId "yourApplicationId" // 此处改成你在极光官网上申请应用时填写的包名
 5         ...
 6         manifestPlaceholders = [
 7                 JPUSH_APPKEY: "yourAppKey", //在此替换你极光官网上申请的 APPKey
 8                 APP_CHANNEL: "developer-default"    //应用渠道号, 默认即可
 9         ]
10     }
11 }
12 ...
13 dependencies {
14     compile project(':jpush-react-native')  // 添加 jpush 依赖
15     compile project(':jcore-react-native')  // 添加 jcore 依赖
16     compile fileTree(dir: "libs", include: ["*.jar"])
17     compile "com.android.support:appcompat-v7:23.0.1"
18     compile "com.facebook.react:react-native:+"  // From node_modules
19 }
(3),检查一下 app 下的 AndroidManifest 配置,有没有增加 <meta-data> 部分。 project/android/app/src/main/AndroidManifest.xml:
1 <application
2     ...
3     <!-- Required . Enable it you can get statistics data with channel -->
4     <meta-data android:name="JPUSH_CHANNEL" android:value="${APP_CHANNEL}"/>
5     <meta-data android:name="JPUSH_APPKEY" android:value="${JPUSH_APPKEY}"/>
6
7 </application>
(4),打开 project/android/app/src/main/java/com/项目名/下的 MainApplication.java 文件,然后加入 JPushPackage
 1 ...
 2
 3 import com.rt2zz.reactnativecontacts.ReactNativeContacts;
 4 import cn.jpush.reactnativejpush.JPushPackage;
 5
 6 ...
 7
 8 public class MainApplication extends Application implements ReactApplication {
 9 // 设置为 true 将不会弹出 toast
10     private boolean SHUTDOWN_TOAST = false;
11     // 设置为 true 将不会打印 log
12     private boolean SHUTDOWN_LOG = false;
13   private final ReactNativeHost mReactNativeHost = new ReactNativeHost(this) {
14     @Override
15     public boolean getUseDeveloperSupport() {
16       return BuildConfig.DEBUG;
17     }
18
19     @Override
20     protected List<ReactPackage> getPackages() {
21       return Arrays.<ReactPackage>asList(
22             new MainReactPackage(),
23                new JPushPackage(SHUTDOWN_TOAST, SHUTDOWN_LOG)
24       );
25     }
26
27    ...
28
29 }
(5),打开 project/android/app/src/main/java/com/项目名/下的MainActivity.java 文件,然后加入 如下代码:
 1 ...
 2
 3
 4 import android.os.Bundle;
 5 import com.facebook.react.ReactActivity;
 6 import cn.jpush.android.api.JPushInterface;
 7
 8 public class MainActivity extends ReactActivity {
 9
10 ...
11
12     @Override
13     protected void onCreate(Bundle savedInstanceState) {
14         super.onCreate(savedInstanceState);
15         JPushInterface.init(this);
16     }
17
18     @Override
19     protected void onPause() {
20         super.onPause();
21         JPushInterface.onPause(this);
22     }
23
24     @Override
25     protected void onResume() {
26         super.onResume();
27         JPushInterface.onResume(this);
28     }
29
30     @Override
31     protected void onDestroy() {
32         super.onDestroy();
33     }
34 }
(6),打开 project/android/app/src/main/下的AndroidManifest.xml 文件,然后添加访问通知的权限:
1 <!--添加通知权限,${ApplicationID}替换成你的applicationID!-->
2     <premission
3         android:name="${ApplicationID}.permission.JPUSH_MESSAGE"
4         android:protectionLevel="signature"/>
这样就基本完成了所有的配置。接下来就可以在 JS 中调用插件提供的 API 了。
三,使用与实现
3.1,使用
(1),在js中 1 import React, { PureComponent } from 'react';
 2 import {
 3   Linking,
 4   Alert
 5 } from 'react-native';
 6 import JPushModule from 'jpush-react-native'
 7
 8 ...
 9
10
11 componentDidMount() {
12 /****************************通知 start **************************************************/
13     if (Platform.OS === 'android') {
14       JPushModule.initPush()
15    // 新版本必需写回调函数
16       JPushModule.notifyJSDidLoad(resultCode => {
17         if (resultCode === 0) {
18         }
19       })
20     } else {
21       JPushModule.setupPush()
22     }
23     // 接收自定义消息
24     this.receiveCustomMsgListener = map => {
25       this.setState({
26         pushMsg: map.content
27       })
28       console.log('extras: ' + map.extras)
29     }
30
31         // 接收自定义消息JPushModule.addReceiveCustomMsgListener(this.receiveCustomMsgListener)
32     this.receiveNotificationListener = map => {
33       console.log('alertContent: ' + map.alertContent)
34       console.log('extras: ' + map.extras)
35     }
36     // 接收推送通知
37 JPushModule.addReceiveNotificationListener(this.receiveNotificationListener)
38  // 打开通知
39     this.openNotificationListener = map => {
40       // console.log('Opening notification!')
41     //  console.log('map.extra: ' + map.extras)
42      let webUrl= JSON.parse(map.extras).webUrl
43       let url = webUrl.replace(new RegExp("/", 'g'), "/")
44       Linking.canOpenURL(url).then(supported => {
45         if (!supported) {
46           Alert.alert('您的系统不支持打开浏览器!')
47         } else {
48           return Linking.openURL(url);
49         }
50       }).catch(err => { });
51
52     }
53     JPushModule.addReceiveOpenNotificationListener(this.openNotificationListener)
54
55     // this.getRegistrationIdListener = registrationId => {
56     //   console.log('Device register succeed, registrationId ' + registrationId)
57     // }
58     // JPushModule.addGetRegistrationIdListener(this.getRegistrationIdListener)
59     /****************************通知 end **************************************************/
60
61
62   }
63   componentWillUnmount() {
64     JPushModule.removeReceiveCustomMsgListener(this.receiveCustomMsgListener)
65     JPushModule.removeReceiveNotificationListener(this.receiveNotificationListener)
66     JPushModule.removeReceiveOpenNotificationListener(this.openNotificationListener)
67     // JPushModule.removeGetRegistrationIdListener(this.getRegistrationIdListener)
68     // console.log('Will clear all notifications')
69     // JPushModule.clearAllNotifications()
70   }
71
72 }
73
74 ...
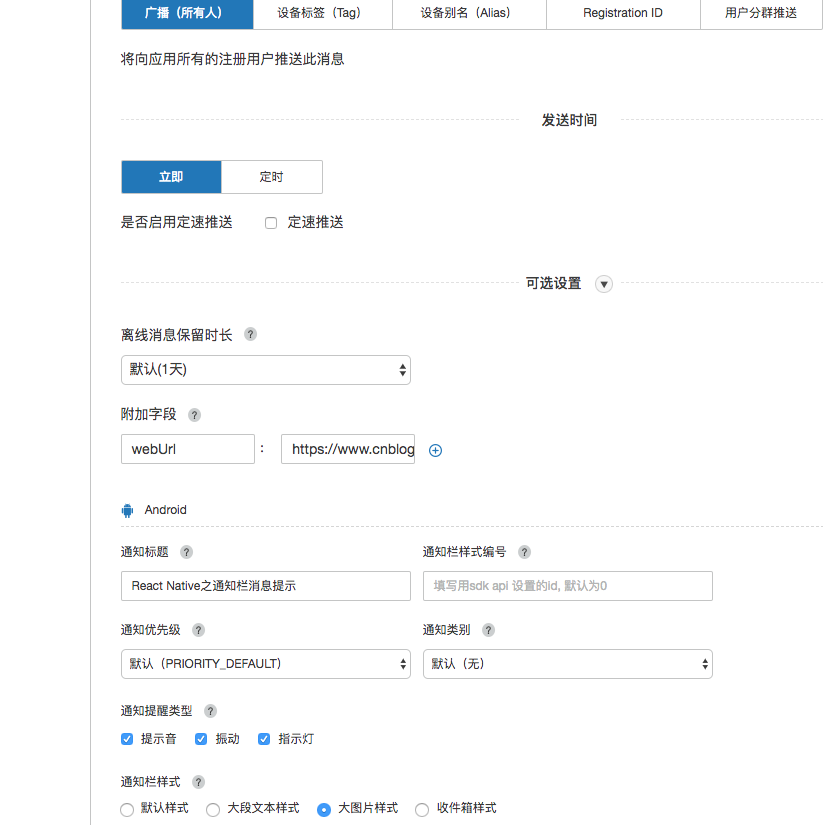
(2),在极光官网上推送
3.2,实现的效果

问题:
1,真机没接收到通知
解决:打开node_modules/jpush_react-native/android/src/AndroidManifest.xml,将所有的${applicationId}替换成你的包名。或将project/android/src/AndroidManifest.xml,的${applicationId}替换成你的包名。
...

<application
        android:name=".MainApplication"
        android:allowBackup="true"
        android:icon="@drawable/ic_launcher"
        android:label="@string/app_name"
        android:theme="@style/AppTheme">
        <activity
            android:name=".MainActivity"
            android:configChanges="keyboard|keyboardHidden|orientation|screenSize"
            android:label="@string/app_name">
            <intent-filter>
                <action android:name="android.intent.action.MAIN" />
                <category android:name="android.intent.category.LAUNCHER" />
            </intent-filter>
        </activity>

   ...

        <!-- Required . Enable it you can get statistics data with channel -->
        <meta-data android:name="JPUSH_CHANNEL" android:value="${APP_CHANNEL}"/>
        <meta-data android:name="JPUSH_APPKEY" android:value="${JPUSH_APPKEY}"/>

    </application>
在.MainApplication和.MainActivity前添加包名