原文地址:03.命令模式
01.策略模式-上篇
02.单件模式
03.命令模式
本篇所有示例程序下载:
【设计模式】03.命令模式_博客园jackson0714.zip
命令模式:将请求封装成对象,这可以让你使用不同的请求,这可以让你使用不同的请求、队列,或者日志请求来参数化其他对象。命令模式也可以支持撤销操作。当需要将发出请求的对象和执行请求的对象解耦的时候,使用命令模式。
在本章,我们将把封装带到一个全新的境界:把方法调用(method invocation) 封装起来。没错,通过封装方法调用,我们可以把运算块包装成形。所以调用此运算的对象不需要关心事情是如何进行的,只要知道如何使用包装成形的方法来完成它就可以。通过封装调用方法调用,也可以做一些很聪明的事情,例如记录日志,或者重复使用这些封装来实现撤销(undo)
实例分析:
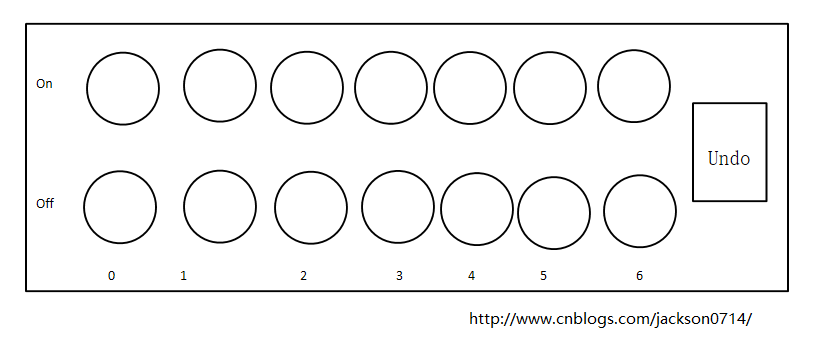
让硬件解脱,让我们看看遥控器
有七个插槽需要编程,可以在每个插槽放上不同的装置,然后用按钮控制它。
这七个插槽具备各自的“开”与“关”按钮。
一、简单遥控器
1.实现电灯类


using System;

namespace Command
{
    public class Light
    {
        public void On()
        {
            Console.WriteLine("Light is On");
        }

        public void Off()
        {
            Console.WriteLine("Light is Off");

        }
    }
}
2.实现命令接口
namespace Command
{
    public interface ICommand
    {
        public void execute();
    }
}
3.实现一个打开电灯的命令
namespace Command
{
    public class LightOnCommand : ICommand
    {
        private Light _light = null;

        public LightOnCommand(Light light)
        {
            this._light = light;
        }

        public void execute()
        {
            _light.On();
        }
    }
}
4.假设我们只有一个遥控器,它只有一个按钮和对应的插槽,可以控制一个装置:
namespace Command
{
    public class SimpleRemoteControl
    {
        private ICommand _slot;

        public SimpleRemoteControl()
        {

        }

        public void SetCommand(ICommand command)
        {
            _slot = command;
        }

        public void ButtonWasPressed()
        {
            _slot.execute();
        }
    }
}
5.测试上面的简单遥控器,控制电灯的打开
using System;

namespace Command
{
    class Program
    {
        static void Main(string[] args)
        {
            SimpleRemoteControl remote = new SimpleRemoteControl();
            Light light = new Light();
            LightOnCommand lightOn = new LightOnCommand(light);
            remote.SetCommand(lightOn);
            remote.ButtonWasPressed();
            Console.ReadKey();
        }
    }
}
6.实现仓库门类。
using System;

namespace Command
{
    public class GarageDoor
    {
        public void Up()
        { Console.WriteLine("Garage door is Open"); }

        public void Close()
        { Console.WriteLine("Garage door is Close"); }

        public void Stop()
        { Console.WriteLine("Garage door is Stop"); }

        public void LightOn()
        { Console.WriteLine("Garage door light is On"); }

        public void LightOff()
        { Console.WriteLine("Garage door light is Off"); }
    }
}
7.实现打开仓库门的类
namespace Command
{
    class GarageDoorOpenCommand:ICommand
    {
        private GarageDoor _garageDoor = null;

        public GarageDoorOpenCommand(GarageDoor garageDoor)
        {
            _garageDoor = garageDoor;
        }

        public void Execute()
        {
            _garageDoor.Up();
        }
    }
}
8.测试打开电灯和打开仓库门的遥控器
using System;

namespace Command
{
    class Program
    {
        static void Main(string[] args)
        {
            SimpleRemoteControl remote = new SimpleRemoteControl();

            Light light = new Light();
            LightOnCommand lightOn = new LightOnCommand(light);
            GarageDoor garageDoor = new GarageDoor();
            GarageDoorOpenCommand garageDoorOpen = new GarageDoorOpenCommand(garageDoor);

            remote.SetCommand(lightOn);
            remote.ButtonWasPressed();

            remote.SetCommand(garageDoorOpen);
            remote.ButtonWasPressed();

            Console.ReadKey();
        }
    }
}
测试结果:

二、复杂遥控器
1.实现遥控器
using System.Text;

namespace Command
{
    class RemoteControl
    {
        ICommand[] onCommands;
        ICommand[] offCommands;

        public RemoteControl()
        {
            onCommands = new ICommand[7];
            offCommands = new ICommand[7];

            ICommand noCommand = new NoCommand();
            for (int i = 0; i < 7; i++)
            {
                onCommands[i] = noCommand;
                offCommands[i] = noCommand;
            }
        }

        public void SetCommand(int slot, ICommand onCommand, ICommand offCommand)
        {
            onCommands[slot] = onCommand;
            offCommands[slot] = offCommand;
        }

        public void OnButtonWasPushed(int slot)
        {
            onCommands[slot].Execute();
        }

        public void OffButtonWasPushed(int slot)
        {
            offCommands[slot].Execute();
        }

        public string ToString()
        {
            StringBuilder stringBuilder = new StringBuilder();
            stringBuilder.Append("
-----Remote Control-----
");
            for (int i = 0; i < onCommands.Length; i++)
            {
                stringBuilder.Append("
[slot " + i + "]");
                stringBuilder.Append(onCommands[i].GetType());
                stringBuilder.Append("    ");
                stringBuilder.Append(offCommands[i].GetType());
            }
            return stringBuilder.ToString();
        }
    }
}
2.实现NoCommand类
namespace Command
{
    class NoCommand:ICommand
    {
        public void Execute()
        {

        }
    }
}
3.实现命令
(1)实现关闭电灯命令
    namespace Command
    {
        public class LightOffCommand : ICommand
        {
            private Light _light = null;

            public LightOffCommand(Light light)
            {
                this._light = light;
            }

            public void Execute()
            {
                _light.Off();
            }
        }
    }
(2)实现关闭仓库门命令
    namespace Command
    {
        class GarageDoorDownCommand:ICommand
        {
            private GarageDoor _garageDoor = null;

            public GarageDoorDownCommand(GarageDoor garageDoor)
            {
                _garageDoor = garageDoor;
            }

            public void Execute()
            {
                _garageDoor.Down();
            }
        }
    }
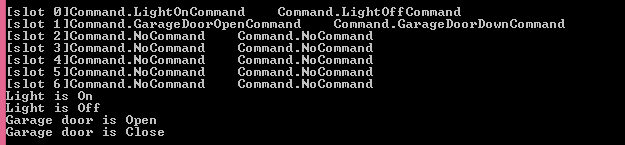
4.测试复杂遥控器
            //02.复杂控制器--------------------------------------
            Console.WriteLine("
-----02.复杂控制器-----
");
            RemoteControl remoteControl = new RemoteControl();
            remoteControl.SetCommand(0, lightOn, lightOff);
            remoteControl.SetCommand(1, garageDoorOpen, garageDoorDown);
            Console.WriteLine(remoteControl.ToString());
            remoteControl.OnButtonWasPushed(0);
            remoteControl.OffButtonWasPushed(0);
            remoteControl.OnButtonWasPushed(1);
            remoteControl.OffButtonWasPushed(1);
测试结果:
三、实现Undo功能
1.当命令支持撤销时,该命令就必须提供和Execute()方法相反的Undo()方法。
不管Execute()刚才做什么,Undo()都会倒转过来。这么一来,在各个命令中加入Undo之前,我们必须先在Command接口中加入Undo()方法:
    namespace Command
    {
        public interface ICommand
        {
            void Execute();

            void Undo();
        }
    }
2.我们从LightOnCommand开始下手
如果LightOnCommand的Execute()方法被调用,那么最后调用的是On()方法。我们知道Undo()需要调用Off()方法进行相反的动作。
    namespace Command
    {
        public class LightOnCommand : ICommand
        {
            private Light _light = null;

            public LightOnCommand(Light light)
            {
                this._light = light;
            }

            public void Execute()
            {
                _light.On();
            }

            public void Undo()
            {
                _light.Off();
            }
        }
    }
3.要加上对撤销按钮的莪支持,我们必须对遥控器类做一些小修改。
加入一个新的实例变量,用来追踪最后被调用的命令,然后,不管何时撤销按钮被按下,我们都可以取出这个命令并调用它的Undo()方法。
    using System.Text;

    namespace Command
    {
        class RemoteControlWithUndo
        {
            ICommand[] onCommands;
            ICommand[] offCommands;
            ICommand undoCommand;

            public RemoteControlWithUndo()
            {
                onCommands = new ICommand[7];
                offCommands = new ICommand[7];

                ICommand noCommand = new NoCommand();
                for (int i = 0; i < 7; i++)
                {
                    onCommands[i] = noCommand;
                    offCommands[i] = noCommand;
                }
                undoCommand = noCommand;
            }

            public void SetCommand(int slot, ICommand onCommand, ICommand offCommand)
            {
                onCommands[slot] = onCommand;
                offCommands[slot] = offCommand;
            }

            public void OnButtonWasPushed(int slot)
            {
                onCommands[slot].Execute();
                undoCommand = onCommands[slot];
            }

            public void OffButtonWasPushed(int slot)
            {
                offCommands[slot].Execute();
                undoCommand = offCommands[slot];
            }

            public void UndoButtonWasPushed()
            {
                undoCommand.Undo();
            }

            public string ToString()
            {
                StringBuilder stringBuilder = new StringBuilder();
                stringBuilder.Append("
-----Remote Control With Undo-----
");
                for (int i = 0; i < onCommands.Length; i++)
                {
                    stringBuilder.Append("
[slot " + i + "]");
                    stringBuilder.Append(onCommands[i].GetType());
                    stringBuilder.Append("    ");
                    stringBuilder.Append(offCommands[i].GetType());
                }
                return stringBuilder.ToString();
            }
        }
    }
4.测试具有撤销功能的复杂控制器
                //03.复杂控制器,撤销功能--------------------------------------
                Console.WriteLine("
-----03.复杂控制器,撤销功能-----
");
                RemoteControlWithUndo remoteControlWithUndo = new RemoteControlWithUndo();
                remoteControlWithUndo.SetCommand(0, lightOn, lightOff);
                remoteControlWithUndo.OnButtonWasPushed(0);
                remoteControlWithUndo.OffButtonWasPushed(0);
                Console.WriteLine(remoteControlWithUndo.ToString());
                remoteControlWithUndo.UndoButtonWasPushed();
                remoteControlWithUndo.OffButtonWasPushed(0);
                remoteControlWithUndo.OnButtonWasPushed(0);
                Console.WriteLine(remoteControlWithUndo.ToString());
                remoteControlWithUndo.UndoButtonWasPushed();
测试结果:

四、复杂撤销
1.使用状态实现撤销
实现电灯的撤销是有意义的,但也实在是太容易了。通常,想要实现撤销的功能,需要记录一些状态,让我们试一个更有趣的例子,比方说厂商类中的天花板上的吊扇。吊扇允许有多种转动速度,当然也允许被关闭。
吊扇的源代码如下:
    namespace Command.Model
    {
        class CeilingFan
        {
            public static readonly int HighSpeed = 3;
            public static readonly int  MediumSpeed = 2;
            public static readonly int LowSpeed = 1;
            public static readonly int OffSpeed = 0;
            private string _location;
            private int _speed;

            public CeilingFan(string location)
            {
                _location = location;
                _speed = OffSpeed;
            }

            public void SetHighSpeed()
            {
                _speed = HighSpeed;
            }
            public void SetMediumSpeed()
            {
                _speed = MediumSpeed;
            }
            public void SetLowSpeed()
            {
                _speed = LowSpeed;
            }

            public void SetOffSpeed()
            {
                _speed = OffSpeed;
            }
            public int GetSpeed()
            {
                return _speed;
            }
        }
    }
2.加入撤销到吊扇的命令类
现在就让我们把撤销加入到天花板吊扇的诸多命令中。这么做,需要追踪吊扇的最后设置速度,如果undo()方法被调用了,就要恢复成之前吊扇的速度的设置值。
下面是CeilingFanHighCommand的代码:
    namespace Command
    {
        class CeilingFanHighCommand : ICommand
        {
            private CeilingFan _ceilingFan;
            private int _prevSpeed;

            public CeilingFanHighCommand(CeilingFan ceilingFan)
            {
                _ceilingFan = ceilingFan;
            }
            public void Execute()
            {
                _prevSpeed = _ceilingFan.GetSpeed();//在改变吊扇速度之前,需要先将它之前的状态记录起来,以便需要撤销时使用。
                _ceilingFan.SetHighSpeed();
            }

            public void Undo()
            {
                if (_prevSpeed == CeilingFan.HighSpeed)
                {
                    _ceilingFan.SetHighSpeed();
                }
                else if (_prevSpeed == CeilingFan.MediumSpeed)
                {
                    _ceilingFan.SetMediumSpeed();
                }
                if (_prevSpeed == CeilingFan.LowSpeed)
                {
                    _ceilingFan.SetLowSpeed();
                }
                if (_prevSpeed == CeilingFan.OffSpeed)
                {
                    _ceilingFan.SetOffSpeed();
                }
            }
        }
    }
下面是CeilingFanMediumCommand的代码:
    namespace Command
    {
        class CeilingFanMediumCommand : ICommand
        {
            private CeilingFan _ceilingFan;
            private int _prevSpeed;

            public CeilingFanMediumCommand(CeilingFan ceilingFan)
            {
                _ceilingFan = ceilingFan;
            }
            public void Execute()
            {
                _prevSpeed = _ceilingFan.GetSpeed();//在改变吊扇速度之前,需要先将它之前的状态记录起来,以便需要撤销时使用。
                _ceilingFan.SetMediumSpeed();
            }

            public void Undo()
            {
                if (_prevSpeed == CeilingFan.HighSpeed)
                {
                    _ceilingFan.SetHighSpeed();
                }
                else if (_prevSpeed == CeilingFan.MediumSpeed)
                {
                    _ceilingFan.SetMediumSpeed();
                }
                if (_prevSpeed == CeilingFan.LowSpeed)
                {
                    _ceilingFan.SetLowSpeed();
                }
                if (_prevSpeed == CeilingFan.OffSpeed)
                {
                    _ceilingFan.SetOffSpeed();
                }
            }
        }
    }
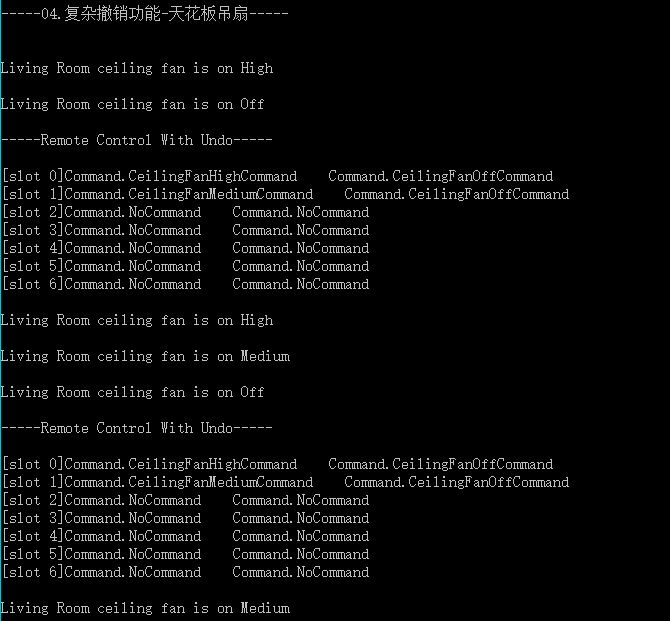
3.测试天花板吊扇
把第0号插槽的开启按钮设置为中苏,把第一号插槽的开启按钮设置为高度,而两个对应的关闭按钮,都是关闭吊扇的命令。
测试脚本如下:
                    //04.复杂撤销功能-天花板吊扇
                    Console.WriteLine("
-----04.复杂撤销功能-天花板吊扇-----
");
                    remoteControlWithUndo = new RemoteControlWithUndo();
                    CeilingFan ceilingFan = new CeilingFan("Living Room");
                    CeilingFanHighCommand ceilingFanHighCommand = new CeilingFanHighCommand(ceilingFan);
                    CeilingFanMediumCommand ceilingFanMediumCommand = new CeilingFanMediumCommand(ceilingFan);
                    CeilingFanOffCommand ceilingFanOffCommand = new CeilingFanOffCommand(ceilingFan);

                    remoteControlWithUndo.SetCommand(0,ceilingFanHighCommand,ceilingFanOffCommand);//0号插槽的On键设置为高速,Off键设置为关闭
                    remoteControlWithUndo.SetCommand(1,ceilingFanMediumCommand,ceilingFanOffCommand);//1号插槽的On键设置为中速,Off键设置为关闭

                    remoteControlWithUndo.OnButtonWasPushed(0);//首先以高速开启吊扇
                    remoteControlWithUndo.OffButtonWasPushed(0);//然后关闭
                    Console.WriteLine(remoteControlWithUndo.ToString());
                    remoteControlWithUndo.UndoButtonWasPushed();//撤销,回到中速

                    remoteControlWithUndo.OnButtonWasPushed(1);//开启中速
                    remoteControlWithUndo.OffButtonWasPushed(1);//关闭
                    Console.WriteLine(remoteControlWithUndo.ToString());//撤销,回到中速
                    remoteControlWithUndo.UndoButtonWasPushed();
测试结果:
五、每个遥控器都需具备“Party模式”!
如果拥有了一个遥控器,却无法光凭按下一个按钮,就同时能弄暗灯管,打开音响和电视,设置好DVD,并让热水器开始加温,那么要这个遥控器还有什么意义?
1.制造一个新的命令,用来执行其他一堆命令,而不只是执行一个命令。
        namespace Command
        {
            class MacroCommand : ICommand
            {
                private ICommand[] _commands;

                public MacroCommand(ICommand[] commands)
                {
                    _commands = commands;
                }
                public void Execute()
                {
                    for (int i = 0; i < _commands.Length; i++)
                    {
                        _commands[i].Execute();
                    }
                }

                public void Undo()
                {
                    for (int i = _commands.Length - 1; i >= 0; i--)
                    {
                        _commands[i].Undo();
                    }
                }
            }
        }
2.使用宏命令
            ICommand[] partyOn = {lightOn, garageDoorOpen, ceilingFanHighCommand};//一个数组用来记录开启命令
                    ICommand[] partyOff = {lightOff, garageDoorDown, ceilingFanOffCommand};//另一个数组用来记录关闭命令
                    MacroCommand partyOnMacroCommand = new MacroCommand(partyOn);//创建对应的宏持有开启命令数组
                    MacroCommand partyOffMacroCommand = new MacroCommand(partyOff);//创建对应的宏持有关闭命令数组
            remoteControlWithUndo.SetCommand(0,partyOnMacroCommand,partyOffMacroCommand);//将宏命令指定一个按钮
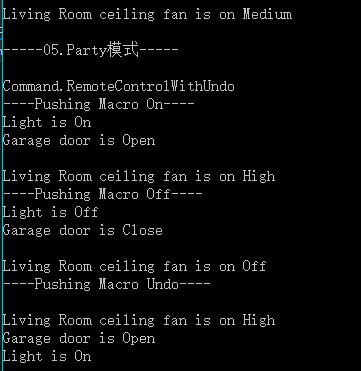
3.测试Party模式
                //05.Party模式
                    Console.WriteLine("
-----05.Party模式-----
");
                    ICommand[] partyOn = {lightOn, garageDoorOpen, ceilingFanHighCommand};//一个数组用来记录开启命令
                    ICommand[] partyOff = {lightOff, garageDoorDown, ceilingFanOffCommand};//另一个数组用来记录关闭命令
                    MacroCommand partyOnMacroCommand = new MacroCommand(partyOn);//创建对应的宏持有开启命令数组
                    MacroCommand partyOffMacroCommand = new MacroCommand(partyOff);//创建对应的宏持有关闭命令数组
                    remoteControlWithUndo = new RemoteControlWithUndo();
                    remoteControlWithUndo.SetCommand(0,partyOnMacroCommand,partyOffMacroCommand);//将宏命令指定一个按钮
                    Console.WriteLine(remoteControlWithUndo);
                    Console.WriteLine("----Pushing Macro On----");
                    remoteControlWithUndo.OnButtonWasPushed(0);
                    Console.WriteLine("----Pushing Macro Off----");
                    remoteControlWithUndo.OffButtonWasPushed(0);
                    Console.WriteLine("----Pushing Macro Undo----");
                    remoteControlWithUndo.UndoButtonWasPushed();
测试结果:
六、问答
1.接收者一定有必要存在吗?为何命令对象不直接实现execute()方法的细节?
答:一般来说,我们尽量设计傻瓜命令对象,它只懂得调用一个接收者的一个行为。然后,有许多“聪明”命令对象会实现许多逻辑,直接完成一个请求。
当然你可以设计聪明的命令对象,只是这样一来,调用者和接收者之间的解耦程度是比不上“傻瓜”命令对象的,而且,你也不能够直接把接收者当作参数传递给命令。
2.我如何能够实现多层次的撤销操作?换句话说,我希望能够按下撤销按钮许多次,撤销到很早很早以前的状态。
答:好问题!其实这相当容易做到,不要只是记录最后一个被执行的命令,而使用一个堆栈记录操作过程的每一个命令。然后,不管什么时候按下了撤销按钮,你都可以从堆栈中去除最上层的命令,然后调用它的undo()方法。
3.我可以创建一个Party-Command,然后再它的execute()方法中调用其他的命令,利用这种做法实现Party模式吗?
答:你可以这么做。然而,这等于把Party模式硬编码到PartyCommand中。
七、命令模式的更多用途
1.队列请求
想象有一个工作队列:你在某一端添加命令,然后另一端则是线程。线程进行下面的动作:从队列中中取出一个命令,调用它的execute()方法,等待这个调用完成,然后将此命令对象对象丢弃,再取出下一个命令。
2.日志请求。
某些应用需要我们将所有的动作都记录在日志中,并能在系统司机之后,重新调用这些动作恢复到之前的状态。通过新增两个方法(Store()、Load())
八、要点
1.命令模式将发出请求的对象和执行请求的对象解耦。
2.在被解耦的两者之间是通过命令对象进行沟通的。命令对象封装了接收者和一个或一组动作。
3.调用者通过调用命令对象的execute()发出请求,这会使得接收者的动作被调用。
4.调用者可以接受命令当作参数,甚至在运行时动态地进行。
5.命令可以支持撤销,做法是实现一个Undo()方法来回到Execute()被执行钱的状态。
6.宏命令是命令的一种简单的延伸,允许调用多个命令。宏方法也可以支持撤销。
7.实际操作时,很常见的使用“聪明”命令对象,也就是直接实现了请求,而不是将工作委托给接收者,这种实现方式并不能将请求的对象和执行请求的对象解耦。
7.命令也可以用来实现日志和事物系统。
参考文献:
《Head First设计模式》