使用graphic-verification-code库做一个生成验证码的测试
1.概述
图片验证码大部分需要登录的网站都有实现的一个功能
作用:为了提高系统的安全性有了验证码,防止大量重复请求、机器人暴力访问等情况的。我们就可以要求用户在输入用户名,密码等信息后,同时输入图片上的文字,用户提交后,系统会首先从session中提取刚刚生成的验证码,并和用户输入的验证码进行比较,如果比较相等,表示用户是从登录界面登录过来的,否则,表示用户是非法的
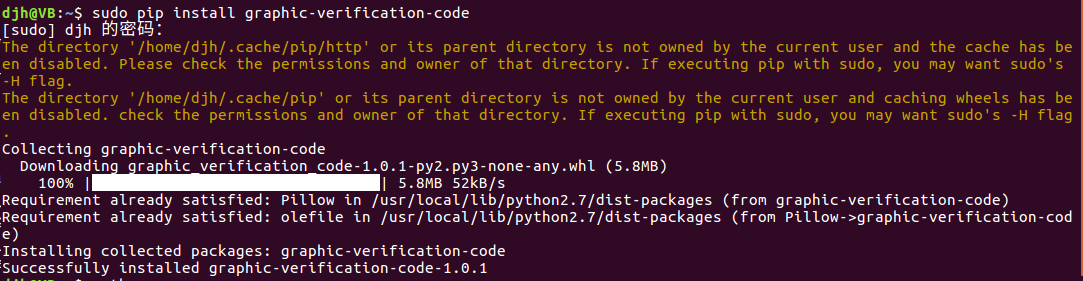
2.安装
sudo pip install graphic-verification-code
3.导入

4.编写
查看可用方法,方法并不多,所以可以方便快速的查看源码学习

python版本判断:2.x还是3.x
# -*- coding: utf-8 -*-

"""
pythoncompat
"""

import sys


# -------
# Pythons
# -------

# Syntax sugar.
_ver = sys.version_info

#: Python 2.x?
is_py2 = (_ver[0] == 2)

#: Python 3.x?
is_py3 = (_ver[0] == 3)

# ---------
# Specifics
# ---------

if is_py2:
    range = xrange

    builtin_str = str
    bytes = str
    str = unicode
    basestring = basestring
    numeric_types = (int, long, float)

elif is_py3:
    range = range

    builtin_str = str
    str = str
    bytes = bytes
    basestring = (str, bytes)
    numeric_types = (int, float)
主要模块main
# -*- coding: utf-8 -*-
import base64 as b64
import os
import random
from cStringIO import StringIO
from .compat import range
try:
from PIL import Image, ImageDraw, ImageFilter, ImageFont
except ImportError:
import Image, ImageDraw, ImageFilter, ImageFont
class GraphicVerificationCode(object):
def __init__(self):
self.chars = 'abcdefghjkmnpqrstuvwxyABCDEFGHJKMNPQRSTUVWXY3456789'
self.BASE_DIR = os.path.dirname(os.path.abspath(__file__))
self.SRC_DIR = os.path.join(self.BASE_DIR, 'resource')
self.FONT_DIR = os.path.join(self.SRC_DIR, 'fonts')
self.FONT_FILE = os.path.join(self.FONT_DIR, 'simsun.ttc')
def generate(self, size=(120, 30), chars=None, format='PNG', mode='RGB', bg_color=(255, 255, 255), fg_color=(0, 0, 255), font_size=18, font_file=None, length=4, draw_lines=True, line_range=(1, 2), draw_points=True, point_chance=2):
"""
@param size: 图片的大小,格式(宽,高),默认为(120, 30)
@param chars: 允许的字符集合,格式字符串
@param format: 图片保存的格式,默认为 PNG,可选的为 GIF,JPEG,TIFF,PNG
@param mode: 图片模式,默认为 RGB
@param bg_color: 背景颜色,默认为白色
@param fg_color: 前景色,验证码字符颜色,默认为蓝色 #0000FF
@param font_size: 验证码字体大小
@param font_file: 验证码字体,默认为 None
@param length: 验证码字符个数
@param draw_lines: 是否划干扰线
@param line_range: 干扰线的条数范围,格式元组,默认为 (1, 2),只有 draw_lines 为 True 时有效
@param draw_points: 是否画干扰点
@param point_chance: 干扰点出现的概率,大小范围 [0, 100],只有 draw_points 为 True 时有效
@return: [0]: PIL Image 实例
@return: [1]: 验证码图片中的字符串
"""
width, height = size # 宽, 高
im = Image.new(mode, size, bg_color) # 创建图形
draw = ImageDraw.Draw(im) # 创建画笔
def generate_chars():
""" 生成给定长度的字符串,返回列表格式 """
return random.sample(chars or self.chars, length)
def random_dot():
""" 随机点 """
return random.randint(0, width), random.randint(0, height)
def create_line():
""" 绘制干扰线 """
draw.line([random_dot(), random_dot()], fill=(0, 0, 0))
def create_lines():
""" 绘制干扰线 """
line_num = random.randint(*line_range) # 干扰线条数
[create_line() for _ in range(line_num)]
def create_points():
""" 绘制干扰点 """
chance = min(100, max(0, int(point_chance))) # 大小限制在[0, 100]
[draw.point((w, h), fill=(0, 0, 0)) for w in range(width) for h in range(height) if random.randint(0, 100) < chance]
def create_chars():
""" 绘制验证码字符 """
chars = generate_chars()
strs = ' {0} '.format(' '.join(chars)) # 每个字符前后以空格隔开
font = ImageFont.truetype(font_file if os.path.exists(font_file or '') else self.FONT_FILE, font_size)
font_width, font_height = font.getsize(strs)
xy = ((width - font_width) / 3, (height - font_height) / 3)
draw.text(xy, strs, font=font, fill=fg_color)
return ''.join(chars)
if draw_lines:
create_lines()
if draw_points:
create_points()
vcode = create_chars()
# 图形扭曲参数
params = [1 - float(random.randint(1, 2)) / 100, 0, 0, 0, 1 - float(random.randint(1, 10)) / 100,
float(random.randint(1, 2)) / 500, 0.001, float(random.randint(1, 2)) / 500]
im = im.transform(size, Image.PERSPECTIVE, params) # 创建扭曲
im = im.filter(ImageFilter.EDGE_ENHANCE_MORE) # 滤镜,边界加强(阈值更大)
return im, vcode
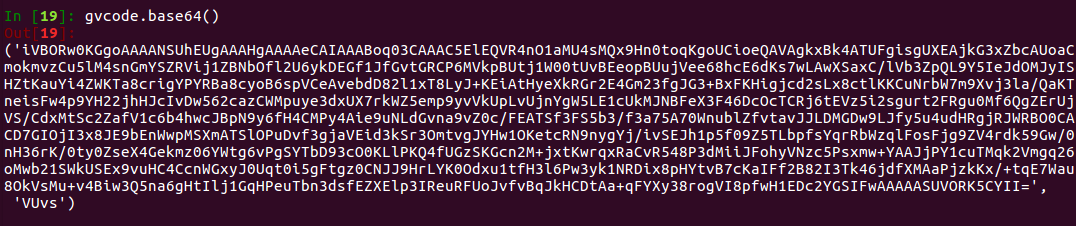
def base64(self, format='PNG'):
im, vcode = self.generate()
out = StringIO()
im.save(out, format=format)
return b64.b64encode(out.getvalue()), vcode
_global_instance = GraphicVerificationCode()
generate = _global_instance.generate
base64 = _global_instance.base64
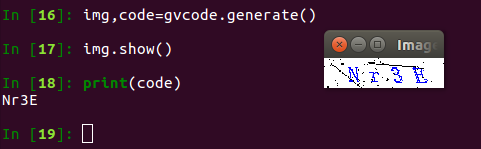
5.测试