在上一篇文章中,我们分析了tomcat的初始化过程,是由Bootstrap反射调用Catalina的load方法完成tomcat的初始化,包括server.xml的解析、实例化各大组件、初始化组件等逻辑。那么tomcat又是如何启动webapp应用,又是如何加载应用程序的ServletContextListener,以及Servlet呢?我们将在这篇文章进行分析
我们先来看下整体的启动逻辑,tomcat由上往下,挨个启动各个组件:
我们接着上一篇文章来分析,上一篇文章我们分析完了Catalina.load(),这篇文章来看看daemon.start();
Bootstrap
daemon.start()
启动过程和初始化一样,由Bootstrap反射调用Catalina的start方法
public void start()
    throws Exception {
    if( catalinaDaemon==null ) init();

    Method method = catalinaDaemon.getClass().getMethod("start", (Class [] )null);
    method.invoke(catalinaDaemon, (Object [])null);
}
Catalina
public void start() {

    if (getServer() == null) {
        load();
    }

    if (getServer() == null) {
        log.fatal("Cannot start server. Server instance is not configured.");
        return;
    }

    long t1 = System.nanoTime();

    // Start the new server
    try {
        //调用Server的start方法,启动Server组件
        getServer().start();
    } catch (LifecycleException e) {
        log.fatal(sm.getString("catalina.serverStartFail"), e);
        try {
            getServer().destroy();
        } catch (LifecycleException e1) {
            log.debug("destroy() failed for failed Server ", e1);
        }
        return;
    }

    long t2 = System.nanoTime();
    if(log.isInfoEnabled()) {
        log.info("Server startup in " + ((t2 - t1) / 1000000) + " ms");
    }

    // Register shutdown hook
    // 注册勾子,用于安全关闭tomcat
    if (useShutdownHook) {
        if (shutdownHook == null) {
            shutdownHook = new CatalinaShutdownHook();
        }
        Runtime.getRuntime().addShutdownHook(shutdownHook);

        // If JULI is being used, disable JULI's shutdown hook since
        // shutdown hooks run in parallel and log messages may be lost
        // if JULI's hook completes before the CatalinaShutdownHook()
        LogManager logManager = LogManager.getLogManager();
        if (logManager instanceof ClassLoaderLogManager) {
            ((ClassLoaderLogManager) logManager).setUseShutdownHook(
                    false);
        }
    }

    // Bootstrap中会设置await为true,其目的在于让tomcat在shutdown端口阻塞监听关闭命令
    if (await) {
        await();
        stop();
    }
}
Server
在前面的Lifecycle文章中,我们介绍了StandardServer重写了startInternal方法,完成自己的逻辑
StandardServer.startInternal
protected void startInternal() throws LifecycleException {

    fireLifecycleEvent(CONFIGURE_START_EVENT, null);
    setState(LifecycleState.STARTING);

    globalNamingResources.start();

    // Start our defined Services
    synchronized (servicesLock) {
        for (int i = 0; i < services.length; i++) {
            services[i].start();
        }
    }
}
先是由LifecycleBase统一发出STARTING_PREP事件,StandardServer额外还会发出CONFIGURE_START_EVENT、STARTING事件,用于通知LifecycleListener在启动前做一些准备工作,比如NamingContextListener会处理CONFIGURE_START_EVENT事件,实例化tomcat相关的上下文,以及ContextResource资源
接着,启动Service组件,这一块的逻辑将在下面进行详细分析,最后由LifecycleBase发出STARTED事件,完成start
Service
StandardService的start代码如下所示:
1. 启动Engine,Engine的child容器都会被启动,webapp的部署会在这个步骤完成;
2. 启动Executor,这是tomcat用Lifecycle封装的线程池,继承至java.util.concurrent.Executor以及tomcat的Lifecycle接口
3. 启动Connector组件,由Connector完成Endpoint的启动,这个时候意味着tomcat可以对外提供请求服务了
StandardService.startInternal
protected void startInternal() throws LifecycleException {

    setState(LifecycleState.STARTING);

    // 启动Engine
    if (engine != null) {
        synchronized (engine) {
            engine.start();
        }
    }

    // 启动Executor线程池
    synchronized (executors) {
        for (Executor executor: executors) {
            executor.start();
        }
    }

    // 启动MapperListener
    mapperListener.start();

    // 启动Connector
    synchronized (connectorsLock) {
        for (Connector connector: connectors) {
            try {
                // If it has already failed, don't try and start it
                if (connector.getState() != LifecycleState.FAILED) {
                    connector.start();
                }
            } catch (Exception e) {
                // logger......
            }
        }
    }
}
Engine
Engine的标准实现为org.apache.catalina.core.StandardEngine。我们先来看看构造函数。其主要职责为:使用默认的基础阀门创建标准Engine组件。
/**
 * Create a new StandardEngine component with the default basic Valve.
 */
public StandardEngine() {
    super();
    pipeline.setBasic(new StandardEngineValve());
    /* Set the jmvRoute using the system property jvmRoute */
    try {
        setJvmRoute(System.getProperty("jvmRoute"));
    } catch(Exception ex) {
        log.warn(sm.getString("standardEngine.jvmRouteFail"));
    }
    // By default, the engine will hold the reloading thread
    backgroundProcessorDelay = 10;
}
我们来看看StandardEngine.startInternal
StandardEngine.startInternal
@Override
protected synchronized void startInternal() throws LifecycleException {

    // Log our server identification information
    if(log.isInfoEnabled())
        log.info( "Starting Servlet Engine: " + ServerInfo.getServerInfo());

    // Standard container startup
    super.startInternal();
}
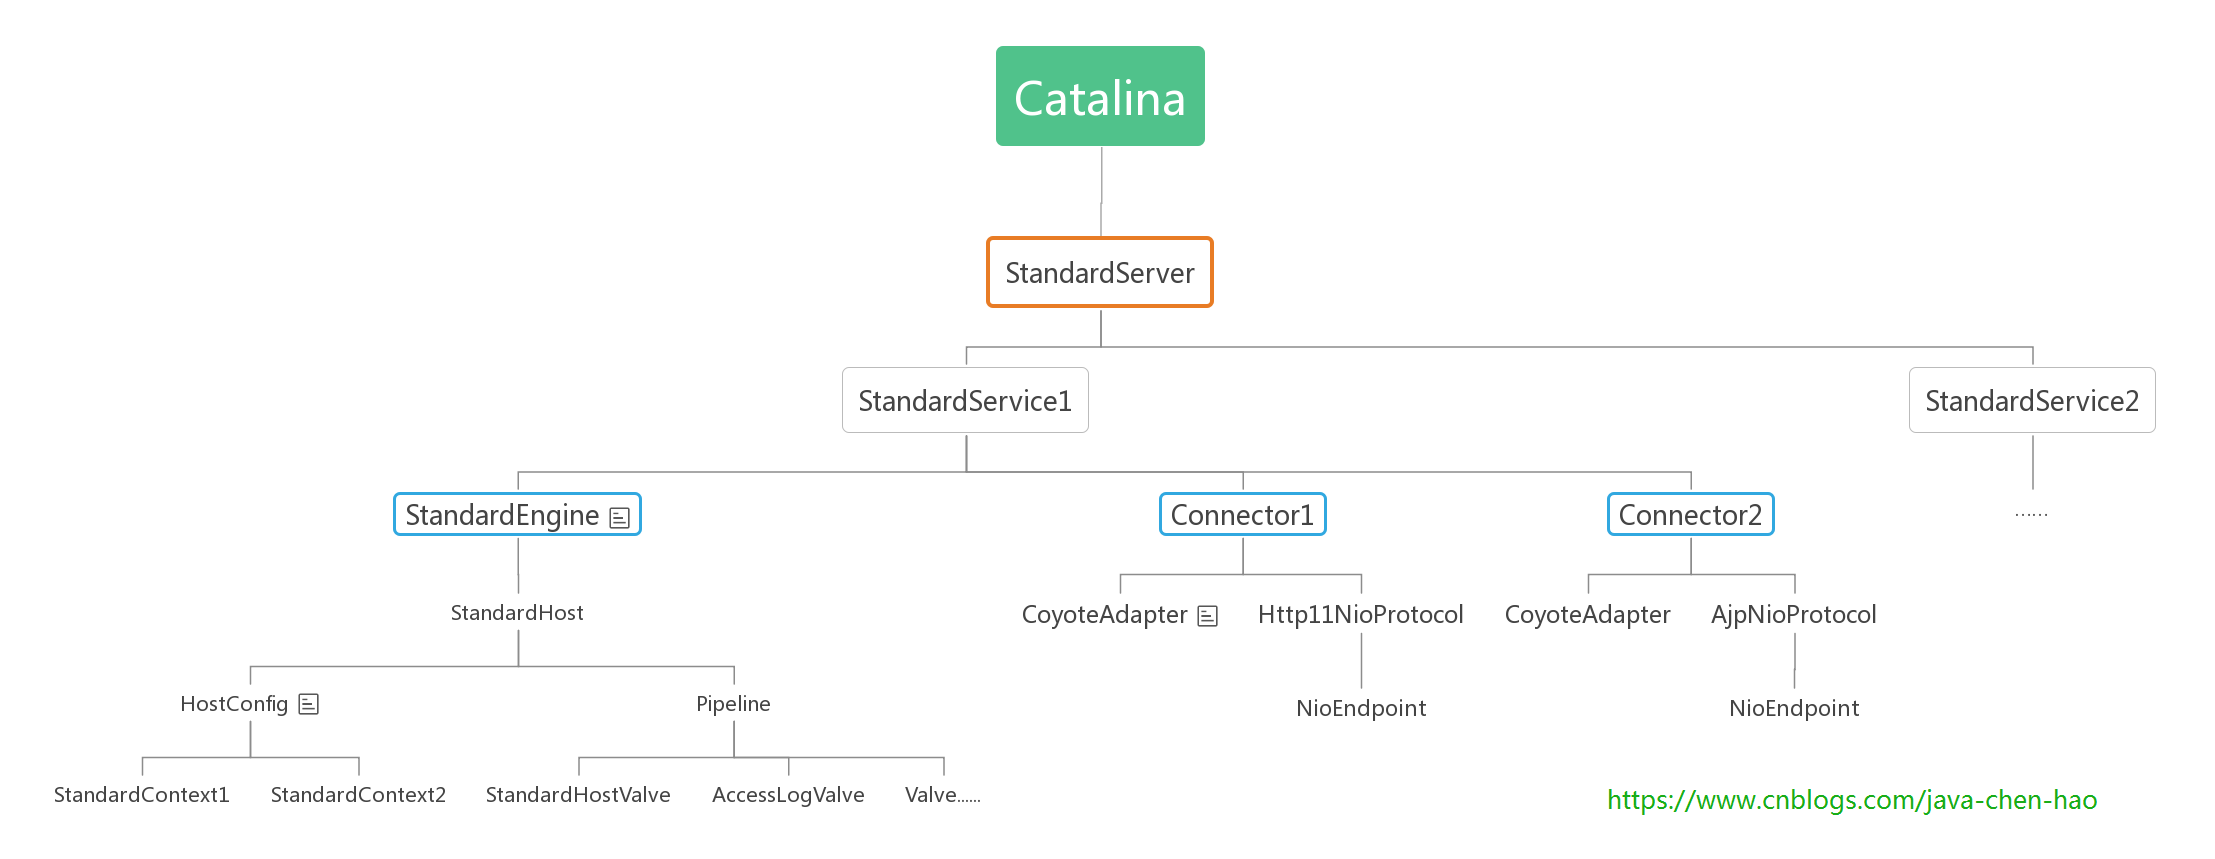
StandardEngine、StandardHost、StandardContext、StandardWrapper各个容器存在父子关系,一个父容器包含多个子容器,并且一个子容器对应一个父容器。Engine是顶层父容器,它不存在父容器。各个组件的包含关系如下图所示,默认情况下,StandardEngine只有一个子容器StandardHost,一个StandardContext对应一个webapp应用,而一个StandardWrapper对应一个webapp里面的一个 Servlet

StandardEngine、StandardHost、StandardContext、StandardWrapper都是继承至ContainerBase,各个容器的启动,都是由父容器调用子容器的start方法,也就是说由StandardEngine启动StandardHost,再StandardHost启动StandardContext,以此类推。
由于它们都是继续至ContainerBase,当调用 start 启动Container容器时,首先会执行 ContainerBase 的 start 方法,它会寻找子容器,并且在线程池中启动子容器,StandardEngine也不例外。
ContainerBase
ContainerBase的startInternal方法如下所示,主要分为以下3个步骤:
1. 启动子容器
2. 启动Pipeline,并且发出STARTING事件
3. 如果backgroundProcessorDelay参数 >= 0,则开启ContainerBackgroundProcessor线程,用于调用子容器的backgroundProcess
protected synchronized void startInternal() throws LifecycleException {
    // 省略若干代码......

    // 把子容器的启动步骤放在线程中处理,默认情况下线程池只有一个线程处理任务队列
    Container children[] = findChildren();
    List<Future<Void>> results = new ArrayList<>();
    for (int i = 0; i < children.length; i++) {
        results.add(startStopExecutor.submit(new StartChild(children[i])));
    }

    // 阻塞当前线程,直到子容器start完成
    boolean fail = false;
    for (Future<Void> result : results) {
        try {
            result.get();
        } catch (Exception e) {
            log.error(sm.getString("containerBase.threadedStartFailed"), e);
            fail = true;
        }
    }

    // 启用Pipeline
    if (pipeline instanceof Lifecycle)
        ((Lifecycle) pipeline).start();
    setState(LifecycleState.STARTING);

    // 开启ContainerBackgroundProcessor线程用于调用子容器的backgroundProcess方法,默认情况下backgroundProcessorDelay=-1,不会启用该线程
    threadStart();
}
ContainerBase会把StartChild任务丢给线程池处理,得到Future,并且会遍历所有的Future进行阻塞result.get(),这个操作是将异步启动转同步,子容器启动完成才会继续运行。我们再来看看submit到线程池的StartChild任务,它实现了java.util.concurrent.Callable接口,在call里面完成子容器的start动作
private static class StartChild implements Callable<Void> {

    private Container child;

    public StartChild(Container child) {
        this.child = child;
    }

    @Override
    public Void call() throws LifecycleException {
        child.start();
        return null;
    }
}
启动Pipeline
默认使用 StandardPipeline 实现类,它也是一个Lifecycle。在容器启动的时候,StandardPipeline 会遍历 Valve 链表,如果 Valve 是 Lifecycle 的子类,则会调用其 start 方法启动 Valve 组件,代码如下
public class StandardPipeline extends LifecycleBase
        implements Pipeline, Contained {

    // 省略若干代码......

    protected synchronized void startInternal() throws LifecycleException {

        Valve current = first;
        if (current == null) {
            current = basic;
        }
        while (current != null) {
            if (current instanceof Lifecycle)
                ((Lifecycle) current).start();
            current = current.getNext();
        }

        setState(LifecycleState.STARTING);
    }

}
Host
分析Host的时候,我们从Host的构造函数入手,该方法主要是设置基础阀门。
public StandardHost() {
    super();
    pipeline.setBasic(new StandardHostValve());
}
StandardEngine.startInternal
protected synchronized void startInternal() throws LifecycleException {

    // errorValve默认使用org.apache.catalina.valves.ErrorReportValve
    String errorValve = getErrorReportValveClass();
    if ((errorValve != null) && (!errorValve.equals(""))) {
        try {
            boolean found = false;

            // 如果所有的阀门中已经存在这个实例,则不进行处理,否则添加到  Pipeline 中
            Valve[] valves = getPipeline().getValves();
            for (Valve valve : valves) {
                if (errorValve.equals(valve.getClass().getName())) {
                    found = true;
                    break;
                }
            }

            // 如果未找到则添加到 Pipeline 中,注意是添加到 basic valve 的前面
            // 默认情况下,first valve 是 AccessLogValve,basic 是 StandardHostValve
            if(!found) {
                Valve valve =
                    (Valve) Class.forName(errorValve).getConstructor().newInstance();
                getPipeline().addValve(valve);
            }
        } catch (Throwable t) {
            // 处理异常,省略......
        }
    }

    // 调用父类 ContainerBase,完成统一的启动动作
    super.startInternal();
}
StandardHost Pipeline 包含的 Valve 组件:
1. basic:org.apache.catalina.core.StandardHostValve
2. first:org.apache.catalina.valves.AccessLogValve
需要注意的是,在往 Pipeline 中添加 Valve 阀门时,是添加到 first 后面,basic 前面
Context
接下来我们分析一下Context的实现org.apache.catalina.core.StandardContext。
先来看看构造方法,该方法用于设置Context.pipeline的基础阀门。
public StandardContext() {
    super();
    pipeline.setBasic(new StandardContextValve());
    broadcaster = new NotificationBroadcasterSupport();
    // Set defaults
    if (!Globals.STRICT_SERVLET_COMPLIANCE) {
        // Strict servlet compliance requires all extension mapped servlets
        // to be checked against welcome files
        resourceOnlyServlets.add("jsp");
    }
}
启动方法和上面的容器启动方法类似,我们就不再赘述了
Wrapper
Wrapper是一个Servlet的包装,我们先来看看构造方法。主要作用就是设置基础阀门StandardWrapperValve。
public StandardWrapper() {
    super();
    swValve=new StandardWrapperValve();
    pipeline.setBasic(swValve);
    broadcaster = new NotificationBroadcasterSupport();
}
这里每个容器中的pipeline设置的StandardEngineValve、StandardHostValve、StandardContextValve、StandardWrapperValve是有大用处的,后面我们会在Http请求过程中详细讲解。
总结
至此,整个启动过程便告一段落。整个启动过程程,由parent组件控制child组件的启动,一层层往下传递,直到最后全部启动完成。