上一篇文章主要讲了netty的read过程,本文主要分析一下write和writeAndFlush。
主要内容
本文分以下几个部分阐述一个java对象最后是如何转变成字节流,写到socket缓冲区中去的
- pipeline中的标准链表结构
- java对象编码过程
- write:写队列
- flush:刷新写队列
- writeAndFlush: 写队列并刷新
pipeline中的标准链表结构
一个标准的pipeline链式结构如下

java对象编码过程
为什么我们在pipeline中添加了encoder节点,java对象就转换成netty可以处理的ByteBuf,写到管道里?
我们先看下调用write的code
BusinessHandler
protected void channelRead0(ChannelHandlerContext ctx, Request request) throws Exception {
    Response response = doBusiness(request);

    if (response != null) {
        ctx.channel().write(response);
    }
}
业务处理器接受到请求之后,做一些业务处理,返回一个Response,然后,response在pipeline中传递,落到 Encoder节点,我们来跟踪一下 ctx.channel().write(response);
public ChannelFuture write(Object msg) {
    return this.pipeline.write(msg);
}
调用了Channel中的pipeline中的write方法,我们接着看
public final ChannelFuture write(Object msg) {
    return this.tail.write(msg);
}
pipeline中有属性tail,调用tail中的write,由此我们知道write消息的时候,从tail开始,接着往下看
private void write(Object msg, boolean flush, ChannelPromise promise) {
    AbstractChannelHandlerContext next = this.findContextOutbound();
    Object m = this.pipeline.touch(msg, next);
    EventExecutor executor = next.executor();
    if (executor.inEventLoop()) {
        if (flush) {
            next.invokeWriteAndFlush(m, promise);
        } else {
            next.invokeWrite(m, promise);
        }
    } else {
        Object task;
        if (flush) {
            task = AbstractChannelHandlerContext.WriteAndFlushTask.newInstance(next, m, promise);
        } else {
            task = AbstractChannelHandlerContext.WriteTask.newInstance(next, m, promise);
        }

        safeExecute(executor, (Runnable)task, promise, m);
    }

}
中间我省略了几个重载的方法,我们来看看第一行代码,next = this.findContextOutbound();
private AbstractChannelHandlerContext findContextOutbound() {
    AbstractChannelHandlerContext ctx = this;

    do {
        ctx = ctx.prev;
    } while(!ctx.outbound);

    return ctx;
}
通过 ctx = ctx.prev; 我们知道从tail开始找到pipeline中的第一个outbound的handler,然后调用 invokeWrite(m, promise),此时找到的第一个outbound的handler就是我们自定义的编码器Encoder
我们接着看 next.invokeWrite(m, promise);
private void invokeWrite(Object msg, ChannelPromise promise) {
    if (this.invokeHandler()) {
        this.invokeWrite0(msg, promise);
    } else {
        this.write(msg, promise);
    }

}
private void invokeWrite0(Object msg, ChannelPromise promise) {
    try {
        ((ChannelOutboundHandler)this.handler()).write(this, msg, promise);
    } catch (Throwable var4) {
        notifyOutboundHandlerException(var4, promise);
    }

}
一路代码跟下来,我们可以知道是调用了第一个outBound类型的handler中的write方法,也就是第一个调用的是我们自定义编码器Encoder的write方法
我们来看看自定义Encoder
public class Encoder extends MessageToByteEncoder<Response> {
    @Override
    protected void encode(ChannelHandlerContext ctx, Response response, ByteBuf out) throws Exception {
        out.writeByte(response.getVersion());
        out.writeInt(4 + response.getData().length);
        out.writeBytes(response.getData());
    }
}
自定义Encoder继承 MessageToByteEncoder ,并且重写了 encode方法,这就是编码器的核心,我们先来看 MessageToByteEncoder
public abstract class MessageToByteEncoder<I> extends ChannelOutboundHandlerAdapter {
我们看到 MessageToByteEncoder 继承了 ChannelOutboundHandlerAdapter,说明了 Encoder 是一个 Outbound的handler
我们来看看 Encoder 的父类 MessageToByteEncoder中的write方法
MessageToByteEncoder
@Override
public void write(ChannelHandlerContext ctx, Object msg, ChannelPromise promise) throws Exception {
    ByteBuf buf = null;
    try {
        // 判断当前Handelr是否能处理写入的消息
        if (acceptOutboundMessage(msg)) {
            @SuppressWarnings("unchecked")
            // 强制换换
            I cast = (I) msg;
            // 分配一段ButeBuf
            buf = allocateBuffer(ctx, cast, preferDirect);
            try {
            // 调用encode,这里就调回到  `Encoder` 这个Handelr中
                encode(ctx, cast, buf);
            } finally {
                // 既然自定义java对象转换成ByteBuf了,那么这个对象就已经无用了,释放掉
                // (当传入的msg类型是ByteBuf的时候,就不需要自己手动释放了)
                ReferenceCountUtil.release(cast);
            }
            // 如果buf中写入了数据,就把buf传到下一个节点
            if (buf.isReadable()) {
                ctx.write(buf, promise);
            } else {
            // 否则,释放buf,将空数据传到下一个节点
                buf.release();
                ctx.write(Unpooled.EMPTY_BUFFER, promise);
            }
            buf = null;
        } else {
            // 如果当前节点不能处理传入的对象,直接扔给下一个节点处理
            ctx.write(msg, promise);
        }
    } catch (EncoderException e) {
        throw e;
    } catch (Throwable e) {
        throw new EncoderException(e);
    } finally {
        // 当buf在pipeline中处理完之后,释放
        if (buf != null) {
            buf.release();
        }
    }
}
这里,我们详细阐述一下Encoder是如何处理传入的java对象的
1.判断当前Handler是否能处理写入的消息,如果能处理,进入下面的流程,否则,直接扔给下一个节点处理
2.将对象强制转换成Encoder可以处理的 Response对象
3.分配一个ByteBuf
4.调用encoder,即进入到 Encoder 的 encode方法,该方法是用户代码,用户将数据写入ByteBuf
5.既然自定义java对象转换成ByteBuf了,那么这个对象就已经无用了,释放掉,(当传入的msg类型是ByteBuf的时候,就不需要自己手动释放了)
6.如果buf中写入了数据,就把buf传到下一个节点,否则,释放buf,将空数据传到下一个节点
7.最后,当buf在pipeline中处理完之后,释放节点
总结一点就是,Encoder节点分配一个ByteBuf,调用encode方法,将java对象根据自定义协议写入到ByteBuf,然后再把ByteBuf传入到下一个节点,在我们的例子中,最终会传入到head节点,因为head节点是一个OutBount类型的handler
HeadContext
public void write(ChannelHandlerContext ctx, Object msg, ChannelPromise promise) throws Exception {
    unsafe.write(msg, promise);
}
这里的msg就是前面在Encoder节点中,载有java对象数据的自定义ByteBuf对象,进入下一节
write:写队列
我们来看看channel中unsafe的write方法,先来看看其中的一个属性
AbstractUnsafe
protected abstract class AbstractUnsafe implements Unsafe {
    private volatile ChannelOutboundBuffer outboundBuffer = new ChannelOutboundBuffer(AbstractChannel.this);
我们来看看 ChannelOutboundBuffer 这个类
public final class ChannelOutboundBuffer {
    private final Channel channel;
    private ChannelOutboundBuffer.Entry flushedEntry;
    private ChannelOutboundBuffer.Entry unflushedEntry;
    private ChannelOutboundBuffer.Entry tailEntry;
ChannelOutboundBuffer内部维护了一个Entry链表,并使用Entry封装msg。其中的属性我们下面会详细讲
我们回到正题,接着看 unsafe.write(msg, promise);
AbstractUnsafe
@Override
public final void write(Object msg, ChannelPromise promise) {
    assertEventLoop();

    ChannelOutboundBuffer outboundBuffer = this.outboundBuffer;

    int size;
    try {
        msg = filterOutboundMessage(msg);
        size = pipeline.estimatorHandle().size(msg);
        if (size < 0) {
            size = 0;
        }
    } catch (Throwable t) {
        safeSetFailure(promise, t);
        ReferenceCountUtil.release(msg);
        return;
    }

    outboundBuffer.addMessage(msg, size, promise);
}
1.调用 filterOutboundMessage() 方法,将待写入的对象过滤,把非ByteBuf对象和FileRegion过滤,把所有的非直接内存转换成直接内存DirectBuffer
@Override
protected final Object filterOutboundMessage(Object msg) {
    if (msg instanceof ByteBuf) {
        ByteBuf buf = (ByteBuf) msg;
        if (buf.isDirect()) {
            return msg;
        }

        return newDirectBuffer(buf);
    }

    if (msg instanceof FileRegion) {
        return msg;
    }

    throw new UnsupportedOperationException(
            "unsupported message type: " + StringUtil.simpleClassName(msg) + EXPECTED_TYPES);
}
2.接下来,估算出需要写入的ByteBuf的size
3.最后,调用 ChannelOutboundBuffer 的addMessage(msg, size, promise) 方法,所以,接下来,我们需要重点看一下这个方法干了什么事情
ChannelOutboundBuffer
public void addMessage(Object msg, int size, ChannelPromise promise) {
    // 创建一个待写出的消息节点
    Entry entry = Entry.newInstance(msg, size, total(msg), promise);
    if (tailEntry == null) {
        flushedEntry = null;
        tailEntry = entry;
    } else {
        Entry tail = tailEntry;
        tail.next = entry;
        tailEntry = entry;
    }
    if (unflushedEntry == null) {
        unflushedEntry = entry;
    }

    incrementPendingOutboundBytes(size, false);
}
想要理解上面这段代码,必须得掌握写缓存中的几个消息指针,如下图
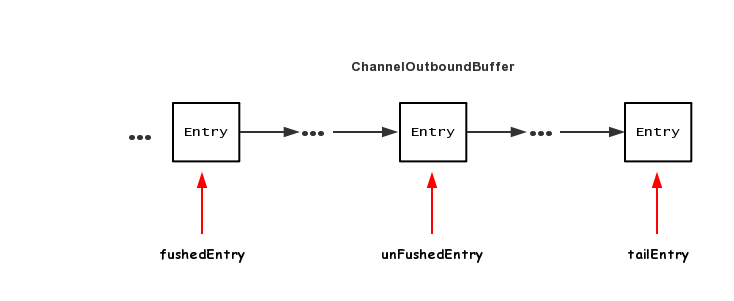
ChannelOutboundBuffer 里面的数据结构是一个单链表结构,每个节点是一个 Entry,Entry 里面包含了待写出ByteBuf 以及消息回调 promise,下面分别是三个指针的作用
1.flushedEntry 指针表示第一个被写到操作系统Socket缓冲区中的节点
2.unFlushedEntry 指针表示第一个未被写入到操作系统Socket缓冲区中的节点
3.tailEntry指针表示ChannelOutboundBuffer缓冲区的最后一个节点
初次调用 addMessage 之后,各个指针的情况为

fushedEntry指向空,unFushedEntry和 tailEntry 都指向新加入的节点
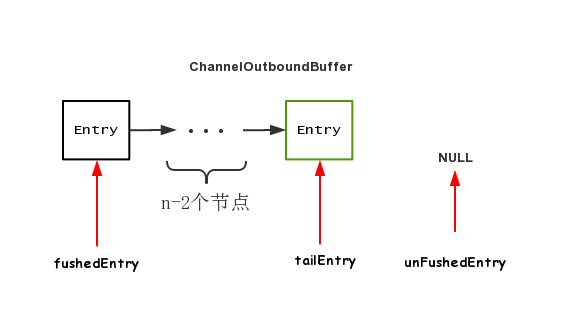
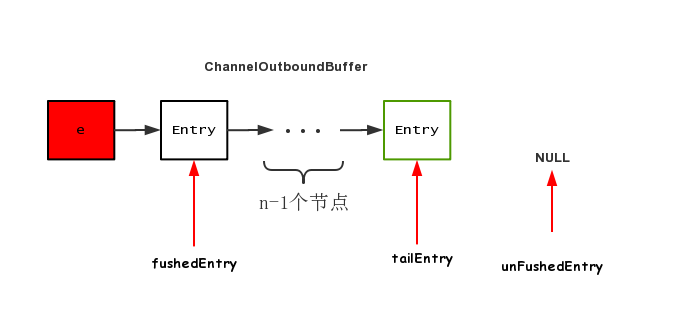
第二次调用 addMessage之后,各个指针的情况为

第n次调用 addMessage之后,各个指针的情况为

可以看到,调用n次addMessage,flushedEntry指针一直指向NULL,表示现在还未有节点需要写出到Socket缓冲区,而unFushedEntry之后有n个节点,表示当前还有n个节点尚未写出到Socket缓冲区中去
flush:刷新写队列
不管调用channel.flush(),还是ctx.flush(),最终都会落地到pipeline中的head节点
HeadContext
@Override
public void flush(ChannelHandlerContext ctx) throws Exception {
    unsafe.flush();
}
之后进入到AbstractUnsafe
AbstractUnsafe
public final void flush() {
   assertEventLoop();

   ChannelOutboundBuffer outboundBuffer = this.outboundBuffer;
   if (outboundBuffer == null) {
       return;
   }

   outboundBuffer.addFlush();
   flush0();
}
flush方法中,先调用 outboundBuffer.addFlush();
ChannelOutboundBuffer
public void addFlush() {
    Entry entry = unflushedEntry;
    if (entry != null) {
        if (flushedEntry == null) {
            flushedEntry = entry;
        }
        do {
            flushed ++;
            if (!entry.promise.setUncancellable()) {
                int pending = entry.cancel();
                decrementPendingOutboundBytes(pending, false, true);
            }
            entry = entry.next;
        } while (entry != null);
        unflushedEntry = null;
    }
}
可以结合前面的图来看,首先拿到 unflushedEntry 指针,然后将 flushedEntry 指向unflushedEntry所指向的节点,调用完毕之后,三个指针的情况如下所示
相当于所有的节点都即将开始推送出去
接下来,调用 flush0();
AbstractUnsafe
protected void flush0() {
    doWrite(outboundBuffer);
}
发现这里的核心代码就一个 doWrite,继续跟
AbstractNioByteChannel
protected void doWrite(ChannelOutboundBuffer in) throws Exception {
    int writeSpinCount = -1;

    boolean setOpWrite = false;
    for (;;) {
        // 拿到第一个需要flush的节点的数据
        Object msg = in.current();

        if (msg instanceof ByteBuf) {
            // 强转为ByteBuf,若发现没有数据可读,直接删除该节点
            ByteBuf buf = (ByteBuf) msg;

            boolean done = false;
            long flushedAmount = 0;
            // 拿到自旋锁迭代次数
            if (writeSpinCount == -1) {
                writeSpinCount = config().getWriteSpinCount();
            }
            // 自旋,将当前节点写出
            for (int i = writeSpinCount - 1; i >= 0; i --) {
                int localFlushedAmount = doWriteBytes(buf);
                if (localFlushedAmount == 0) {
                    setOpWrite = true;
                    break;
                }

                flushedAmount += localFlushedAmount;
                if (!buf.isReadable()) {
                    done = true;
                    break;
                }
            }

            in.progress(flushedAmount);

            // 写完之后,将当前节点删除
            if (done) {
                in.remove();
            } else {
                break;
            }
        }
    }
}
这里略微有点复杂,我们分析一下
1.第一步,调用current()先拿到第一个需要flush的节点的数据
ChannelOutBoundBuffer
public Object current() {
    Entry entry = flushedEntry;
    if (entry == null) {
        return null;
    }

    return entry.msg;
}
2.第二步,拿到自旋锁的迭代次数
if (writeSpinCount == -1) {
    writeSpinCount = config().getWriteSpinCount();
}
3.自旋的方式将ByteBuf写出到jdk nio的Channel
for (int i = writeSpinCount - 1; i >= 0; i --) {
    int localFlushedAmount = doWriteBytes(buf);
    if (localFlushedAmount == 0) {
        setOpWrite = true;
        break;
    }

    flushedAmount += localFlushedAmount;
    if (!buf.isReadable()) {
        done = true;
        break;
    }
}
doWriteBytes 方法跟进去
protected int doWriteBytes(ByteBuf buf) throws Exception {
    final int expectedWrittenBytes = buf.readableBytes();
    return buf.readBytes(javaChannel(), expectedWrittenBytes);
}
我们发现,出现了 javaChannel(),表明已经进入到了jdk nio Channel的领域,我们来看看 buf.readBytes(javaChannel(), expectedWrittenBytes);
public int readBytes(GatheringByteChannel out, int length) throws IOException {
    this.checkReadableBytes(length);
    int readBytes = this.getBytes(this.readerIndex, out, length);
    this.readerIndex += readBytes;
    return readBytes;
}
我们来看关键代码 this.getBytes(this.readerIndex, out, length)
private int getBytes(int index, GatheringByteChannel out, int length, boolean internal) throws IOException {
    this.checkIndex(index, length);
    if (length == 0) {
        return 0;
    } else {
        ByteBuffer tmpBuf;
        if (internal) {
            tmpBuf = this.internalNioBuffer();
        } else {
            tmpBuf = ((ByteBuffer)this.memory).duplicate();
        }

        index = this.idx(index);
        tmpBuf.clear().position(index).limit(index + length);
        //将tmpBuf中的数据写到out中
        return out.write(tmpBuf);
    }
}
我们来看看out.write(tmpBuf)
public int write(ByteBuffer src) throws IOException {
    ensureOpen();
    if (!writable)
        throw new NonWritableChannelException();
    synchronized (positionLock) {
        int n = 0;
        int ti = -1;
        try {
            begin();
            ti = threads.add();
            if (!isOpen())
                return 0;
            do {
                n = IOUtil.write(fd, src, -1, nd);
            } while ((n == IOStatus.INTERRUPTED) && isOpen());
            return IOStatus.normalize(n);
        } finally {
            threads.remove(ti);
            end(n > 0);
            assert IOStatus.check(n);
        }
    }
}
和read实现一样,SocketChannelImpl的write方法通过IOUtil的write实现:关键代码 n = IOUtil.write(fd, src, -1, nd);
static int write(FileDescriptor var0, ByteBuffer var1, long var2, NativeDispatcher var4) throws IOException {
    //如果是DirectBuffer,直接写,将堆外缓存中的数据拷贝到内核缓存中进行发送
    if (var1 instanceof DirectBuffer) {
        return writeFromNativeBuffer(var0, var1, var2, var4);
    } else {
        //非DirectBuffer
        //获取已经读取到的位置
        int var5 = var1.position();
        //获取可以读到的位置
        int var6 = var1.limit();

        assert var5 <= var6;
        //申请一个原buffer可读大小的DirectByteBuffer
        int var7 = var5 <= var6 ? var6 - var5 : 0;
        ByteBuffer var8 = Util.getTemporaryDirectBuffer(var7);

        int var10;
        try {

            var8.put(var1);
            var8.flip();
            var1.position(var5);
            //通过DirectBuffer写,将堆外缓存的数据拷贝到内核缓存中进行发送
            int var9 = writeFromNativeBuffer(var0, var8, var2, var4);
            if (var9 > 0) {
                var1.position(var5 + var9);
            }

            var10 = var9;
        } finally {
            //回收分配的DirectByteBuffer
            Util.offerFirstTemporaryDirectBuffer(var8);
        }

        return var10;
    }
}
代码逻辑我们就不再讲了,代码注释已经很清楚了,这里我们关注一点,我们可以看看我们前面的一个方法 filterOutboundMessage(),将待写入的对象过滤,把非ByteBuf对象和FileRegion过滤,把所有的非直接内存转换成直接内存DirectBuffer
说明到了这一步所有的 var1 意境是直接内存DirectBuffer,就不需要走到else,就不需要write两次了
4.删除该节点
节点的数据已经写入完毕,接下来就需要删除该节点
ChannelOutBoundBuffer
public boolean remove() {
    Entry e = flushedEntry;
    Object msg = e.msg;

    ChannelPromise promise = e.promise;
    int size = e.pendingSize;

    removeEntry(e);

    if (!e.cancelled) {
        ReferenceCountUtil.safeRelease(msg);
        safeSuccess(promise);
    }

    // recycle the entry
    e.recycle();

    return true;
}
首先拿到当前被flush掉的节点(flushedEntry所指),然后拿到该节点的回调对象 ChannelPromise, 调用 removeEntry()方法移除该节点
private void removeEntry(Entry e) {
    if (-- flushed == 0) {
        flushedEntry = null;
        if (e == tailEntry) {
            tailEntry = null;
            unflushedEntry = null;
        }
    } else {
        flushedEntry = e.next;
    }
}
这里的remove是逻辑移除,只是将flushedEntry指针移到下个节点,调用完毕之后,节点图示如下
writeAndFlush: 写队列并刷新
理解了write和flush这两个过程,writeAndFlush 也就不难了
public final ChannelFuture writeAndFlush(Object msg) {
    return tail.writeAndFlush(msg);
}

public ChannelFuture writeAndFlush(Object msg) {
    return writeAndFlush(msg, newPromise());
}

public ChannelFuture writeAndFlush(Object msg, ChannelPromise promise) {
    write(msg, true, promise);

    return promise;
}

private void write(Object msg, boolean flush, ChannelPromise promise) {
    AbstractChannelHandlerContext next = findContextOutbound();
    EventExecutor executor = next.executor();
    if (executor.inEventLoop()) {
        if (flush) {
            next.invokeWriteAndFlush(m, promise);
        } else {
            next.invokeWrite(m, promise);
        }
    }
}
可以看到,最终,通过一个boolean变量,表示是调用 invokeWriteAndFlush,还是 invokeWrite,invokeWrite便是我们上文中的write过程
private void invokeWriteAndFlush(Object msg, ChannelPromise promise) {
    invokeWrite0(msg, promise);
    invokeFlush0();
}
可以看到,最终调用的底层方法和单独调用 write 和 flush 是一样的
private void invokeWrite(Object msg, ChannelPromise promise) {
        invokeWrite0(msg, promise);
}

private void invokeFlush(Object msg, ChannelPromise promise) {
        invokeFlush0(msg, promise);
}
由此看来,invokeWriteAndFlush基本等价于write方法之后再来一次flush
总结
1.pipeline中的编码器原理是创建一个ByteBuf,将java对象转换为ByteBuf,然后再把ByteBuf继续向前传递
2.调用write方法并没有将数据写到Socket缓冲区中,而是写到了一个单向链表的数据结构中,flush才是真正的写出
3.writeAndFlush等价于先将数据写到netty的缓冲区,再将netty缓冲区中的数据写到Socket缓冲区中,写的过程与并发编程类似,用自旋锁保证写成功
4.netty中的缓冲区中的ByteBuf为DirectByteBuf