springboot开发打包时,一般会有多个环境,dev,qa,prod等,配置文件大多雷同,只是方便开发切换,但是生成部署时产生的war包就无需这么多重复配置了,这时这些dev,qa的配置就不应该打入war包,这时就得用到profile属性
1、pom文件中添加profile节点,并在build下的resources节点添加打包过滤的配置文件规则
    <profiles>
        <profile>
            <id>dev</id>
            <properties>
                <profileActive>dev</profileActive>
            </properties>
            <activation>
                <activeByDefault>true</activeByDefault>
            </activation>
        </profile>
        <profile>
            <id>local</id>
            <properties>
                <profileActive>local</profileActive>
            </properties>
        </profile>
        <profile>
            <id>qa</id>
            <properties>
                <profileActive>qa</profileActive>
            </properties>
        </profile>
        <profile>
            <id>sdrmyy</id>
            <properties>
                <profileActive>sdrmyy</profileActive>
            </properties>
        </profile>
        <profile>
            <id>show</id>
            <properties>
                <profileActive>show</profileActive>
            </properties>
        </profile>
    </profiles>

    <build>
        <plugins>
            <plugin>
                <groupId>org.springframework.boot</groupId>
                <artifactId>spring-boot-maven-plugin</artifactId>
            </plugin>
            <plugin>
                <groupId>org.apache.maven.plugins</groupId>
                <artifactId>maven-compiler-plugin</artifactId>
            </plugin>
            <!-- maven打包插件 end -->
            <plugin>
                <groupId>org.apache.maven.plugins</groupId>
                <artifactId>maven-war-plugin</artifactId>
                <configuration>
                    <warName>oip_hosp</warName>
                </configuration>
            </plugin>
        </plugins>
        <resources>
            <resource>
                <directory>src/main/webapp</directory>
            </resource>
            <resource>
                <directory>src/main/resources</directory>
                <includes>
                    <include>application-${profileActive}.yml</include>
                    <include>application.yml</include>
                    <include>**/*.xml</include>
                </includes>
                <filtering>true</filtering>
            </resource>
            <resource>
                <directory>src/main/java</directory>
                <includes>
                    <include>**/*.xml</include>
                </includes>
            </resource>
        </resources>
    </build>
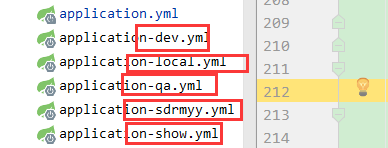
此节点需与配置文件后缀一一对应,如-dev
打包过滤配置文件规则也是用一个占位符进行占位,打包时也会通过maven传入参数进行替换
2、在主application.yml中配置一个动态属性进行占位,默认的分隔符是@属性名@,这个属性会通过maven打包时传入参数进行替换

3、maven打包时可以通过两种方式传入参数:
a)、通过 -D命令传入属性值profileActive,如:
clean install -Dmaven.test.skip=true -DprofileActive=dev
b)、通过-P命令指定profile环境,如:
clean package -P prod
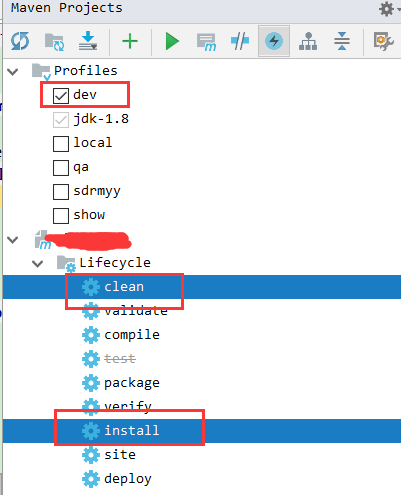
或者直接通过插件可视化操作:

如果是idea的话,直接在右侧maven工具栏中勾选更方便:
4、本机运行时,一般通过指定profile属性,如
