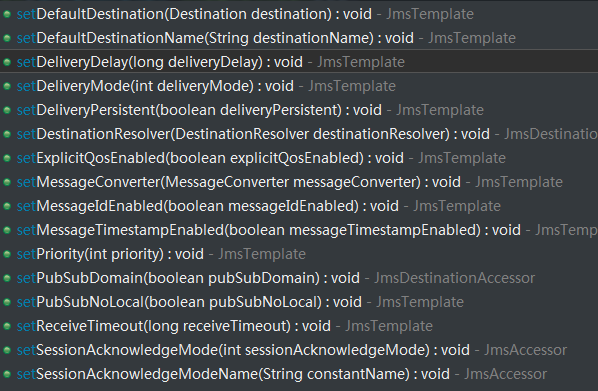
与jdbcTemplate相似的是,Spring也提供了JmsTemplate
生产者使用JmsTemplate生产消息,消费者实现一个监听器用于获取消息
项目用maven构建,jdk1.8,
文末提供免费源码下载
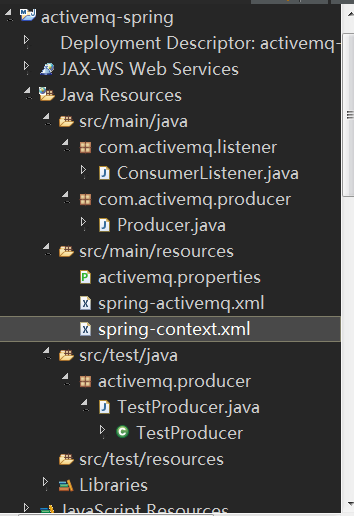
项目工程截图如下

activemq.properties 主要配置连接activemq相关连接参数
spring-activemq.xml 主要用于配置jmsTemplate
spring-context.xml 主要加载bean
我们重点关注spring-activemq.xml:
<?xml version="1.0" encoding="UTF-8"?>
<beans xmlns="http://www.springframework.org/schema/beans"
       xmlns:xsi="http://www.w3.org/2001/XMLSchema-instance"
       xsi:schemaLocation="http://www.springframework.org/schema/beans http://www.springframework.org/schema/beans/spring-beans.xsd">

       <!-- activeMQ工厂: ConnectionFactory -->
       <bean id="targetConnectionFactory" class="org.apache.activemq.ActiveMQConnectionFactory">
              <property name="brokerURL" value="${activemq.brokerURL}" />
<!--           <property name="userName" value="${activemq.userName}"></property>
              <property name="password" value="${activemq.password}"></property> -->
       </bean>

       <!--
           ActiveMQ为我们提供了一个PooledConnectionFactory,通过往里面注入一个ActiveMQConnectionFactory
           可以用来将Connection、Session和MessageProducer池化,这样可以大大的减少我们的资源消耗,要依赖于 activemq-pool包
        -->
       <bean id="pooledConnectionFactory" class="org.apache.activemq.pool.PooledConnectionFactory">
              <property name="connectionFactory" ref="targetConnectionFactory" />
              <property name="maxConnections" value="${activemq.pool.maxConnections}" />
       </bean>

       <!-- Spring用于管理真正的ConnectionFactory的ConnectionFactory -->
       <bean id="connectionFactory" class="org.springframework.jms.connection.SingleConnectionFactory">

              <property name="targetConnectionFactory" ref="pooledConnectionFactory" />
       </bean>

       <!--目的地-->
       <bean id="msgQueue" class="org.apache.activemq.command.ActiveMQQueue">
              <constructor-arg>
                     <value>${activemq.queueName}</value>
              </constructor-arg>
       </bean>

       <!-- Spring提供的JMS模板类,它可以进行消息发送、接收等 -->

       <bean id="jmsTemplate" class="org.springframework.jms.core.JmsTemplate">

              <property name="connectionFactory" ref="connectionFactory"/>
              <property name="pubSubDomain" value="false"></property> <!-- 设置p2p 还是主题订阅模式 默认是false 即p2p模式 -->
              <property name="defaultDestinationName" value="${activemq.queueName}"></property>
       </bean>

       <!-- 配置自定义监听:MessageListener -->
       <bean id="messageListener" class="com.activemq.listener.ConsumerListener"></bean>

       <!-- 将连接工厂、目标对象、自定义监听注入jms模板 -->
       <bean id="sessionAwareListenerContainer" class="org.springframework.jms.listener.DefaultMessageListenerContainer">
              <property name="connectionFactory" ref="connectionFactory" />
              <property name="destination" ref="msgQueue" />
              <property name="messageListener" ref="messageListener" />
       </bean>

</beans>
上面只是一些常见的配置 ,jmsTemplate还有很多配置

生产者代码
 @Service
public class Producer {
	@Autowired
	private JmsTemplate jmsTemplate;
	public void sendTextMessage(String text) {
		jmsTemplate.send(new MessageCreator() {
			@Override
			public Message createMessage(Session session) throws JMSException {
				Message mes =  session.createTextMessage(text);
				return mes;
			}
		});
	}
}
消费者代码(异步监听)
public class ConsumerListener implements SessionAwareMessageListener<Message>{
	@Override
	public void onMessage(Message message, Session session) throws JMSException {

		if(message instanceof TextMessage)
		{
			System.out.println("Text "+((TextMessage)message).getText());
		}

	}
}
测试代码
@RunWith(SpringJUnit4ClassRunner.class)
@ContextConfiguration(locations = { "classpath:spring-context.xml" })
public class TestProducer {
	@Autowired
	private Producer producer;

	@Test
	public void send() {
		producer.sendTextMessage("activemq-Spring!");

	}
}
@RunWith 指明采用SpringJunit4进行测试
@ContextConfiguration 配置Spring核心配置文件位置
结果如下 :

注意:消息中间件适用于生产者能力强 而消费者能力弱的场景,就是大量写的情况。
源码下载:http://pan.baidu.com/s/1dFpPHw1