springboot的pom.xml文件中有很多starter,只要引入starter就可以获取某个服务,现在试着直接写一个starter。并且总结一下步骤。
1、新建springboot工程spring-boot-starter-redis,引入jedis依赖
<dependency>
    <groupId>redis.clients</groupId>
    <artifactId>jedis</artifactId>
</dependency>
完整pom.xml如下:


<?xml version="1.0" encoding="UTF-8"?>

<project xmlns="http://maven.apache.org/POM/4.0.0"
    xmlns:xsi="http://www.w3.org/2001/XMLSchema-instance"
    xsi:schemaLocation="http://maven.apache.org/POM/4.0.0 http://maven.apache.org/xsd/maven-4.0.0.xsd">
    <modelVersion>4.0.0</modelVersion>

    <groupId>com.edu.spring</groupId>
    <artifactId>spring-boot-starter-redis</artifactId>
    <version>1.0.0</version>

    <name>spring-boot-starter-redis</name>
    <!-- FIXME change it to the project's website -->
    <url>http://www.example.com</url>
    <parent>
        <groupId>org.springframework.boot</groupId>
        <artifactId>spring-boot-starter-parent</artifactId>
        <version>2.0.4.RELEASE</version>
    </parent>
    <properties>
        <project.build.sourceEncoding>UTF-8</project.build.sourceEncoding>
        <maven.compiler.source>1.8</maven.compiler.source>
        <maven.compiler.target>1.8</maven.compiler.target>
    </properties>

    <dependencies>
        <dependency>
            <groupId>org.springframework.boot</groupId>
            <artifactId>spring-boot-starter</artifactId>
        </dependency>
        <dependency>
            <groupId>redis.clients</groupId>
            <artifactId>jedis</artifactId>
        </dependency>
    </dependencies>

</project>
2、RedisProperties.java,接收配置文件的属性
package com.edu.spring.boot.redis;

import org.springframework.boot.context.properties.ConfigurationProperties;

@ConfigurationProperties(prefix="redis")
public class RedisProperties {

    private String host;
    private Integer port;

    public String getHost() {
        return host;
    }
    public void setHost(String host) {
        this.host = host;
    }
    public Integer getPort() {
        return port;
    }
    public void setPort(Integer port) {
        this.port = port;
    }


}
3、RedisAutoConfiguration.java,装配redis的bean
package com.edu.spring.boot.redis;

import org.springframework.boot.autoconfigure.condition.ConditionalOnClass;
import org.springframework.boot.autoconfigure.condition.ConditionalOnMissingBean;
import org.springframework.boot.context.properties.EnableConfigurationProperties;
import org.springframework.context.annotation.Bean;
import org.springframework.context.annotation.Configuration;

import redis.clients.jedis.Jedis;

@Configuration
@ConditionalOnClass(Jedis.class)
@EnableConfigurationProperties(RedisProperties.class)
public class RedisAutoConfiguration {

    @Bean
    @ConditionalOnMissingBean
    public Jedis jedis(RedisProperties redisProperties) {
        return new Jedis(redisProperties.getHost(),redisProperties.getPort());
    }
}
说明:@ConditionalOnClass(Jedis.class):必须Jedis这个类存在
@ConditionalOnMissingBean:当容器中没有装配Jedis的bean时才会创建bean
@EnableConfigurationProperties(RedisProperties.class):自动装配一个RedisProperties类型的bean。
4、新建注解EnableRedis.java,导入自动配置类RedisAutoConfiguration.class,在后面的启动类中添加该注解
package com.edu.spring.boot.redis;

import java.lang.annotation.Documented;
import java.lang.annotation.ElementType;
import java.lang.annotation.Retention;
import java.lang.annotation.RetentionPolicy;
import java.lang.annotation.Target;

import org.springframework.context.annotation.Import;

@Target(ElementType.TYPE)
@Retention(RetentionPolicy.RUNTIME)
@Documented
@Import(RedisAutoConfiguration.class)
public @interface EnableRedis {

}
6、再建一个springboot工程,用来测试,引入上个工程的依赖。
<dependency>
  <groupId>com.edu.spring</groupId>
  <artifactId>spring-boot-starter-redis</artifactId>
  <version>1.0.0</version>
</dependency>
完整pom.xml如下:
<?xml version="1.0" encoding="UTF-8"?>

<project xmlns="http://maven.apache.org/POM/4.0.0"
    xmlns:xsi="http://www.w3.org/2001/XMLSchema-instance"
    xsi:schemaLocation="http://maven.apache.org/POM/4.0.0 http://maven.apache.org/xsd/maven-4.0.0.xsd">
    <modelVersion>4.0.0</modelVersion>

    <groupId>com.edu.spring</groupId>
    <artifactId>springboot_web</artifactId>
    <version>1.0.0</version>

    <name>springboot_web</name>
    <!-- FIXME change it to the project's website -->
    <url>http://www.example.com</url>
    <parent>
        <groupId>org.springframework.boot</groupId>
        <artifactId>spring-boot-starter-parent</artifactId>
        <version>2.0.4.RELEASE</version>
    </parent>
    <properties>
        <project.build.sourceEncoding>UTF-8</project.build.sourceEncoding>
        <maven.compiler.source>1.8</maven.compiler.source>
        <maven.compiler.target>1.8</maven.compiler.target>
    </properties>

    <dependencies>
        <dependency>
            <groupId>org.springframework.boot</groupId>
            <artifactId>spring-boot-starter</artifactId>
        </dependency>
        <dependency>
            <groupId>com.edu.spring</groupId>
            <artifactId>spring-boot-starter-redis</artifactId>
            <version>1.0.0</version>
        </dependency>
    </dependencies>

</project>
App.java,测试类,添加注解@EnableRedis
package com.edu.spring.springboot;

import org.springframework.boot.SpringApplication;
import org.springframework.boot.autoconfigure.SpringBootApplication;
import org.springframework.context.ConfigurableApplicationContext;

import com.edu.spring.boot.redis.EnableRedis;

import redis.clients.jedis.Jedis;

@SpringBootApplication
@EnableRedis
public class App
{
    public static void main(String[] args) {
        ConfigurableApplicationContext context=SpringApplication.run(App.class, args);
        Jedis jedis = context.getBean(Jedis.class);
        jedis.set("testKey","testValue");
        System.out.println(jedis.get("testKey"));
        context.close();
    }
}
application.properties,配置属性
redis.host=127.0.0.1
redis.port=6379
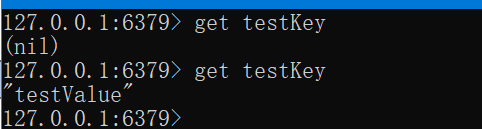
启动redis服务,测试结果如下:

注意:@ConfigurationProperties、@EnableConfigurationProperties、@Import注解的经典组合