作者:fredalxin
地址:https://fredal.xin/netty-process
本文基于版本 4.1.46,同时只描述类而不展示具体源码。
Netty 的整体流程
Netty 的整体流程相对来说还是比较复杂的,初学者往往会被绕晕。
所以这里总结了一下整体的流程,从而对 Netty 的整体服务流程有一个大致的了解。从功能上,流程可以分为服务启动、建立连接、读取数据、业务处理、发送数据、关闭连接以及关闭服务。
整体流程如下所示(图中没有包含关闭的部分):
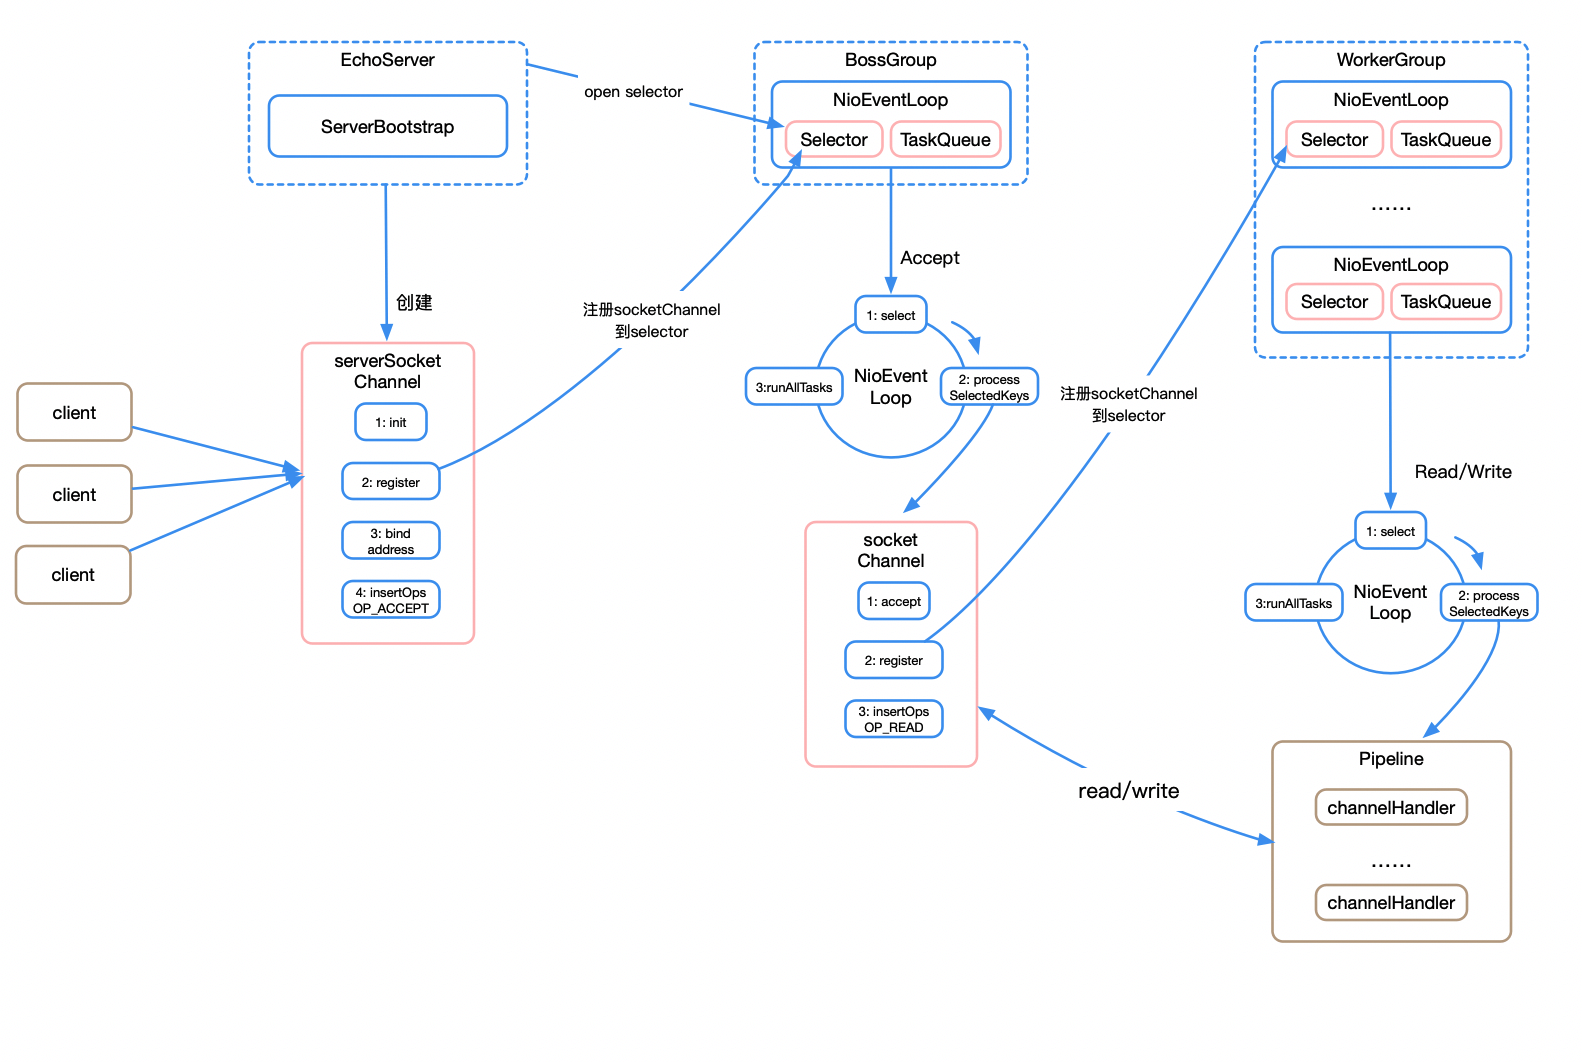
服务启动
服务启动时,我们以 example 代码中的 EchoServer 为例,启动的过程以及相应的源码类如下:
EchoServer#new NioEventLoopGroup(1)->NioEventLoop#provider.openSelector(): 创建 selectorEchoServer#b.bind(PORT).sync->AbstractBootStrap#doBind()->initAndRegister()-> channelFactory.newChannel() / init(channel): 创建 serverSocketChannel 以及初始化EchoServer#b.bind(PORT).sync->AbstractBootStrap#doBind()->initAndRegister()-> config().group().register(channel):从 boss group 中选择一个 NioEventLoop 开始注册 serverSocketChannelEchoServer#b.bind(PORT).sync->AbstractBootStrap#doBind()->initAndRegister()->config().group().register(channel)->AbstractChannel#register0(promise)->AbstractNioChannel#javaChannel().register(eventLoop().unwrappedSelector(), 0, this): 将 server socket channel 注册到选择的 NioEventLoop 的 selectorEchoServer#b.bind(PORT).sync()->AbstractBootStrap#doBind()->doBind0()->AbstractChannel#doBind(localAddress)->NioServerSocketChannel#javaChannel().bind(localAddress, config.getBacklog()): 绑定地址端口开始启动EchoServer#b.bind(PORT).sync()->AbstractBootStrap#doBind()->doBind0()->AbstractChannel#pipeline.fireChannelActive()->AbstractNioChannel#selectionKey.interestOps(interestOps|readInterestOp): 注册 OP_READ 事件
上述启动流程中,1、2、3 是由我们自己的线程执行的,即 mainThread,4、5、6 是由 Boss Thread 执行。相应时序图如下:

建立连接
服务启动后便是建立连接的过程了,相应过程及源码类如下:
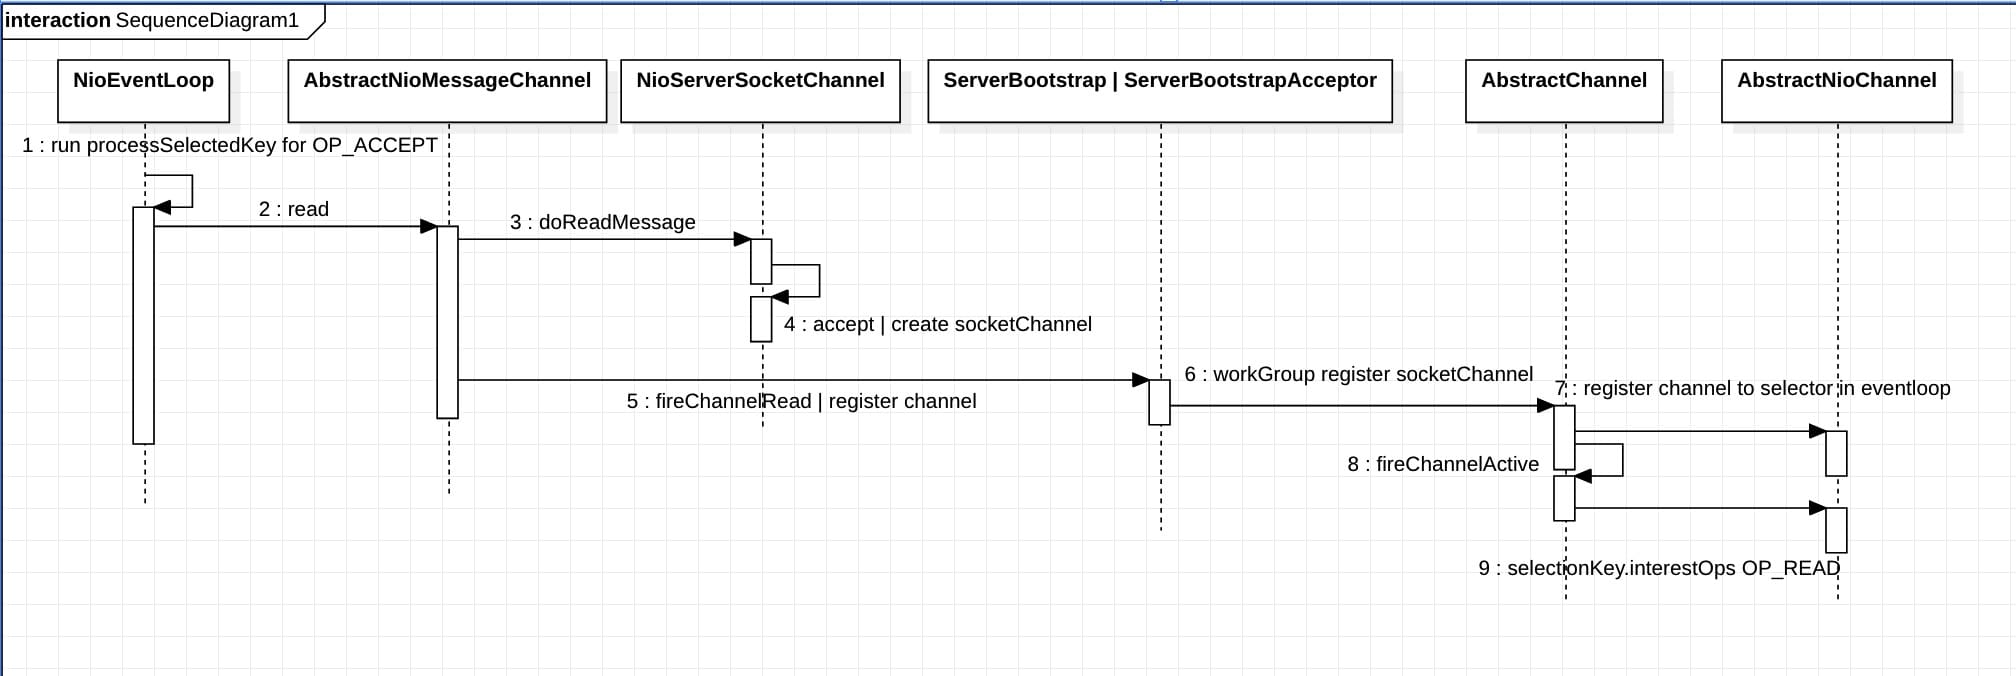
NioEventLoop#run()->processSelectedKey()NioEventLoop 中的 selector 轮询创建连接事件(OP_ACCEPT)NioEventLoop#run()->processSelectedKey()->AbstractNioMessageChannel#read->NioServerSocketChannel#doReadMessages()->SocketUtil#accept(serverSocketChannel)创建 socket channelNioEventLoop#run()->processSelectedKey()->AbstractNioMessageChannel#fireChannelRead->ServerBootstrap#ServerBootstrapAcceptor#channelRead-> childGroup.register(child)从worker group 中选择一个 NioEventLoop 开始注册 socket channelNioEventLoop#run()->processSelectedKey()->AbstractNioMessageChannel#fireChannelRead->ServerBootstrap#ServerBootstrapAcceptor#channelRead-> childGroup.register(child)->AbstractChannel#register0(promise)-> AbstractNioChannel#javaChannel().register(eventLoop().unwrappedSelector(), 0, this)将 socket channel 注册到选择的 NioEventLoop 的 selectorNioEventLoop#run()->processSelectedKey()->AbstractNioMessageChannel#fireChannelRead->ServerBootstrap#ServerBootstrapAcceptor#channelRead-> childGroup.register(child)->AbstractChannel#pipeline.fireChannelActive()-> AbstractNioChannel#selectionKey.interestOps(interestOps | readInterestOp)注册 OP_ACCEPT 事件
同样,上述流程中 1、2、3 的执行仍由 Boss Thread 执行,直到 4、5 由具体的 Work Thread 执行。
读写与业务处理
连接建立完毕后是具体的读写,以及业务处理逻辑。以 EchoServerHandler 为例,读取数据后会将数据传播出去供业务逻辑处理,此时的 EchoServerHandler 代表我们的业务逻辑,而它的实现也非常简单,就是直接将数据写回去。我们将这块看成一个整条,流程如下:
NioEventLoop#run()->processSelectedKey() NioEventLoop 中的 selector轮询创建读取事件(OP_READ)NioEventLoop#run()->processSelectedKey()->AbstractNioByteChannel#read()nioSocketChannel 开始读取数据NioEventLoop#run()->processSelectedKey()->AbstractNioByteChannel#read()->pipeline.fireChannelRead(byteBuf)把读取到的数据传播出去供业务处理AbstractNioByteChannel#pipeline.fireChannelRead->EchoServerHandler#channelRead在这个例子中即 EchoServerHandler 的执行EchoServerHandler#write->ChannelOutboundBuffer#addMessage调用 write 方法EchoServerHandler#flush->ChannelOutboundBuffer#addFlush调用 flush 准备数据EchoServerHandler#flush->NioSocketChannel#doWrite调用 flush 发送数据
在这个过程中读写数据都是由 Work Thread 执行的,但是业务处理可以由我们自定义的线程池来处理,并且一般我们也是这么做的,默认没有指定线程的情况下仍然由 Work Thread 代为处理。

关闭连接
服务处理完毕后,单个连接的关闭是什么样的呢?
NioEventLoop#run()->processSelectedKey()NioEventLoop 中的 selector 轮询创建读取事件(OP_READ),这里关闭连接仍然是读取事件NioEventLoop#run()->processSelectedKey()->AbstractNioByteChannel#read()->closeOnRead(pipeline)当字节<0 时开始执行关闭 nioSocketChannelNioEventLoop#run()->processSelectedKey()->AbstractNioByteChannel#read()->closeOnRead(pipeline)->AbstractChannel#close->AbstractNioChannel#doClose()关闭 socketChannelNioEventLoop#run()->processSelectedKey()->AbstractNioByteChannel#read()->closeOnRead(pipeline)->AbstractChannel#close->outboundBuffer.failFlushed/close清理消息:不接受新信息,fail 掉所有 queue 中消息NioEventLoop#run()->processSelectedKey()->AbstractNioByteChannel#read()->closeOnRead(pipeline)->AbstractChannel#close->fireChannelInactiveAndDeregister->AbstractNioChannel#doDeregister eventLoop().cancel(selectionKey())关闭多路复用器的 key
时序图如下:

关闭服务
最后是关闭整个 Netty 服务:
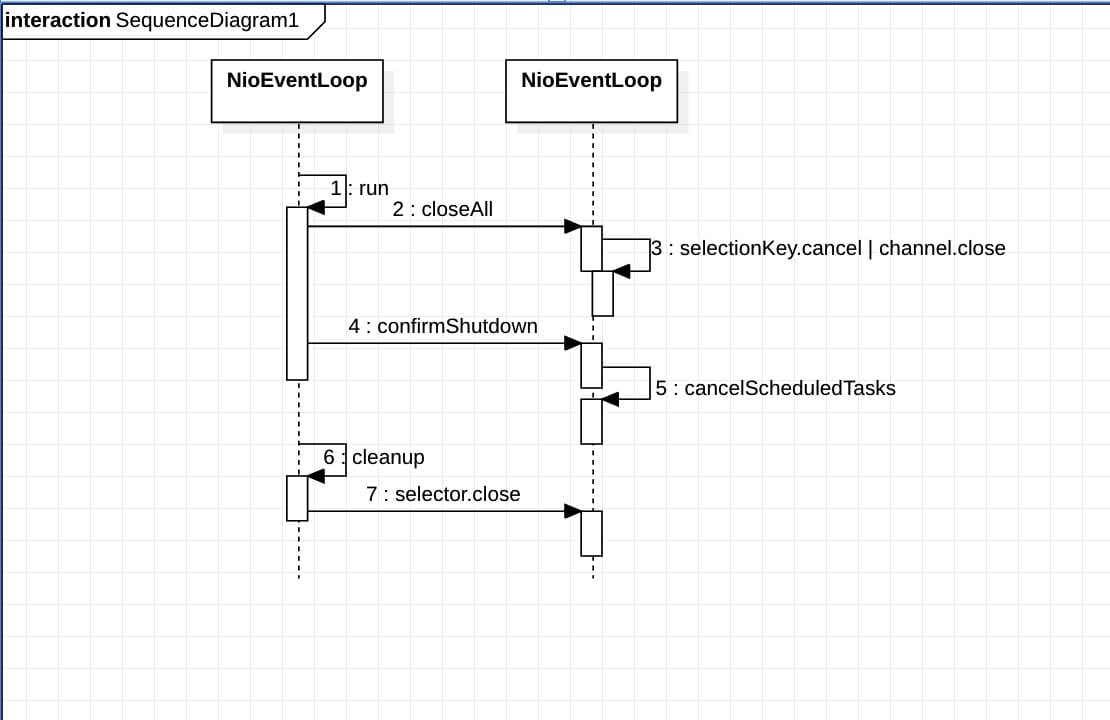
NioEventLoop#run->closeAll()->selectionKey.cancel/channel.close关闭 channel,取消 selectionKeyNioEventLoop#run->confirmShutdown->cancelScheduledTasks取消定时任务NioEventLoop#cleanup->selector.close()关闭 selector
时序图如下,为了好画将 NioEventLoop 拆成了 2 块:
至此,整个 Netty 的服务流程就结束了。
近期热文推荐:
1.600+ 道 Java面试题及答案整理(2021最新版)
2.终于靠开源项目弄到 IntelliJ IDEA 激活码了,真香!
3.阿里 Mock 工具正式开源,干掉市面上所有 Mock 工具!
4.Spring Cloud 2020.0.0 正式发布,全新颠覆性版本!
觉得不错,别忘了随手点赞+转发哦!