13.1、自定义结果集介绍
自定义结果集,可以给复杂的对象使用。也就是对象内又嵌套一个对象。或者一个集合。
在这种情况下。前面学过的知识点,已经无法直接获取出对象内对象的信息。
这个时候就需要使用resultMap自定义结果集来返回需要的数据。
13.2、创建一对一数据库表
## 一对一数据表
## 创建锁表
create table t_lock(
	`id` int primary key auto_increment,
	`name` varchar(50)
);

## 创建钥匙表
create table t_key(
	`id` int primary key auto_increment,
	`name` varchar(50),
	`lock_id` int ,
	foreign key(`lock_id`) references t_lock(`id`)
);

## 插入初始化数据
insert into t_lock(`name`) values('阿里巴巴');
insert into t_lock(`name`) values('华为');
insert into t_lock(`name`) values('联想');

insert into t_key(`name`,`lock_id`) values('马云',1);
insert into t_key(`name`,`lock_id`) values('任正非',2);
insert into t_key(`name`,`lock_id`) values('柳传志',3);
13.3、创建实体对象
钥匙对象
public class Key {
	private int id;
	private String name;
	private Lock lock;
锁对象
public class Lock {
	private int id;
private String name;
13.4、一对一的使用示例
13.4.1、创建 KeyMapper 接口
public interface KeyMapper {
	public Key queryKeyForSimple(int id);
}
13.4.2、级联属性的映射配置
<!--
	resultMap标签专门用来定义自定义的结果集数据。
		type属性设置返回的数据类型
		id属性定义一个唯一标识
 -->
<resultMap type="com.bean.Key" id="queryKeyForSimple_resultMap">
	<!-- id定义主键列 -->
	<id column="id" property="id"/>
	<!-- result 定义一个列和属性的映射 -->
	<result column="name" property="name"/>
	<!-- lock.id 和  lock.name 叫级联属性映射 -->
	<result column="lock_id" property="lock.id"/>
	<result column="lock_name" property="lock.name"/>
</resultMap>
<!--
	select 标签用于定义一个select语句
		id属性设置一个statement标识
		parameterType设置参数的类型
		resultMap 设置返回的结果类型
 -->
<select id="queryKeyForSimple" parameterType="int" resultMap="queryKeyForSimple_resultMap">
	select t_key.*,t_lock.name lock_name
		from
	t_key left join t_lock
		on
	t_key.lock_id = t_lock.id
		where
	t_key.id = #{id}
</select>
13.4.3、<association /> 嵌套结果集映射配置
<association /> 标签可以给返回结果中对象的属性是子对象的情况,进行映射。
比如:Key对象中有一个子对象Lock。就可以使用<association /> 来进行映射返回
<!--
	resultMap标签专门用来定义自定义的结果集数据。
		type属性设置返回的数据类型
		id属性定义一个唯一标识
 -->
<resultMap type="com.bean.Key" id="queryKeyForSimple_resultMap_association">
	<!-- id定义主键列 -->
	<id column="id" property="id"/>
	<!-- result 定义一个列和属性的映射 -->
	<result column="name" property="name"/>
	<!--
		association 标签可以给一个子对象定义列的映射。
			property 属性设置 子对象的属性名 lock
			javaType 属性设置子对象的全类名
	 -->
	<association property="lock" javaType="com.bean.Lock">
		<!-- id 属性定义主键 -->
		<id column="lock_id" property="id"/>
		<!-- result 标签定义列和对象属性的映射 -->
		<result column="lock_name" property="name"/>
	</association>
</resultMap>
13.4.4、KeyMapper的测试代码
@Test
public void testQueryKeyForSimple() {
	SqlSession session = sqlSessionFactory.openSession();
	try {
		KeyMapper keyMapper = session.getMapper( KeyMapper.class );
		System.out.println( keyMapper.queryKeyForSimple(1) );
	} finally {
		session.close();
	}
}
运行的结果:

13.4.5、 定义分步查询
添加一个 LockMapper 接口
public interface LockMapper {
	public Lock queryLockById(int lockId);
}
添加 LockMapper 接口对应的配置文件
<?xml version="1.0" encoding="UTF-8" ?>
<!DOCTYPE mapper
  PUBLIC "-//mybatis.org//DTD Mapper 3.0//EN"
  "http://mybatis.org/dtd/mybatis-3-mapper.dtd">
<mapper namespace="com.dao.LockMapper">
	<!-- 定义一个根据id查询锁的select -->
	<select id="queryLockById" parameterType="int" resultType="com.bean.Lock">
		select id , name from t_lock where id = #{value}
	</select>
</mapper>
在KeyMapper接口中,添加另一个方法分步查询:
public interface KeyMapper {
	public Key queryKeyForSimple(int id);
	public Key queryKeyByTwoStep(int id);
}
修改KeyMapper中的配置
<!-- 	resultMap 标签定义复杂对象的结果集数据  -->
<resultMap type="com.bean.Key" id="queryKeyByTwoStep_resultMap">
	<id column="id" property="id"/>
	<result column="name" property="name"/>
	<!--
		association标签定义一个子对象的集合集
			property 属性映射子对象的名称
			select 属性定义执行的查询语句
			也就是说。property指定的lock子对象,是通过执行。select标识的查询语句返回
			column 属性定义需要传递给select语句的参数
	 -->
	<association property="lock" select="com.dao.LockMapper.queryLockById" column="lock_id" />
</resultMap>
<!--
	定义分步查询的select
 -->
<select id="queryKeyByTwoStep" parameterType="int" resultMap="queryKeyByTwoStep_resultMap">
	select id,name,lock_id from t_key where id = #{value}
</select>
分步查询的测试代码:
@Test
public void testQueryKeyByTwoStep() {
	SqlSession session = sqlSessionFactory.openSession();
	try {
		KeyMapper keyMapper = session.getMapper( KeyMapper.class );
		System.out.println( keyMapper.queryKeyByTwoStep(1) );
	} finally {
		session.close();
	}
}
运行结果:

13.5、延迟加载
延迟加载在一定程序上可以减少很多没有必要的查询。给数据库服务器提升性能上的优化。
要启用延迟加载,需要在mybatis-config.xml配置文件中,添加如下两个全局的settings配置。
<!-- 打开延迟加载的开关 -->
<setting name="lazyLoadingEnabled" value="true" />
<!-- 将积极加载改为消极加载  按需加载 -->
<setting name="aggressiveLazyLoading" value="false"/>
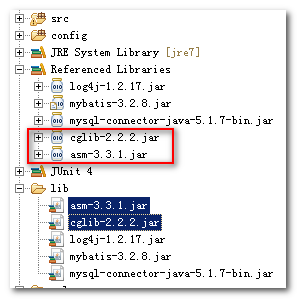
懒加载还需要同时引入两个jar包
修改mybatis-config.xml配置文件,添加全局的设置
<!-- 配置全局mybatis的配置 -->
<settings>
	<!-- 启用驼峰标识 -->
	<setting name="mapUnderscoreToCamelCase" value="true" />
	<!-- 打开延迟加载的开关 -->
	<setting name="lazyLoadingEnabled" value="true" />
	<!-- 将积极加载改为消息加载即按需加载 -->
	<setting name="aggressiveLazyLoading" value="false" />
</settings>
添加类库到工程项目中
13.6、多对一、一对多的使用示例
13.6.1、创建一对多数据库
## 一对多数据表
## 创建班级表
create table t_clazz(
	`id` int primary key auto_increment,
	`name` varchar(50)
);

## 插入班级信息
insert into t_clazz(`name`) values('javaEE20170228');
insert into t_clazz(`name`) values('javaEE20170325');
insert into t_clazz(`name`) values('javaEE20170420');
insert into t_clazz(`name`) values('javaEE20170515');

## 创建学生表
create table t_student(
	`id` int primary key auto_increment,
	`name` varchar(50),
	`clazz_id` int,
	foreign key(`clazz_id`) references t_clazz(`id`)
);

## 插入班级信息
insert into t_student(`name`,`clazz_id`) values('stu0228_1',1);
insert into t_student(`name`,`clazz_id`) values('stu0228_2',1);
insert into t_student(`name`,`clazz_id`) values('stu0228_3',1);
insert into t_student(`name`,`clazz_id`) values('stu0325_1',2);
insert into t_student(`name`,`clazz_id`) values('stu0325_2',2);
insert into t_student(`name`,`clazz_id`) values('stu0420_1',3);
13.6.2、<collection/> 一对多,立即加载关联查询
创建实体对象
班级对象
public class Clazz {
	private int id;
	private String name;
	private List<Student> stus;
学生对象
public class Student {
	private int id;
	private String name;
创建ClazzMapper接口类:
public interface ClazzMapper {
	public Clazz queryClazzByIdForSimple(int id);
}
编写ClazzMapper.xml配置文件
<mapper namespace="com.dao.ClazzMapper">
	<!--
		resultMap可以定义一个自定义的结果集返回
	 -->
	<resultMap type="com.bean.Clazz" id="queryClazzByIdForSimple_resultMap">
		<id column="id" property="id"/>
		<result column="name" property="name"/>
		<!--
			collection定义一个子集合对象返回
		 -->
		<collection property="stus" ofType="com.bean.Student">
			<id column="student_id" property="id"/>
			<result column="student_name" property="name"/>
		</collection>
	</resultMap>
	<!-- 定义一个立即加载的查询Clazz对象 -->
	<select id="queryClazzByIdForSimple" parameterType="int" resultMap="queryClazzByIdForSimple_resultMap">
		select t_clazz.* , t_student.id student_id,t_student.name student_name
		from
			t_clazz left join t_student
		on
			t_clazz.id = t_student.clazz_id
		where
			t_clazz.id = #{id}
	</select>
</mapper>
测试代码:
@Test
	public void testQueryClazzByIdForSimple() {
		SqlSession session = sqlSessionFactory.openSession();
		try {
			ClazzMapper clazzMapper = session.getMapper( ClazzMapper.class );
			System.out.println( clazzMapper.queryClazzByIdForSimple(1) );

		} finally {
			session.close();
		}
	}
运行效果:

13.6.3、一对多,赖加载
在ClazzMapper接口中添加一个分步查询延迟加载的方法
public interface ClazzMapper {
	public Clazz queryClazzByIdForSimple(int id);
	public Clazz queryClazzByIdForLazy(int id);
}
创建一个StudentMapper接口
public interface StudentMapper {
	public List<Student> queryStudentsByClazzId(int clazzId);
}
创建StudentMapper.xml配置文件
<!-- 根据班级id查询学生信息 -->
	<select id="queryStudentsByClazzId" parameterType="int" resultType="com.bean.Student">
		select id,name from t_student where clazz_id = #{value}
    </select>
修改ClazzMapper.xml配置文件内容:
<!-- 创建一个自定义集合集 -->
	<resultMap type="com.bean.Clazz" id="queryClazzByIdForLazy_resultMap">
		<id column="id" property="id"/>
		<result column="name" property="name"/>
		<collection property="stus" ofType="com.bean.Student"
			select="com.dao.StudentMapper.queryStudentsByClazzId" column="id" />
	</resultMap>

	<!-- 创建一个懒加载Clazz对象的查询 -->
	<select id="queryClazzByIdForLazy" parameterType="int" resultMap="queryClazzByIdForLazy_resultMap">
		select id,name from t_clazz where id = #{value}
	</select>
修改log4j日记配置文件如下:
# Global logging configuration
log4j.rootLogger=DEBUG, stdout
# MyBatis logging configuration...
#log4j.logger.org.mybatis.example.BlogMapper=TRACE
# Console output...
log4j.appender.stdout=org.apache.log4j.ConsoleAppender
log4j.appender.stdout.layout=org.apache.log4j.PatternLayout
log4j.appender.stdout.layout.ConversionPattern=%5p [%t %d{HH:mm:ss}] - %m%n
上面日记中标黄的部分,是给日记添加当前时间的输出
测试延迟加载的代码
@Test
public void testQueryClazzByIdForLazy() {
	SqlSession session = sqlSessionFactory.openSession();
	try {
		ClazzMapper clazzMapper = session.getMapper( ClazzMapper.class );
		Clazz clazz = clazzMapper.queryClazzByIdForLazy( 1 );
		System.out.println(clazz.getName());
		try {
			//暂停一会儿
			Thread.sleep(5000);
		} catch (Exception e) {
			e.printStackTrace();
		}
		System.out.println(clazz.getStus());
	} finally {
		session.close();
	}
}
运行效果:

13.6.4、双向关联
修改班级对象
public class Clazz {
	private int id;
	private String name;
	private List<Student> stus;
修改学生对象
public class Student {
	private int id;
	private String name;
	private Clazz clazz;
修改StudentMapper配置文件
<resultMap type="com.bean.Student" id="queryStudentsByClazzId_resultMap">
	<id column="id" property="id"/>
	<result column="name" property="name"/>
	<association property="clazz" javaType="com.atguigu.bean.Clazz"
		select="com.dao.ClazzMapper.queryClazzByIdForLazy"	column="clazz_id"></association>
</resultMap>

<!-- 根据班级id查询学生信息 -->
<select id="queryStudentsByClazzId" parameterType="int"
	resultMap="queryStudentsByClazzId_resultMap">
	select id,name,clazz_id from t_student where clazz_id = #{value}
</select>
注意:双向关联,要小心进入死循环,
1、防止死循环就是不要调用toString方法
2、最后一次查询返回resultType.
修改测试的代码如下:
@Test
public void testQueryClazzByIdForLazy() {
	SqlSession session = sqlSessionFactory.openSession();
	try {
		ClazzMapper clazzMapper = session.getMapper( ClazzMapper.class );
		Clazz clazz = clazzMapper.queryClazzByIdForLazy( 1 );
		System.out.println(clazz.getName());
		try {
			//暂停一会儿
			Thread.sleep(3000);
		} catch (Exception e) {
			e.printStackTrace();
		}
		System.out.println(clazz.getStus().get(0).getName());
		System.out.println(clazz.getStus().get(0).getClazz().getName());
	} finally {
		session.close();
	}
}