1. MVC使用
在研究源码之前,先来回顾以下springmvc 是如何配置的,这将能使我们更容易理解源码。
1.1 web.xml
 1 <servlet>
 2     <servlet-name>mvc-dispatcher</servlet-name>
 3     <servlet-class>org.springframework.web.servlet.DispatcherServlet</servlet-class>
 4     <!-- 配置springMVC需要加载的配置文件
 5         spring-dao.xml,spring-service.xml,spring-web.xml
 6         Mybatis - > spring -> springmvc
 7      -->
 8     <init-param>
 9         <param-name>contextConfigLocation</param-name>
10         <param-value>classpath:spring/spring-*.xml</param-value>
11     </init-param>
12 </servlet>
13 <servlet-mapping>
14     <servlet-name>mvc-dispatcher</servlet-name>
15     <!-- 默认匹配所有的请求 -->
16     <url-pattern>/</url-pattern>
17 </servlet-mapping>
值的注意的是contextConfigLocation和DispatcherServlet(用此类来拦截请求)的引用和配置。
1.2 spring-web.xml
 1 <!-- 配置SpringMVC -->
 2 <!-- 1.开启SpringMVC注解模式 -->
 3 <!-- 简化配置:
 4     (1)自动注册DefaultAnootationHandlerMapping,AnotationMethodHandlerAdapter
 5     (2)提供一些列:数据绑定,数字和日期的format @NumberFormat, @DateTimeFormat, xml,json默认读写支持
 6 -->
 7 <mvc:annotation-driven />
 8
 9 <!-- 2.静态资源默认servlet配置
10     (1)加入对静态资源的处理:js,gif,png
11     (2)允许使用"/"做整体映射
12  -->
13  <mvc:default-servlet-handler/>
14
15  <!-- 3.配置jsp 显示ViewResolver -->
16  <bean class="org.springframework.web.servlet.view.InternalResourceViewResolver">
17      <property name="viewClass" value="org.springframework.web.servlet.view.JstlView" />
18      <property name="prefix" value="/WEB-INF/jsp/" />
19      <property name="suffix" value=".jsp" />
20  </bean>
21
22  <!-- 4.扫描web相关的bean -->
23  <context:component-scan base-package="com.xxx.fantj.web" />
值的注意的是InternalResourceViewResolver,它会在ModelAndView返回的试图名前面加上prefix前缀,在后面加载suffix指定后缀。
SpringMvc主支源码分析
引用《Spring in Action》中的一张图来更好的了解执行过程:
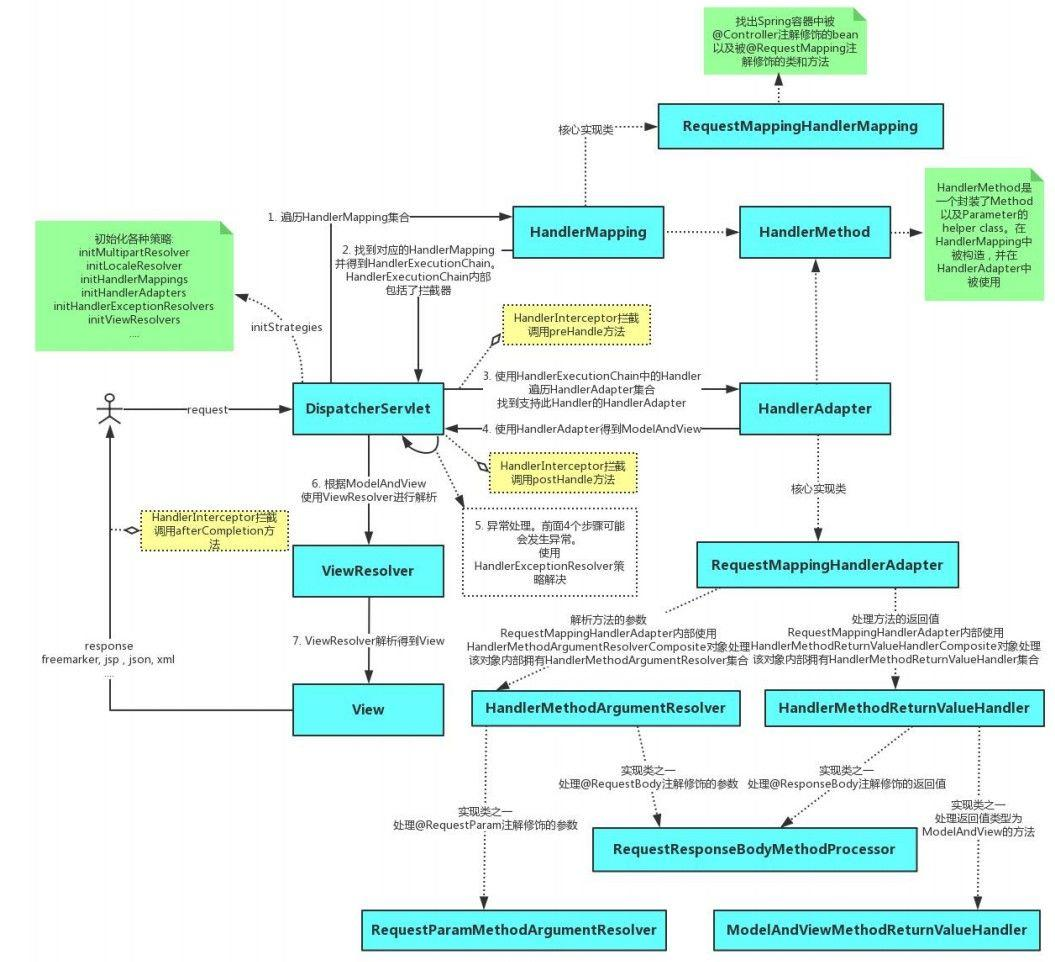
上图流程总体来说可分为三大块:
-
Map的建立(并放入WebApplicationContext) -
HttpRequest请求中Url的请求拦截处理(DispatchServlet处理) -
反射调用
Controller中对应的处理方法,并返回视图
本文将围绕这三块进行分析。
1. Map的建立
在容器初始化时会建立所有 url 和 Controller 的对应关系,保存到 Map<url,controller>中,那是如何保存的呢。
ApplicationObjectSupport #setApplicationContext方法
1 // 初始化ApplicationContext
2 @Override
3 public void initApplicationContext() throws ApplicationContextException {
4     super.initApplicationContext();
5     detectHandlers();
6 }
AbstractDetectingUrlHandlerMapping #detectHandlers()方法:
 1 /**
 2  * 建立当前ApplicationContext 中的 所有Controller 和url 的对应关系
 3  * Register all handlers found in the current ApplicationContext.
 4  * <p>The actual URL determination for a handler is up to the concrete
 5  * {@link #determineUrlsForHandler(String)} implementation. A bean for
 6  * which no such URLs could be determined is simply not considered a handler.
 7  * @throws org.springframework.beans.BeansException if the handler couldn't be registered
 8  * @see #determineUrlsForHandler(String)
 9  */
10 protected void detectHandlers() throws BeansException {
11     if (logger.isDebugEnabled()) {
12         logger.debug("Looking for URL mappings in application context: " + getApplicationContext());
13     }
14     // 获取容器中的beanNames
15     String[] beanNames = (this.detectHandlersInAncestorContexts ?
16             BeanFactoryUtils.beanNamesForTypeIncludingAncestors(getApplicationContext(), Object.class) :
17             getApplicationContext().getBeanNamesForType(Object.class));
18     // 遍历 beanNames 并找到对应的 url
19     // Take any bean name that we can determine URLs for.
20     for (String beanName : beanNames) {
21         // 获取bean上的url(class上的url + method 上的 url)
22         String[] urls = determineUrlsForHandler(beanName);
23         if (!ObjectUtils.isEmpty(urls)) {
24             // URL paths found: Let's consider it a handler.
25             // 保存url 和 beanName 的对应关系
26             registerHandler(urls, beanName);
27         }
28         else {
29             if (logger.isDebugEnabled()) {
30                 logger.debug("Rejected bean name '" + beanName + "': no URL paths identified");
31             }
32         }
33     }
34 }
determineUrlsForHandler()方法:
该方法在不同的子类有不同的实现,我这里分析的是
DefaultAnnotationHandlerMapping类的实现,该类主要负责处理@RequestMapping注解形式的声明。
 1 /**
 2  * 获取@RequestMaping注解中的url
 3  * Checks for presence of the {@link org.springframework.web.bind.annotation.RequestMapping}
 4  * annotation on the handler class and on any of its methods.
 5  */
 6 @Override
 7 protected String[] determineUrlsForHandler(String beanName) {
 8     ApplicationContext context = getApplicationContext();
 9     Class<?> handlerType = context.getType(beanName);
10     // 获取beanName 上的requestMapping
11     RequestMapping mapping = context.findAnnotationOnBean(beanName, RequestMapping.class);
12     if (mapping != null) {
13         // 类上面有@RequestMapping 注解
14         this.cachedMappings.put(handlerType, mapping);
15         Set<String> urls = new LinkedHashSet<String>();
16         // mapping.value()就是获取@RequestMapping注解的value值
17         String[] typeLevelPatterns = mapping.value();
18         if (typeLevelPatterns.length > 0) {
19             // 获取Controller 方法上的@RequestMapping
20             String[] methodLevelPatterns = determineUrlsForHandlerMethods(handlerType);
21             for (String typeLevelPattern : typeLevelPatterns) {
22                 if (!typeLevelPattern.startsWith("/")) {
23                     typeLevelPattern = "/" + typeLevelPattern;
24                 }
25                 for (String methodLevelPattern : methodLevelPatterns) {
26                     // controller的映射url+方法映射的url
27                     String combinedPattern = getPathMatcher().combine(typeLevelPattern, methodLevelPattern);
28                     // 保存到set集合中
29                     addUrlsForPath(urls, combinedPattern);
30                 }
31                 addUrlsForPath(urls, typeLevelPattern);
32             }
33             // 以数组形式返回controller上的所有url
34             return StringUtils.toStringArray(urls);
35         }
36         else {
37             // controller上的@RequestMapping映射url为空串,直接找方法的映射url
38             return determineUrlsForHandlerMethods(handlerType);
39         }
40     }
41     // controller上没@RequestMapping注解
42     else if (AnnotationUtils.findAnnotation(handlerType, Controller.class) != null) {
43         // 获取controller中方法上的映射url
44         return determineUrlsForHandlerMethods(handlerType);
45     }
46     else {
47         return null;
48     }
49 }
更深的细节代码就比较简单了,有兴趣的可以继续深入。
到这里,Controller和Url的映射就装配完成,下来就分析请求的处理过程。
2. url的请求处理
我们在xml中配置了
DispatcherServlet为调度器,所以我们就来看它的代码,可以
从名字上看出它是个Servlet,那么它的核心方法就是doService()
DispatcherServlet #doService():
 1 /**
 2  * 将DispatcherServlet特定的请求属性和委托 公开给{@link #doDispatch}以进行实际调度。
 3  * Exposes the DispatcherServlet-specific request attributes and delegates to {@link #doDispatch}
 4  * for the actual dispatching.
 5  */
 6 @Override
 7 protected void doService(HttpServletRequest request, HttpServletResponse response) throws Exception {
 8     if (logger.isDebugEnabled()) {
 9         String requestUri = new UrlPathHelper().getRequestUri(request);
10         logger.debug("DispatcherServlet with name '" + getServletName() + "' processing " + request.getMethod() +
11                 " request for [" + requestUri + "]");
12     }
13
14     //在包含request的情况下保留请求属性的快照,
15     //能够在include之后恢复原始属性。
16     Map<String, Object> attributesSnapshot = null;
17     if (WebUtils.isIncludeRequest(request)) {
18         logger.debug("Taking snapshot of request attributes before include");
19         attributesSnapshot = new HashMap<String, Object>();
20         Enumeration attrNames = request.getAttributeNames();
21         while (attrNames.hasMoreElements()) {
22             String attrName = (String) attrNames.nextElement();
23             if (this.cleanupAfterInclude || attrName.startsWith("org.springframework.web.servlet")) {
24                 attributesSnapshot.put(attrName, request.getAttribute(attrName));
25             }
26         }
27     }
28
29     // 使得request对象能供 handler处理和view处理 使用
30     request.setAttribute(WEB_APPLICATION_CONTEXT_ATTRIBUTE, getWebApplicationContext());
31     request.setAttribute(LOCALE_RESOLVER_ATTRIBUTE, this.localeResolver);
32     request.setAttribute(THEME_RESOLVER_ATTRIBUTE, this.themeResolver);
33     request.setAttribute(THEME_SOURCE_ATTRIBUTE, getThemeSource());
34
35     try {
36         doDispatch(request, response);
37     }
38     finally {
39         // 如果不为空,则还原原始属性快照。
40         if (attributesSnapshot != null) {
41             restoreAttributesAfterInclude(request, attributesSnapshot);
42         }
43     }
44 }
可以看到,它将请求拿到后,主要是给request设置了一些对象,以便于后续工作的处理(Handler处理和view处理)。比如WebApplicationContext,它里面就包含了我们在第一步完成的controller与url映射的信息。
DispatchServlet # doDispatch()
  1 /**
  2  * 控制请求转发
  3  * Process the actual dispatching to the handler.
  4  * <p>The handler will be obtained by applying the servlet's HandlerMappings in order.
  5  * The HandlerAdapter will be obtained by querying the servlet's installed HandlerAdapters
  6  * to find the first that supports the handler class.
  7  * <p>All HTTP methods are handled by this method. It's up to HandlerAdapters or handlers
  8  * themselves to decide which methods are acceptable.
  9  * @param request current HTTP request
 10  * @param response current HTTP response
 11  * @throws Exception in case of any kind of processing failure
 12  */
 13 protected void doDispatch(HttpServletRequest request, HttpServletResponse response) throws Exception {
 14     HttpServletRequest processedRequest = request;
 15     HandlerExecutionChain mappedHandler = null;
 16     int interceptorIndex = -1;
 17
 18     try {
 19
 20         ModelAndView mv;
 21         boolean errorView = false;
 22
 23         try {
 24             // 1. 检查是否是上传文件
 25             processedRequest = checkMultipart(request);
 26
 27             // Determine handler for the current request.
 28             // 2. 获取handler处理器,返回的mappedHandler封装了handlers和interceptors
 29             mappedHandler = getHandler(processedRequest, false);
 30             if (mappedHandler == null || mappedHandler.getHandler() == null) {
 31                 // 返回404
 32                 noHandlerFound(processedRequest, response);
 33                 return;
 34             }
 35
 36             // Apply preHandle methods of registered interceptors.
 37             // 获取HandlerInterceptor的预处理方法
 38             HandlerInterceptor[] interceptors = mappedHandler.getInterceptors();
 39             if (interceptors != null) {
 40                 for (int i = 0; i < interceptors.length; i++) {
 41                     HandlerInterceptor interceptor = interceptors[i];
 42                     if (!interceptor.preHandle(processedRequest, response, mappedHandler.getHandler())) {
 43                         triggerAfterCompletion(mappedHandler, interceptorIndex, processedRequest, response, null);
 44                         return;
 45                     }
 46                     interceptorIndex = i;
 47                 }
 48             }
 49
 50             // Actually invoke the handler.
 51             // 3. 获取handler适配器 Adapter
 52             HandlerAdapter ha = getHandlerAdapter(mappedHandler.getHandler());
 53             // 4. 实际的处理器处理并返回 ModelAndView 对象
 54             mv = ha.handle(processedRequest, response, mappedHandler.getHandler());
 55
 56             // Do we need view name translation?
 57             if (mv != null && !mv.hasView()) {
 58                 mv.setViewName(getDefaultViewName(request));
 59             }
 60
 61             // HandlerInterceptor 后处理
 62             if (interceptors != null) {
 63                 for (int i = interceptors.length - 1; i >= 0; i--) {
 64                     HandlerInterceptor interceptor = interceptors[i];
 65                     // 结束视图对象处理
 66                     interceptor.postHandle(processedRequest, response, mappedHandler.getHandler(), mv);
 67                 }
 68             }
 69         }
 70         catch (ModelAndViewDefiningException ex) {
 71             logger.debug("ModelAndViewDefiningException encountered", ex);
 72             mv = ex.getModelAndView();
 73         }
 74         catch (Exception ex) {
 75             Object handler = (mappedHandler != null ? mappedHandler.getHandler() : null);
 76             mv = processHandlerException(processedRequest, response, handler, ex);
 77             errorView = (mv != null);
 78         }
 79
 80         // Did the handler return a view to render?
 81         if (mv != null && !mv.wasCleared()) {
 82             render(mv, processedRequest, response);
 83             if (errorView) {
 84                 WebUtils.clearErrorRequestAttributes(request);
 85             }
 86         }
 87         else {
 88             if (logger.isDebugEnabled()) {
 89                 logger.debug("Null ModelAndView returned to DispatcherServlet with name '" + getServletName() +
 90                         "': assuming HandlerAdapter completed request handling");
 91             }
 92         }
 93
 94         // Trigger after-completion for successful outcome.
 95         // 请求成功响应之后的方法
 96         triggerAfterCompletion(mappedHandler, interceptorIndex, processedRequest, response, null);
 97     }
 98
 99     catch (Exception ex) {
100         // Trigger after-completion for thrown exception.
101         triggerAfterCompletion(mappedHandler, interceptorIndex, processedRequest, response, ex);
102         throw ex;
103     }
104     catch (Error err) {
105         ServletException ex = new NestedServletException("Handler processing failed", err);
106         // Trigger after-completion for thrown exception.
107         triggerAfterCompletion(mappedHandler, interceptorIndex, processedRequest, response, ex);
108         throw ex;
109     }
110
111     finally {
112         // Clean up any resources used by a multipart request.
113         if (processedRequest != request) {
114             cleanupMultipart(processedRequest);
115         }
116     }
117 }
该方法主要是
-
通过request对象获取到
HandlerExecutionChain,HandlerExecutionChain对象里面包含了拦截器interceptor和处理器handler。如果获取到的对象是空,则交给noHandlerFound返回404页面。 -
拦截器预处理,如果执行成功则进行3
-
获取handler适配器 Adapter
-
实际的处理器处理并返回 ModelAndView 对象
下面是该方法中的一些核心细节:
DispatchServlet #doDispatch # noHandlerFound核心源码:
response.sendError(HttpServletResponse.SC_NOT_FOUND);
DispatchServlet #doDispatch #getHandler方法事实上调用的是AbstractHandlerMapping #getHandler方法,我贴出一个核心的代码:
1 // 拿到处理对象
2 Object handler = getHandlerInternal(request);
3 ...
4 String handlerName = (String) handler;
5 handler = getApplicationContext().getBean(handlerName);
6 ...
7 // 返回HandlerExecutionChain对象
8 return getHandlerExecutionChain(handler, request);
可以看到,它先从request里获取handler对象,这就证明了之前DispatchServlet #doService为什么要吧WebApplicationContext放入request请求对象中。
最终返回一个HandlerExecutionChain对象.
3. 反射调用处理请求的方法,返回结果视图
在上面的源码中,实际的处理器处理并返回 ModelAndView 对象调用的是
mv = ha.handle(processedRequest, response, mappedHandler.getHandler());这个方法。该方法由AnnotationMethodHandlerAdapter #handle() #invokeHandlerMethod()方法实现.
`AnnotationMethodHandlerAdapter #handle() #invokeHandlerMethod()`
 1 /**
 2  * 获取处理请求的方法,执行并返回结果视图
 3  */
 4 protected ModelAndView invokeHandlerMethod(HttpServletRequest request, HttpServletResponse response, Object handler)
 5         throws Exception {
 6
 7     // 1.获取方法解析器
 8     ServletHandlerMethodResolver methodResolver = getMethodResolver(handler);
 9     // 2.解析request中的url,获取处理request的方法
10     Method handlerMethod = methodResolver.resolveHandlerMethod(request);
11     // 3. 方法调用器
12     ServletHandlerMethodInvoker methodInvoker = new ServletHandlerMethodInvoker(methodResolver);
13     ServletWebRequest webRequest = new ServletWebRequest(request, response);
14     ExtendedModelMap implicitModel = new BindingAwareModelMap();
15     // 4.执行方法(获取方法的参数)
16     Object result = methodInvoker.invokeHandlerMethod(handlerMethod, handler, webRequest, implicitModel);
17     // 5. 封装成mv视图
18     ModelAndView mav =
19             methodInvoker.getModelAndView(handlerMethod, handler.getClass(), result, implicitModel, webRequest);
20     methodInvoker.updateModelAttributes(handler, (mav != null ? mav.getModel() : null), implicitModel, webRequest);
21     return mav;
22 }
这个方法有两个重要的地方,分别是resolveHandlerMethod和invokeHandlerMethod。
resolveHandlerMethod 方法
methodResolver.resolveHandlerMethod(request):获取controller类和方法上的@requestMapping value,与request的url进行匹配,找到处理request的controller中的方法.最终拼接的具体实现是org.springframework.util.AntPathMatcher#combine方法。
invokeHandlerMethod方法
从名字就能看出来它是基于反射,那它做了什么呢。
解析该方法上的参数,并调用该方法。
1 //上面全都是为解析方法上的参数做准备
2 ...
3 // 解析该方法上的参数
4 Object[] args = resolveHandlerArguments(handlerMethodToInvoke, handler, webRequest, implicitModel);
5 // 真正执行解析调用的方法
6 return doInvokeMethod(handlerMethodToInvoke, handler, args);
invokeHandlerMethod方法#resolveHandlerArguments方法
代码有点长,我就简介下它做了什么事情吧。
-
如果这个方法的参数用的是注解,则解析注解拿到参数名,然后拿到request中的参数名,两者一致则进行赋值(详细代码在
HandlerMethodInvoker#resolveRequestParam),然后将封装好的对象放到args[]的数组中并返回。 -
如果这个方法的参数用的不是注解,则需要asm框架(底层是读取字节码)来帮助获取到参数名,然后拿到request中的参数名,两者一致则进行赋值,然后将封装好的对象放到args[]的数组中并返回。
invokeHandlerMethod方法#doInvokeMethod方法
 1 private Object doInvokeMethod(Method method, Object target, Object[] args) throws Exception {
 2     // 将一个方法设置为可调用,主要针对private方法
 3     ReflectionUtils.makeAccessible(method);
 4     try {
 5         // 反射调用
 6         return method.invoke(target, args);
 7     }
 8     catch (InvocationTargetException ex) {
 9         ReflectionUtils.rethrowException(ex.getTargetException());
10     }
11     throw new IllegalStateException("Should never get here");
12 }
到这里,就可以对request请求中url对应的controller的某个对应方法进行调用了。
总结:
看完后脑子一定很乱,有时间的话还是需要自己动手调试一下。本文只是串一下整体思路,所以功能性的源码没有全部分析。
其实理解这些才是最重要的。
-
用户发送请求至前端控制器DispatcherServlet
-
DispatcherServlet收到请求调用HandlerMapping处理器映射器。
-
处理器映射器根据请求url找到具体的处理器,生成处理器对象及处理器拦截器(如果有则生成)一并返回给DispatcherServlet。
-
DispatcherServlet通过HandlerAdapter处理器适配器调用处理器
-
HandlerAdapter执行处理器(handler,也叫后端控制器)。
-
Controller执行完成返回ModelAndView
-
HandlerAdapter将handler执行结果ModelAndView返回给DispatcherServlet
-
DispatcherServlet将ModelAndView传给ViewReslover视图解析器
-
ViewReslover解析后返回具体View对象
-
DispatcherServlet对View进行渲染视图(即将模型数据填充至视图中)。
-
DispatcherServlet响应用户
参考文献:
-
https://github.com/fangjian0423/springmvc-source-minibook
-
https://docs.spring.io/spring/docs/4.0.2.RELEASE/spring-framework-reference/htmlsingle/#mvc-ann-requestmapping
-
https://translate.google.cn/