Guava地址:https://github.com/google/guava
第一次接触我是在16年春github上,当时在找单机查缓存方法,google guava当初取名是因为JAVA的类库不好用,所以谷歌工程师自己开发一套,想着google出品必属精品理念,我们一起来了解一下。
guava在还没做分布式处理上,单机单整合上大行其道。所以guava在程序性能优化上下了不少的工夫,我们称其为单块架构的利器
我认为强大的有几点:1.集合处理 2.EventBus消息总线处理 3.guava cache 单机缓存处理 4.并发listenableFutrue回调处理,以下是所有的功能:
1. 基本工具 [Basic utilities]
让使用Java语言变得更舒适
1.1 使用和避免null:null是模棱两可的,会引起令人困惑的错误,有些时候它让人很不舒服。很多Guava工具类用快速失败拒绝null值,而不是盲目地接受
1.2 前置条件: 让方法中的条件检查更简单
1.3 常见Object方法: 简化Object方法实现,如hashCode()和toString()
1.5 Throwables:简化了异常和错误的传播与检查
2. 集合[Collections]
Guava对JDK集合的扩展,这是Guava最成熟和为人所知的部分
2.1 不可变集合: 用不变的集合进行防御性编程和性能提升。
2.2 新集合类型: multisets, multimaps, tables, bidirectional maps等
2.3 强大的集合工具类: 提供java.util.Collections中没有的集合工具
2.4 扩展工具类:让实现和扩展集合类变得更容易,比如创建Collection的装饰器,或实现迭代器
3. 缓存[Caches]
Guava Cache:本地缓存实现,支持多种缓存过期策略
4. 函数式风格[Functional idioms]
Guava的函数式支持可以显著简化代码,但请谨慎使用它
5. 并发[Concurrency]
强大而简单的抽象,让编写正确的并发代码更简单
5.1 ListenableFuture:完成后触发回调的Future
5.2 Service框架:抽象可开启和关闭的服务,帮助你维护服务的状态逻辑
6. 字符串处理[Strings]
非常有用的字符串工具,包括分割、连接、填充等操作
7. 原生类型[Primitives]
扩展 JDK 未提供的原生类型(如int、char)操作, 包括某些类型的无符号形式
8. 区间[Ranges]
可比较类型的区间API,包括连续和离散类型
9. I/O
简化I/O尤其是I/O流和文件的操作,针对Java5和6版本
10. 散列[Hash]
提供比Object.hashCode()更复杂的散列实现,并提供布鲁姆过滤器的实现
11. 事件总线[EventBus]
发布-订阅模式的组件通信,但组件不需要显式地注册到其他组件中
12. 数学运算[Math]
优化的、充分测试的数学工具类
13. 反射[Reflection]
Guava 的 Java 反射机制工具类
1.Guava EventBus探讨
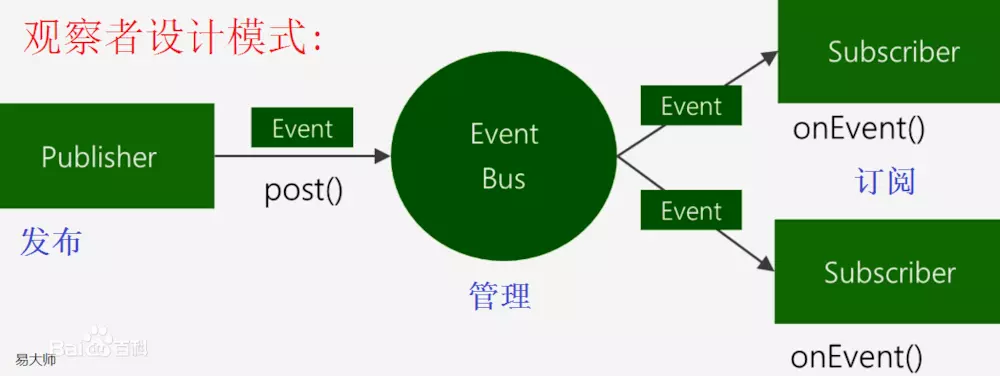
在设计模式中, 有一种叫做发布/订阅模式, 即某事件被发布, 订阅该事件的角色将自动更新。
那么订阅者和发布者直接耦合, 也就是说在发布者内要通知订阅者说我这边有东西发布了, 你收一下。
Observable.just(1).subscribe(new Subsriber(){

    @Override
    public void onCompleted() {
    System.out.println("onCompleted ");
    }

    @Override
    public void onError(Throwable arg0) {
    }

    @Override
    public void onNext(Long arg0) {
        System.out.println("onNext " + arg0);
    }
})

我们可以看到, 发布者发布一个数字1, 订阅者订阅了这个
而加入eventBus, 发布者与生产者之间的耦合性就降低了。因为这时候我们去管理eventbus就可以, 发布者只要向eventbus发送信息就可以, 而不需要关心有多少订阅者订阅了此消息。模型如下
为什么说eventBus 是单块架构的利器呢?
首先单块架构就是在一个进程内, 在一个进程内, 我们还是希望模块与模块之间(功能与功能之间)是松耦合的,而在一个模块中是高度内聚的, 如何降低一定的耦合, 使得代码更加有结构, guava eventbus就是支持进程内通讯的桥梁。
想象一下以下业务
我们希望在数据到来之后, 进行入库, 同时能够对数据进行报警预测, 当发生报警了, 能够有以下几个动作, 向手机端发送推送, 向web端发送推送, 向手机端发送短信。
在一般情况下我们可以这样实现: (伪代码如下)
processData(data){
    insertintoDB(data); //执行入库操作
    predictWarning(data);   // 执行报警预测
}
在predictWarning(data)中{
    if(data reaches warning line){
        sendNotification2App(data); //向手机端发送推送
        sendNotification2Web(data); // 向web端发送推送
        sendSMS2APP(data);      //手机端发送短信
    }
}
在这里我不去讲具体是如何向web端发送推送, 如何发送短信。主要用到第三方平台
分析
入库和报警预测是没有直接联系,或者是不分先后顺序的, 同样在报警模块中, 向3个客户端发送信息也应该是没有联系的, 所以以上虽然可以实现功能, 但不符合代码的合理性。
应该是怎么样的逻辑呢? 如下图
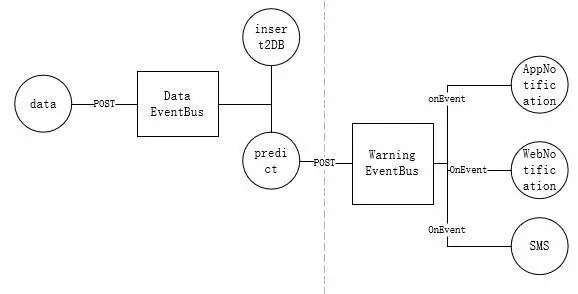
当数据事件触发, 发布到data EventBus 上, 入库和预警分别订阅这个eventBus, 就会触发这两个事件, 而在预警事件中, 将事件发送到warning EventBus 中, 由下列3个订阅的客户端进行发送消息。
如何实现
先来讲同步, 即订阅者收到事件后依次执行, 下面都是伪代码, 具体的入库细节等我在这里不提供。
@Component
public class DataHandler{

    @Subscribe
    public void handleDataPersisist(Data data){
        daoImpl.insertData2Mysql(data);
    }

    @Subscribe
    public void predictWarning(Data data){
        if(data is warning){ // pseudo code  如果预警
            Warning warning = createWarningEvent(data);  // 根据data创建一个Warning事件
            postWarningEvent(warning)
        }
    }

    protected postWarningEvent(Warning warning){
        EventBusManager.warningEventBus.post(warning);// 发布到warning event 上
    }

    @PostConstruct   // 由spring 在初始化bean后执行
    public void init(){
        register2DataEventBus();
    }

    // 将自己注册到eventBus中
    protected void register2DataEventBus(){
        EventBusManager.dataEventBus.register(this);
    }

}

@Component
public class WarningHandler{
    @Subscribe
    public void sendNotification2AppClient(Warning warning){
        JpushUtils.sendNotification(warning);
    }
    @Subscribe
    public void sendSMS(Warning warning){
        SMSUtils.sendSMS(warning);
    }
    @Subscribe
    public void send2WebUsingWebSocket(Warning warning){
        WebsocketUtils.sendWarning(warning);
    }

    @PostConstruct   // 由spring 在初始化bean后执行
    public void init(){
        register2WarningEventBus();
    }

    // 将自己注册到eventBus中
    protected void register2DataEventBus(){
        EventBusManager.warningEventBus.register(this);
    }
}


/**
 * 管理所有的eventBus
 **/
public class EventBusManager{
    public final static EventBus dataEventBus = new EventBus();
    public final static EventBus warningEventBus = new EventBus();

}


简化
// 我们发现每一个Handler都要进行注册,
public abstract class BaseEventBusHandler{

    @PostConstruct
    public void init(){
        register2EventBus();
    }
    private void register2EventBus(){
        getEventBus().register(this);
    }
    protected abstract EventBus getEventBus();
}
这样在写自己的eventBus只需要

@Component
public class MyEventBus extends BaseEventBusHandler{
    @Override
    protected abstract EventBus getEventBus(){
        retrun EventBusManager.myEventBus;
    }
}

在目前的应用场景下, 同步是我们不希望的, 异步场景也很容易实现。
只需要将EventBus 改成
 AsyncEventBus warningEvent = new AsyncEventBus(Executors.newFixedThreadPool(1))
 AsyncEventBus dataEventBus = new AsyncEventBus(Executors.newFixedThreadPool(3))
2.集合处理
1.optional空值比较
2.集合排序guava
    Integer[] inumber={55,22,33};
        System.out.println(new Ordering<Integer>(){
            @Override
            public int compare(Integer left, Integer right) {
                return left-right;
            }
        }.sortedCopy(Arrays.asList(inumber)));

//java 需要自定义compare
3.guava cache 缓存触发机制
业务场景,当某一个文件保留的有效期30分钟后删除;某一个文件容易超过一定限定。
基于容量的回收:
public class GuavaCacheTest {
    public static void main(String[] args) {
        Cache<Integer, String> cache = CacheBuilder.newBuilder().maximumSize(2).build();
        cache.put(1, "a");
        cache.put(2, "b");
        cache.put(3, "c");
        System.out.println(cache.asMap());
        System.out.println(cache.getIfPresent(2));
        cache.put(4, "d");
        System.out.println(cache.asMap());
    }
}

基于时间的回收
guava 提供两种定时回收的方法
expireAfterAccess(long, TimeUnit):缓存项在给定时间内没有被读/写访问,则回收。请注意这种缓存的回收顺序和基于大小回收一样。
expireAfterWrite(long, TimeUnit):缓存项在给定时间内没有被写访问(创建或覆盖),则回收。如果认为缓存数据总是在固定时候后变得陈旧不可用,这种回收方式是可取的。
public class GuavaCacheTest {
    public static void main(String[] args) {
        LoadingCache<Integer, Integer> cache = CacheBuilder.newBuilder().expireAfterWrite(3, TimeUnit.SECONDS).removalListener(new RemovalListener<Object, Object>() {
            @Override
            public void onRemoval(RemovalNotification<Object, Object> notification) {
                System.out.println("remove key[" + notification.getKey() + "],value[" + notification.getValue() + "],remove reason[" + notification.getCause() + "]");
            }
        }).recordStats().build(
                new CacheLoader<Integer, Integer>() {
                    @Override
                    public Integer load(Integer key) throws Exception {
                        return 2;
                    }
                }
        );
        cache.put(1, 1);
        cache.put(2, 2);
        System.out.println(cache.asMap());
        cache.invalidateAll();
        System.out.println(cache.asMap());
        cache.put(3, 3);
        try {
            System.out.println(cache.getUnchecked(3));
            Thread.sleep(4000);
            System.out.println(cache.getUnchecked(3));
        } catch (InterruptedException e) {
            e.printStackTrace();
        }
    }
}

Cache<Integer, Integer> cache = CacheBuilder.newBuilder().maximumSize(100).expireAfterAccess(3, TimeUnit.SECONDS).build();
4.ListenableFuture 异步回调通知
传统JDK中的Future通过异步的方式计算返回结果:在多线程运算中可能或者可能在没有结束返回结果,Future是运行中的多线程的一个引用句柄,确保在服务执行返回一个Result。
ListenableFuture可以允许你注册回调方法(callbacks),在运算(多线程执行)完成的时候进行调用, 或者在运算(多线程执行)完成后立即执行。这样简单的改进,使得可以明显的支持更多的操作,这样的功能在JDK concurrent中的Future是不支持的。
ListenableFuture 中的基础方法是addListener(Runnable, Executor), 该方法会在多线程运算完的时候,指定的Runnable参数传入的对象会被指定的Executor执行。
添加回调(Callbacks)
多数用户喜欢使用 Futures.addCallback(ListenableFuture<V>, FutureCallback<V>, Executor)的方式, 或者 另外一个版本version(译者注:addCallback(ListenableFuture<V> future,FutureCallback<? super V> callback)),默认是采用 MoreExecutors.sameThreadExecutor()线程池, 为了简化使用,Callback采用轻量级的设计. FutureCallback<V> 中实现了两个方法:
- onSuccess(V),在Future成功的时候执行,根据Future结果来判断。
- onFailure(Throwable), 在Future失败的时候执行,根据Future结果来判断。
ListenableFuture的创建
对应JDK中的 ExecutorService.submit(Callable) 提交多线程异步运算的方式,Guava 提供了ListeningExecutorService 接口, 该接口返回 ListenableFuture 而相应的 ExecutorService 返回普通的 Future。将 ExecutorService 转为 ListeningExecutorService,可以使用MoreExecutors.listeningDecorator(ExecutorService)进行装饰。
ListeningExecutorService service = MoreExecutors.listeningDecorator(Executors.newFixedThreadPool(10));
ListenableFuture explosion = service.submit(new Callable() {
  public Explosion call() {
    return pushBigRedButton();
  }
});
Futures.addCallback(explosion, new FutureCallback() {
  // we want this handler to run immediately after we push the big red button!
  public void onSuccess(Explosion explosion) {
    walkAwayFrom(explosion);
  }
  public void onFailure(Throwable thrown) {
    battleArchNemesis(); // escaped the explosion!
  }
});