一、标准IO
1.1、
| 抽象类 | 结点流 | 缓冲流(处理流的一种,可以提高文件操作的效率,开发中一般用缓冲流,效率高) |
|---|---|---|
| InputStream | FileInputStream | BufferedInputstream |
| OutputStream | FileOutputStream | BufferedOutputStream |
| Reader | FileReader | BufferedReader |
| Writer | FileWriter | BufferWriter |
方法:
-
- long getFilePointer():获取文件记录指针的当前位置
- void seek(long pos):将文件记录的指针定位到pos位置
允许把内存中的Java对象转换成平台无关的二进制流,从而允许把这种二进制流持久到磁盘上,或通过网络将这种二进制流传输到另一个网络结点,当其他程序获取了这种二进制流,就可以恢复原来的Java对象
序列化的好处:可以将任何实现Serializable接口的对象转换为字节数据,时期在保存传输时可被还原 序列化是RMI(Remote-Method-Invoke远程方法调用)过程的参数和返回值都必须实现的机制,而RMI是JavaEE的基础,因此序列化机制是JavaEE的基础 对象要序列化,则其类必须序列化,类序列化必须实现Serializable 或者Externalizable
| NIO(缓冲区双向) | 传统IO(单向的) |
|---|---|
| 面相缓冲区 | 面相流 |
| 非阻塞 | 阻塞 |
| 有选择器 | 没有选择器 |
// 创建一个容量为capacity的XxxBuffer对象。
static XxxBuffer allocate(int capacity):
| Buffer中的重要概念 | |
|---|---|
| 容量(capacity) | 表示Buffer最大容量,缓冲区容量不能为负,并且创建后不能更改 |
| 限制(limit) | 第一个不应该读取或者写入的数据索引,即位于limit之后的数据不能读写,limit不不能为负,且不能大于容量capacity |
| 位置(position) | 下一个要读去或者写入的数据的索引,缓冲区的位置不能为负,并且不能大于其限制。 |
| 标记(mark)与重置(reset) | 标记一个索引,通过Buffer中的Mark()方法指定Bufferz中一个特定的position,之后可以通过调用reset()方法恢复到这个position() |

//清空缓冲区并返回对缓冲区的引用 Buffer clear(): //将缓冲区的界限设置为当前位置,并将当前位置重置为0 Buffer flip(): // 返回缓冲区的容量 int capacity(): //判断缓冲区是否还有元素 boolean hasRemaining(): //返回缓冲区的界限位置 int limit(): //将设置缓冲区界限为n,并返回一个具有新limit的缓冲区 Buffer limit(int n): //对缓冲区设置标记 Buffer mark(): //返回缓冲区的当期位置 int position(): //将缓冲区的当前位置为n,并返回修改的Buffer对象。 int position(int n): //返回position和limit之间的元素个数 int remaning(): //将位置position 转到以前设置的mark所在的位置 Buffer reset(): //将位置设置为0,取消设置的mark Buffer rewind():。
(3)、缓冲区的数据操作
Buffer的所有子类提供了两个用于操作数据的方法:get()/put()方法,
//获取Buffer中的数据 get():读取单个字节 get(byte[] dst):批量读取多个字节到dst中。 get(int index):读取指定位置的字节 //向缓冲区放入数据: put(byte b):将给定的自己写入缓冲区的当前位置 put(byte[] src):将src中的字节写入缓冲区的当前位置。 put(int index,byte b);将制定的字节写入到缓冲区的索引位置。
    @Test
    public void bufferTest() {

        //创建缓冲区
        ByteBuffer buffer = ByteBuffer.allocate(10);
        System.out.println(buffer.position());//0
        System.out.println(buffer.limit());//10
        System.out.println(buffer.capacity());//10

        //2.向缓冲区存数据
        buffer.put("abcde".getBytes());//放5个字节
        System.out.println(buffer.position());//5
        System.out.println(buffer.limit());//10
        System.out.println(buffer.capacity());//10

        //3.切换到读取数据的模式
        buffer.flip();
        System.out.println(buffer.position());//0 切换成读取数据的模式,从0位置开始读取
        System.out.println(buffer.limit());//5 之前存入了5个字节,读取数据模式下 只有5个字节
        System.out.println(buffer.capacity());//10  还是原来的那个缓冲区,所以容量没有变


        //4.从缓冲读取
        byte[] bytes = new byte[buffer.limit()];
        ByteBuffer byteBuffer = buffer.get(bytes);
        System.out.println(new String(bytes, 0, bytes.length));
        System.out.println(buffer.position());//5 读取完了,指针移动到地5个
        System.out.println(buffer.limit());//5 读取数据模式下 只有5个字节
        System.out.println(buffer.capacity());//10  还是原来的那个缓冲区,所以容量没有变

        //5.rewind()//重复读
        buffer.rewind();
        System.out.println(buffer.position());//0 rewind 将指针移动到开始位置,可以实现重复读取。
        System.out.println(buffer.limit());//5 读取数据模式下 只有5个字节
        System.out.println(buffer.capacity());//10  还是原来的那个缓冲区,所以容量没有变

        //6.清空缓冲区clear()
        buffer.clear();//清空缓冲区,但缓冲区的数据 依然存在只是出于被遗忘状态
        System.out.println(buffer.position());//0
        System.out.println(buffer.limit());//10
        System.out.println(buffer.capacity());//10
    }
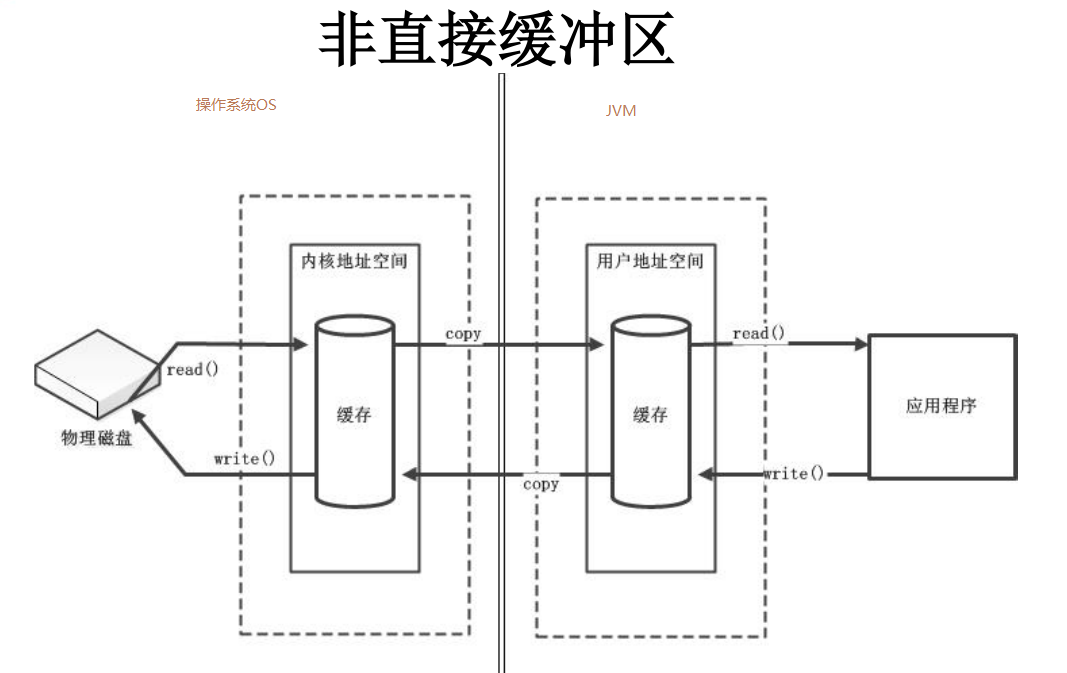
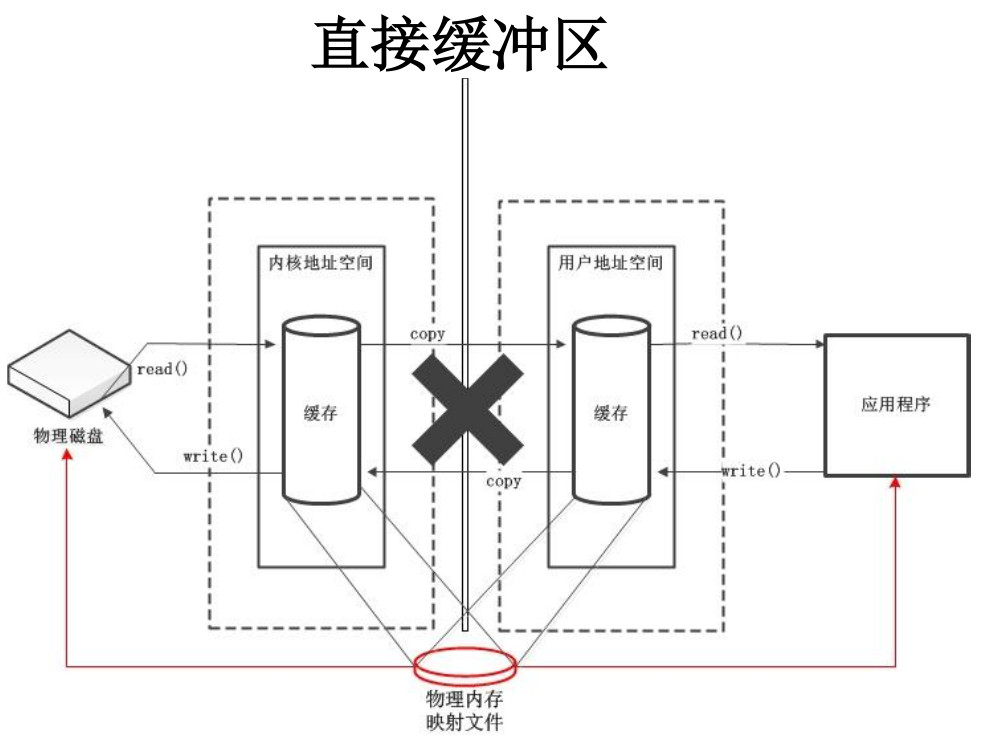
(4)、直接缓冲区和非直接缓冲区
2.3、通道Channel
(1)、简介
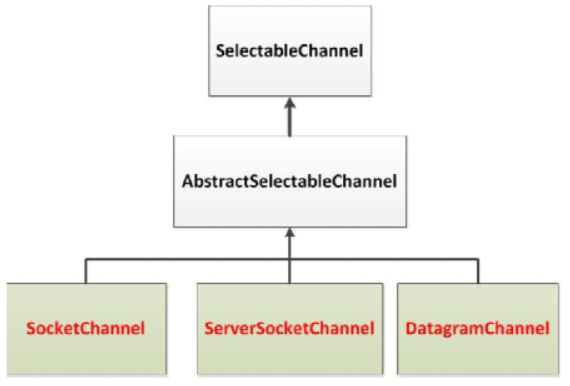
(2)、Channel接口的最主要实现类
- FileChannel:用于读取、写入、映射和操作文件的通道
- DatagramChannel:通过UDP读取网络中的数据通道
- SocketChannel:通过TCP读写网络中的数据
- ServerSocketChannel:可以监听新进来的TCP连接,对每一个新进来的连接都会建立一个SocketChannel.
/**
     * 内存和IO接口之间有一个 DMA(直接存储器)    --->DMA 更新到通道
     * <p>
     * 通道:用于源节点和目标节点的连接,在Java NIO 中负责缓冲区数据的传输,
     * FileChannel
     * SocketChannel
     * ServerSocketChannel
     * DatagramChannel
     * 二.获取通道
     * 1. java 针对支持通道的类提供类getChannel()方法
     * 本地IO:
     * FileInputStream/FileOutputStream
     * RandomRccessFile
     * 网络IO;
     * Socket
     * ServerSocket
     * DatagramSocket
     * 2.在JDK1.7中NIO.2针对通道提供了静态方法open()
     * 3.在JDK1.7中的FIles工具类的newByteChannel()
     */
    @Test
    public void CopyFileByNIO() {
        //获取通到
        FileInputStream fis = null;
        FileOutputStream fos = null;
        FileChannel inChannel = null;
        FileChannel outChannel = null;
        try {
            fis = new FileInputStream(path + file2);
            fos = new FileOutputStream(path + "aa.wmv");
            //1.创建通道
            inChannel = fis.getChannel();
            outChannel = fos.getChannel();

            //2.创建缓冲区
            ByteBuffer buf = ByteBuffer.allocate(100);

            //3将通道中的数据写入到缓冲区  channel-->buffer
            while (inChannel.read(buf) != -1) {
                buf.flip();
             //4·将缓冲去的数据写入到通道   buffer -->channel
                outChannel.write(buf);
                buf.clear();
            }

        } catch (FileNotFoundException e) {
            e.printStackTrace();
        } catch (IOException e) {
            e.printStackTrace();
        } finally {
            try {
                if (outChannel != null) {
                    outChannel.close();
                }
            } catch (IOException e) {
                e.printStackTrace();
            }
            try {
                if (outChannel != null) {
                    inChannel.close();
                }
            } catch (IOException e) {
                e.printStackTrace();
            }
            try {
                if (outChannel != null) {
                    fos.close();
                }
            } catch (IOException e) {
                e.printStackTrace();
            }
            try {
                if (outChannel != null) {
                    fis.close();
                }
            } catch (IOException e) {
                e.printStackTrace();
            }
        }
    }
/**
     * 使用直接内存缓冲区完成文件复制(内存映射文件)
     */
    @Test
    public void copyFile() {
        FileChannel inChannel = null;
        FileChannel outChannel = null;
        try {
            //1创建缓冲区
            inChannel = FileChannel.open(Paths.get(path, file2), StandardOpenOption.READ);
            outChannel = FileChannel.open(Paths.get(path, "2.wmv"), StandardOpenOption.WRITE,StandardOpenOption.READ,StandardOpenOption.CREATE);

            //2.获取缓冲区(内存映射文件,只有ByteBuffer支付)
            MappedByteBuffer inBuffer = inChannel.map(FileChannel.MapMode.READ_ONLY, 0, inChannel.size());
            MappedByteBuffer outBuffer = outChannel.map(FileChannel.MapMode.READ_WRITE, 0, inChannel.size());

            //3.直接对缓冲区数据进行读写操作
            byte[] bytes = new byte[inBuffer.limit()];
            inBuffer.get(bytes);
            outBuffer.put(bytes);
        } catch (IOException e) {
            e.printStackTrace();
        }finally {
            try {
                if (outChannel != null) {
                    outChannel.close();
                }
            } catch (IOException e) {
                e.printStackTrace();
            }
            try {
                if (inChannel != null) {
                    inChannel.close();
                }
            } catch (IOException e) {
                e.printStackTrace();
            }
        }
    }
 /*
     * 通道之间的数据传输()
     */
    @Test
    public void channelTransfor(){
        FileChannel inChannel = null;
        FileChannel outChannel = null;
        try {
            //1创建缓冲区
            inChannel = FileChannel.open(Paths.get(path, file2), StandardOpenOption.READ);
            outChannel = FileChannel.open(Paths.get(path, "3.wmv"), StandardOpenOption.WRITE,StandardOpenOption.READ,StandardOpenOption.CREATE);
            //通道传输操作的也是直接缓冲区
            inChannel.transferTo(0,inChannel.size(),outChannel);

        } catch (IOException e) {
            e.printStackTrace();
        }finally {
            try {
                if (outChannel != null) {
                    outChannel.close();
                }
            } catch (IOException e) {
                e.printStackTrace();
            }
            try {
                if (inChannel != null) {
                    inChannel.close();
                }
            } catch (IOException e) {
                e.printStackTrace();
            }
        }
    }
 /*
    *字符集
    * 编码  字符串 -->字节数组
    * 解码  字节数组 --->字符串
     */
    @Test
    public void CharSetTest(){
       /* SortedMap<String, Charset> stringCharsetSortedMap = Charset.availableCharsets();
        Set<Map.Entry<String, Charset>> entries = stringCharsetSortedMap.entrySet();//目前多少种字符集
        for (Map.Entry<String, Charset> entry : entries) {
            System.out.println(entry.getKey()+"===="+entry.getValue());
        }*/

       //获取某个字符集
        Charset gbk = Charset.forName("GBK");
        //获取编码器
        CharsetEncoder charsetDecoder = gbk.newEncoder();//就是CharBuffer和ByteBuffer之间的转换
        //获取解码器
        CharsetDecoder charsetDecoder1 = gbk.newDecoder();

        CharBuffer cbuf = CharBuffer.allocate(100);
        cbuf.put("中国");
        cbuf.flip();

        //编码
        ByteBuffer bbuf = gbk.encode(cbuf);

        //解码
        CharBuffer decode = gbk.decode(bbuf);
    }
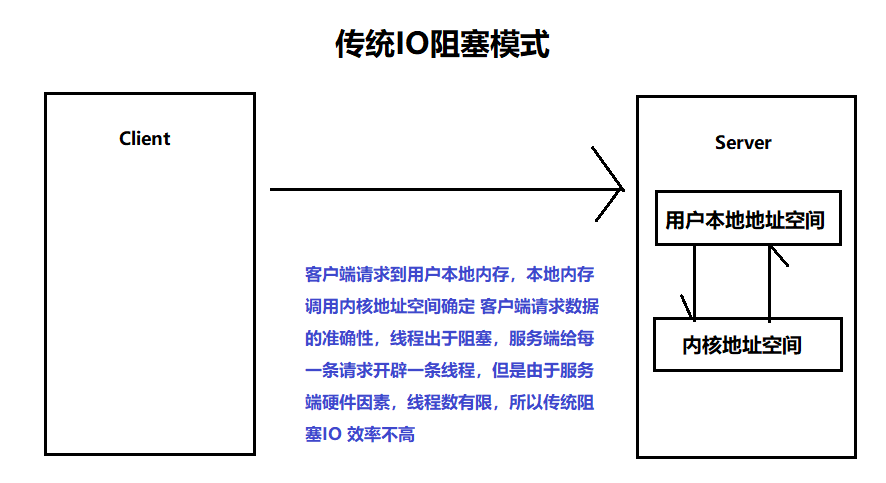
传统的 IO 流都是阻塞式的。也就是说,当一个线程调用 read() 或 write()时,该线程被阻塞,直到有一些数据被读取或写入,该线程在此期间不能执行其他任务。因此,在完成网络通信进行 IO 操作时,由于线程会阻塞,所以服务器端必须为每个客户端都提供一个独立的线程进行处理,当服务器端需要处理大量客户端时,性能急剧下降。
传统IO进行网络传输:
@Test
public void clientNew() throws IOException {
    //1.获取通道
    SocketChannel socketChannel = SocketChannel.open(new InetSocketAddress("127.0.0.1", 9999));

    FileChannel fileChannel = FileChannel.open(Paths.get(path, file3), StandardOpenOption.READ);
    //2.分配指定大小的缓冲区
    ByteBuffer buffer = ByteBuffer.allocate(1024);

    //3.读取本地文件并发送到服务端
    while (fileChannel.read(buffer) != -1) {
        buffer.flip();
        socketChannel.write(buffer);
        buffer.clear();
    }

    socketChannel.shutdownOutput();
    //4接收服务端的反馈 (就是网络IO监视缓冲区数据)
    int len ;
    while((len = socketChannel.read(buffer))!=-1){
        buffer.flip();
        System.out.println(new String(buffer.array(),0,len));
        buffer.clear();
    }

    //5.关闭通道
    fileChannel.close();
    socketChannel.close();
}
- 服务端
@Test
public  void ServerNew() throws IOException {
    //1.获取通道
    ServerSocketChannel serverSocketChannel = ServerSocketChannel.open();

    FileChannel fileChannel = FileChannel.open(Paths.get(path, "12132.jpg"), StandardOpenOption.WRITE, StandardOpenOption.CREATE);

    //2.绑定连接
    serverSocketChannel.bind(new InetSocketAddress(9999));

    //3.获取客户端连接的通道
    SocketChannel accept = serverSocketChannel.accept();

    //4.分配指定大小的缓冲区
    ByteBuffer buffer = ByteBuffer.allocate(1024);

    //5.接收客户端的数据
    while (accept.read(buffer) != -1) {
        buffer.flip();
        fileChannel.write(buffer);
        buffer.clear();
    }

    buffer.put("服务端接收成功".getBytes());
    buffer.flip();
    accept.write(buffer);

    //6.关闭通道
    accept.close();
    fileChannel.close();
    serverSocketChannel.close();
}
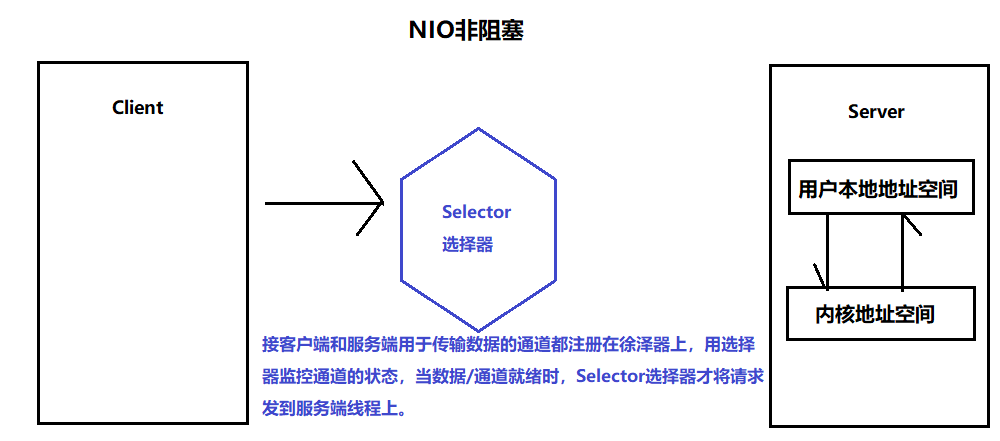
NIO用选择器Selector注册进行的网络传输
- 客户端
@Test
public void clientNIO() throws IOException {
    //1.获取通道
    SocketChannel socketChannel = SocketChannel.open(new InetSocketAddress("127.0.0.1", 9999));

    //2.切换成非阻塞模式
    socketChannel.configureBlocking(false);

    FileChannel fileChannel = FileChannel.open(Paths.get(path, file3), StandardOpenOption.READ);

    //3.分配指定大小的缓冲区
    ByteBuffer buffer = ByteBuffer.allocate(1024);

    //4.读取本地文件并发送到服务端
    while (fileChannel.read(buffer) != -1) {
        buffer.flip();
        socketChannel.write(buffer);
        buffer.clear();
    }

    //5.关闭通道
    fileChannel.close();
    socketChannel.close();
}
- 服务端
@Test
public  void ServerNIO() throws IOException {
    //1.获取通道
    ServerSocketChannel serverSocketChannel = ServerSocketChannel.open();

    FileChannel fileChannel = FileChannel.open(Paths.get(path, "NIO.jpg"), StandardOpenOption.WRITE, StandardOpenOption.CREATE);

    //2.切换成非阻塞模式
    serverSocketChannel.configureBlocking(false);

    //3.绑定连接
    serverSocketChannel.bind(new InetSocketAddress(9999));

    //4.获取选择器
    Selector selector = Selector.open();

    //5.将通道注册到选择器上并指定监听事件
    serverSocketChannel.register(selector, SelectionKey.OP_ACCEPT);

    //6.轮询式获取选择器上已经准备就绪的事件
    while (selector.select()>0){
        //7.获取当前选择器中所有注册的选择键(已就绪的监听事件)
        Iterator<SelectionKey> iterator = selector.selectedKeys().iterator();

        while(iterator.hasNext()){
            //8.获取准备就绪的事件
            SelectionKey next = iterator.next();
            //9判断具体是什么事件准备就绪
            if(next.isAcceptable()){
                //10.若接收就绪,获取客户端连接
                SocketChannel accept = serverSocketChannel.accept();
                //11.切换非阻塞模式
                accept.configureBlocking(false);
                //12.接客通道注册到选择器上面
                accept.register(selector,SelectionKey.OP_READ);
            }else if(next.isReadable()){
                //13.获取当前选择器上“读”就绪状态的通道
                SocketChannel channel = (SocketChannel) next.channel();
                //14.分配指定大小的缓冲区
                ByteBuffer buffer = ByteBuffer.allocate(1024);
                while(channel.read(buffer)!=-1){
                    buffer.flip();
                    fileChannel.write(buffer);
                    buffer.clear();
                }

            }
        }
        //取消选择器
        iterator.remove();
    }
}
(2)、选择器(Selector)的应用
当调用 register(Selector sel, int ops) 将通道注册选择器时,选择器对通道的监听事件,需要通过第二个参数 ops 指定。
可以监听的事件类型(可使用 SelectionKey 的四个常量表示):
-
- 读 : SelectionKey.OP_READ (1)
- 写 : SelectionKey.OP_WRITE (4)
- 连接 : SelectionKey.OP_CONNECT (8)
- 接收 : SelectionKey.OP_ACCEPT (16)
若注册时不止监听一个事件,则可以使用“位或”操作符连接
serverSocketChannel.register(selector, SelectionKey.OP_ACCEPT|SelectionKey.OP_READ);
(3)、
| 方法 | 描述 |
|---|---|
| int interestOps() | 获取感兴趣事件集合 |
| int readyOps() | 获取通道已经准备就绪的操作的集合 |
| SelectableChannel channel() | 获取注册通道 |
| Selector selector() | 返回选择器 |
| boolean isReadable() | 检测Channal 中读事件是否就绪 |
| boolean isWritable() | 检测Channal 中写事件是否就绪 |
| boolean isConnectable() | 检测Channel 中连接是否就绪 |
| boolean isAcceptable() | 检测Channel 中接收是否就绪 |
(4)、
| 方法 | 描述 |
|---|---|
| Set keys() | 所有的SelectionKey 集合。代表注册在该Selector上的Channel |
| selected Keys() | 被选择的SelectionKey 集合。返回此Selector的已选择键 集 |
| int select() | 监控所有注册的Channel,当它们中间有需要处理的 IO 操作时, 该方法返回,并将对应得的SelectionKey 加入被选择的SelectionKey集合中,该方法返回这些 Channel 的数量。 |
| int select(long timeout) | 可以设置超时时长的select() 操作 |
| int selectNow() | 执行一个立即返回的select() 操作,该方法不会阻塞线程 |
| Selector wakeup() | 使一个还未返回的select() 方法立即返回 |
| void close() | 关闭该选择器 |