前面一篇博客(实现struts2框架)带大家对基于mvc业务流程熟悉了一下,现在我们就用对mvc实现最好的框架struts2来开发一个应用实例。虽然现在MyEclipse8.5以上版本已经开始支持Struts2,但为了我们能更好的熟悉开发struts2的业务流程,现在我们还是手动去搭配环境。首先我们需要到struts.apache.org去下载struts-2.2.3-all包。现在最高版本应该达到2.3了。要想正常使用Struts2,至少需要如下五个包(可能会因为Struts2的版本不同,包名略有差异,但包名的前半部是一样的)。
struts2-core-2.0.11.1.jar
xwork-2.0.4.jar
commons-logging-1.0.4.jar
freemarker-2.3.8.jar
ognl-2.6.11.jar
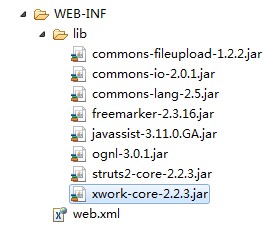
注:貌似好像一些高版本的还需要加入一些其他jar包,如下图所示:
好了,jar包加入之后,我们下一步开始搭配配置环境了。很多同学可能会有这样的疑问,为什么我提交的请求能到struts.xml去找对应的action呢??至少我刚开始学习的时候有这么个疑问。现在答案即可以为大家揭晓了,因为struts2的核心是拦截器,一切请求都要经过拦截器才转发给所对应的action的。Struts2中第一个拦截请求的就是org.apache.struts2.dispatcher.FilterDispatcher这个拦截器(下一篇博客我们即将对这个拦截器的源码进行分析),拦截器对请求进行一些处理之后然后去struts.xml寻找对应的action。我们一起来看一下web.xml的配置:
[html] view plaincopyprint?
-
<?xml version="1.0" encoding="UTF-8"?>
-
<web-app version="2.4"
-
xmlns="http://java.sun.com/xml/ns/j2ee"
-
xmlns:xsi="http://www.w3.org/2001/XMLSchema-instance"
-
xsi:schemaLocation="http://java.sun.com/xml/ns/j2ee
-
http://java.sun.com/xml/ns/j2ee/web-app_2_4.xsd">
-
<filter>
-
<filter-name>struts2</filter-name>
-
<filter-class>org.apache.struts2.dispatcher.FilterDispatcher</filter-class>
-
</filter>
-
<filter-mapping>
-
<filter-name>struts2</filter-name>
-
<url-pattern>*.action</url-pattern>
-
</filter-mapping>
-
<welcome-file-list>
-
<welcome-file>index.jsp</welcome-file>
-
</welcome-file-list>
-
</web-app>
在struts2官方提供的文档中要求,在服务器class文件夹下建立struts.xml文件。由于在web项目部署到服务器上,开启服务器对web项目进行编译时会自动把src文件夹下的文件加载到服务器class文件夹下,所以我们直接在src下面建立struts.xml文件,具体struts.xml配置如下:
[html] view plaincopyprint?
-
<?xml version="1.0" encoding="UTF-8"?>
-
<!DOCTYPE struts PUBLIC
-
"-//Apache Software Foundation//DTD Struts Configuration 2.0//EN"
-
"http://struts.apache.org/dtds/struts-2.0.dtd">
-
<struts>
-
<constant name="struts.i18n.encoding" value="utf-8" />
-
<package name="struts2" extends="struts-default">
-
<action name="" class="">
-
<result name=""></result>
-
<result name=""></result>
-
</action>
-
</package>
-
</struts>
注:上述代码具体意义:
1.<constant>标签主要是用来修改struts.properties配置文件信息,name和value分别相当于struts.properties文件中的name和value
2.<package>主要是作为分包作用,比如一个项目分好几个模块,这里可以每一个模块分配一个包,一个struts.xml文件中可以出现多个<package>标签,这里一定要有extends="struts-default",因为struts的核心拦截器都配置在struts-default包中,如果没有这个,所有请求都不会请求到
3.一个<action>标签对应一个action类,主要是通过action标签中的去寻找class,然后执行对应的class。Action标签里有一个一个method属性,他可以指定执行action中的哪个方法
下面我们就开始以登录为例来写一下struts2开发的视图层:
Login.jsp
[html] view plaincopyprint?
-
<%@ page language="java" import="java.util.*" pageEncoding="utf-8"%>
-
<%
-
String path = request.getContextPath();
-
String basePath = request.getScheme()+"://"+request.getServerName()+":"+request.getServerPort()+path+"/";
-
%>
-
<html>
-
<head>
-
</head>
-
<body>
-
<form action="LoginAction.action">
-
<input type="text" name="username"/><br/>
-
<input type="password" name="password"/><br/>
-
<input type="submit" value="提交"/>
-
</form>
-
</body>
-
</html>
好了,视图层写完了,下面就要开始写核心action了,由于业务逻辑层就是判断用户名和密码是否与固定的admin和123456相等,所以本程序只是为了测试,就不再单独抽出来了,直接写在action里面了LoginAction.java
[java] view plaincopyprint?
-
package com.bzu.action;
-
public class LoginAction {
-
private String username;
-
private String password;
-
public String getUsername() {
-
return username;
-
}
-
public void setUsername(String username) {
-
this.username = username;
-
}
-
public String getPassword() {
-
return password;
-
}
-
public void setPassword(String password) {
-
this.password = password;
-
}
-
public String execute(){
-
if(username.equals("admin")&&password.equals("123456"))
-
return "success";
-
return "fail";
-
}
-
}
从上面的程序可以看出,我们在action中要把form表单中数据都以私有变量的形式定义出来,然后在提供对应的set和get方法。很多同学可能在这又有疑问了。为什么给他提供set和get方法,form表单中的数据就可以设置到对应的属性上呢?为什么他会默认的去执行execute方法呢?为什么把配置文件中action标签对应的method属性修改后就可以执行新设置的方法呢?呵呵,在这在卖个关子,在接下来的博客中,会为大家一一把这些疑问解决。
Action写完之后,我们就可以把struts.xml对应的写上了,本程序完整的struts.xml:
[html] view plaincopyprint?
-
<?xml version="1.0" encoding="UTF-8"?>
-
<!DOCTYPE struts PUBLIC
-
"-//Apache Software Foundation//DTD Struts Configuration 2.0//EN"
-
"http://struts.apache.org/dtds/struts-2.0.dtd">
-
<struts>
-
<constant name="struts.i18n.encoding" value="utf-8" />
-
<package name="struts2" extends="struts-default">
-
<action name="LoginAction" class="com.bzu.action.LoginAction">
-
<result name="success">success.jsp</result>
-
<result name="fail">fail.jsp</result>
-
</action>
-
</package>
-
</struts>
对应的success.jsp和fai.jsp没什么内容,就是显示成功和失败几个字。
好了,到此,我们的第一个struts2的应用程序就写完了,下面我们一起来看一下运行结果:

————》
