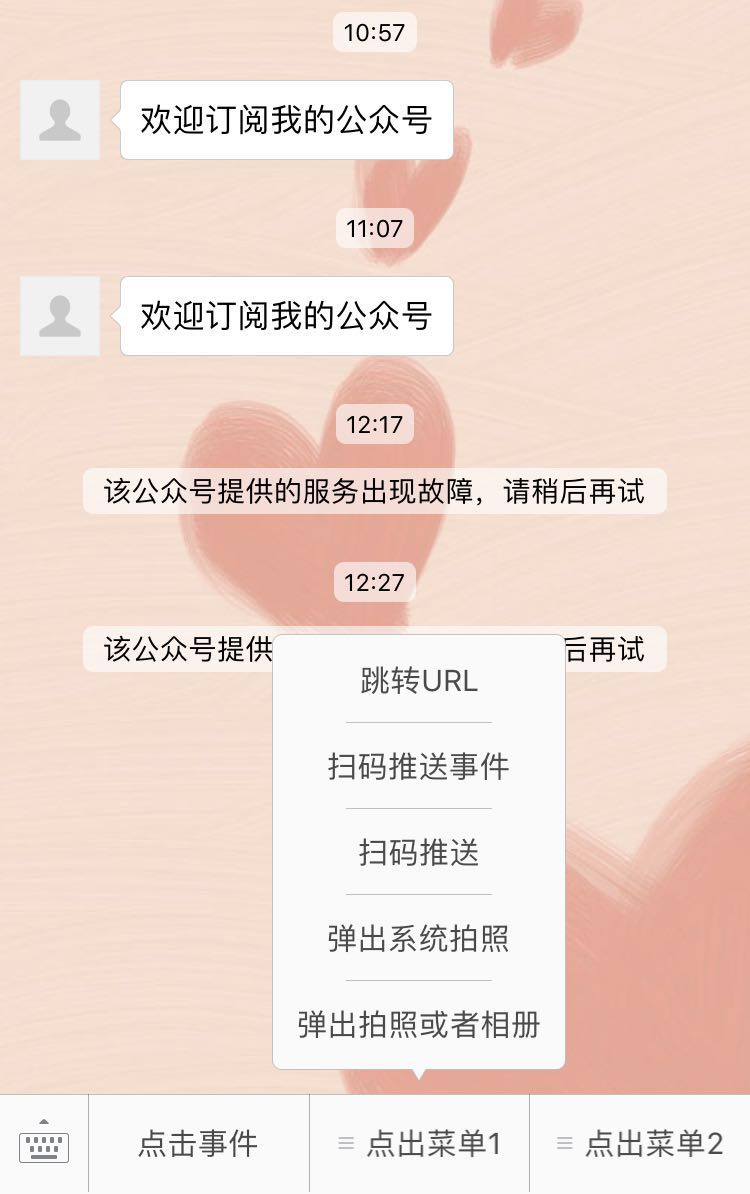
自定义菜单能够帮助公众号丰富界面,让用户更好更快地理解公众号的功能。
我这里不一一说明接口内容以及注意事项了,因为官方文档随着更新会有变化,所以没必要一一列明,最好就是随时查看官方文档,会更加准确。下面我们来从当前文档中摘出来我们想要测试的功能。
1.菜单创建接口:http请求方式:POST https://api.weixin.qq.com/cgi-bin/menu/create?access_token=ACCESS_TOKEN
2.菜单查询接口:http请求方式:GET https://api.weixin.qq.com/cgi-bin/menu/get?access_token=ACCESS_TOKEN
3.菜单删除接口:http请求方式:GET https://api.weixin.qq.com/cgi-bin/menu/delete?access_token=ACCESS_TOKEN
4.获取自定义菜单配置接口:GET https://api.weixin.qq.com/cgi-bin/get_current_selfmenu_info?access_token=ACCESS_TOKEN
我们在wechat.js文件配置一下url变量:
    //自定义菜单
    menu: {
        create: prefix + 'menu/create?',
        fetch: prefix + 'menu/get?',
        del: prefix + 'menu/delete?',
        current: prefix + 'get_current_selfmenu_info?'
    }
然后依然在wechat.js文件中,添加菜单的相关方法:
//在weChat的原型链上增加createMenu方法 用来创建自定义菜单
weChat.prototype.createMenu = function(menu) {
    var that = this;

    return new Promise(function(resolve, reject) {
        that
            .fetchAccessToken()
            .then(function(data) {
                var url = api.menu.create + 'access_token=' + data.access_token;

                //使用request发起请求
                request({
                        method: 'POST',
                        url: url,
                        body: menu,
                        json: true
                    })
                    .then(function(response) {
                        var _data = response.body;
                        if (_data) {
                            resolve(_data);
                        } else {
                            throw new Error('create menu fail');
                        };

                    })
                    .catch(function(err) {
                        reject(err);
                    });
            });
    });
};

//在weChat的原型链上增加getMenu方法 用来获取自定义菜单
weChat.prototype.getMenu = function() {
    var that = this;

    return new Promise(function(resolve, reject) {
        that
            .fetchAccessToken()
            .then(function(data) {
                var url = api.menu.fetch + 'access_token=' + data.access_token;

                //使用request发起请求
                request({
                        url: url,
                        json: true
                    })
                    .then(function(response) {
                        var _data = response.body;
                        if (_data) {
                            resolve(_data);
                        } else {
                            throw new Error('get menu fail');
                        };

                    })
                    .catch(function(err) {
                        reject(err);
                    });
            });
    });
};

//在weChat的原型链上增加delMenu方法 用来删除自定义菜单
weChat.prototype.delMenu = function() {
    var that = this;

    return new Promise(function(resolve, reject) {
        that
            .fetchAccessToken()
            .then(function(data) {
                var url = api.menu.del + 'access_token=' + data.access_token;

                //使用request发起请求
                request({
                        url: url,
                        json: true
                    })
                    .then(function(response) {
                        var _data = response.body;
                        if (_data) {
                            resolve(_data);
                        } else {
                            throw new Error('delete menu fail');
                        };

                    })
                    .catch(function(err) {
                        reject(err);
                    });
            });
    });
};

//在weChat的原型链上增加getCurrentMenu方法 用来删除自定义菜单
weChat.prototype.getCurrentMenu = function() {
    var that = this;

    return new Promise(function(resolve, reject) {
        that
            .fetchAccessToken()
            .then(function(data) {
                var url = api.menu.current + 'access_token=' + data.access_token;

                //使用request发起请求
                request({
                        url: url,
                        json: true
                    })
                    .then(function(response) {
                        var _data = response.body;
                        if (_data) {
                            resolve(_data);
                        } else {
                            throw new Error('get current menu fail');
                        };

                    })
                    .catch(function(err) {
                        reject(err);
                    });
            });
    });
};
在项目的根目录下,新建menu.js文件,用于存放菜单模板:
'use strict';

module.exports = {
    'button': [{
        'name':'点击事件',
        'type':'click',
        'key':'menu_click'
    },{
        'name':'点出菜单1',
        'sub_button':[{
            'name':'跳转URL',
            'type':'view',
            'url':'https://www.baidu.com'
        },{
            'name':'扫码推送事件',
            'type':'scancode_push',
            'key':'qr_scan'
        },{
            'name':'扫码推送',
            'type':'scancode_waitmsg',
            'key':'qr_scan_wait'
        },{
            'name':'弹出系统拍照',
            'type':'pic_sysphoto',
            'key':'pic_photo'
        },{
            'name':'弹出拍照或者相册',
            'type':'pic_photo_or_album',
            'key':'pic_photo_album'
        }]
    },{
        'name':'点出菜单2',
        'sub_button':[{
            'name':'微信相册发图',
            'type':'pic_weixin',
            'key':'pic_weixin'
        },{
            'name':'地理位置',
            'type':'location_select',
            'key':'location_select'
        }
        // ,{
        //     'name':'下发消息(除文本消息)',
        //     'type':'media_id',
        //     'media_id':''
        // },{
        //     'name':'跳转图文消息',
        //     'type':'view_limited',
        //     'media_id':''
        // }
        ]
    }]
}
现在我们来生成菜单,打开weixin.js文件,在文件上方引入menu.js,同时初始化菜单:
var menu = require('./menu');
//初始化weChat 并传入配置信息
var wechatApi = new weChat(config.wechat);
//重置并初始化菜单
wechatApi.delMenu().then(function(){
    return wechatApi.createMenu(menu);
})
.then(function(msg){
    console.log(msg);
});
之后,回复函数内,在message.MsgType === 'event'的条件里,添加菜单事件的判断:
//判断用户行为 是事件推送还是普通消息 先判断的是事件推送
    if (message.MsgType === 'event') {
        //订阅事件 分为搜索订阅和二维码订阅
        if (message.Event === 'subscribe') {
            if (message.EventKey) {
                console.log('扫描二维码进来' + message.EventKey + ' ' + message.ticket);
            }
            //通过this.body设置回复消息
            this.body = '欢迎订阅我的公众号';
        }
        //取消订阅事件
        else if (message.Event === 'unsubscribe') {
            console.log('用户取消了关注');
            this.body = '';
        }
        //地理位置事件
        else if (message.Event === 'LOCATION') {
            this.body = '您上报的位置是:' + message.Latitude + '/' + message.Longitude + '-' + message.Precision;
        }
        //点击事件 自定义菜单事件
        else if (message.Event === 'CLICK') {
            this.body = '您点击了菜单:' + message.EventKey;
        }
        //跳转链接事件 点击菜单跳转链接时的事件推送
        else if (message.Event === 'VIEW') {
            this.body = '您点击了菜单中的链接:' + message.EventKey;
        }
        //扫描事件
        else if (message.Event === 'SCAN') {
            console.log('关注后扫描二维码' + message.EventKey + ' ' + message.Ticket);
            this.body = '看到你扫一下哦';
        }
        //扫码推送事件
        else if (message.Event === 'scancode_push') {
            console.log(message.ScanCodeInfo.ScanType);
            console.log(message.ScanCodeInfo.ScanResult);
            this.body = '您点击了菜单中的链接:' + message.EventKey;
        }
        //扫码推送
        else if (message.Event === 'scancode_waitmsg') {
            console.log(message.ScanCodeInfo.ScanType);
            console.log(message.ScanCodeInfo.ScanResult);
            this.body = '您点击了菜单中的:' + message.EventKey;
        }
        //弹出系统拍照
        else if (message.Event === 'pic_sysphoto') {
            console.log( message.SendPicsInfo.PicList);
            console.log( message.SendPicsInfo.Count);
            this.body = '您点击了菜单中的:' + message.EventKey;
        }
        //弹出拍照或者相册
        else if (message.Event === 'pic_photo_or_album') {
            console.log( message.SendPicsInfo.PicList);
            console.log( message.SendPicsInfo.Count);
            this.body = '您点击了菜单中的:' + message.EventKey;
        }
        //微信相册发图
        else if (message.Event === 'pic_weixin') {
            console.log( message.SendPicsInfo.PicList);
            console.log( message.SendPicsInfo.Count);
            this.body = '您点击了菜单中的:' + message.EventKey;
        }
        //地理位置选择器
        else if (message.Event === 'location_select') {
            console.log(message.SendLocationInfo.Location_X);
            console.log(message.SendLocationInfo.Location_Y);
            console.log(message.SendLocationInfo.Scale);
            console.log(message.SendLocationInfo.Label);
            console.log(message.SendLocationInfo.Poiname);
            this.body = '您点击了菜单中的:' + message.EventKey;
        }
    }
这时我们取消关注,会报两个错误,第一个错误:Cannot read property 'then' of undefined ,这个错误解决,我们在this.getAccessToken()前面加上return就可以解决。如下图:

第二个错误:TypeError: Cannot read property 'type' of undefined ,这个错误是因为事件触发时,服务器会推送两条不同类型的事件,解决方法是,打开tools.js文件,在格式化回复体时,对content多加一个判断:

现在我们的自定义菜单就可以跑通啦~
