在web开发过程中经常会碰到需要选择日期的功能,一般的操作都是在文本框点击,然后弹出日历选择框,直接选择日期就可以在文本框显示选择的日期。开发好之后给用户使用是很方便,但如果每一个日历选择器都要临时开发的话,会严重影响项目进度。所以网上有很多日历插件提供下载使用。
在实际工作中,日历选择器功能确实都是直接使用已开发好的插件。但作为一个前端工程师,还是需要知道具体实例方法,也应该有能力完成此类功能。本实例教程详细讲解怎么样使用原生js,通过面向对象来开发一个日历选择器插件。
一般日历插件使用都非常简单,只需要提供一个input元素就行,其他的工作都是通过插件来完成。本实例也先准备一个input元素待用,如下所示:
<div style="text-align:center;">
  <input type="text" id="calendarInput">
</div>

在这里附上css样式,读者也可以根据喜好自己编写样式。css代码如下所示:
*{box-sizing:border-box;}
.calendar_wrap{position:relative;display:inline-block;margin:100px auto;}
.calendar_wrap a{color:#333;text-decoration:none;cursor:pointer;}

.calendar_container input{
  width:100%;border:1px solid #ccc;border-radius:4px;line-height:30px;
  font-size:14px;color:#333;outline:none;padding-left:6px;
}
.calendar_container .calendar_clean{position:absolute;top:6px;right:6px;z-index:1;display:none;cursor:pointer;}
.calendar_container .calendar_clean:after{content:"E62F";font-family:"iconfont";font-size:16px;display:inline-block;color:#ccc;}
.calendar_container .calendar_icon{position:absolute;top:6px;right:6px;pointer-events:none;display:block;}
.calendar_container .calendar_icon::after{content:"E646";font-family:"iconfont";font-size:16px;display:inline-block;color:#aaa;}
.calendar_container:hover .calendar_clean{display:block;}
.calendar_container:hover .calendar_icon{display:none;}
.calendar_main{
  position:absolute;top:36px;left:0px;width:220px;box-shadow:0px 0px 3px #ccc;
  border-radius:4px;z-index:2;background:#fff;
}
.calendar_main .calendar_head{font-size:0;}
.calendar_main .calendar_head a{
  display:inline-block;height:32px;line-height:32px;
  text-align:center;font-size:12px;vertical-align:middle;
}
.calendar_main .calendar_head .chang_btn{width:30px;padding-top:1px;}
.calendar_main .calendar_head .year_month_btn{width:64px;margin:0 48px;white-space:nowrap;}
.calendar_main .calendar_head .year_btn,.calendar_main .calendar_head .month_btn{width:50px;}
.calendar_main .calendar_head .chang_btn::after{content:"";display:inline-block;height:0;width:0;border:6px solid transparent;}
.calendar_main .calendar_head .chang_btn::before{content:"";display:inline-block;height:0;width:0;border:6px solid transparent;}
.calendar_main .calendar_head .left_year_btn::after{border-right-color:#aaa;margin-left:-14px;}
.calendar_main .calendar_head .left_year_btn:hover::after{border-right-color:#f60;}
.calendar_main .calendar_head .right_year_btn::after{border-left-color:#aaa;margin-left:-14px;}
.calendar_main .calendar_head .right_year_btn:hover::after{border-left-color:#f60;}
.calendar_main .calendar_head .left_month_btn::after{border-right-color:#fff;margin-left:-10px;}
.calendar_main .calendar_head .left_month_btn::before{border-right-color:#aaa;}
.calendar_main .calendar_head .left_month_btn:hover::before{border-right-color:#f60;}
.calendar_main .calendar_head .right_month_btn::after{border-left-color:#fff;margin-left:-14px;}
.calendar_main .calendar_head .right_month_btn::before{border-left-color:#aaa;}
.calendar_main .calendar_head .right_month_btn:hover::before{border-left-color:#f60;}
.calendar_main .calendar_head a:hover{color:#f60;}

.calendar_main .calendar_body{border-top:1px solid #ccc;border-bottom:1px solid #ccc;}
.calendar_main .calendar_body table{width:100%;table-layout:fixed;}
.calendar_main .calendar_body th{text-align:center;line-height:20px;font-size:12px;}
.calendar_main .calendar_body td{padding:0 4px;height:24px;text-align:center;font-size:12px;}
.calendar_main .calendar_body td a{display:inline-block;width:20px;height:20px;cursor:pointer;line-height:20px;color:#ccc;}
.calendar_main .calendar_body .cur_month{color:#666;background:inherit;}
.calendar_main .calendar_body .cur_day{
  border-radius:2px;font-weight:bold;line-height:18px;background:#eee;color:#000
}
.calendar_main .calendar_body .sel_day{color:#fff;background:#f60;border-radius:2px;}

.calendar_main .calendar_foot{padding:6px 10px;text-align:right;}
.calendar_main .calendar_foot .define_btn{
  border-radius:4px;line-height:24px;height:24px;border:0;
  background:none;color:#666;cursor:pointer;outline:none;
}
.calendar_main .calendar_foot .define_btn:hover{color:#f60;}
.calendar_main .calendar_body ul{font-size:0;margin:0;padding:0;}
.calendar_main .calendar_body li{display:inline-block;width:55px;height:60px;line-height:54px;font-size:14px;}
.calendar_main .calendar_body li a{padding:8px;}
.calendar_main .calendar_body li .no_cur{color:#ccc;}
接下来开始封装日历选择器插件。新建 calendar.js 文件,接下来的插件代码都写在此文件中。
需要在body元素中引入 calendar.js 文件,如下所示:
<script src="js/calendar.js"></ script>
把日历选择器功能拆分成一个一个的步骤来完成。
//创建日历插件构造函数
function CalendarPlugin(elem,opt={}){

}
  <script src="js/calendar.js"></script>
  <script>
    //获取文本框
    var eCalendarInput = document.getElementById('calendarInput');
    //配置选项
    var oConfig = {

    }
    //调用日历构造函数生成实例对象
    var oCalenderObj = new CalendarPlugin(eCalendarInput,oConfig);
  </script>
//创建日历插件构造函数
function CalendarPlugin(elem,opt={}){
    //执行初始化
    this.init();
}

//初始化
CalendarPlugin.prototype.init = function(){

}
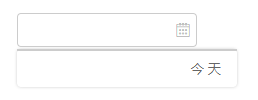
//创建日历插件构造函数
function CalendarPlugin(elem,opt={}){
  //把文本框设置为日历对象的属性
  this.eInput = elem;

  /*...*/
}

//初始化
CalendarPlugin.prototype.init = function(){
  //获取原有intpu元素的父元素
  var eInputParent = this.eInput.parentNode;
  //创建日历包裹元素并添加class名称
  var eWrap = document.createElement('div');
  eWrap.className = 'calendar_wrap';
  //创建文本框容器元素
  var eInputContainer = document.createElement('div');
  eInputContainer.className = 'calendar_container';
  //创建清除按钮
  var eClear = document.createElement('div');
  eClear.className = 'calendar_clean';
  //创建日历图标元素
  var eIcon = document.createElement('div');
  eIcon.className = 'calendar_icon';
  //把日历包裹放到原有父元素中
  eInputParent.appendChild(eWrap);
  //文本框容器放到包裹中
  eWrap.appendChild(eInputContainer);
  //把相关元素放到文本框容器中
  eInputContainer.appendChild(this.eInput);
  eInputContainer.appendChild(eClear);
  eInputContainer.appendChild(eIcon);

  //设置文本框为只读
  this.eInput.setAttribute('readonly',true);

}
此时文档框已经变成日历选择器的样式了,如图所示:

3.2 在init方法中创建弹出日历选择框元素
CalendarPlugin.prototype.init = function(){

  /*...*/

  //创建主要日历容器元素
    this.eMain = document.createElement('div');
    this.eMain.className = 'calendar_main';
    //把日历容器放到包裹元素中
    eWrap.appendChild(this.eMain);
}
3.3 在日历选择框中添加头部元素、主体元素和底部元素,代码如下:
CalendarPlugin.prototype.init = function(){
  /*...*/

  //创建日历头部
    this.eHead = document.createElement('div');
    this.eHead.className = 'calendar_head';
    //把日历头部放到日历容器中
    this.eMain.appendChild(this.eHead);
    //设置当前年份
    this.nYear = null;
    //设置当前月份
    this.nMonth = null;
    //设置日历模式,默认显示日历
    this.sModel = 'date';

    //创建日历主体
    this.eBody = document.createElement('div');
    this.eBody.className = 'calendar_body';
    //把日历主体放到日历容器中
    this.eMain.appendChild(this.eBody);
    //当前选定日期
    this.selDate = null;

    //创建底部元素
    this.eFoot = document.createElement('div');
    this.eFoot.className = 'calendar_foot';
    this.eDefine = document.createElement('button');
    this.eDefine.className = 'define_btn';
    //把底部元素放到日历容器中
    this.eMain.appendChild(this.eFoot);
    this.eFoot.appendChild(this.eDefine);
    this.eDefine.innerHTML = '今 天';
}
此时效果如图所示:
只有底部有一个“今 天”的按钮,头部年/月和主要的日期都还没有,接下来开始创建这些元素
3.4 创建日历选择框中的头部和日期元素
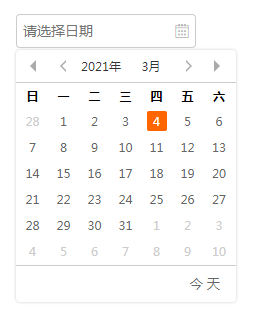
//初始化
CalendarPlugin.prototype.init = function(){
  /*...*/

  //生成日历元素
  this.generateDate();
}

//创建头部元素
CalendarPlugin.prototype.generateHead = function(){
    //根据日历模式不同,组成日历头部html代码
    var sHeadHtml = '<a class="left_year_btn chang_btn" data-run="lessYear"></a>';

    if(this.sModel == 'date'){    //日历模式
        sHeadHtml += `<a class="left_month_btn chang_btn" data-run="lessMonth"></a>
                                    <a class="year_btn" data-run="showYear" data-model="year">${this.nYear}年</a>
                                    <a class="month_btn" data-run="showMonth" data-model="month">${+this.nMonth+1}月</a>
                                    <a class="right_month_btn chang_btn" data-run="addMonth"></a>`;
    }else if(this.sModel == 'month'){    //月历模式
        sHeadHtml += `<a class="year_month_btn" data-run="showYear" data-model="year">${this.nYear}年</a>`;
    }else if (this.sModel == 'year'){    //年历模式
        sHeadHtml += `<a class="year_month_btn">${+(Math.floor(this.nYear/10)+'0')}-
                                    ${+(Math.floor(this.nYear/10)+'0')+10}</a>`;
    }

    sHeadHtml += '<a class="right_year_btn chang_btn" data-run="addYear"></a>';
    //填充日历头部
    this.eHead.innerHTML = sHeadHtml;
}
//生成日历
CalendarPlugin.prototype.generateDate = function(date=null){
    //组成日历的html代码
    var sBodyHtml = '<table>';
    //组合周日 - 周六的列表头
    sBodyHtml += `<thead>
                                    <tr><th>日</th><th>一</th><th>二</th><th>三</th><th>四</th><th>五</th><th>六</th></tr>
                             </thead>`

    /*日历中需要记录当前日期、选定日期、面板日期共三个时间*/
    //当前日期:当前日期在日历面板中有一个背景和加粗字体,需要添加class为cur_day
    var dCurDate = new Date();
    //选定日期:在面板上选择的日期,并且显示在文本框中,有一个背景和白色字体,需要添加class为sel_day
    //选定日期需要记录在日历实例的selDate属性上,如果暂无选定日期则为当前日期
    var dSelDate = this.selDate || dCurDate;
    //初始化当前年/月
    this.nYear = this.nYear || dSelDate.getFullYear();
    this.nMonth = this.nMonth || dSelDate.getMonth();
    //面板上显示的日历
    var dShowDate = new Date(this.nYear,this.nMonth,dSelDate.getDate());

    /*
    日历面板规则:
    显示42天,6行7列;
    面板上的第一天是当月1号往前推到星期日。比如当月1号是星期一则上月显示1天、星期三上月显示3天、星期日上月显示7天;
    */
    //计算上月要显示的天数
    var nFrontNum = new Date(this.nYear,this.nMonth,1).getDay() || 7;
    //日历面板上的日期每增加一个循环周期是一天,获取一天的毫秒数
    var cycle = 1000*60*60*24;
    sBodyHtml += '<thbody>'
    //循环42次
    for(let i=1;i<43;i++){
        //以下公式获取日历中每天递增日期的时间戳
        let dTimes = +dShowDate + cycle * (i-nFrontNum-dShowDate.getDate());
        //通过时间戳创建Date实例对象
        let dNewDate = new Date(dTimes);
        //获取日期添加到html中
        if((i-1)%7==0){ //判断是否需要换行
            sBodyHtml += '<tr>';
        }
        //判断是否是选定日期,当前日期,面板当月日期,分别加上对应的class
        sBodyHtml += `<td><a data-time="${dTimes}" class="${
                                    this.quiteDate(dNewDate,dSelDate)?'sel_day':
                                    this.quiteDate(dNewDate,dCurDate)?'cur_day':
                                    dNewDate.getMonth()==this.nMonth?'cur_month':''
                                 }">${dNewDate.getDate()}</a></td>`;
        if(i%7==0){ //判断是否需要结束表格行
            sBodyHtml += '</tr>';
        }
    }
    sBodyHtml += '</thbody></table>';

    //填充日历面板
    this.eBody.innerHTML = sBodyHtml;
    //生成面板头部
    this.generateHead();
}
//比较两个日期是否为同一天
CalendarPlugin.prototype.quiteDate = function(d1,d2){
    var format = 'yyyy-MM-dd';
    return this.format(d1,format) == this.format(d2,format);
}
//格式化日期
CalendarPlugin.prototype.format = function(date,format){
    //用于正则表达式的匹配
    var o =  {
    "M+" : date.getMonth()+1, //月
    "d+" : date.getDate(), //日
    "h+" : date.getHours(), //小时
    "m+" : date.getMinutes(), //分钟
    "s+" : date.getSeconds(), //秒
    };
    //使用正则将yyyy替换为当前年份
    if(/(y+)/.test(format)){
        format = format.replace(RegExp.$1, (date.getFullYear()+"").substr(4 - RegExp.$1.length));
    }
    //枚举o对象中匹配的正则,比如MM替换当前月份,dd替换为当前日期
    for(var k in o)  {
        if(new RegExp("("+ k +")").test(format)){
            format = format.replace(RegExp.$1, RegExp.$1.length==1 ? o[k] : ("00"+ o[k]).substr((""+ o[k]).length));
        }
    }
    //把格式替换为正确日期后返回
    return format;
}
此时效果如图所示:

到这一步,日历选择器的元素大部分都已经创建。这段代码新加了几个方法,分别用于创建头部、日期等,因为我都写了详细的注释,这里就不再赘述。接下来需要给元素绑定事件,实现日期变化和选择等。
4. 添加配置选项
插件一般都会允许开发人员根据项目需求做个性化设置,所以可以自行修改配置,比如设置初始日期、文本框提示、日期格式等。比如在输入框添加提示,可以修改配置选项代码如下:
  //获取文本框
  /*...*/

  //配置选项
  var oConfig = {
    placeholder:'请选择日期',
  }

  //调用日历构造函数生成实例对象
  /*...*/
修改构建函数,在里面添加默认配置选项代码,如下所示:
//创建日历插件构造函数
function CalendarPlugin(elem,opt={}){
    //把文本框设置为日历对象的属性
    /*...*/

    //默认配置选项
    this.oConfig = {
        format:'yyyy-MM-dd',            //日期格式
        value:null,                                //默认日期
        placeholder:''     //文本框提示
    }
    //修改为传入的配置选项
    for(let k in this.oConfig){
        opt[k] && (this.oConfig[k] = opt[k]);
    }

    //执行初始化
    /*...*/
}
在初始化方法中设置相关配置
//初始化
CalendarPlugin.prototype.init = function(){
  /*...*/

  //默认赋值
    this.oConfig.value && (this.eInput.value = this.oConfig.value) && (this.selDate = new Date(this.oConfig.value));
    //设置文本框提示
    this.eInput.placeholder = this.oConfig.placeholder;
}
此时可以看到输入框中就有了默认提示信息,如图所示:
5. 添加绑定事件
5.1 输入框绑定点击事件,点击显示日历面板
默认情况下,应该先把日历面板设置隐藏
CalendarPlugin.prototype.init = function(){
  /*...*/

  //默认隐藏日历面板
    this.eMain.style.display = 'none';
}
再给输入框添加事件,生成并显示日历。this.generateDate() 方法也应该放到事件中再调用,代码中有详细注释:
//初始化
CalendarPlugin.prototype.init = function(){
  /*...*/

  //文本框点击显示日历面板
    this.eInput.addEventListener('click',()=>{
        if(this.eMain.style.display=='none'){
            //显示日历面板
            this.eMain.style.display = 'block';
            //在页面上绑定点击事件,除日历面板以外任何位置点击鼠标时,隐藏日历面板
            document.addEventListener('click',hideMain,false);
            //默认显示日历
            this.sModel = 'date';
            //初始化年/月
            this.nYear = null;
            this.nMonth = null;
            //生成日历
            this.generateDate();
        }else{
            //隐藏日历面板
            hideMain();
        }
    });

    //因为addEventListener监听事件必须是命名函数才能取消,所以在这里创建一个隐藏日历面板函数
    var eMain = this.eMain;
    function hideMain(){
        eMain.style.display = 'none';
        document.removeEventListener('click',hideMain,false);
    }

    //阻止冒泡
    eWrap.addEventListener('click',function(event){
        event.stopPropagation();
    });
}
此时已经实现输入框点击显示日历选择框,空白位置点击隐藏日历选择框功能。
5.2 日期面板绑定点击事件,选择日期或今天按钮,修改文本框的值,并且隐藏日历面板
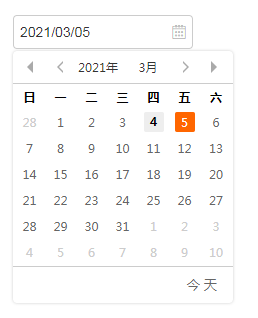
//初始化
CalendarPlugin.prototype.init = function(){
  /*...*/

  //日期面板点击事件
    this.eBody.addEventListener('click',(event)=>{
        //获取点击的元素
        let eTarget = event.target;
        //获取日期时间戳
        let sTime = eTarget.dataset.time;
        //获取月
        let sMonth = eTarget.dataset.month;
        //获取年
        let sYear = eTarget.dataset.year;
        //获取当前元素className
        let sClass = eTarget.className;
        if(this.sModel=='date'){    //当前模式是日期,在输入框显示日期,并隐藏日历面板
            if(sTime && sClass != 'sel_day'){
                this.selDate = new Date(+sTime);
                this.eInput.value = this.format(this.selDate,this.oConfig.format);
                hideMain();
            }
        }else{
            if(sMonth||sYear){    //年历或月历面板,创建选择的年或月的日期
                this.nYear = sYear || this.nYear;
                this.nMonth = sMonth || this.nMonth;
                this.sModel = 'date';
                this.generateDate();
            }
        }
    });
    //点击今天按钮选择今天的日期
    this.eDefine.addEventListener('click',(event)=>{
        this.selDate = new Date();
        this.eInput.value = this.format(this.selDate,this.oConfig.format);
        hideMain();
    });
}
此时选择日期后效果如下所示:
5.3 头部元素绑定点击事件,实例修改年、月,选择年、月等功能,代码如下:
//初始化
CalendarPlugin.prototype.init = function(){
  /*...*/

  //日历面板头部点击事件
    this.eHead.addEventListener('click',(event)=>{
        //获取点击的元素
        let eTarget = event.target;
        //获取修改方式
        let sRun = eTarget.dataset.run;
        //获取面板模式
        let sModel = eTarget.dataset.model;
        this.sModel = sModel || this.sModel;

        if(sRun=='addYear'){    //切换后一年
            if(this.sModel=='year'){
                this.nYear+=10;
            }else{
                this.nYear++;
            }
        }else if(sRun=='lessYear'){    //切换前一年
            if(this.sModel=='year'){
                this.nYear-=10;
            }else{
                this.nYear--;
            }
        }else if(sRun=='addMonth'){    //切换下一个月
            this.nMonth++;
        }else if(sRun=='lessMonth'){    //切换前一个月
            this.nMonth--;
        }

        if(this.sModel=='year'){
            this.generateYear();
        }else if(this.sModel=='month'){
            this.generateMonth();
        }else{
            this.generateDate(new Date(this.nYear,this.nMonth,1));    //因为切换只年月没选择日期,日期可以任意一天,所以设置为1号
        }

    });
}

/*...*/

//生成月历
CalendarPlugin.prototype.generateMonth = function(){
    //生成月份的html元素
    let sBodyHtml = '<ul>';
    for(let i=0;i<12;i++){
        sBodyHtml += `<li><a data-month="${i+1}" class="${i==this.nMonth?'sel_day':''}">${i+1}月</a></li>`
    }
    sBodyHtml += '</ul>';
    this.eBody.innerHTML = sBodyHtml;
    //生成面板头部
    this.generateHead();
}
//生成年历
CalendarPlugin.prototype.generateYear = function(){
    //共显示12年,可以通过把当前年最后一个数字改为0获取10年中的第一年
    let nStart = +(Math.floor(this.nYear/10)+'0');
    //再从-1开始循环到11,就可以循环出12年
    //生成年份的html元素
    let sBodyHtml = '<ul>';
    for(let i=-1;i<11;i++){
        sBodyHtml += `<li><a data-year="${i+nStart}" class="${
                                i==-1||i==10?'no_cur':
                                i+nStart==this.nYear?'sel_day':''
                            }">${i+nStart}</a></li>`
    }
    sBodyHtml += '</ul>';
    //修改面板
    this.eBody.innerHTML = sBodyHtml;
    //生成面板头部
    this.generateHead();
}
日期选择器功能已经基本完成,这已经是一个可以在项目中正常使用的日期选择器,如有疑问或bug,欢迎在留言中提出,感谢!