Refer:http://www.2cto.com/kf/201205/131876.html
(一)最简单的用法(详见注释)
 1         // 1、创建简单的AlertDialog // AlertDialog的构造方法全部是Protected的,
 2             // 所以不能直接通过new一个AlertDialog来创建出一个AlertDialog; //
 3             // (1)要创建一个AlertDialog,就要用到AlertDialog.Builder
 4             AlertDialog.Builder dialog = new AlertDialog.Builder(this);
 5
 6             // (2)设置各种属性 // 注:不设置哪项属性,这个属性就默认不会显示出来
 7             dialog.setTitle("这是一个简单的对话框");
 8             dialog.setIcon(R.drawable.dictation2_64);
 9             dialog.setMessage("欢迎使用!");
10
11             // (3)设置dialog可否被取消
12             dialog.setCancelable(true);
13
14             // (4)显示出来
15             dialog.show();
效果如下:

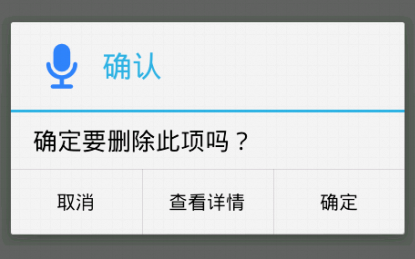
(二)带按钮的AlertDialog
 1         // 2、带按钮的AlertDialog
 2             AlertDialog.Builder dialog = new AlertDialog.Builder(this);
 3             dialog.setTitle("确认");
 4             dialog.setIcon(R.drawable.dictation2_64);
 5             dialog.setMessage("确定要删除此项吗?");
 6
 7             // 设置“确定”按钮,使用DialogInterface.OnClickListener接口参数
 8             dialog.setPositiveButton("确定",
 9                     new DialogInterface.OnClickListener() {
10
11                         @Override
12                         public void onClick(DialogInterface dialog, int which) {
13                             Log.d("Dialog", "点击了“确认”按钮");
14                         }
15                     });
16
17             // 设置“查看详情”按钮,使用DialogInterface.OnClickListener接口参数
18             dialog.setNeutralButton("查看详情",
19                     new DialogInterface.OnClickListener() {
20
21                         @Override
22                         public void onClick(DialogInterface dialog, int which) {
23                             Log.d("Dialog", "点击了“查看详情”按钮");
24                         }
25                     });
26
27             // 设置“取消”按钮,使用DialogInterface.OnClickListener接口参数
28             dialog.setNegativeButton("取消",
29                     new DialogInterface.OnClickListener() {
30
31                         @Override
32                         public void onClick(DialogInterface dialog, int which) {
33                             Log.d("Dialog", "点击了“取消”按钮");
34                         }
35                     });
36
37             dialog.show();
效果如下:
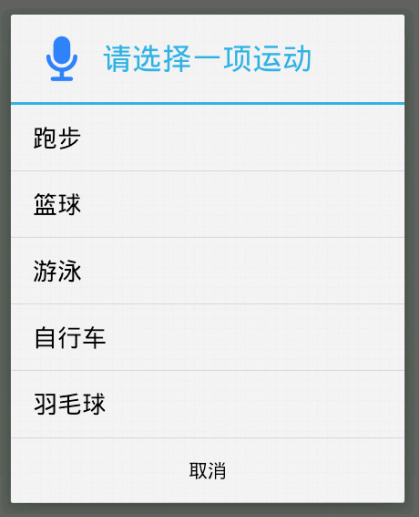
(三)类似于ListView的AlertDialog
用setItems(CharSequence[] items, final OnClickListener listener)方法来实现类似ListView的AlertDialog。
 1         // 3、类似ListView的AlertDialog
 2             AlertDialog.Builder dialog = new AlertDialog.Builder(this);
 3             dialog.setTitle("请选择一项运动");
 4             dialog.setIcon(R.drawable.dictation2_64);
 5             // 设置为false说明当前dialog是不能用返回键取消的
 6             dialog.setCancelable(false);
 7
 8             // 列表字符串数组
 9             final String[] sportsArray = new String[] { "跑步", "篮球", "游泳",
10                     "自行车", "羽毛球" };
11             // 用于在item的点击事件中,记录选择的是哪一项,初始值设为0.这里用final数组只是因为匿名内部类中只能使用外部终态的变量
12             final int selectedIndex[] = { 0 };
13
14             // 用setItems方法来实现
15             dialog.setItems(sportsArray, new DialogInterface.OnClickListener() {
16
17                 @Override
18                 public void onClick(DialogInterface dialog, int which) {
19                     selectedIndex[0] = which;
20                     Log.d("Dialog", "选择了:" + sportsArray[selectedIndex[0]]);
21                 }
22             });
23
24             dialog.setNegativeButton("取消",
25                     new DialogInterface.OnClickListener() {
26
27                         @Override
28                         public void onClick(DialogInterface dialog, int which) {
29                             Log.d("Dialog", "点击了“取消”按钮");
30                         }
31                     });
32
33             dialog.show();
效果如下:
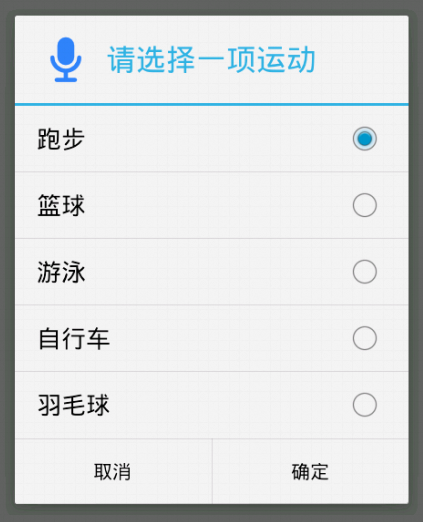
(四)类似RadioButton的AlertDialog
用setSingleChoiceItems(CharSequence[] items, int checkedItem, final OnClickListener listener)方法来实现类似RadioButton的AlertDialog
第一个参数是要显示的数据的数组,第二个参数是初始值(初始被选中的item),第三个参数是点击某个item的触发事件
 1         // 4、类似RadioButton的AlertDialog
 2             AlertDialog.Builder dialog = new AlertDialog.Builder(this);
 3             dialog.setTitle("请选择一项运动");
 4             dialog.setIcon(R.drawable.dictation2_64);
 5
 6             // 列表字符串数组
 7             final String[] sportsArray = new String[] { "跑步", "篮球", "游泳",
 8                     "自行车", "羽毛球" };
 9             // 用于在item的点击事件中,记录选择的是哪一项,初始值设为0.这里用final数组只是因为匿名内部类中只能使用外部终态的变量
10             final int selectedIndex[] = { 0 };
11
12             // 用setSingleChoiceItems方法来实现
13             dialog.setSingleChoiceItems(sportsArray, 0,
14                     new DialogInterface.OnClickListener() {
15
16                         @Override
17                         public void onClick(DialogInterface dialog, int which) {
18                             selectedIndex[0] = which;
19
20                         }
21                     });
22
23             dialog.setPositiveButton("确定",
24                     new DialogInterface.OnClickListener() {
25
26                         @Override
27                         public void onClick(DialogInterface dialog, int which) {
28                             Log.d("Dialog", "选择了:"
29                                     + sportsArray[selectedIndex[0]]);
30                         }
31                     });
32
33             dialog.setNegativeButton("取消",
34                     new DialogInterface.OnClickListener() {
35
36                         @Override
37                         public void onClick(DialogInterface dialog, int which) {
38                             Log.d("Dialog", "点击了“取消”按钮");
39                         }
40                     });
41
42             dialog.show();
效果如下:
(五)类似CheckBox的AlertDialog
用setMultiChoiceItems(CharSequence[] items, boolean[] checkedItems, final OnMultiChoiceClickListener listener)方法来实现类似CheckBox的AlertDialog
第一个参数是要显示的数据的数组,第二个参数是选中状态的数组,第三个参数是点击某个item的触发事件
 1         // 5、类似CheckBox的AlertDialog
 2             AlertDialog.Builder dialog = new AlertDialog.Builder(this);
 3             dialog.setTitle("请选择喜欢的运动(可多选)");
 4             dialog.setIcon(R.drawable.dictation2_64);
 5
 6             // 列表字符串数组
 7             final String[] sportsArray = new String[] { "跑步", "篮球", "游泳",
 8                     "自行车", "羽毛球" };
 9             // 用于在item的点击事件中,记录选择了哪些项.
10             final boolean[] selectedIndex = { true, true, false, false, false };
11
12             // 用setMultiChoiceItems方法来实现
13             dialog.setMultiChoiceItems(sportsArray, selectedIndex,
14                     new DialogInterface.OnMultiChoiceClickListener() {
15
16                         @Override
17                         public void onClick(DialogInterface dialog, int which,
18                                 boolean isChecked) {
19                             selectedIndex[which] = isChecked;
20                         }
21                     });
22
23             dialog.setPositiveButton("确定",
24                     new DialogInterface.OnClickListener() {
25
26                         @Override
27                         public void onClick(DialogInterface dialog, int which) {
28                             for (int i = 0; i < selectedIndex.length; i++) {
29                                 if (selectedIndex[i]) {
30                                     Log.d("Dialog", "选择了:" + sportsArray[i]);
31                                 }
32                             }
33                         }
34                     });
35
36             dialog.setNegativeButton("取消",
37                     new DialogInterface.OnClickListener() {
38
39                         @Override
40                         public void onClick(DialogInterface dialog, int which) {
41                             Log.d("Dialog", "点击了“取消”按钮");
42                         }
43                     });
44
45             dialog.show();
效果如下:

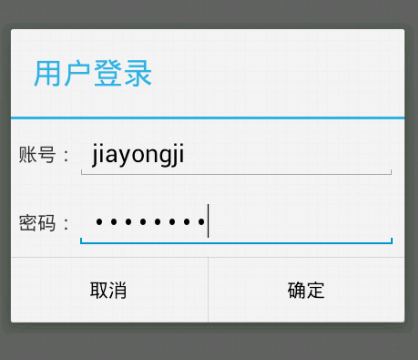
(六)自定义View的AlertDialog
有时候系统自带的AlertDialog风格不能满足我们的需求,就比如说我们要实现一个Login画面,有用户名和密码,这时我们就要用到自定义View的AlertDialog
1、先创建自定义登录框的布局文件my_login_view.xml:
 1 <?xml version="1.0" encoding="utf-8"?>
 2 <LinearLayout xmlns:android="http://schemas.android.com/apk/res/android"
 3     android:layout_width="match_parent"
 4     android:layout_height="match_parent"
 5     android:orientation="vertical" >
 6
 7     <LinearLayout
 8         android:layout_width="fill_parent"
 9         android:layout_height="wrap_content"
10         android:gravity="center"
11         android:padding="5dp" >
12
13         <TextView
14             android:layout_width="wrap_content"
15             android:layout_height="wrap_content"
16             android:text="账号:" />
17
18         <EditText
19             android:id="@+id/my_login_account_et"
20             android:layout_width="0dip"
21             android:layout_height="wrap_content"
22             android:layout_weight="1" />
23     </LinearLayout>
24
25     <LinearLayout
26         android:layout_width="fill_parent"
27         android:layout_height="wrap_content"
28         android:gravity="center"
29         android:padding="5dp" >
30
31         <TextView
32             android:layout_width="wrap_content"
33             android:layout_height="wrap_content"
34             android:text="密码:" />
35
36         <EditText
37             android:id="@+id/my_login_password_et"
38             android:layout_width="0dip"
39             android:layout_height="wrap_content"
40             android:layout_weight="1"
41             android:inputType="numberPassword" />
42     </LinearLayout>
43
44 </LinearLayout>
2、在Activity的合适地方创建自定义的AlertDialog(比如按钮的点击事件中):
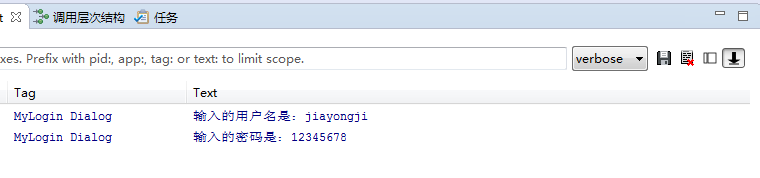
 1         // 6、自定义View的AlertDialog
 2             AlertDialog.Builder dialog = new AlertDialog.Builder(this);
 3             dialog.setTitle("用户登录");
 4
 5             // 取得自定义View
 6             LayoutInflater layoutInflater = LayoutInflater.from(this);
 7             final View myLoginView = layoutInflater.inflate(
 8                     R.layout.my_login_view, null);
 9             dialog.setView(myLoginView);
10
11             dialog.setPositiveButton("确定",
12                     new DialogInterface.OnClickListener() {
13
14                         @Override
15                         public void onClick(DialogInterface dialog, int which) {
16                             EditText loginAccountEt = (EditText) myLoginView
17                                     .findViewById(R.id.my_login_account_et);
18                             EditText loginPasswordEt = (EditText) myLoginView
19                                     .findViewById(R.id.my_login_password_et);
20                             Log.d("MyLogin Dialog", "输入的用户名是:"
21                                     + loginAccountEt.getText().toString());
22                             Log.d("MyLogin Dialog", "输入的密码是:"
23                                     + loginPasswordEt.getText().toString());
24                         }
25                     });
26
27             dialog.setNegativeButton("取消",
28                     new DialogInterface.OnClickListener() {
29
30                         @Override
31                         public void onClick(DialogInterface dialog, int which) {
32
33                         }
34                     });
35
36             dialog.show();
效果如下:
点击“确定”按钮后LogCat中的内容: