前言
最近在面试的时候被问到SPI了,没回答上来,主要也是自己的原因,把自己给带沟里去了,因为讲到了类加载器的双亲委派模型,后面就被问到了有哪些是破坏了双亲委派模型的场景,然后我就说到了SPI,JNDI,以及JDK9的模块化都破坏了双亲委派。
然后就被问,那你说说对Java中的SPI的理解吧。然后我就一脸懵逼了,之前只是知道它会破坏双亲委派,也知道是个怎么回事,但是并没有深入了解,那么这次我就好好的来总结一下这个知识吧。
什么是SPI
SPI全称Service Provider Interface,字面意思是提供服务的接口,再解释详细一下就是Java提供的一套用来被第三方实现或扩展的接口,实现了接口的动态扩展,让第三方的实现类能像插件一样嵌入到系统中。
咦。。。
这个解释感觉还是有点绕口。
那就说一下它的本质。
将接口的实现类的全限定名配置在文件中(文件名是接口的全限定名),由服务加载器读取配置文件,加载实现类。实现了运行时动态为接口替换实现类。
SPI示例
还是举例说明吧。
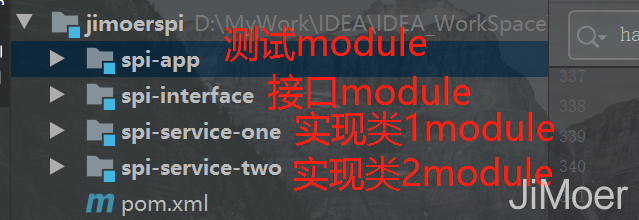
我们创建一个项目,然后创建一个module叫spi-interface。
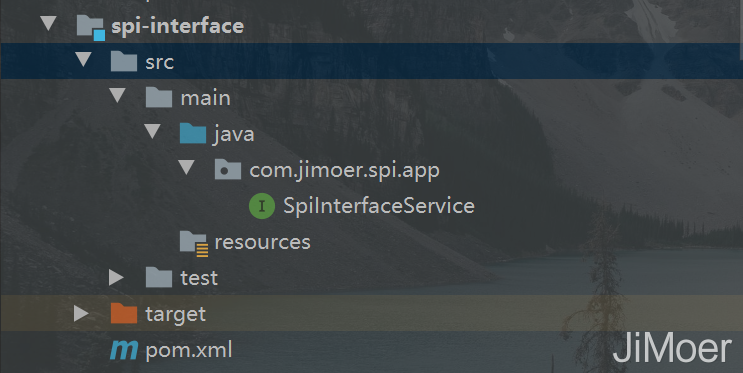
在这个module中我们定义一个接口:
/**
 * @author jimoer
 **/
public interface SpiInterfaceService {

    /**
     * 打印参数
     * @param parameter 参数
     */
    void printParameter(String parameter);
}
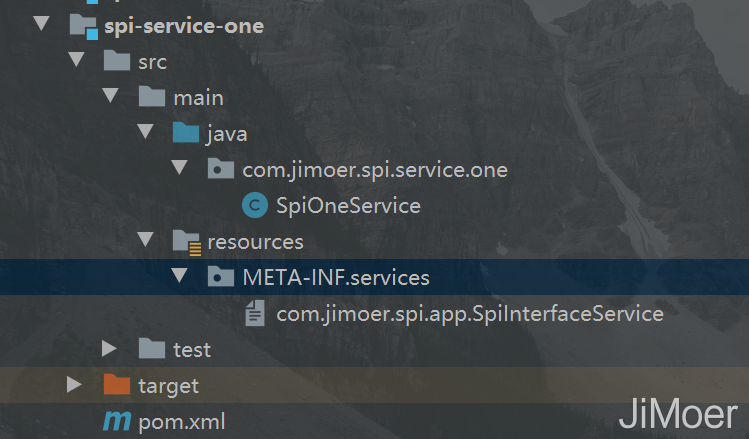
再定义一个module,名字叫spi-service-one,pom.xml中依赖spi-interface。
在spi-service-one中定义一个实现类,实现SpiInterfaceService 接口。
package com.jimoer.spi.service.one;
import com.jimoer.spi.app.SpiInterfaceService;

/**
 * @author jimoer
 **/
public class SpiOneService implements SpiInterfaceService {
    /**
     * 打印参数
     *
     * @param parameter 参数
     */
    @Override
    public void printParameter(String parameter) {
        System.out.println("我是SpiOneService:"+parameter);
    }
}
然后再spi-service-one的resources目录下创建目录META-INF/services,在此目录下创建一个文件名称为SpiInterfaceService接口的全限定名称,文件内容写入SpiOneService这个实现类的全限定名称。
效果如下:
再创建一个module,名称为:spi-service-one,也是依赖spi-interface,并且定义一个实现类SpiTwoService 来实现SpiInterfaceService 接口。
package com.jimoer.spi.service.two;
import com.jimoer.spi.app.SpiInterfaceService;
/**
 * @author jimoer
 **/
public class SpiTwoService implements SpiInterfaceService {
    /**
     * 打印参数
     *
     * @param parameter 参数
     */
    @Override
    public void printParameter(String parameter) {
        System.out.println("我是SpiTwoService:"+parameter);
    }
}
目录结构如下:

下面再创建一个用来测试的module,名为:spi-app。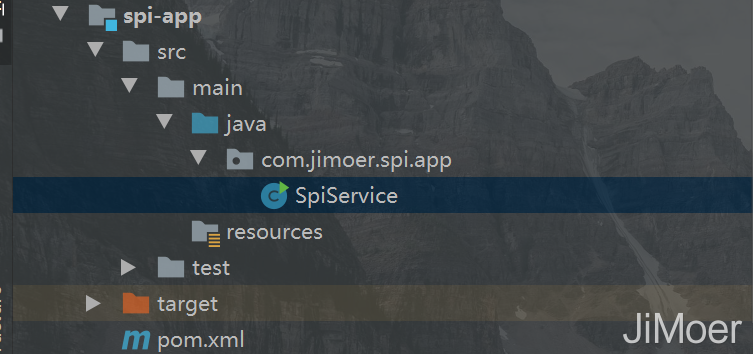
pom.xml中依赖spi-service-one和spi-service-two
<dependencies>
    <dependency>
        <groupId>com.jimoer.spi</groupId>
        <artifactId>spi-service-one</artifactId>
        <version>1.0-SNAPSHOT</version>
    </dependency>
    <dependency>
        <groupId>com.jimoer.spi</groupId>
        <artifactId>spi-service-two</artifactId>
        <version>1.0-SNAPSHOT</version>
    </dependency>
</dependencies>
创建测试类
/**
 * @author jimoer
 **/
public class SpiService {

    public static void main(String[] args) {

        ServiceLoader<SpiInterfaceService> spiInterfaceServices = ServiceLoader.load(SpiInterfaceService.class);
        Iterator<SpiInterfaceService> iterator = spiInterfaceServices.iterator();
        while (iterator.hasNext()){
            SpiInterfaceService sip = iterator.next();
            sip.printParameter("参数");
        }
    }
}
执行结果:
我是SpiTwoService:参数
我是SpiOneService:参数
通过运行结果我们可以看到,已经将SpiInterfaceService接口的所有实现都加载到了当前项目中,并且执行了调用。
这整个代码结构我们可以看出SPI机制将模块的装配放到了程序外面,就是说,接口的实现可以在程序外面,只需要在使用的时候指定具体的实现。并且动态的加载到自己的项目中。
SPI机制的主要目的:
一是为了解耦,将接口和具体实现分离开来;
二是提高框架的扩展性。以前写程序的时候,接口和实现都写在一起,调用方在使用的时候依赖接口来进行调用,无权选择使用具体的实现类。
SPI的实现
那么我们来看一下SPI具体是如何实现的呢?
通过上面的例子,我们可以看到,SPI机制的核心代码是下面这段:
ServiceLoader<SpiInterfaceService> spiInterfaceServices = ServiceLoader.load(SpiInterfaceService.class);
那么我们来看一下ServiceLoader.load()方法的源码:
public static <S> ServiceLoader<S> load(Class<S> service) {
    ClassLoader cl = Thread.currentThread().getContextClassLoader();
    return ServiceLoader.load(service, cl);
}
看到Thread.currentThread().getContextClassLoader();我就明白是怎么回事了,这个就是线程上下文类加载器,因为线程上下文类加载器就是为了做类加载双亲委派模型的逆序而创建的。
使用这个线程上下文类加载器去加载所需的SPI服务代码,这是一种父类加载器去请求子类加载器完成类加载的行为,这种行为实际上是打通了,双亲委派模型的层次结构来逆向使用类加载器,已经违背了双亲委派模型的一般性原则,但也是无可奈何的事情。
《深入理解Java虚拟机(第三版)》
虽然知道了它是破坏双亲委派的了,但是具体实现,还是需要具体往下看的。
在ServiceLoader里找到具体实现hasNext()的方法了,那么继续来看这个方法的实现。
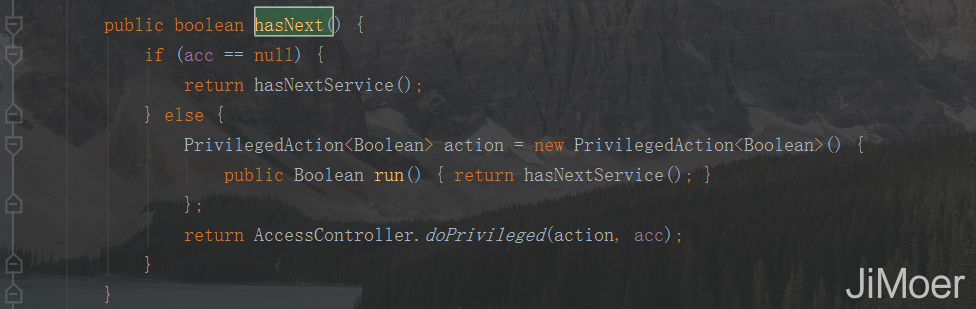
hasNext()方法又主要调用了hasNextService()方法。
// 固定路径
private static final String PREFIX = "META-INF/services/";

private boolean hasNextService() {
     if (nextName != null) {
         return true;
     }
     if (configs == null) {
         try {
         	// 固定路径+接口全限定名称
             String fullName = PREFIX + service.getName();
             // 如果当前线程上下文类加载器为空,会用父类加载器(默认是应用程序类加载器)
             if (loader == null)
                 configs = ClassLoader.getSystemResources(fullName);
             else
                 configs = loader.getResources(fullName);
         } catch (IOException x) {
             fail(service, "Error locating configuration files", x);
         }
     }
     while ((pending == null) || !pending.hasNext()) {
         if (!configs.hasMoreElements()) {
             return false;
         }
         pending = parse(service, configs.nextElement());
     }
     // 后面next()方法中判断当前类是否已经出现化的时候要用
     nextName = pending.next();
     return true;
 }
主要就是去加载META-INF/services/路径下的接口全限定名称的文件然后去里面找到实现类的类路径将实现类进行类加载。
继续看迭代器是如何取出每一个实现对象的。那就要看ServiceLoader中实现了迭代器的next()方法了。
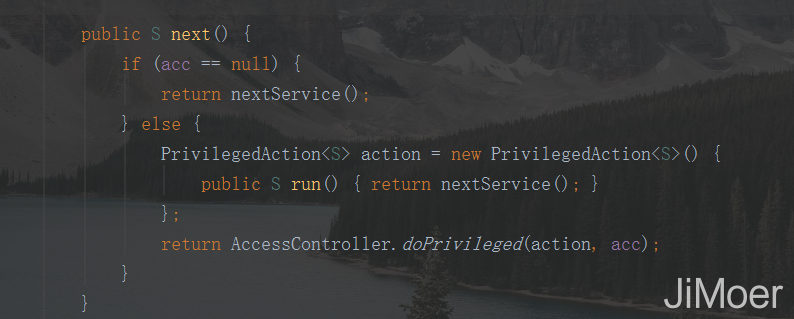
next()方法主要是nextService()实现的,那么继续看nextService()方法。
private S nextService() {
     if (!hasNextService())
         throw new NoSuchElementException();
     String cn = nextName;
     nextName = null;
     Class<?> c = null;
     try {
     // 直接加载类,无需初始化(因为上面hasNext()已经初始化了)。
         c = Class.forName(cn, false, loader);
     } catch (ClassNotFoundException x) {
         fail(service,
              "Provider " + cn + " not found");
     }
     if (!service.isAssignableFrom(c)) {
         fail(service,
              "Provider " + cn  + " not a subtype");
     }
     try {
     	// 将加载好的类实例化出对象。
         S p = service.cast(c.newInstance());
         providers.put(cn, p);
         return p;
     } catch (Throwable x) {
         fail(service,
              "Provider " + cn + " could not be instantiated",
              x);
     }
     throw new Error();          // This cannot happen
 }
看到这里就可以明白了,是如何创建出对象的了。先在hasNext()将接口的实现类进行加载并判断是否存在接口的实现类,然后在next()方法中将实现类进实例化。
Java中使用SPI机制的功能其实有很多,像JDBC、JNDI、以及Spring中也有使用,甚至RPC框架(Dubbo)中也有使用SPI机制来实现功能。