在Redis的使用过程中,大多数人都是使用现成的客户端,如Jedis,Redisson,Lettuce。因此本文研究用BIO的方式手写Redis客户端尝试,对遇到的问题进行探究及总结。
如何从架构角度思考架构分层?
Redis通讯协议RESP是怎么回事?
如何基于BIO实现Redis客户端?
Redis客户端通讯线程安全问题如何解决?
一、Jedis客户端如何进行架构分层
要进行远程访问,如下图所示:
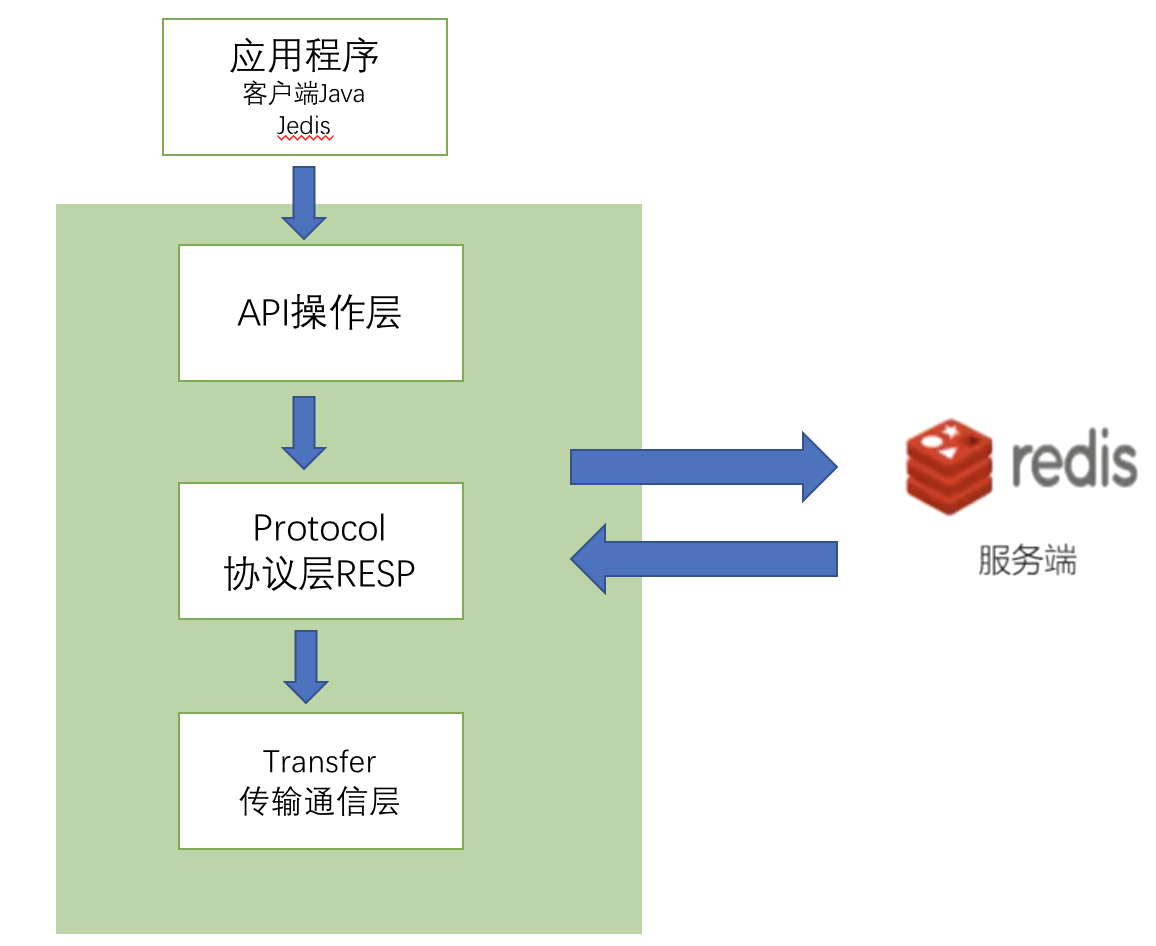
- 我们在Java应用程序的客户端通过访问包装的API进行Redis访问,API使我们直接可以看懂的调用入口;
- 然后API是对Redis通信协议的包装,通过对协议的包装,实现我们对Redis访问协议的透明使用;
- 协议是按照一定规则组装的数据,并不能直接用于网络IO,所以必须进行序列化和反序列化,这样才能进行远程Redis的请求调用以及返回数据的处理。
二、传输层通信
基于远程访问,我们可以使用BIO的Socket进行通信,首先定义一个Connection,Connection类包含了建立BIO连接的远程地址host,端口port,套接字Socket以及输入输出流。
此类一个Connection的构造方法,一个Connection的初始化方法,以及请求发送方法。
public class Connection {

    private String host;
    private int port;
    private Socket socket;
    private InputStream inputStream;
    private OutputStream outputStream;

    public Connection(String host, int port) {
        this.host = host;
        this.port = port;
    }

    public boolean isConnection() {

        if (socket != null && !socket.isClosed() && !socket.isBound() && socket.isConnected()) {
            return true;
        }
        try {
            socket = new Socket(host, port);
            inputStream = socket.getInputStream();
            outputStream = socket.getOutputStream();
        } catch (IOException e) {
            e.printStackTrace();
            return false;
        }
        return true;
    }

    public String sendCommand(byte[] command) {
        if (isConnection()) {
            try {
                outputStream.write(command);
                int length = 0;
                byte[] response = new byte[1024];
                while ((length = inputStream.read(response)) > 0) {
                    return new String(response, 0, length);
                }
            } catch (IOException e) {
                e.printStackTrace();
            }
        }
        return null;
    }
}
有了连接类后就可以发送BIO请求,然后就构建Connection进行请求发送测试:
public class MainTest {
    public static void main(String[] args) {

        String command = "set ant 123456";
        Connection connection = new Connection("localhost", 6379);
        System.out.println(connection.sendCommand(command.getBytes()));
  }
}
发现结果如下图,请求调用后没有返回,但是main方法也没有结束,通过debug可以知道是因为inputStream.read(response))这一句代码是阻塞调用,因为一直没返回结果,因此main方法阻塞,如下图:
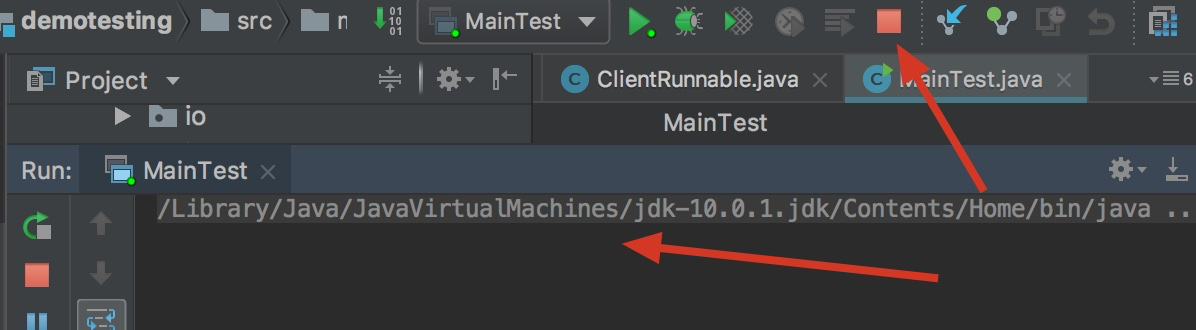
实际上的原因是因为任何请求都是基于协议,发送了请求command = "set ant 123456"后,由于并未遵循Redis的任何访问协议,因此Redis无法识别请求并做出返回。
三、协议层包装
我们先进行抓包测试,看看Jedis客户端传给服务端的到底是些什么内容,我们自己手写一个假的服务端,然后用Jedis发送请求,我们的伪服务端会接受到请求,伪服务端如下所示:
public class Hack {

   public static void main(String[] args) throws Exception {
      ServerSocket serverSocket = new ServerSocket(10000);
      Socket socket = serverSocket.accept();
      byte[] b=new byte[1024];
      socket.getInputStream().read(b);
      System.out.println(new String(b));
   }
}
然后用一个客户端进行调用:
public class Test {

   public static void main(String[] args) {
      Jedis jedis = new Jedis("redis://localhost:10000");
      jedis.set("monkey", "2019");
      System.out.println(jedis.get("monkey"));
   }
}
在伪服务端可以接收到请求:
*3
$3
SET
$6
monkey
$4
2019
可以看到请求是根据一定规则进行了包装,这就是Redis的RESP协议。RESP协议是在Redis 1.2中引入的,但是它成为Redis 2.0中与Redis服务器通信的标准方法。RESP实际上是支持以下数据类型的序列化协议:简单字符串,错误,整数,大容量字符串和数组。
RESP在Redis中用作请求-响应协议的方式如下:
- 客户端将命令作为大容量字符串的RESP数组发送到Redis服务器。
- 服务器根据命令实现以RESP类型之一进行回复。
在RESP中,某些数据的类型取决于第一个字节:
- 对于简单字符串,答复的第一个字节为“ +”
- 对于错误,回复的第一个字节为“-”
- 对于整数,答复的第一个字节为“:”
- 对于批量字符串,答复的第一个字节为“ $”
- 对于数组,回复的第一个字节为“
*”
另外,RESP可以使用Bulk Strings或Array的特殊变体来表示Null值,如稍后指定。在RESP中,协议的不同部分始终以“ r n”(CRLF)终止。详情请查看https://redis.io/topics/protocol
我们知道了Redis的RESP规则,那么我们就可以定义一个协议类Protocol,来实现请求的包装(本示例未完全实现RESP协议内容,仅实现简单的SET、GET请求以及内容的解析):
public class Protocol {

    public static final String DOLLER="$";
    public static final String ALLERSTIC="*";
    public static final String CRLF="
";

  // 如SET请求 set ant 7777
  // *3
        长度为3的数组
  // $3
        第一个字符串长度为3
  // SET
       第一个字符串为SET
  // $6
        第二个字符串长度为6
  // monkey
       第二个字符串为ant
  // $4
        第三个字符串长度为4
  // 2019
      第三个字符串为2019
    public static byte[] buildRespByte(Command command, byte[]... bytes){
        StringBuilder stringBuilder = new StringBuilder();
        stringBuilder.append(ALLERSTIC).append(bytes.length+1).append(CRLF);

     // 封装方法SET、GET
     stringBuilder.append(DOLLER).append(command.name().length()).append(CRLF);
        stringBuilder.append(command.name()).append(CRLF);
        // 封装参数
        for(byte[] arg:bytes){
            stringBuilder.append(DOLLER).append(arg.length).append(CRLF);
            stringBuilder.append(new String(arg) ).append(CRLF);
        }
        return stringBuilder.toString().getBytes();
    }

    public enum Command{
        SET,GET
    }
}
此时我们就可以进行调用:
public class MainTest {

    public static void main(String[] args) {
        Connection connection = new Connection("localhost",6379);
        System.out.println(connection.sendCommand(Protocol.buildRespByte(Protocol.Command.SET, "monkey".getBytes(), "2019".getBytes())));
        System.out.println(connection.sendCommand(Protocol.buildRespByte(Protocol.Command.GET, "monkey".getBytes())));
    }

}
然后得到返回结果为:
+OK

$4
2019
四、API包装
如上述调用方式,我们直接组装Connection以及入参进行调用是极其不友好的,因此我们创建一个Clientset和get方法进行封装,然后暴露出调用API:
public class Client {

    private Connection connection;

    public SelfRedisClient(String host, int ip) {
        connection = new Connection(host, ip);
    }

    public String set(String key, String value) {
        String result = connection.sendCommand(
                Protocol.buildRespByte(Protocol.Command.SET, key.getBytes(), value.getBytes()));
        return result;
    }

    public String get(String key) {
        String result = connection.sendCommand(
                Protocol.buildRespByte(Protocol.Command.GET, key.getBytes()));
        return result;
    }
}
然后调用Main方法:
public class MainTest {
    public static void main(String[] args) {
        Client client = new Client("localhost", 6379);
        System.out.println(client.set("ant", "123456"));
        System.out.println(client.get("ant"));
    }
}
可以看出结果正常返回,当然我们未对返回结果使用协议解析, 不过这样使用API调用方式已经得到了极大的简化:

五、使用多线程对Redis进行请求
上面的示例是在单线程的访问情况下进行的测试,那么在多线程情况下会如何呢。接下来我们构建一个线程池,使用多线程对Redis进行请求尝试,构建一个ClientRunnable方法如下:
public class ClientRunnable implements Runnable {

    private Client client;
    private String value;

    public ClientRunnable(Client client, String value) {
        this.client = client;
        this.value = value;
    }
    @Override
    public void run() {
        client.set("ant", value);
    }
}
main方法如下:
public class MainTest {
    public static void main(String[] args) {
        Client client = new client("localhost", 6379);
        ExecutorService pool = Executors.newCachedThreadPool();
        for(int i=0;i<20;i++){
            pool.execute(new ClientRunnable(client,"value"+i));
        }
    }
}
并在set方法中增加输出到控制台:
public String set(String key, String value) {
    String result = connection.sendCommand(
            Protocol.buildRespByte(Protocol.Command.SET, key.getBytes(), value.getBytes()));
    System.out.println("Thread name: " + Thread.currentThread().getName() + "[result]: "
            + result.replace("
", "") + " [value]: " + value);
    return result;
}
查看结果如下:
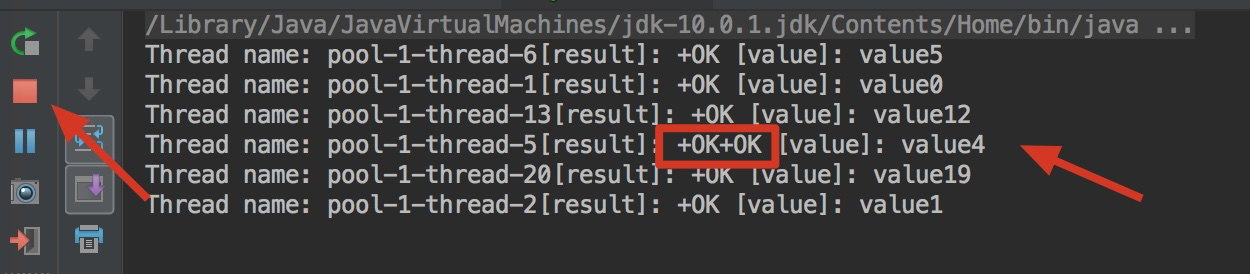
发现不但返回结果一次出现了两个甚至多个Redis服务其返回的OK,而且main方法还未执行结束。为什么呢,因为在多线程下Socket是线程不安全的,当多个线程访问Socket的时候,同时发送了请求,然后请求的返回结果会累积,然后被一个线程完全获取的情况,其余发送了请求的线程将一直阻塞等待返回,可是已经被先来的线程截取了流,因此程序无法继续运行。

因此现在就需要一个线程池来管理Connection,每个线程使用一个单独的Connection,对于没有拿到Connection的线程就在阻塞队列等待,直到有线程完成调用,并将Connection释放回线程池,被阻塞的线程才继续进行调用。如下图:
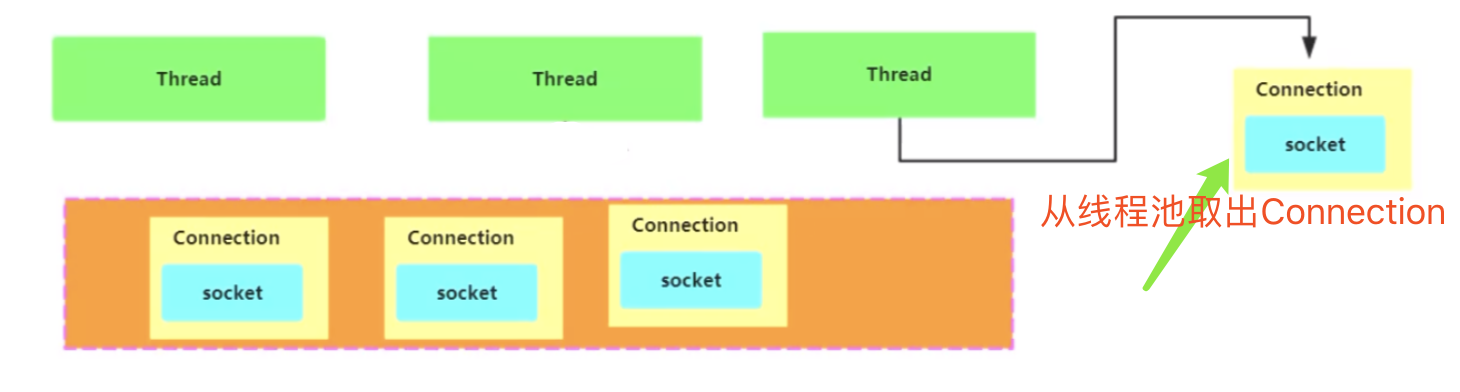
六、实现Connection的线程池管理
首先实现一个阻塞队列用于管理特定数量的Connection,当有Connection使用时就返回Connection,用完Connection后就进行归还。
public class RedisClientPool {

    private LinkedBlockingQueue<SelfRedisClient> linkedBlockingQueue;

    public RedisClientPool(String host,int port ,int connectionCount){
        this.linkedBlockingQueue = new LinkedBlockingQueue<SelfRedisClient>(connectionCount);
        for(int i=0;i<connectionCount;i++){
            Client client = new Client(host,port);
            linkedBlockingQueue.add(client);
        }
    }

    public Client getClient(){
        try{
            return linkedBlockingQueue.take();
        }catch (InterruptedException e){
            e.printStackTrace();
        }
        return null;
    }

    public void returnClient(Client client) {
        if(client != null){
            linkedBlockingQueue.add(client);
        }
    }
}
修改ClientRunnable方法,改为从线程池获取Connection进行请求调用:
public class ClientRunnable implements Runnable {

    private RedisClientPool redisClientPool;
    private String value;

    public ClientRunnable(RedisClientPool redisClientPool, String value) {
        this.redisClientPool = redisClientPool;
        this.value = value;
    }

    @Override
    public void run() {
        // 执行前先去管理Connection的阻塞队列中获取封装了Connection的SelfRedisClient
        Client client = redisClientPool.getClient();
        client.set("ant", value);
        // 使用完后进行归还client
        redisClientPool.returnClient(client);
    }
}
使用Main方法进行请求调用:
public class MainTest {
    public static void main(String[] args) {
        RedisClientPool redisClientPool = new RedisClientPool("localhost",6379,5);
        ExecutorService executorService = Executors.newCachedThreadPool();
        for(int i=0;i<10;i++){
            executorService.execute(new ClientRunnable(redisClientPool,"value"+i));
        }
    }
}
查看执行结果:

可以知道成功返回了所有的请求调用,最后也是线程9成功将value值修改为value8。
因此,可以发现使用一个阻塞队列对Connection资源进行管理不仅近能节省Connection的创建和回收时间,在本例中更核心的功能是实现了线程不安全资源的管理。