目录
前言
RHEV3.2的Web管理界面有了很大的改进,更加的简单和便捷,还可以使用中文浏览。
Install RHEV
Step1:更新系统
yum update -yStep2:安装RHEV并将其report功能也安装上
yum install -y rhevm rhevm-reports rhevm-dwhStep3:配置RHEV
[root@rhevm ~]# engine-setup
[ INFO  ] Stage: Initializing
[ INFO  ] Stage: Environment setup
          Configuration files: ['/etc/ovirt-engine-setup.conf.d/10-packaging-dwh.conf', '/etc/ovirt-engine-setup.conf.d/10-packaging-wsp.conf', '/etc/ovirt-engine-setup.conf.d/10-packaging.conf', '/etc/ovirt-engine-setup.conf.d/20-packaging-rhevm-reports.conf']
          Log file: /var/log/ovirt-engine/setup/ovirt-engine-setup-20160604231558-xbilsi.log
          Version: otopi-1.3.0 (otopi-1.3.0-2.el6ev)
[ INFO  ] Stage: Environment packages setup
[ INFO  ] Stage: Programs detection
[ INFO  ] Stage: Environment setup
[ INFO  ] Stage: Environment customization

          --== PRODUCT OPTIONS ==--

          Configure Engine on this host (Yes, No) [Yes]:
          Configure Data Warehouse on this host (Yes, No) [Yes]:          #是否在本机配置数据仓库
          Configure Reports on this host (Yes, No) [Yes]:                 #是否在本机配置报告功能
          Configure WebSocket Proxy on this host (Yes, No) [Yes]:         #是否在本机配置Web代理服务

          --== PACKAGES ==--

[ INFO  ] Checking for product updates...
[ INFO  ] No product updates found

          --== ALL IN ONE CONFIGURATION ==--


          --== NETWORK CONFIGURATION ==--

          Setup can automatically configure the firewall on this system.
          Note: automatic configuration of the firewall may overwrite current settings.
          Do you want Setup to configure the firewall? (Yes, No) [Yes]: no               #需要配置防火墙吗
          Host fully qualified DNS name of this server [rhevm.pod2.example.com]:         #指定主机的FQDN

          --== DATABASE CONFIGURATION ==--

          Where is the Reports database located? (Local, Remote) [Local]:                      #在哪里安装Report功能的数据库
          Setup can configure the local postgresql server automatically for the Reports to run. This may conflict with existing applications.
          Would you like Setup to automatically configure postgresql and create Reports database, or prefer to perform that manually? (Automatic, Manual) [Automatic]:                           #手动还是自动配置postgresql数据库
          Where is the DWH database located? (Local, Remote) [Local]:                          #在哪里安装DWH数据库
          Setup can configure the local postgresql server automatically for the DWH to run. This may conflict with existing applications.
          Would you like Setup to automatically configure postgresql and create DWH database, or prefer to perform that manually? (Automatic, Manual) [Automatic]:
          Where is the Engine database located? (Local, Remote) [Local]:                       #在哪里安装RHEV Engine的数据库
          Setup can configure the local postgresql server automatically for the engine to run. This may conflict with existing applications.
          Would you like Setup to automatically configure postgresql and create Engine database, or prefer to perform that manually? (Automatic, Manual) [Automatic]:

          --== OVIRT ENGINE CONFIGURATION ==--

          Engine admin password:                                #数据RHEV admin的密码
          Confirm engine admin password:
[WARNING] Password is weak: it is based on a dictionary word
          Use weak password? (Yes, No) [No]: yes
          Application mode (Virt, Gluster, Both) [Both]:

          --== PKI CONFIGURATION ==--

          Organization name for certificate [pod2.example.com]: pod2.example.com     #颁发证书的组织名,这个要保证准确

          --== APACHE CONFIGURATION ==--

          Setup can configure the default page of the web server to present the application home page. This may conflict with existing applications.
          Do you wish to set the application as the default page of the web server? (Yes, No) [Yes]:              #是否将RHEV Web界面设置为Web服务器的默认站点
          Setup can configure apache to use SSL using a certificate issued from the internal CA.
          Do you wish Setup to configure that, or prefer to perform that manually? (Automatic, Manual) [Automatic]:

          --== SYSTEM CONFIGURATION ==--

          Configure an NFS share on this server to be used as an ISO Domain? (Yes, No) [Yes]:      //将ISO域的共享配置为NFS
          Local ISO domain path [/var/lib/exports/iso]:
          Local ISO domain ACL - note that the default will restrict access to rhevm.pod2.example.com only, for security reasons [rhevm.pod2.example.com(rw)]:
          Local ISO domain name [ISO_DOMAIN]: iso2

          --== MISC CONFIGURATION ==--

          Reports power users password:                    #Report功能Web界面的密码
          Confirm Reports power users password:
[WARNING] Passwords do not match
          Reports power users password:
          Confirm Reports power users password:
[WARNING] Password is weak: it is based on a dictionary word
          Use weak password? (Yes, No) [No]: yes
          Would you like transactions from the Red Hat Access Plugin sent from the RHEV Manager to be brokered through a proxy server? (Yes, No) [No]:

          --== END OF CONFIGURATION ==--

[ INFO  ] Stage: Setup validation
[WARNING] Less than 16384MB of memory is available

          --== CONFIGURATION PREVIEW ==--

          Application mode                        : both
          Update Firewall                         : False
          Host FQDN                               : rhevm.pod2.example.com
          Engine database name                    : engine
          Engine database secured connection      : False
          Engine database host                    : localhost
          Engine database user name               : engine
          Engine database host name validation    : False
          Engine database port                    : 5432
          Engine installation                     : True
          NFS setup                               : True
          PKI organization                        : pod2.example.com
          NFS mount point                         : /var/lib/exports/iso
          NFS export ACL                          : rhevm.pod2.example.com(rw)
          Configure local Engine database         : True
          Set application as default page         : True
          Configure Apache SSL                    : True
          DWH installation                        : True
          DWH database name                       : ovirt_engine_history
          DWH database secured connection         : False
          DWH database host                       : localhost
          DWH database user name                  : ovirt_engine_history
          DWH database host name validation       : False
          DWH database port                       : 5432
          Configure local DWH database            : True
          Reports installation                    : True
          Reports database name                   : ovirt_engine_reports
          Reports database secured connection     : False
          Reports database host                   : localhost
          Reports database user name              : ovirt_engine_reports
          Reports database host name validation   : False
          Reports database port                   : 5432
          Configure local Reports database        : True
          Engine Host FQDN                        : rhevm.pod2.example.com
          Configure WebSocket Proxy               : True

          Please confirm installation settings (OK, Cancel) [OK]:
[ INFO  ] Stage: Transaction setup
[ INFO  ] Stopping dwh service
[ INFO  ] Stopping reports service
[ INFO  ] Stopping engine service
[ INFO  ] Stopping ovirt-fence-kdump-listener service
[ INFO  ] Stopping websocket-proxy service
[ INFO  ] Stage: Misc configuration
[ INFO  ] Stage: Package installation
[ INFO  ] Stage: Misc configuration
[ INFO  ] Initializing PostgreSQL
[ INFO  ] Creating PostgreSQL 'engine' database
[ INFO  ] Configuring PostgreSQL
[ INFO  ] Creating PostgreSQL 'ovirt_engine_history' database
[ INFO  ] Configuring PostgreSQL
[ INFO  ] Creating PostgreSQL 'ovirt_engine_reports' database
[ INFO  ] Configuring PostgreSQL
[ INFO  ] Creating/refreshing Engine database schema
[ INFO  ] Creating CA
[ INFO  ] Creating/refreshing DWH database schema
[ INFO  ] Deploying Jasper
[ INFO  ] Importing data into Jasper
[ INFO  ] Configuring Jasper Java resources
[ INFO  ] Configuring Jasper Database resources
[ INFO  ] Customizing Jasper
[ INFO  ] Customizing Jasper metadata
[ INFO  ] Customizing Jasper Pro Parts
[ INFO  ] Configuring WebSocket Proxy
[ INFO  ] Generating post install configuration file '/etc/ovirt-engine-setup.conf.d/20-setup-ovirt-post.conf'
[ INFO  ] Stage: Transaction commit
[ INFO  ] Stage: Closing up
[ INFO  ] Restarting nfs services

          --== SUMMARY ==--

[WARNING] Less than 16384MB of memory is available
          SSH fingerprint: A3:61:93:18:AF:88:80:8F:BE:90:57:AB:60:F1:ED:BD
          Internal CA 1A:33:97:83:9B:2E:44:FD:52:D4:BF:84:F5:C5:75:17:36:B4:26:98
          Web access is enabled at:
              http://rhevm.pod2.example.com:80/ovirt-engine
              https://rhevm.pod2.example.com:443/ovirt-engine
          Please use the user "admin" and password specified in order to login
          The following network ports should be opened:
              tcp:111
              tcp:2049
              tcp:32803
              tcp:443
              tcp:5432
              tcp:6100
              tcp:662
              tcp:80
              tcp:875
              tcp:892
              udp:111
              udp:32769
              udp:662
              udp:7410
              udp:875
              udp:892
          An example of the required configuration for iptables can be found at:
              /etc/ovirt-engine/iptables.example

          --== END OF SUMMARY ==--

[ INFO  ] Starting engine service
[ INFO  ] Restarting httpd
[ INFO  ] Starting dwh service
[ INFO  ] Starting reports service
[ INFO  ] Stage: Clean up
          Log file is located at /var/log/ovirt-engine/setup/ovirt-engine-setup-20160604231558-xbilsi.log
[ INFO  ] Generating answer file '/var/lib/ovirt-engine/setup/answers/20160604233528-setup.conf'
[ INFO  ] Stage: Pre-termination
[ INFO  ] Stage: Termination
[ INFO ] Execution of setup completed successfullyStep5:将rhevadmin用户加入到example.com域并赋予权限。
[root@rhevm ~]# engine-manage-domains add --domain=example.com --provider=IPA --user=rhevadmin --add-permissions
Enter password:
Successfully added domain example.com. oVirt Engine restart is required in order for the changes to take place (service ovirt-engine restart).
Manage Domains completed successfullyStep6:重启ovirt-engine服务使配置生效
[root@rhevm ~]#/etc/init.d/ovirt-engine restartStep7:验证rhevadmin用户是否成功加入域
[root@rhevm ~]# engine-manage-domains list
Domain: example.com
    User name: rhevadmin@EXAMPLE.COM
Manage Domains completed successfully
创建Data Center、Cluster、Host
Step1:Get the CPU Type
- Login Manager Potal from rhevadmin
- 将H端加入到Host中
- Get the CUPtype:
Intel Nehalem Family用于之后创建cluster时使用
- Get the CUPtype:
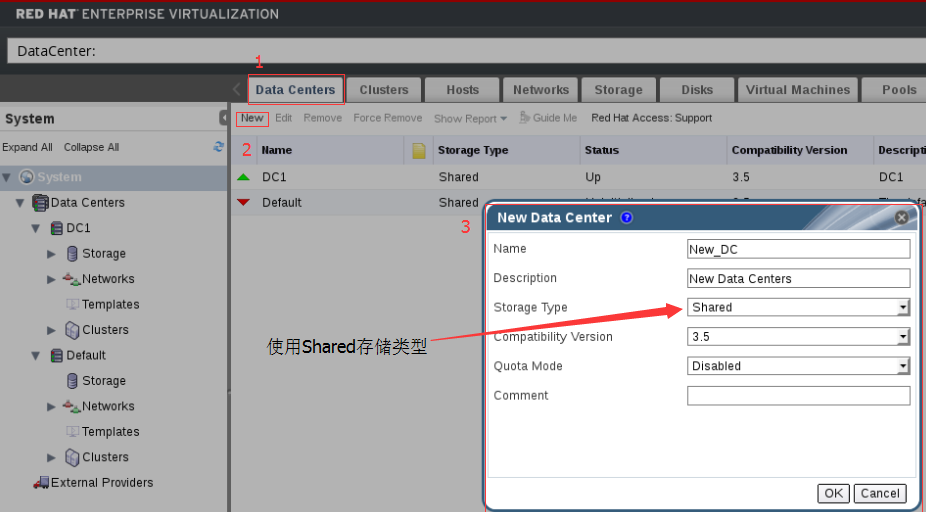
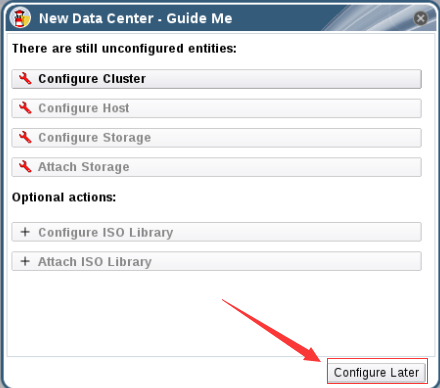
Step2:Create DataCenter、Cluster and Host
DataCenters: (Add Data Centers)New –> OK
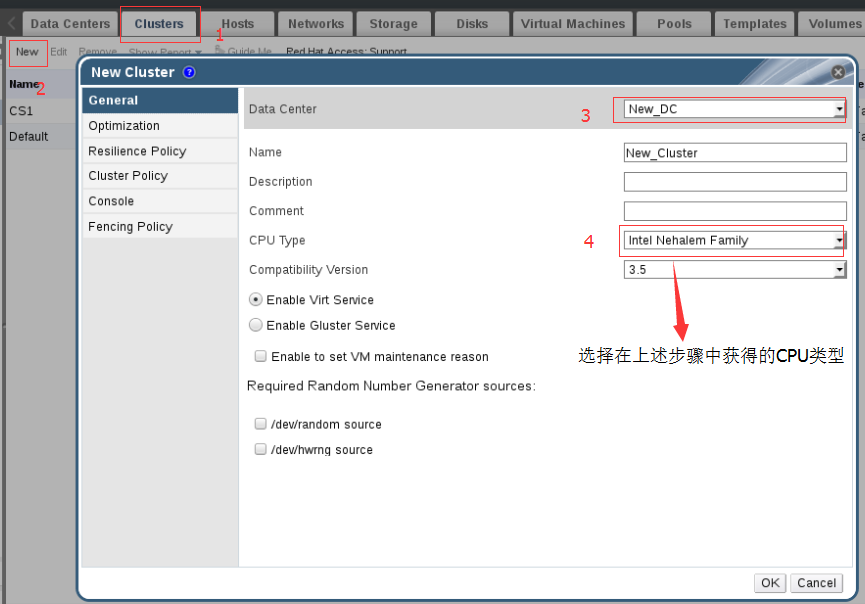
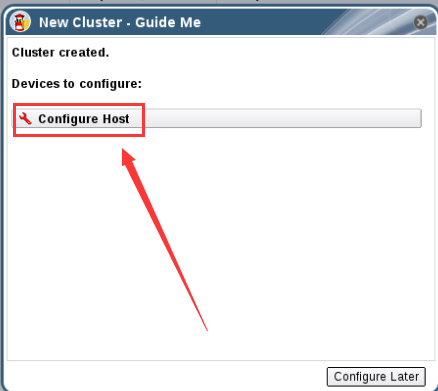
Cluster: (Add Clusters) New –> CPU Type:Intel Nehalem Family
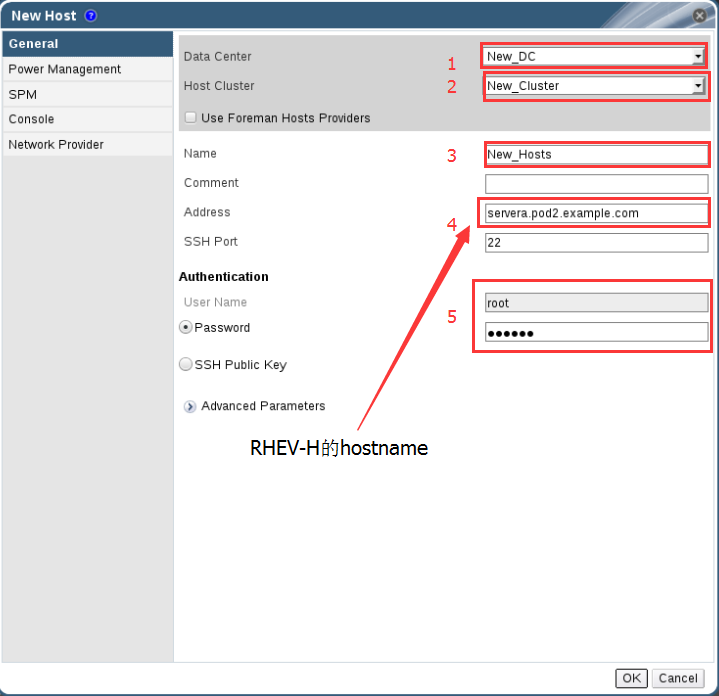
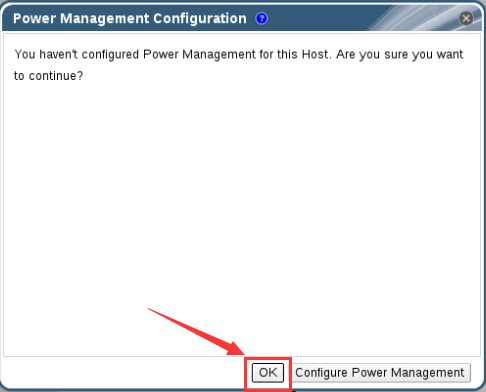
Hosts: New –> Data Center –> Host Cluster –> Address:RHEVHAddress –> UserName:root –> Password:RHEV-HPassword
创建存储
Step1:新建Shared Directory
[root@rhevm ~]# mkdir -p /exports/testdate
[root@rhevm ~]# mkdir /exports/testexport
[root@rhevm ~]# chown 36:36 /exports/test* #必须给你36权限,RHEVM才能够访问Step2:配置NFS共享
vim /etc/exports
/var/lib/exports/iso    rhevm.pod2.example.com(rw)
/var/lib/exports/iso    172.25.2.0/255.255.0.0(rw,sync,no_root_squash)
/var/lib/exports/iso    172.25.2.0/255.255.255.0(rw,sync,no_root_squash)
/exports/testdata       172.25.0.0/255.255.0.0(rw,sync,no_root_squash)
/exports/testdata       172.25.0.0/255.255.255.0(rw,sync,no_root_squash)
/exports/testexport     172.25.0.0/255.255.0.0(rw,sync,no_root_squash)
/exports/testexport     172.25.0.0/255.255.255.0(rw,sync,no_root_squash)
/exports/rhevisos       172.25.0.0/255.255.255.0(rw,sync,no_root_squash)
/exports/rhevisos 172.25.0.0/255.255.0.0(rw,sync,no_root_squash)Step3:重启使共享生效
[root@rhevm ~]# exportfs -r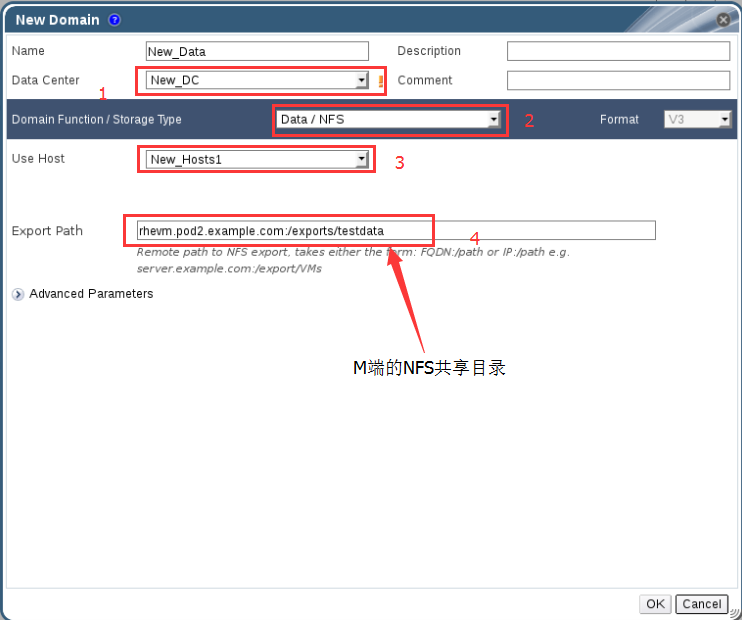
[root@rhevm ~]# service nfs restartStep4:在RHEVM Web界面新建Data Storage
Storage –> New Domain –> Data/NFS
Step5:新建ISO Storage
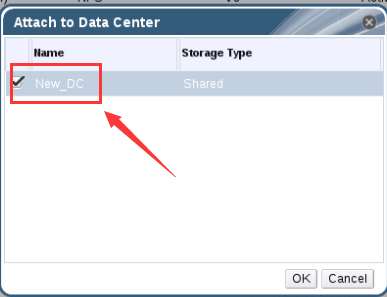
Storage –> New Domain –> ISO/NFS or iso2 –> Data Center -> Attach
创建虚拟机
Step1:获取虚拟机镜像
[root@rhevm ~]# wget http://classroom.example.com/materials/rhel-server-7.1-x86_64-boot.iso
--2016-06-05 02:43:21--  http://classroom.example.com/materials/rhel-server-7.1-x86_64-boot.iso
Resolving classroom.example.com... 172.25.254.254
Connecting to classroom.example.com|172.25.254.254|:80... connected.
HTTP request sent, awaiting response... 200 OK
Length: 358612992 (342M) [application/octet-stream]
Saving to: “rhel-server-7.1-x86_64-boot.iso”

100%[======================================>] 358,612,992 90.5M/s   in 3.7s

2016-06-05 02:43:25 (91.5 MB/s) - “rhel-server-7.1-x86_64-boot.iso” saved [358612992/358612992]Step2:上传虚拟机镜像到RHEVM
[root@rhevm ~]# engine-iso-uploader list
Please provide the REST API password for the admin@internal oVirt Engine user (CTRL+D to abort):
ISO Storage Domain Name   | Datacenter                | ISO Domain Status
iso2                      | DC1                       | active

[root@rhevm ~]# engine-iso-uploader -i iso2 upload rhel-server-7.1-x86_64-boot.iso
Please provide the REST API password for the admin@internal oVirt Engine user (CTRL+D to abort):
Uploading, please wait...
INFO: Start uploading rhel-server-7.1-x86_64-boot.iso
INFO: rhel-server-7.1-x86_64-boot.iso uploaded successfullyStep3:配置虚拟机的MAC Pool
[root@rhevm ~]# engine-config -s MacPoolRanges=52:54:00:00:02:10-52:54:00:00:02:FF
[root@rhevm ~]# /etc/init.d/ovirt-engine restart
Stopping oVirt Engine:                                     [  OK  ]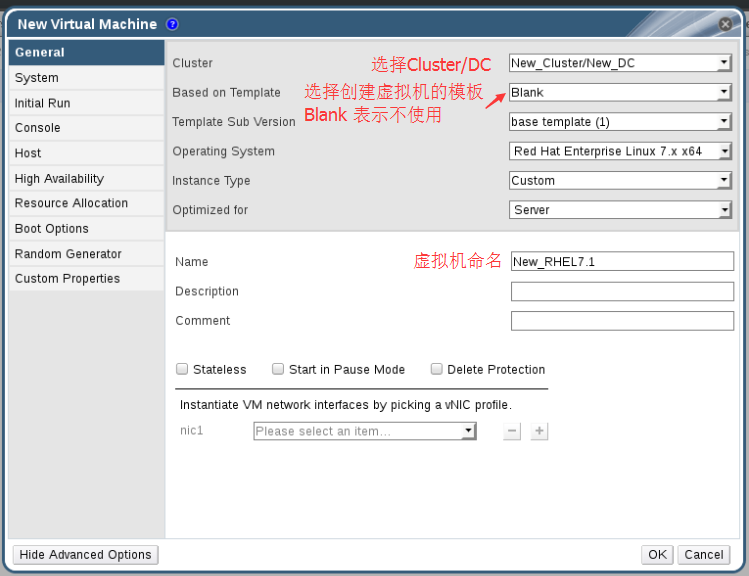
Starting oVirt Engine: [ OK ]Step4:创建虚拟机
Virtual Machines –> New VM
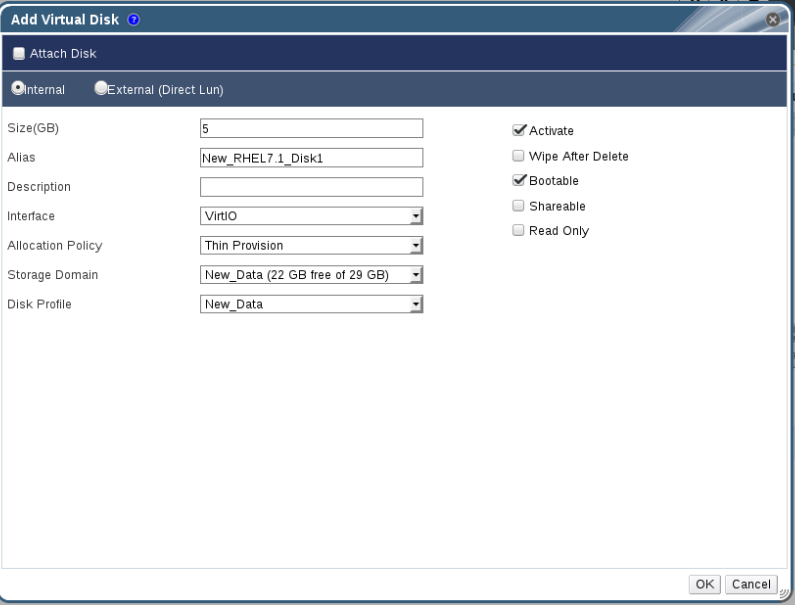
Step5:创建虚拟机的虚拟磁盘
Virtual Machines –> VMName –> Disks
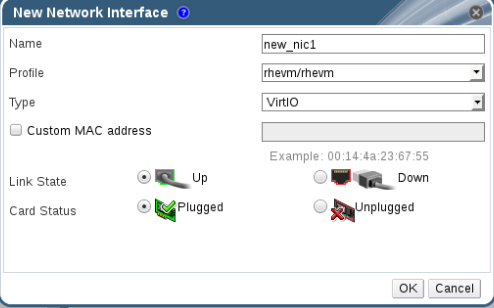
Step6:创建虚拟机的虚拟网卡
Virtual Machines –> VMName –> Network Interfaces
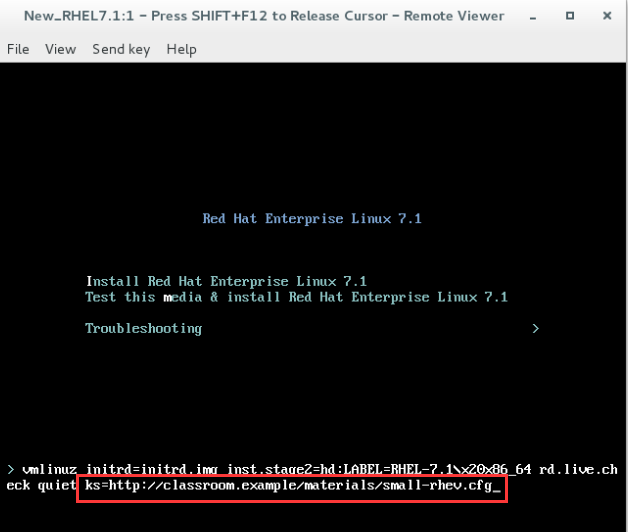
Step7:安装虚拟机操作系统
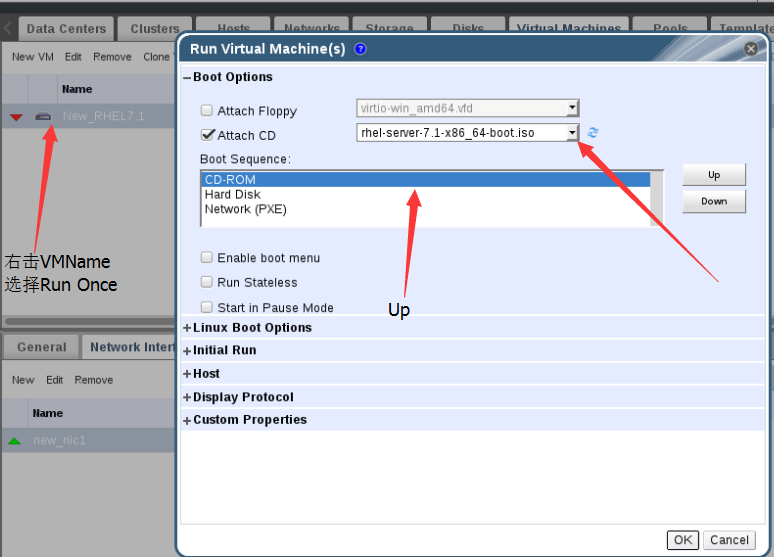
点击小电视开启VM –> 在grub2界面按tab建 –> 输入ks=http://classroom.example.com/materisals/small-rhev.cfg –> 回车
Step8:login the VM and check the MAC
Step9:新建快照
Virtual Machines –> VMName –> Snapshots –> Create –> OK
Step10:新建模板
Virtual Machines –> stopVM –> right chick the VM and Make Template –> OK
Step11:新建Pool
Pool –> New –> 3 –> OK