目录
文章目录
硬件设备要求
OAI 要在基于 Intel 处理器架构的 PCs 上运行 eNB 和 UE,这是因为 DSP(数字信号处理器)大量的使用到了整数指令集(SSE, SSE2, SSS3, SSE4, and AVX2)。而对于 EPC,则可以在任意的 64 位 Linux 操作系统上运行,但不能使用容器来运行,因为 EPC 需要安装内核模块,eNB 对电脑配置的要求比 EPC 要更高一些。
OAI eNB 和 UE 在以下 CPU 型号完成了测试:
- Generation 3/4/5/6 Intel Core i5,i7
- Generation 2/3/4 Intel Xeon
- Intel Atom Rangeley, E38xx, x5-z8300
针对 UE 还在下列具体的 CPU 型号完成了测试:
- Intel® Core™ i5-6600K CPU @ 3.50GHz × 4
- Intel® Core™ i5-6600 CPU @ 3.30GHz × 4
- Intel® Core™ i7-8700 CPU @ 3.20GHz × 6
当你希望与基站进行 Real-Time Operation 交互时,还需要特殊的硬件设备支持:
- RF 前端设备:NI/Ettus USRP B200/B210 需要 PC 具有 USB3.0 插口。
SIM Card 要求:在部署 OAI LTE SDR 之前,需要 SIM Card,并对其进行编程。
- 可编程 USIM 卡:例如 Sysmocom 的 sysmoUSIM-SJS1 型号 USIM Card(http://shop.sysmocom.de/products/sysmousim-sjs1)
- SIM Card 读卡机:PC/SC Smart Card Reader
- SIM Card 烧录软件:PySIM
物料购买
设备清单:
- EPC:PC1(Intel Core i5,双网卡)
- eNB:PC2(Intel Core i5,单网卡,USB3.0)
- RF 前端:USRP B210
- UE:安卓手机
- USIM Card:Sysmocom sysmoUSIM-SJS1
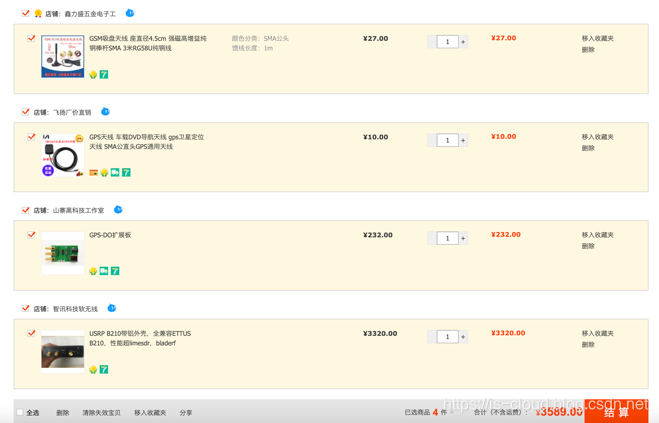
物料购买:
- USIM Card 相关
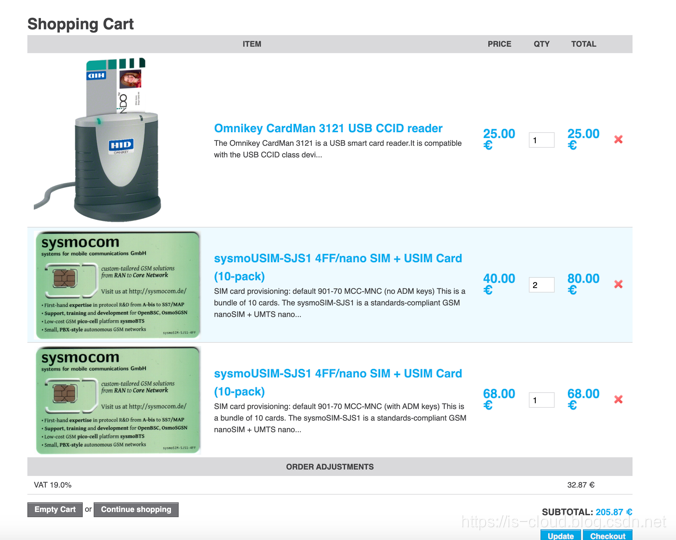
- USRP 210 相关
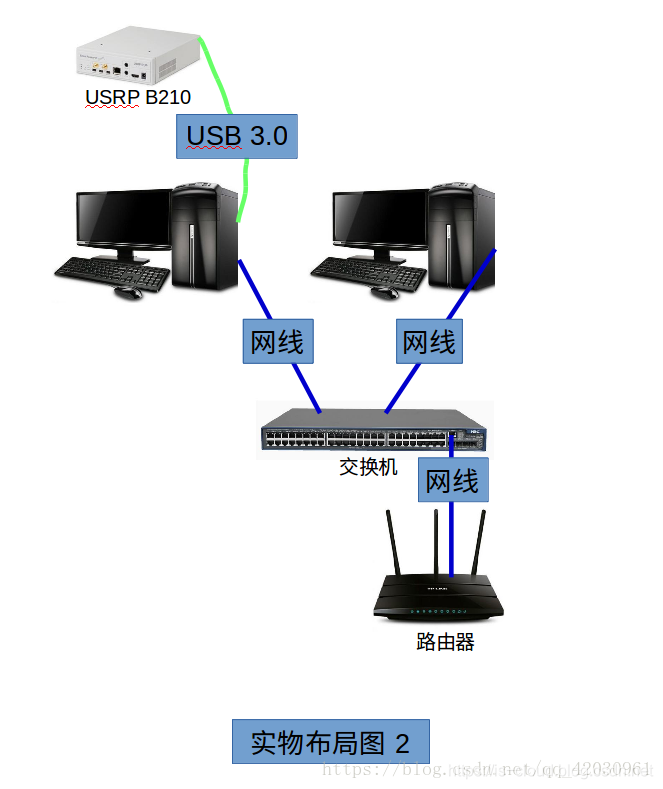
部署架构图
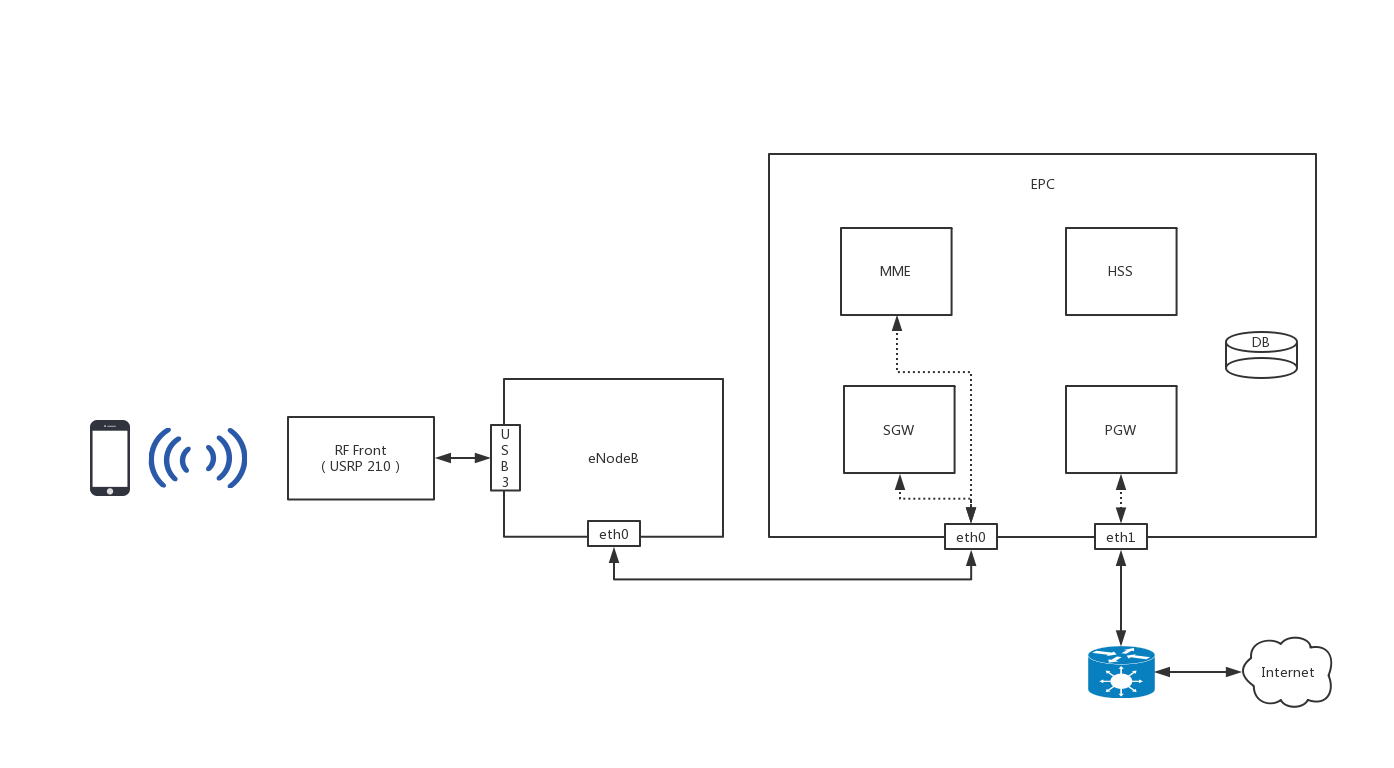
NOTE:官方不建议使用无线网卡代替 PGW 连接 PDN 的网关,所以对于只有单网卡的 PCs 可以参考下面的实物连线图。这么做的话需要分配静态 IP 地址来 Ping 通两台 PCs,注意千万别用 DHCP。
安装 LTE/EPC
注:以下所有操作均通过 root 用户执行。
前期准备
运维相关
国内软件源:
sudo vim /etc/apt/sources.list

deb http://mirrors.aliyun.com/ubuntu/ xenial main
deb-src http://mirrors.aliyun.com/ubuntu/ xenial main
deb http://mirrors.aliyun.com/ubuntu/ xenial-updates main
deb-src http://mirrors.aliyun.com/ubuntu/ xenial-updates main
deb http://mirrors.aliyun.com/ubuntu/ xenial universe
deb-src http://mirrors.aliyun.com/ubuntu/ xenial universe
deb http://mirrors.aliyun.com/ubuntu/ xenial-updates universe
deb-src http://mirrors.aliyun.com/ubuntu/ xenial-updates universe
deb http://mirrors.aliyun.com/ubuntu/ xenial-security main
deb-src http://mirrors.aliyun.com/ubuntu/ xenial-security main
deb http://mirrors.aliyun.com/ubuntu/ xenial-security universe
deb-src http://mirrors.aliyun.com/ubuntu/ xenial-security universe
运维工具:
sudo apt-get install git vim openssh-server i7z subversion
NOTE:请科学上网。e.g.
sudo gedit ~/.gitconfig

[http]
	   proxy = http://127.0.0.1:1080
[https]
	   proxy = https://127.0.0.1:1080
操作系统要求
用于部署 OAI 的操作系统强烈建议使用 Ubuntu Linux 发行版,因为 OAI 是在 Ubuntu 上进行开发的,所以这是最稳定的部署系统。
- 对于 old tags(older than v0.6.1_tdd)的 OAI 应该使用 Ubuntu 14.04 LTS with low-latency kernel 3.19;
- 对于 newer tags(starting v1.0.0 or develop)的 OAI 则应该使用 Ubuntu 16.04 with low-latency kernel 4.8.0 or higher。
NOTE:本文操作系统为 Ubuntu 16.04 LTS。
NOTE 1:不建议在虚拟机上运行 OAI,因为某些虚拟机可能没有加载需要的 CPU models。
NOTE 2:不建议在同一台 PC 上安装 eNB 和 EPC,因为存在对不同软件/内核版本的依赖。
首先更新操作系统环境:
sudo apt-get update
sudo apt-get upgrade
内核要求
OAI 其实对内核非常敏感,很多莫名其表的错误都是由内核不适应导致的,所以切记检查内核的版本。
NOTE:实际上 EPC 不依赖 low-latency kernel,但是为了部署的流畅度,也安装上。
安装 Kernel 4.8.0(最低要求):
wget http://kernel.ubuntu.com/~kernel-ppa/mainline/v4.8/linux-headers-4.8.0-040800-generic_4.8.0-040800.201610022031_amd64.deb
wget http://kernel.ubuntu.com/~kernel-ppa/mainline/v4.8/linux-image-4.8.0-040800-generic_4.8.0-040800.201610022031_amd64.deb
sudo dpkg -i linux-headers-4.8.0-040800-generic_4.8.0-040800.201610022031_amd64.deb
sudo dpkg -i linux-image-4.8.0-040800-generic_4.8.0-040800.201610022031_amd64.deb
安装 low-latency kernel(低延时内核):
sudo apt-get install linux-lowlatency
sudo apt-get install linux-image-`uname -r | cut -d- -f1-2`-lowlatency
sudo apt-get install linux-headers-`uname -r | cut -d- -f1-2`-lowlatency
sudo reboot
NOTE:重新登录可以看见当前内核版本,e.g. Welcome to Ubuntu 16.04.6 LTS (GNU/Linux 4.15.0-70-lowlatency x86_64)。
检查是否加载了 GTP 内核模块(for openair-cn):
uname -a
# 临时加载 gtp 模块
sudo modprobe gtp
dmesg | tail # You should see something that says about GTP kernel module
# e.g.
# [  111.364332] gtp: GTP module loaded (pdp ctx size 104 bytes)
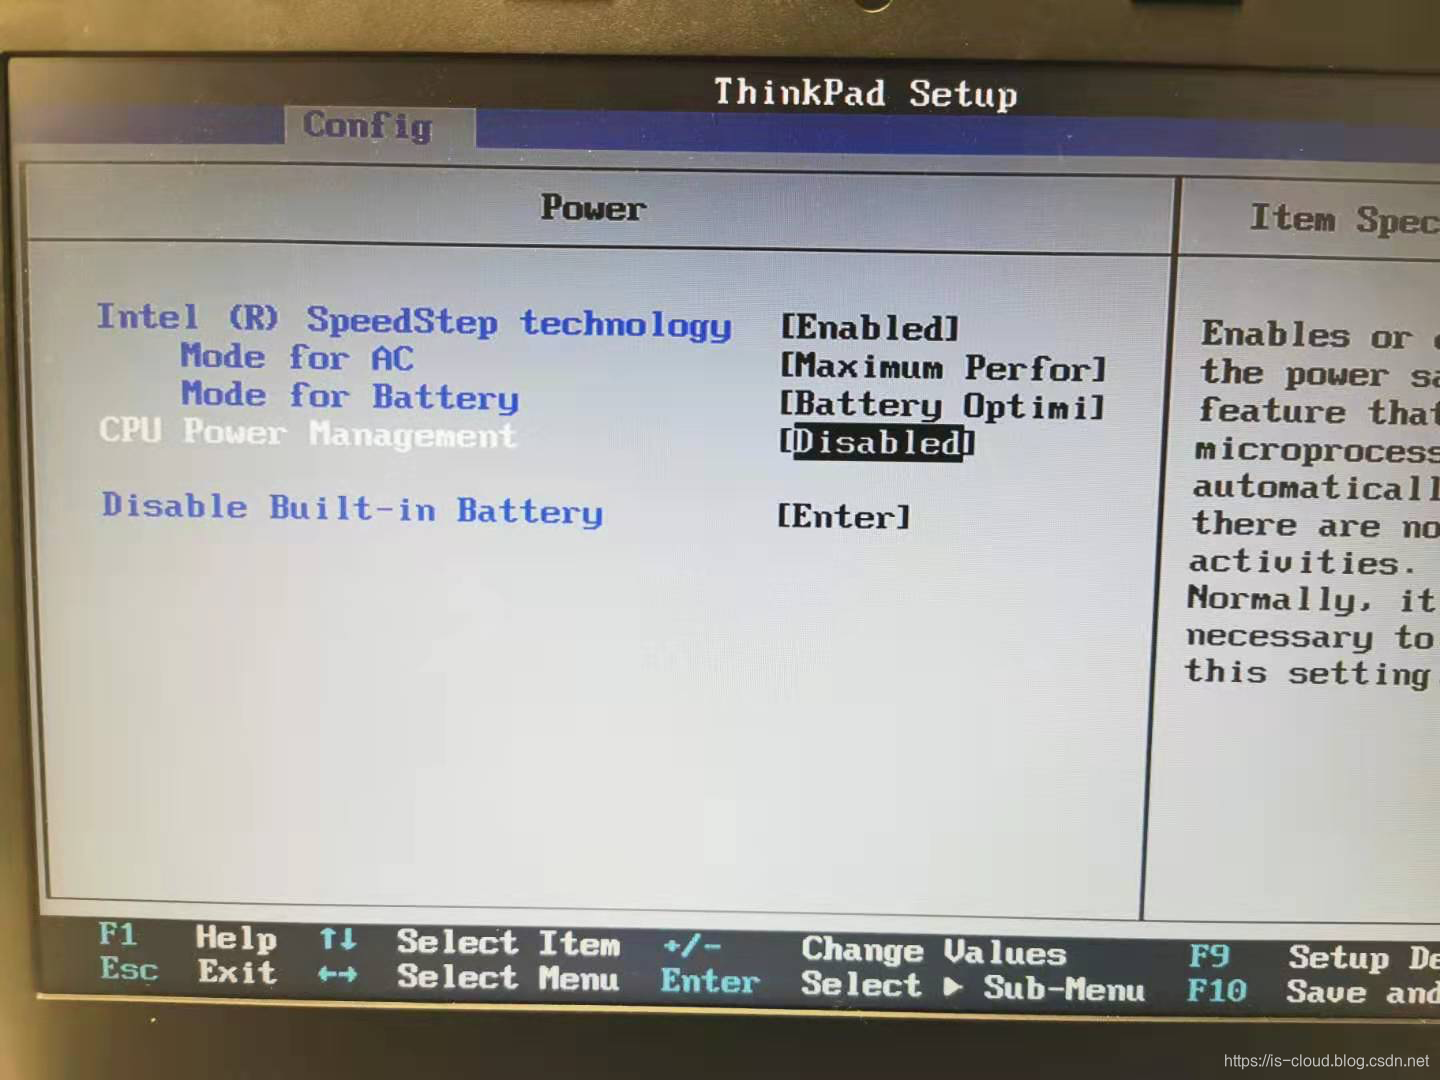
CPU Frequency scaling,将 CPU 频率打满
CPU 调频功能允许操作系统通过提高或降低 CPU 频率来达到省电目的,这里我们将 CPU 的频率打满,不让操作系统自己控制 CPU 的频率。
NOTE:这里主要是对 eNB 节点进行的操作,因为 eNB 对 Real-Time 操作具有很高的要求。
NOTE 1:将 CPU 频率打满会损耗 CPU 的寿命,酌情处理。
在 BIOS 中移除电源管理功能(P-states, C-states):
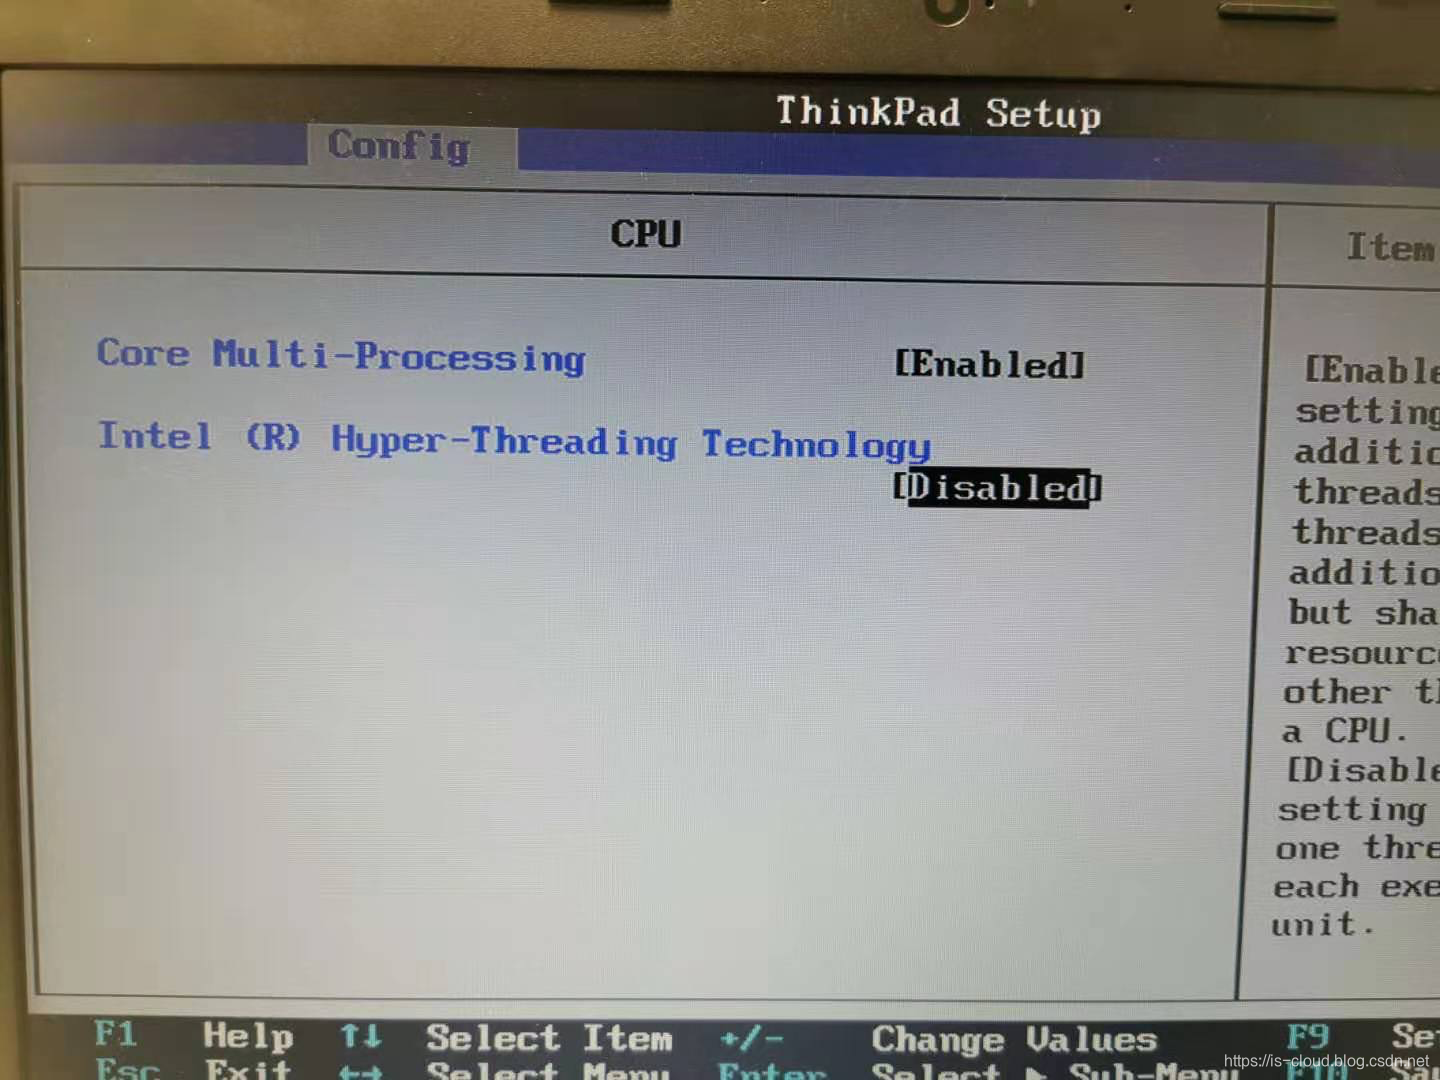
在 BIOS 中关闭超线程(hyper-threading):
禁用 Intel CPU 的 P-state 驱动(CONFIG_X86_INTEL_PSTATE),这个是 Intel CPU 专用的频率调节器驱动:
sudo vi /etc/default/grub
GRUB_CMDLINE_LINUX_DEFAULT="quiet splash"
GRUB_CMDLINE_LINUX_DEFAULT="quiet intel_pstate=disable"
GRUB_CMDLINE_LINUX_DEFAULT="quiet processor.max_cstate=1 intel_idle.max_cstate=0 idle=poll"

sudo update-grub
将 intel_powerclamp(Intel 电源管理驱动程序)加入黑名单:
sudo vi /etc/modprobe.d/blacklist.conf
# 末尾添加
blacklist intel_powerclamp

reboot
关闭 CPU 睿频:
sudo apt-get install cpufrequtils

sudo vi /etc/default/cpufrequtils
...
GOVERNOR="performance"

sudo update-rc.d ondemand disable
sudo /etc/init.d/cpufrequtils restart

# 查看睿频是否成功关闭,会看到所有频率都在 C0%
i7z
再次查看 CPU 功率,此时的 CPU 功率应该有了很大的提升,而且频率变动极小:
watch grep "cpu MHz" /proc/cpuinfo
NOTE:如果没有成功关闭 C-state 的话还需要执行以下操作
sudo gedit /etc/default/grub

#GRUB_CMDLINE_LINUX_DEFAULT="quiet splash”
#GRUB_CMDLINE_LINUX_DEFAULT="quiet intel_pstate=disable"
#GRUB_CMDLINE_LINUX_DEFAULT="processor.max_cstate=1 intel_idle.max_cstate=0 idle=poll”
GRUB_CMDLINE_LINUX_DEFAULT="quiet splash quiet intel_pstate=disable processor.max_cstate=1 intel_idle.max_cstate=0 idle=poll"

sudo update-grub
sudo reboot
eNodeB
获取 RAN 的代码:
git config --global http.sslverify false
git config --global http.postBuffer 1048576000

git clone https://gitlab.eurecom.fr/oai/openairinterface5g.git --branch v0.6.1
git checkout -b v0.6.1
配置 eNB:需要更改和确认的部分如下:前三行在 MME 中可以查到,之后就是把 IP 对应换成自己的 EPC 和 eNB 所在的 IP 地址。
sudo vi ~/openairinterface5g/targets/PROJECTS/GENERIC-LTE-EPC/CONF/enb.band7.tm1.usrpb210.conf

eNBs =
(
 {
    // Tracking area code, 0x0000 and 0xfffe are reserved values
    tracking_area_code  =  "1";
    mobile_country_code =  "208";
    mobile_network_code =  "92";
...
    ////////// MME parameters:

    mme_ip_address      = ( { ipv4       = "192.168.0.1";
                              ipv6       = "192:168:30::17";
                              active     = "yes";
                              preference = "ipv4";
                            }
                          );

    NETWORK_INTERFACES :
    {

        ENB_INTERFACE_NAME_FOR_S1_MME            = "enp0s31f6";
        ENB_IPV4_ADDRESS_FOR_S1_MME              = "192.168.0.2/24";
        ENB_INTERFACE_NAME_FOR_S1U               = "enp0s31f6";
        ENB_IPV4_ADDRESS_FOR_S1U                 = "192.168.0.2/24";
        ENB_PORT_FOR_S1U                         = 2152; # Spec 2152
    };
安装依赖包:这里采用了「文件安装 + USRP 驱动安装」的方式
cd ~/openairinterface5g
source oaienv
cd cmake_targets
sudo ./build_oai -I -w USRP
如有需要,可以按照 USRP 官方文档安装相应的 UHD 驱动:
https://kb.ettus.com/Building_and_Installing_the_USRP_Open-Source_Toolchain_(UHD_and_GNU_Radio)_on_Linux
编译安装 eNB + USRP(使用空口硬件传输):
cd ~/openairinterface5g
source oaienv
cd cmake_targets
./build_oai --eNB -c -w USRP
Will install external packages
Setting hardware to: OAI_USRP
CMAKE_CMD=cmake ..
RF HW set to OAI_USRP
Flags for Deadline scheduler: False
Flags for CPU Affinity: False
2. Setting the OAI PATHS ...
OPENAIR_DIR    = /root/openairinterface5g
FreeDiameter prefix not found, install freeDiameter if EPC, HSS
Installing packages
...
Installing ASN1. The log file for ASN1 installation is here: /root/openairinterface5g/cmake_targets/log/asn1c_install_log.txt
Cloning into '/opt/ssh'...
installing packages for USRP support
...
[INFO] Images destination: /usr/share/uhd/images
[INFO] Target usrp1_b100_fw_default is up to date.
[INFO] Target x3xx_x310_fpga_default is up to date.
[INFO] Target usrp2_n210_fpga_default is up to date.
[INFO] Target n230_n230_fpga_default is up to date.
[INFO] Target usrp1_b100_fpga_default is up to date.
[INFO] Target b2xx_b200_fpga_default is up to date.
[INFO] Target usrp2_n200_fpga_default is up to date.
[INFO] Target e3xx_e320_fpga_default is up to date.
[INFO] Target n3xx_n310_fpga_default is up to date.
[INFO] Target b2xx_b205mini_fpga_default is up to date.
[INFO] Target octoclock_octoclock_fw_default is up to date.
[INFO] Target usrp2_usrp2_fw_default is up to date.
[INFO] Target usrp2_n200_fw_default is up to date.
[INFO] Target usrp2_usrp2_fpga_default is up to date.
[INFO] Target b2xx_common_fw_default is up to date.
[INFO] Target n3xx_n320_fpga_default is up to date.
[INFO] Target b2xx_b200mini_fpga_default is up to date.
[INFO] Target usrp1_usrp1_fpga_default is up to date.
[INFO] Target usrp2_n210_fw_default is up to date.
[INFO] Target n3xx_n300_fpga_default is up to date.
[INFO] Target e3xx_e310_fpga_default is up to date.
[INFO] Target b2xx_b210_fpga_default is up to date.
[INFO] Downloading x3xx_x300_fpga_default-gbb85bdff.zip, total size: 19053.994 kB
[INFO] Downloading usb_common_windrv_default-g14000041.zip, total size: 4838.302 kB
[INFO] Images download complete.
3. building the compilation directives ...
10. Bypassing the Tests ...
EPC
配置 FQDN:
sudo vim /etc/hosts
...
127.0.0.1     localhost
127.0.1.1     epc.openair4G.eur      epc
127.0.1.1     hss.openair4G.eur      hss

hostname -f
获取 CN 代码(包括 MME、S/P-GW 及 HSS):
git config --global http.sslverify false
git config --global http.postBuffer 1048576000

//新版
sudo git clone https://github.com/OPENAIRINTERFACE/openair-cn.git
//史前的旧版
#git clone https://gitlab.eurecom.fr/oai/openair-cn.git

cd openair-cn
git checkout -b v0.5.0
准备 EPC config files in /usr/local/etc/oai:
sudo mkdir -p /usr/local/etc/oai/freeDiameter
sudo cp ~/openair-cn/etc/mme.conf /usr/local/etc/oai
sudo cp ~/openair-cn/etc/hss.conf /usr/local/etc/oai
sudo cp ~/openair-cn/etc/spgw.conf /usr/local/etc/oai
sudo cp ~/openair-cn/etc/acl.conf /usr/local/etc/oai/freeDiameter
sudo cp ~/openair-cn/etc/mme_fd.conf /usr/local/etc/oai/freeDiameter
sudo cp ~/openair-cn/etc/hss_fd.conf /usr/local/etc/oai/freeDiameter
HSS
安装依赖包:
cd ~/openair-cn/scripts

# -i 表示安装 Missing Packages
./build_hss -i
这里会安装 MySQL 和 phpmyadmin,过程中会要求输出 MySQL 的密码,一般设置为 linux。phpmyadmin 的用户名为 root,密码为 linux。安装成功后在浏览器中输入 http://127.0.0.1/phpmyadmin。如果发现访问不成功,则需要手动安装(视实际情况):
# 安装 apache2
sudo apt-get install apache2

# 安装 PHP
apt-get install php7.0
apt-get install libapache2-mod-php7.0

# 安装 MySQL
sudo apt-get install mysql-server mysql-client

# 安装 phpmyadmin
sudo apt-get install phpmyadmin
sudo ln -s /etc/phpmyadmin/apache.conf /etc/apache2/conf-available/phpmyadmin.conf
sudo a2enconf phpmyadmin
sudo /etc/init.d/apache2 reload
sudo service apache2 restart
修改 HSS 配置:
- 主要是修改 MySQL 连接信息,其中
OPERATOR_key也可以先不管,用这个默认的就可以,是后面 SIM 卡的相关信息。
sudo vim /usr/local/etc/oai/hss.conf

HSS :
{
  ## MySQL mandatory options
  MYSQL_server = "127.0.0.1";     # HSS S6a bind address
  MYSQL_user   = "root";  # Database server login
  MYSQL_pass   = "linux";  # Database server password
  MYSQL_db     = "oai_db";        # Your database name

  ## HSS options
  #OPERATOR_key = "@OPERATOR_KEY@"; # OP key matching your database
  #OPERATOR_key = "1006020f0a478bf6b699f15c062e42b3"; # OP key matching your database
  OPERATOR_key = "11111111111111111111111111111111"; # OP key matching your database

  RANDOM = "true";                                   # True random or only pseudo random (for subscriber vector generation)

  ## Freediameter options
  FD_conf = "@PREFIX@/freeDiameter/hss_fd.conf";

  PID_DIRECTORY = "@PID_DIRECTORY@";              # /var/run is the default

};
- 修改 HSS freeDiameter 配置。
sudo vim /usr/local/etc/oai/freeDiameter/hss_fd.conf

# The first parameter in this section is Identity, which will be used to
# identify this peer in the Diameter network. The Diameter protocol mandates
# that the Identity used is a valid FQDN for the peer. This parameter can be
# omitted, in that case the framework will attempt to use system default value
# (as returned by hostname --fqdn).
Identity = "hss.openair4G.eur";

# In Diameter, all peers also belong to a Realm. If the realm is not specified,
# the framework uses the part of the Identity after the first dot.
Realm = "openair4G.eur";
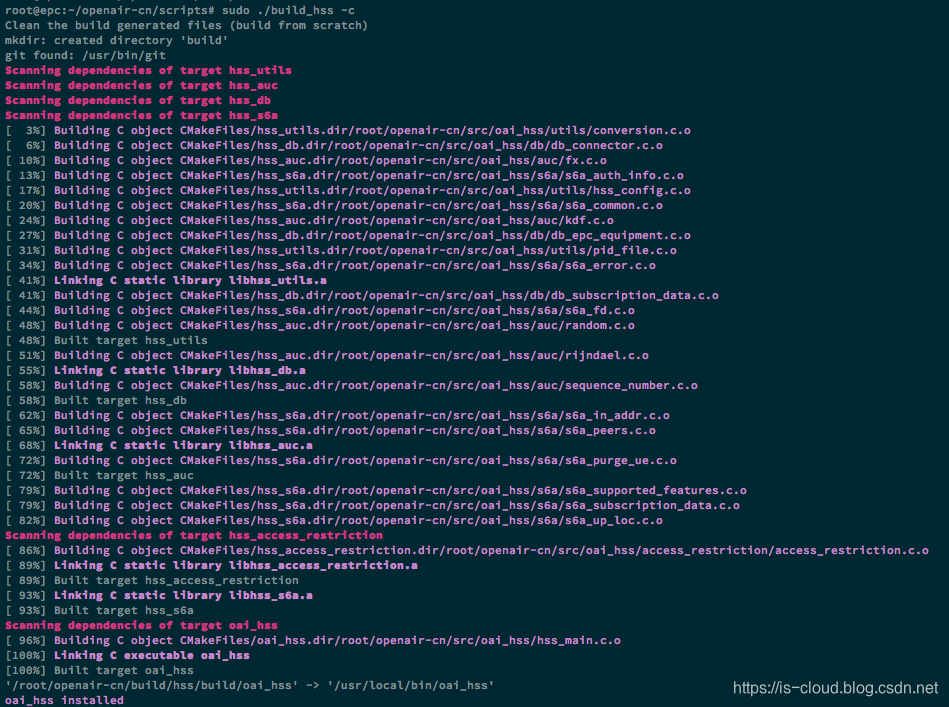
编译安装:
cd ~/openair-cn/scripts
sudo ./build_hss -c
MME
安装依赖包:
cd ~/openair-cn/scripts
sudo ./build_mme  -i
修改 MME 配置:
- 修改 MME Network Interface 配置,关注 S1 和 S11 接口。
NOTE:S1 和 eNB 和 EPC 连接的接口的统称;S11 是 S-GW 与 MME 连接的接口。
sudo vim /usr/local/etc/oai/mme.conf

    NETWORK_INTERFACES :
    {
        # MME binded interface for S1-C or S1-MME  communication (S1AP), can be ethernet interface, virtual ethernet interface, we don't advise wireless interfaces
        MME_INTERFACE_NAME_FOR_S1_MME   = "enp0s25";    # YOUR NETWORK CONFIG HERE
        MME_IPV4_ADDRESS_FOR_S1_MME     = "192.168.0.1/24";      # CIDR, YOUR NETWORK CONFIG HERE

        # MME binded interface for S11 communication (GTPV2-C)
        MME_INTERFACE_NAME_FOR_S11      = "lo";       # YOUR NETWORK CONFIG HERE
        MME_IPV4_ADDRESS_FOR_S11        = "127.0.11.1/8";         # CIDR, YOUR NETWORK CONFIG HERE
        MME_PORT_FOR_S11                = 2123;                                 # YOUR NETWORK CONFIG HERE


        #S10 Interface
        MME_INTERFACE_NAME_FOR_S10      = "@MME_INTERFACE_NAME_FOR_S10@";       # YOUR NETWORK CONFIG HERE
        MME_IPV4_ADDRESS_FOR_S10        = "@MME_IPV4_ADDRESS_FOR_S10@";         # CIDR, YOUR NETWORK CONFIG HERE
        MME_PORT_FOR_S10                = 2123;                                 # YOUR NETWORK CONFIG HERE
    };
- 修改 MME freediameter 配置。
sudo vim /usr/local/etc/oai/freeDiameter/mme_fd.conf

Identity = "epc.openair4G.eur";
Realm = "openair4G.eur";
ConnectPeer= "hss.openair4G.eur" {ConnectTo = "127.0.0.1"; No_SCTP ; No_IPv6; Prefer_TCP; No_TLS; port = 3868;  realm = "openair4G.eur";};
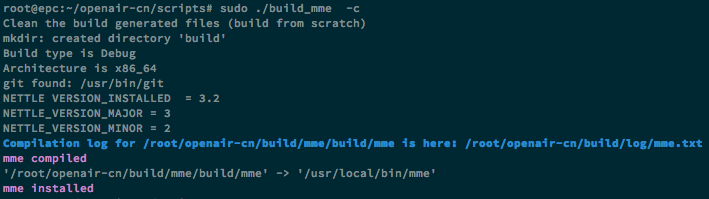
编译安装:
cd ~/openair-cn/scripts
sudo ./build_mme  -c
S/PGW
安装依赖包:
cd ~/openair-cn/scripts
sudo ./build_spgw -i
修改 S/PGW 配置:
- 修改 SGW 配置,关注 S1-U 和 S11 接口。
sudo vim /usr/local/etc/oai/spgw.conf

S-GW :
{
    NETWORK_INTERFACES :
    {
        # S-GW binded interface for S11 communication (GTPV2-C), if none selected the ITTI message interface is used
        SGW_INTERFACE_NAME_FOR_S11              = "lo"; # STRING, interface name, YOUR NETWORK CONFIG HERE
        SGW_IPV4_ADDRESS_FOR_S11                = "127.0.11.2/8"; # STRING, CIDR, YOUR NETWORK CONFIG HERE
        SGW_UDP_PORT_FOR_S11                    = 2123;                         # INTEGER, port number, PREFER NOT CHANGE UNLESS YOU KNOW WHAT YOU ARE DOING

        # S-GW binded interface for S1-U communication (GTPV1-U) can be ethernet interface, virtual ethernet interface, we don't advise wireless interfaces
        SGW_INTERFACE_NAME_FOR_S1U_S12_S4_UP    = "enp0s25"; # STRING, interface name, YOUR NETWORK CONFIG HERE, USE "lo" if S-GW run on eNB host
        SGW_IPV4_ADDRESS_FOR_S1U_S12_S4_UP      = "192.168.0.1/24";   # STRING, CIDR, YOUR NETWORK CONFIG HERE
        SGW_UDP_PORT_FOR_S1U_S12_S4_UP          = 2152;         # INTEGER, port number default is 2152, PREFER NOT CHANGE UNLESS YOU KNOW WHAT YOU ARE DOING

        # S-GW binded interface for S5 or S8 communication, not implemented, so leave it to none
        SGW_INTERFACE_NAME_FOR_S5_S8_UP         = "none";                       # STRING, interface name, DO NOT CHANGE (NOT IMPLEMENTED YET)
        SGW_IPV4_ADDRESS_FOR_S5_S8_UP           = "0.0.0.0/24";                 # STRING, CIDR, DO NOT CHANGE (NOT IMPLEMENTED YET)
    };
- 修改 PGW 配置,关注 SGi 接口。
sudo vim /usr/local/etc/oai/spgw.conf

P-GW =
{
    INSTANCE                                  = @INSTANCE@;                     # 0 is the default
    PID_DIRECTORY                             = "@PID_DIRECTORY@";              # /var/run is the default

    NETWORK_INTERFACES :
    {
        # P-GW binded interface for S5 or S8 communication, not implemented, so leave it to none
        PGW_INTERFACE_NAME_FOR_S5_S8          = "none";                         # STRING, interface name, DO NOT CHANGE (NOT IMPLEMENTED YET)

        # P-GW binded interface for SGI (egress/ingress internet traffic)
        PGW_INTERFACE_NAME_FOR_SGI            = "enp0s25"; # STRING, YOUR NETWORK CONFIG HERE
        PGW_IPV4_ADDRESS_FOR_SGI              = "192.168.0.1/24";   # STRING, CIDR, YOUR NETWORK CONFIG HERE
        PGW_MASQUERADE_SGI                    = "yes";                           # STRING, {"yes", "no"}. YOUR NETWORK CONFIG HERE, will do NAT for you if you put "yes", only if OVS/OPENFLOW not used.
        UE_TCP_MSS_CLAMPING                   = "no";                           # STRING, {"yes", "no"}, only if OVS/OPENFLOW not used.
    };
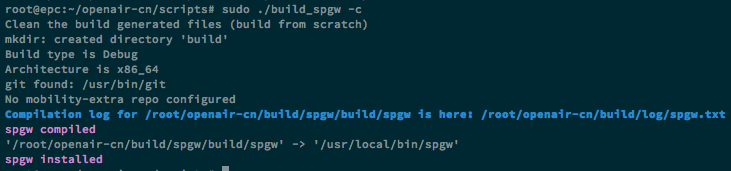
编译安装:
cd ~/openair-cn/scripts
sudo ./build_spgw -c
GTP-U handled by OVS in PGW
启动 LTE/EPC
测试前准备好 wireshark 抓包,启动 LTE/EPC 所有进程后可以抓到 S1 SetupRequest 和 S1 SetupResponse 的包,后面如果有 UE 接入,还会抓到 NAS 信令的包。
安装 gitlab.eurecom.fr 的 certificates:
echo -n | openssl s_client -showcerts -connect gitlab.eurecom.fr:443 2>/dev/null | sed -ne '/-BEGIN CERTIFICATE-/,/-END CERTIFICATE-/p' | sudo tee -a /etc/ssl/certs/ca-certificates.crt

cd  ~/openair-cn/scripts
sudo ./check_hss_s6a_certificate /usr/local/etc/oai/freeDiameter/ hss.openair4G.eur
sudo ./check_mme_s6a_certificate /usr/local/etc/oai/freeDiameter/ epc.openair4G.eur

root@epc:~/openair-cn/scripts# ll /usr/local/etc/oai/freeDiameter/
total 60
drwxr-xr-x 2 root root 4096 11月 29 15:32 ./
drwxr-xr-x 3 root root 4096 11月 29 15:25 ../
-rw-r--r-- 1 root root 1052 11月 29 13:21 acl.conf
-rw-r--r-- 1 root root  960 11月 29 15:32 hss.cacert.pem
-rw-r--r-- 1 root root  916 11月 29 15:32 hss.cakey.pem
-rw-r--r-- 1 root root 3071 11月 29 15:32 hss.cert.pem
-rw-r--r-- 1 root root 4123 11月 29 14:04 hss_fd.conf
-rw-r--r-- 1 root root  887 11月 29 15:32 hss.key.pem
-rw-r--r-- 1 root root  960 11月 29 15:32 mme.cacert.pem
-rw-r--r-- 1 root root  916 11月 29 15:32 mme.cakey.pem
-rw-r--r-- 1 root root 3071 11月 29 15:32 mme.cert.pem
-rw-r--r-- 1 root root 4150 11月 29 14:45 mme_fd.conf
-rw-r--r-- 1 root root  891 11月 29 15:32 mme.key.pem
NOTE:hss.openair4G.eur 和 epc.openair4G.eur 之前有空格。
HSS
编辑环境变量:
cd ~/openair-cn;  vi oaienv

export OPENAIRCN_DIR=$(pwd)
export PREFIX=/usr/local/etc/oai
export PID_DIRECTORY=/var/run
export REALM="openair4G.eur"

declare -A HSS_CONF
HSS_CONF[@PREFIX@]=$PREFIX
HSS_CONF[@PID_DIRECTORY@]=$PID_DIRECTORY
HSS_CONF[@REALM@]=$REALM

for K in "${!HSS_CONF[@]}"; do
  egrep -lRZ "$K" $PREFIX | xargs -0 -l sed -i -e "s|$K|${HSS_CONF[$K]}|g"
done
- 第一次启动 HSS
cd ~/openair-cn; source oaienv; cd scripts
sudo ./run_hss -i ~/openair-cn/src/oai_hss/db/oai_db.sql
NOTE:-i ~/openair-cn/src/oai_hss/db/oai_db.sql 会安装 oai_db 数据库,再次运行会重装数据库,仅执行一次。
- 后续启动 HSS
cd openair-cn; source oaienv; cd scripts; sudo ./run_hss
启动日志:
root@epc:~/openair-cn/scripts# sudo ./run_hss -i ~/openair-cn/src/oai_hss/db/oai_db.sql
setting import DB flag to: 1
OPENAIRCN_DIR   = /root/openair-cn
mysqladmin: [Warning] Using a password on the command line interface can be insecure.
Database "oai_db" dropped
mysql: [Warning] Using a password on the command line interface can be insecure.
HSS: oai_db creation succeeded
mysql: [Warning] Using a password on the command line interface can be insecure.
HSS: oai_db import succeeded
==== EURECOM OPENAIR-HSS vBranch: heads/v0.5.0 Abrev. Hash: d1d0e45 Date: Mon Sep 30 15:46:32 2019 +0200 ====
Initial built: Nov 29 2019 14:04:31
Please report any bug to: openaircn-user@lists.eurecom.fr

Parsing configuration file: /usr/local/etc/oai/hss.conf
Configuration
* Global:
	- File .............: /usr/local/etc/oai/hss.conf
* MYSQL:
	- Server ...........: 127.0.0.1
	- Database .........: oai_db
	- User .............: root
	- Password .........: *****
* FreeDiameter:
	- Conf file ........: /usr/local/etc/oai//freeDiameter/hss_fd.conf
* Security:
	- Operator key......: ********************************
	- Random      ......: true
Initializing db layer
Initializing db layer: DONE
Initialized random
Query: SELECT `imsi`,`key`,`OPc` FROM `users`
IMSI: 20834123456789Key: 2b.d6.45.9f.82.c5.b3.00.95.2c.49.10.48.81.ff.48.
OPc: 5e.9c.a4.4b.ac.ee.f2.88.d5.d8.46.65.55.ff.97.e0.
RijndaelKeySchedule: K 2BD6459F82C5B300952C49104881FF48
Compute opc:
	K:	2BD6459F82C5B300952C49104881FF48
	In:	11111111111111111111111111111111
	Rinj:	76FC81817B423A50600E9580B6270D48
	Out:	67ED90906A532B41711F8491A7361C59
Query: UPDATE `users` SET `OPc`=UNHEX('67ed90906a532b41711f8491a7361c59') WHERE `users`.`imsi`='20834123456789'
IMSI 20834123456789 Updated OPc 5e9ca44baceef288d5d8466555ff97e0 -> 67ed90906a532b41711f8491a7361c59
1 rows affected
...
...
Initializing s6a layer
10:10:22  NOTI   libfdproto '1.2.1' initialized.
10:10:22  NOTI   libgnutls '3.4.10' initialized.
10:10:22  NOTI   HASHLIST is enabled
10:10:22   DBG   Core state: 0 -> 1
10:10:22  NOTI   libfdcore '1.2.1' initialized.
10:10:22   DBG   Generating fresh Diffie-Hellman parameters of size 1024 (this takes some time)...
10:10:22   DBG   Loading : /usr/local/lib/freeDiameter/acl_wl.fdx
10:10:22  NOTI   Loading (acl_wl) extension.
10:10:22  NOTI   Extension ACL_wl initialized with configuration: '/usr/local/etc/oai/freeDiameter/acl.conf'
10:10:22   DBG   Loading : /usr/local/lib/freeDiameter/dict_nas_mipv6.fdx
10:10:23  NOTI   Loading (dict_nas_mipv6) extension.
10:10:23   DBG   Dictionary Extension 'MIPv6 NAS-to-HAAA Interaction' initialized
10:10:23   DBG   Loading : /usr/local/lib/freeDiameter/dict_s6a.fdx
10:10:23  NOTI   Dictionary Extension 'S6A from 3GPP standard v.10.5' initialized
10:10:23  NOTI   Unable to  resolve symbol 'fd_ext_init2' for extension /usr/local/lib/freeDiameter/acl_wl.fdx:
10:10:23  NOTI   Unable to  resolve symbol 'fd_ext_init2' for extension /usr/local/lib/freeDiameter/dict_nas_mipv6.fdx:
10:10:23  NOTI   Unable to  resolve symbol 'fd_ext_init2' for extension /usr/local/lib/freeDiameter/dict_s6a.fdx:
10:10:23  NOTI   All extensions loaded.
10:10:23  NOTI   freeDiameter configuration:
10:10:23  NOTI     Default trace level .... : +1
10:10:23  NOTI     Configuration file ..... : /usr/local/etc/oai//freeDiameter/hss_fd.conf
10:10:23  NOTI     Diameter Identity ...... : hss.openair4G.eur (l:17)
10:10:23  NOTI     Diameter Realm ......... : openair4G.eur (l:13)
10:10:23  NOTI     Tc Timer ............... : 30
10:10:23  NOTI     Tw Timer ............... : 30
10:10:23  NOTI     Local port ............. : 3868
10:10:23  NOTI     Local secure port ...... : 5868
10:10:23  NOTI     Number of SCTP streams . : 3
10:10:23  NOTI     Number of clients thr .. : 5
10:10:23  NOTI     Number of app threads .. : 4
10:10:23  NOTI     Local endpoints ........ : Default (use all available)
10:10:23  NOTI     Local applications ..... : (none)
10:10:23  NOTI     Flags : - IP ........... : Enabled
10:10:23  NOTI             - IPv6 ......... : DISABLED
10:10:23  NOTI             - Relay app .... : DISABLED
10:10:23  NOTI             - TCP .......... : Enabled
10:10:23  NOTI             - SCTP ......... : DISABLED (at compilation)
10:10:23  NOTI             - Pref. proto .. : TCP
10:10:23  NOTI             - TLS method ... : Separate port
10:10:23  NOTI     TLS :   - Certificate .. : /usr/local/etc/oai/freeDiameter/hss.cert.pem
10:10:23  NOTI             - Private key .. : /usr/local/etc/oai/freeDiameter/hss.key.pem
10:10:23  NOTI             - CA (trust) ... : /usr/local/etc/oai/freeDiameter/hss.cacert.pem (1 certs)
10:10:23  NOTI             - CRL .......... : (none)
10:10:23  NOTI             - Priority ..... : (default: 'NORMAL')
10:10:23  NOTI             - DH bits ...... : 1024
10:10:23  NOTI     Origin-State-Id ........ : 1575425422
10:10:23  NOTI   Loaded extensions: '/usr/local/lib/freeDiameter/acl_wl.fdx'[/usr/local/etc/oai/freeDiameter/acl.conf], loaded
10:10:23  NOTI   Loaded extensions: '/usr/local/lib/freeDiameter/dict_nas_mipv6.fdx'[(no config file)], loaded
10:10:23  NOTI   Loaded extensions: '/usr/local/lib/freeDiameter/dict_s6a.fdx'[(no config file)], loaded
10:10:23   DBG   Core state: 1 -> 2
10:10:23  NOTI   Local server address(es): 172.18.20.190{---L-}	192.168.0.1{---L-}
10:10:23   DBG   Core state: 2 -> 3
Initializing s6a layer: DONE
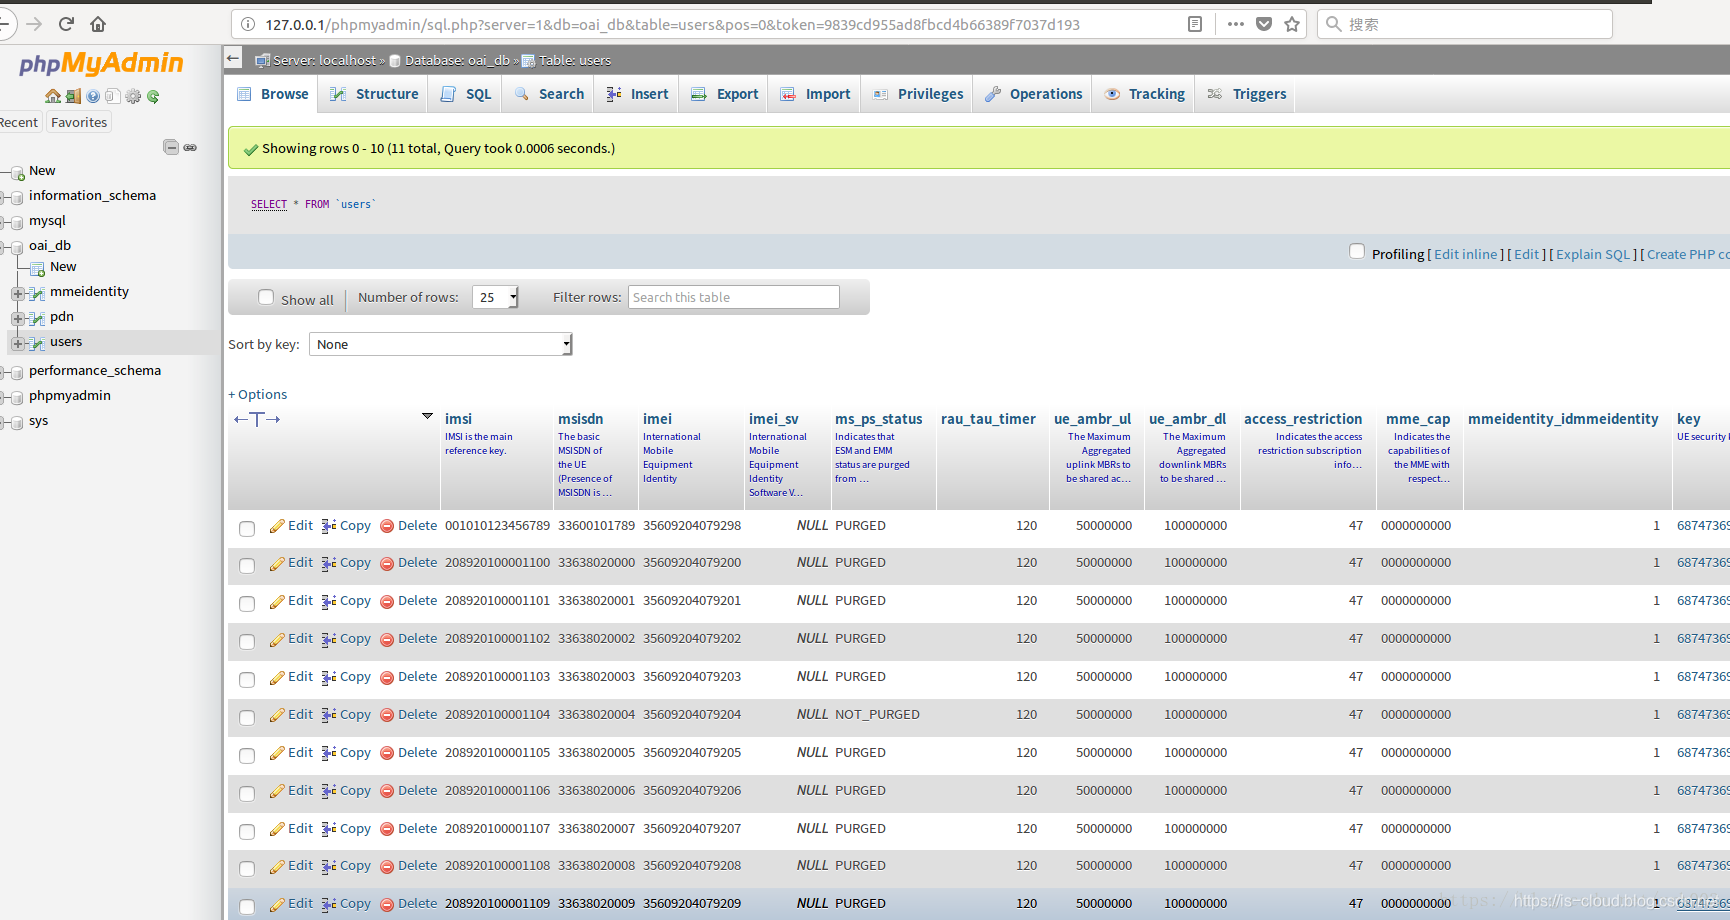
配置数据库:访问 http://127.0.0.1/phpmyadmin,在 oai_db 数据库里修改/添加一会儿要进行测试的 USIM 卡的信息,例如:USIM IMSI 是 208930100001111,key 值是 8baf473f2f8fd09487cccbd7097c6862,OPC 是 e734f8734007d6c5ce7a0508809e7e9c。则:
- mmeidentity 表里添加 epc.openair4G.eur 项
- users 表里修改 imsi=208930100001111 的 key 值为 8baf473f2f8fd09487cccbd7097c6862
- users 表里修改 OPC 为 e734f8734007d6c5ce7a0508809e7e9c,同时修改它的 mmeidentity_idmmeidentity 为你刚刚在 mmeidentity 里添加的新项的 ID
或者使用 SQL 语句进行修改:
sudo mysql -u root -p
use oai_db;
select * from mmeidentity;
update mmeidentity set mmehost="epc.openair4G.eur" where idmmeidentity=6;
update users set mmeidentity_idmmeidentity=6 where imsi=208930100001111;
MME & S/P-GW
- MME
cd openair-cn; source oaienv; cd scripts; ./run_mme
- S/P-GW
NOTE:需要首先运行 HSS
cd openair-cn; source oaienv; cd SCRIPTS; sudo -E ./run_spgw
eNB
- 启动 eNB
cd openairinterface5g; source oaienv
cd cmake_targets/lte_build_oai/build
sudo ./lte-softmodem -d -O ~/openairinterface5g/targets/PROJECTS/GENERIC-LTE-EPC/CONF/enb.band7.tm1.usrpb210.conf
# sudo -E ./lte-softmodem -O $OPENAIR_DIR/targets/PROJECTS/GENERIC-LTE-EPC/CONF/enb.band7.tm1.usrpb210.conf
Connect the UE, it should attach to network and be able to reach internet through OAI network
自动化脚本
一键启动 EPC:
#!/bin/sh
YOURNAME='kujou'
while :
do
  stillRunning=$(ps -A | grep "run_hss" |grep -v "grep")
  if [ "$stillRunning" ] ; then
    echo "HSS was already started by another way"
  else
  pkill -9 hss
    pkill -9 mme
    pkill -9 spgw
    echo "HSS was not started"
    echo "Starting service ..."
    /home/$YOURNAME/openair-cn/scripts/run_hss &
  fi

  sleep 2

  stillRunning=$(ps -A | grep "run_mme" |grep -v "grep")
  if [ "$stillRunning" ] ; then
    echo "MME was already started by another way"

  else
  pkill -9 hss
    pkill -9 mme
    pkill -9 spgw
    echo "MME was not started"
    echo "Starting service ..."
    /home/$YOURNAME/openair-cn/scripts/run_mme &

  fi

  sleep 2

  stillRunning=$(ps -A | grep "run_spgw" |grep -v "grep")
  if [ "$stillRunning" ] ; then
    echo "SPGW was already started by another way"

  else
  pkill -9 hss
    pkill -9 mme
    pkill -9 spgw
    echo "SPGW was not started"
    echo "Starting service ..."
    /home/$YOURNAME/openair-cn/scripts/run_spgw &

  fi
  sleep 6
done
- 一键关闭 EPC
#!/bin/bash

sudo pkill -9 hss
sudo pkill -9 mme
sudo pkill -9 spgw

sudo ps -A | grep hss
sudo ps -A | grep mme
sudo ps -A | grep spgw
COST UE
前提条件
- eNB 侧运行 scope 可以弹出观察窗,且不会提示 eNB 没有 associated with MME;
- EPC 侧可以观测到 MME 与 eNB 连上了。
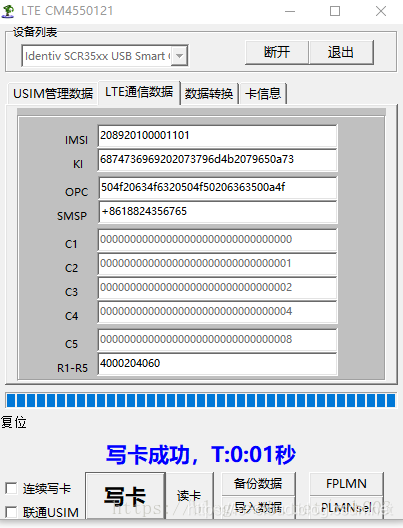
写白卡
将 http://127.0.0.1/phpmyadmin 里面的参数写到 USIM 卡。
- OAI 预设了 10 个 IMSI: 20892010000110[0~9]
- Ki: 6874736969202073796d4b2079650a73
- OPC: 504f20634f6320504f50206363500a4f
- R1-R5: 4000204060
- 短消息中心随便填
EXAMPLE:
- 写卡:
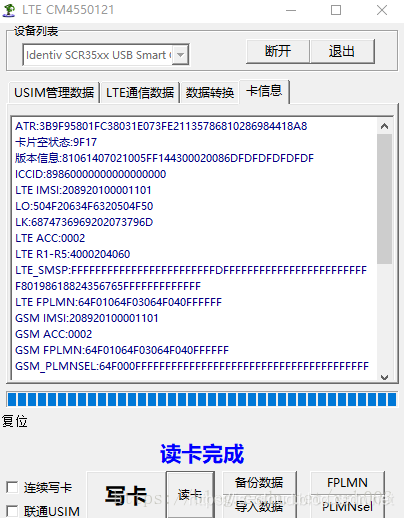
- 读卡:
- 手动添加 OAI DB 的 users 记录:
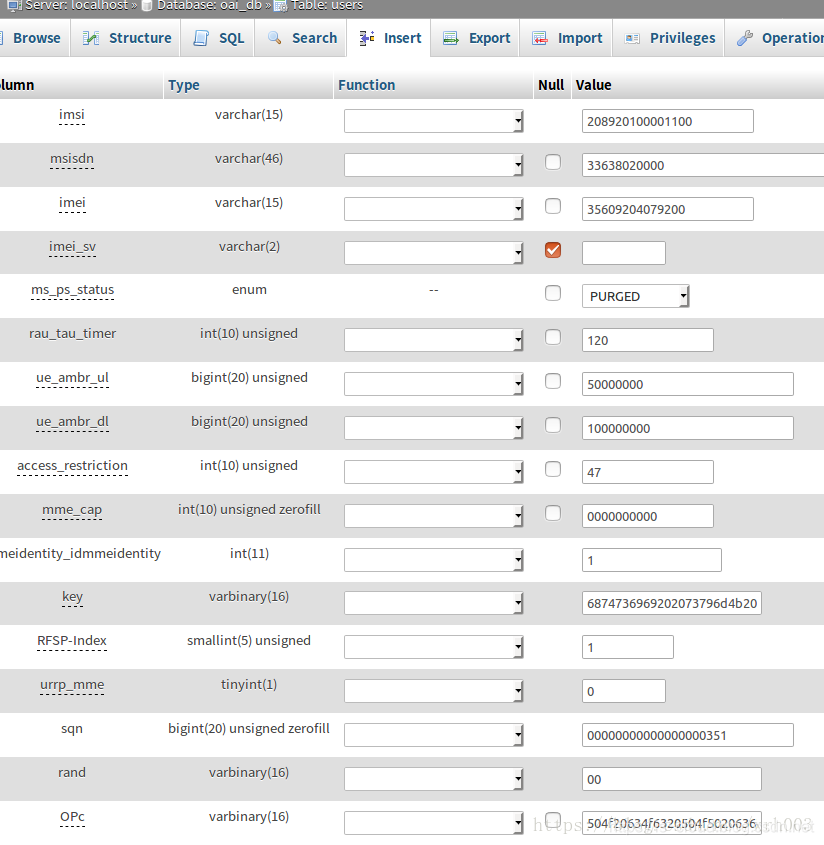
- 总共可以加 10 条记录
手机设置
- 添加 APN(Access Point Network),开启数据漫游
- 插入白卡,重启手机
- 扫描网络
注:测试机安装一款网优分析软件,e.g. 信号大师、网优大师。信号大师可以锁定网锁频段,在测试时锁频段后可以加快接入 eNB 的速度。
问题 1
问题:安装 HSS 依赖包过程中错误。
Cloning into 'freediameter'...
remote: Enumerating objects: 10135, done.
remote: Counting objects: 100% (10135/10135), done.
remote: Compressing objects: 100% (9796/9796), done.
error: RPC failed; curl 56 GnuTLS recv error (-9): A TLS packet with unexpected length was received.
fatal: The remote end hung up unexpectedly
fatal: early EOF
fatal: index-pack failed
分析:git clone 连接中断。
解决:重试。
问题 2
问题:编译安装 S/P-GW 过程中错误。
Install GTP kernel module
Do you want to install modified GTP kernel module for OVS ? <y/N> y
Check kernel
Kernel in 4.9.1...4.9.108 required. Aborting installation
Error: SPGW software installation failed
Workaround:不安装 OVS。
参考文档
https://blog.csdn.net/prowc/article/details/75253440
https://blog.csdn.net/xrh003/article/details/75285108
http://www.doc88.com/p-1186932021431.html
https://blog.csdn.net/BUPTOctopus/article/details/81560514
https://www.mobibrw.com/2018/10729
https://blog.csdn.net/qq_42030961/article/details/82751991
https://blog.csdn.net/qq_42030961/article/details/82695682
https://blog.csdn.net/qq_42030961/article/details/82740296
https://blog.csdn.net/qq_42030961/article/details/84039098
https://zhuanlan.zhihu.com/p/25675218
https://blog.csdn.net/feifei_csdn/article/details/80364770
https://blog.csdn.net/huangkangying/article/details/8104463