pytest介绍
pytest 是 python 的第三方单元测试框架,比自带 unittest 更简洁和高效,支持315种以上的插件,同时兼容 unittest 框架。这就使得我们在 unittest 框架迁移到 pytest 框架的时候不需要重写代码。接下来我们在文中来对分析下 pytest 有哪些简洁、高效的用法。
pytest特点:
入门简单易上手,文档支持较好。
支持单元测试和功能测试。
支持参数化。
可以跳过指定用例,或对某些预期失败的case标记成失败。
支持重复执行失败的case。
支持运行由unittest编写的测试用例。
有很多第三方插件,并且可自定义扩展。
方便和支持集成工具进行集成。
安装
pip install pytest
测试是否安装成功
C:UsersAnthony>pytest --version
This is pytest version 5.2.2, imported from c:python36libsite-packagespytest.py
我的演示脚本处于这样一个的目录中:
M:py_tests # 我的是D盘的 py_tests 目录,所有操作都在 py_tests 目录内完成
    ├─scripts     #编写测试用例的文件夹
    │  ├─test_case_dir1
    │  │  ├─test_case_02.py    # 用例脚本文件
    │  │  └─__init__.py
    │  ├─test_allure_case.py   # 脚本文件
    │  ├─test_case_01.py   # 脚本文件
    │  └─__init__.py
    ├─report    --报告生成的文件夹
    │  ├─report.html   # pytest-html生成的用例报告
    │  ├─assets  # allure的依赖目录
    │  ├─result  # allure生成的用例数据
    │  └─allure_html   # allure生成的用例报告目录
    |     └─index.html  # allure生成的最终的html类型的测试报告
    ├─case_set.py
    ├─demo0.py   # 用例脚本文件
    ├─demo1.py   # 用例脚本文件
    ├─pytest.ini  # 配置文件
    └─__init__.py
简单示例
import pytest

def test_case01():
    print('执行用例01.......')
    assert 0  # 断言失败

def test_case02():
    print('执行用例02.......')
    assert 1  # 断言成功

def custom_case03():
    print('执行用例03.......')
    assert 1  # 断言成功

if __name__ == '__main__':
    pytest.main(["-s", "demo.py"])
    # pytest.main("-s demo.py")
TypeError: `args` parameter expected to be a list or tuple of strings, got: '-s demo1.py' (type: <class 'str'>)
遇到上述报错,就是参数需要一个列表或者元组的形式,而我们使用的是str形式。
上述代码正确的执行结果是这样的:
===================================================== test session starts ======================================================
platform win32 -- Python 3.6.2, pytest-5.2.2, py-1.8.0, pluggy-0.13.0
rootdir: M:py_tests
collected 2 items

demo1.py 执行用例01.......
F执行用例02.......
.
=========================================================== FAILURES ===========================================================
_________________________________________________________ test_case01 __________________________________________________________

    def test_case01():
        print('执行用例01.......')
>       assert 0  # 断言失败
E       assert 0

demo1.py:11: AssertionError
================================================= 1 failed, 1 passed in 0.13s ==================================================
大致的信息就是告诉我们:
-
collected 2 items:本次执行中,收集了2个用例。 -
完了开始执行用例,
.表示执行成功,F表示执行失败。 -
脚本中的第一个用例执行失败;第二个用例执行成功;但是第三个也就是
custom_case03并没有执行,由此我们知道,pytest只识别以test_开头的用例。
pytest.main(["-s", "demo.py"])参数说明
-
-s,表示输出用例执行的详细结果。 -
demo1.py是要执行的脚本名称。
除了上述的函数这种写法,也可以有用例类的写法:
import pytest
class TestCase(object):
    def test_case01(self):
        """ 用例 01 """
        print('执行用例01.......')
        assert 0  # 断言失败

    def test_case02(slef):
        """ 用例 02 """
        print('执行用例02.......')
        assert 1  # 断言成功
if __name__ == '__main__':
    pytest.main(["-s", "demo.py"])
类名要以Test开头,并且其中的用例方法也要以test开头,不然pytest不会执行
执行结果:
D:py_tests>python demo.py
========================================================== test session starts ===========================================================
platform win32 -- Python 3.6.2, pytest-5.2.2, py-1.8.0, pluggy-0.13.0
rootdir: M:py_tests
collected 2 items

demo1.py 执行用例01.......
F执行用例02.......
.

================================================================ FAILURES ================================================================
__________________________________________________________ TestCase.test_case01 __________________________________________________________

self = <demo1.TestCase object at 0x03DD6110>

    def test_case01(self):
        """ 用例 01 """
        print('执行用例01.......')
>       assert 0  # 断言失败
E       assert 0

demo1.py:49: AssertionError
====================================================== 1 failed, 1 passed in 0.12s =======================================================
. 表示通过, F表示失败
接下来,我们来研究一下pytest中的setup和teardown的用法。
setup和teardown
我们知道,在unittest中,setup和teardown可以在每个用例前后执行,也可以在所有的用例集执行前后执行。那么在pytest中,有以下几种情况:
-
模块级别,也就是在整个测试脚本文件中的用例集开始前后,对应的是:
-
setup_module
-
teardown_module
-
-
类级别,在类中的所有用例集执行前后,在类里写,对应的是:
-
setup_class
-
teardown_class
-
-
在类中呢,也可以在进一步划分,在每一个方法执行前后,在类里写,对应:
-
setup_method
-
teardown_methd
-
-
函数级别,在用例函数之前后,对应:
-
setup_function
-
teardown_function
-
来一一看看各自的用法。
模块级别setup_module/teardown_module
import pytest
def setup_module():
    """ 模块级别的 setup,在该脚本内所有用例集执行之前触发执行 """
    print('模块级别的 setup.....')
def test_case01():
    print('执行用例01.......')
    assert 0  # 断言失败
def test_case02():
    print('执行用例02.......')
    assert 1  # 断言成功
def teardown_module():
    """ 模块级别的 teardown,在该脚本内所有用例集执行之后触发执行 """
    print('模块级别的 teardown.....')

if __name__ == '__main__':
    pytest.main(["-s", "demo1.py"])
执行结果
D:py_tests>python demo.py
========================================================== test session starts ===========================================================
platform win32 -- Python 3.6.2, pytest-5.2.2, py-1.8.0, pluggy-0.13.0
rootdir: M:py_tests
collected 2 items

demo1.py 模块级别的 setup.....
执行用例01.......
F执行用例02.......
.模块级别的 teardown.....


================================================================ FAILURES ================================================================
______________________________________________________________ test_case01 _______________________________________________________________

    def test_case01():
        print('执行用例01.......')
>       assert 0  # 断言失败
E       assert 0

demo1.py:16: AssertionError
====================================================== 1 failed, 1 passed in 0.12s =======================================================
类级别的setup_class/teardown_class
import pytest

class TestCase(object):

    def setup_class(self):
        """ 类级别的 setup,在该类中内用例集执行之前触发执行 """
        print('类级别的 setup.....')

    def teardown_class(self):
        """ 类级别的 teardown,在该类中内用例集执行之后触发执行 """
        print('类级别的 teardown.....')

    def test_case01(self):
        """ 用例 01 """
        print('执行用例01.......')
        assert 0  # 断言失败

    def test_case02(slef):
        """ 用例 02 """
        print('执行用例02.......')
        assert 1  # 断言成功

if __name__ == '__main__':
    pytest.main(["-s", "demo1.py"])
执行结果
D:py_tests>python demo.py
========================================================== test session starts ===========================================================
platform win32 -- Python 3.6.2, pytest-5.2.2, py-1.8.0, pluggy-0.13.0
rootdir: M:py_tests
collected 2 items

demo1.py 类级别的 setup.....
执行用例01.......
F执行用例02.......
.类级别的 teardown.....


================================================================ FAILURES ================================================================
__________________________________________________________ TestCase.test_case01 __________________________________________________________

self = <demo1.TestCase object at 0x0363F710>

    def test_case01(self):
        """ 用例 01 """
        print('执行用例01.......')
>       assert 0  # 断言失败
E       assert 0

demo1.py:53: AssertionError
====================================================== 1 failed, 1 passed in 0.10s =======================================================
类中方法级别的setup_method/teardown_method
import pytest

class TestCase(object):

    def setup_method(self):
        """ 类中方法级别的 setup,在该类中内每个用例执行之前触发执行 """
        print('类中方法级别的 setup.....')

    def teardown_method(self):
        """ 类中方法级别的 teardown,在该类中内每个用例执行之后触发执行 """
        print('类中方法级别的 teardown.....')

    def test_case01(self):
        """ 用例 01 """
        print('执行用例01.......')
        assert 0  # 断言失败

    def test_case02(slef):
        """ 用例 02 """
        print('执行用例02.......')
        assert 1  # 断言成功

if __name__ == '__main__':
    pytest.main(["-s", "demo1.py"])
执行结果:
D:py_tests>python demo.py
========================================================== test session starts ===========================================================
platform win32 -- Python 3.6.2, pytest-5.2.2, py-1.8.0, pluggy-0.13.0
rootdir: M:py_tests
collected 2 items

demo1.py 类中方法级别的 setup.....
执行用例01.......
F类中方法级别的 teardown.....
类中方法级别的 setup.....
执行用例02.......
.类中方法级别的 teardown.....


================================================================ FAILURES ================================================================
__________________________________________________________ TestCase.test_case01 __________________________________________________________

self = <demo1.TestCase object at 0x042BA2D0>

    def test_case01(self):
        """ 用例 01 """
        print('执行用例01.......')
>       assert 0  # 断言失败
E       assert 0

demo1.py:49: AssertionError
====================================================== 1 failed, 1 passed in 0.42s =======================================================
函数级别的setup_function/teardown_function
import pytest

def setup_function():
    """ 函数级别的 setup,在该脚本内每个用例函数执行之前触发执行 """
    print('函数级别的 setup.....')

def test_case01():
    print('执行用例01.......')
    assert 0  # 断言失败

def test_case02():
    print('执行用例02.......')
    assert 1  # 断言成功

def teardown_function():
    """ 函数级别的 teardown,在该脚本内每个用例函数执行之后触发执行 """
    print('函数级别的 teardown.....')


if __name__ == '__main__':
    pytest.main(["-s", "demo1.py"])
执行结果
D:py_tests>python demo.py
========================================================== test session starts ===========================================================
platform win32 -- Python 3.6.2, pytest-5.2.2, py-1.8.0, pluggy-0.13.0
rootdir: M:py_tests
collected 2 items

demo1.py 函数级别的 setup.....
执行用例01.......
F函数级别的 teardown.....
函数级别的 setup.....
执行用例02.......
.函数级别的 teardown.....


================================================================ FAILURES
______________________________________________________________ test_case01

    def test_case01():
        print('执行用例01.......')
>       assert 0  # 断言失败
E       assert 0

demo1.py:16: AssertionError
====================================================== 1 failed, 1 passed in 0.11s
小结
-
在类中,不需要
__init__方法。 -
测试类的类名必须以
Test开头。 -
类中的测试方法编写规则跟函数一致
配置文件
该脚本有多种运行方式,如果处于PyCharm环境,可以使用右键或者点击运行按钮运行,也就是在pytest中的主函数中运行:
if __name__ == '__main__':
    pytest.main(["-s", "demo1.py"])   # 就是调用的 pytest 的 main 函数
也可以在命令行中运行:
D:py_tests>python demo1.py
这种方式,跟使用Python解释器执行Python脚本没有什么两样。也可以如下面这么执行:
D:py_tests>pytest -s demo1.py
当然,还有一种是使用配置文件运行,来看看怎么用。
在项目的根目录下,我们可以建立一个pytest.ini文件,在这个文件中,我们可以实现相关的配置:
[pytest]
addopts = -s -v
#可以搭配相关的参数,比如-s。多个参数以空格分割,其他参数后续用到再说
#-s,在运行测试脚本时,为了调试或打印一些内容,我们会在代码中加一些print内容,但是在运行pytest时,这些内容不会显示出来。如果带上-s,就可以显示了。
#-v,使输出结果更加详细
testpaths = ./scripts
#配置测试用例的目录  ,必须有
python_files = demo*.py
#执行指定的文件,以test开头的python文件
python_classes = Test*
#执行指定的类
python_functions = test_*
#执行指定的函数
注意,配置文件中不许有中文,那这个配置文件中的各项都是什么意思呢?
首先,pytest.ini文件必须位于项目的根目录,而且也必须叫做pytest.ini。
其他的参数:
-
addopts可以搭配相关的参数,比如-s。多个参数以空格分割,其他参数后续用到再说。-
-s,在运行测试脚本时,为了调试或打印一些内容,我们会在代码中加一些print内容,但是在运行pytest时,这些内容不会显示出来。如果带上-s,就可以显示了。 -
-v,使输出结果更加详细。
-
-
testpaths配置测试用例的目录,-
因为我们用例可能分布在不同的目录或文件中,那么这个
scripts就是我们所有文件或者目录的顶层目录。其内的子文件或者子目录都要以test_开头,pytest才能识别到。 -
另外,上面这么写,是从一个总目录下寻找所有的符合条件的文件或者脚本,那么我们想要在这个总目录下执行其中某个具体的脚本文件怎么办?
-
[pytest]
testpaths = ./scripts/
python_files = test_case_01.py
-
这么写就是执行
scripts目录下面的test_case_01.py这个文件。 -
python_classes则是说明脚本内的所有用例类名必须是以Test开头,当然,你也可以自定义为以Test_开头,而类中的用例方法则当然是以test_开头。 -
python_functions则是说脚本内的所有用例函数以test_开头才能识别。
OK,来个示例。
首先,(详细目录参考开头的目录结构)在scripts/test_case_01.py中:
import pytest
def test_case01():
    print('执行用例01.......')
    assert 1  # 断言成功

def test_case02():
    print('执行用例02.......')
    assert 1  # 断言成功

class TestCaseClass(object):

    def test_case_03(self):
        assert 0  # 断言失败
import pytest

def test_case_04():
    assert 1  # 断言成功

def test_case_05():
    assert 0  # 断言失败
M:py_tests>pytest
======================================================= test session starts ========================================================
platform win32 -- Python 3.6.2, pytest-5.2.2, py-1.8.0, pluggy-0.13.0
rootdir: M:py_tests, inifile: pytest.ini, testpaths: ./scripts
collected 5 items

scripts	est_case_01.py 执行用例01.......
.执行用例02.......
.F
scripts	est_case_dir1	est_case_02.py .F

============================================================= FAILURES
____________________________________________________ TestCaseClass.test_case_03

self = <test_case_01.TestCaseClass object at 0x03CAF4D0>

    def test_case_03(self):
>       assert 0
E       assert 0

scripts	est_case_01.py:22: AssertionError
___________________________________________________________ test_case_05

    def test_case_05():
>       assert 0
E       assert 0

scripts	est_case_dir1	est_case_02.py:14: AssertionError
=================================================== 2 failed, 3 passed in 0.14s
由执行结果可以发现,2 failed, 3 passed,跟我们的预期一致。
后续执行相关配置都来自配置文件,如果更改,会有相应说明,终端都是直接使用pytest执行。
进阶
跳过用例
import pytest
#无条件跳过
@pytest.mark.skip()
def test_case_01():
    assert 1
#有条件跳过,两个参数必须加上
@pytest.mark.skipif(condition=1 < 2, reason='如果条件为true就跳过用例')
def test_case_02():
    assert 1
跳过用例,我们使用@pytest.mark.skipif(condition, reason):
-
condition表示跳过用例的条件。
-
reason表示跳过用例的原因。
然后将它装饰在需要被跳过用例的的函数上面。
效果如下:
M:py_tests>pytest

scripts/test_allure_case.py::test_case_01 SKIPPED
scripts/test_allure_case.py::test_case_02 SKIPPED

=========================================================== 2 skipped in 0.14s
上例执行结果相对详细,因为我们在配置文件中为addopts增加了-v,之前的示例结果中,没有加!
参数化
pytest身为强大的测试单元测试框架,那么同样支持DDT数据驱动测试的概念。也就是当对一个测试函数进行测试时,通常会给函数传递多组参数。比如测试账号登陆,我们需要模拟各种千奇百怪的账号密码。
当然,我们可以把这些参数写在测试函数内部进行遍历。不过虽然参数众多,但仍然是一个测试,当某组参数导致断言失败,测试也就终止了。
通过异常捕获,我们可以保证程所有参数完整执行,但要分析测试结果就需要做不少额外的工作。
在 pytest 中,我们有更好的解决方法,就是参数化测试,即每组参数都独立执行一次测试。使用的工具就是 pytest.mark.parametrize(argnames, argvalues)。
-
argnames表示参数名。
-
argvalues表示列表形式的参数值。
使用就是以装饰器的形式使用。
只有一个参数的测试用例
import pytest

mobile_list = ['10010', '10086']

@pytest.mark.parametrize('mobile', mobile_list)
def test_register(mobile):
    """ 通过手机号注册 """
    print('注册手机号是: {}'.format(mobile))
来看(重要部分)结果::
M:py_tests>pytest
scripts/test_case_01.py::test_register[10010] 注册手机号是: 10010
PASSED
scripts/test_case_01.py::test_register[10086] 注册手机号是: 10086
PASSED

====================================================== 2 passed in 0.11s
多个参数的测试用例
import pytest

mobile_list = ['10010', '10086']
code_list = ['x2zx', 'we2a']

@pytest.mark.parametrize('mobile', mobile_list)
@pytest.mark.parametrize('code', code_list)
def test_register(mobile, code):
    """ 通过手机号注册 """
    print('注册手机号是: {} 验证码是: {}'.format(mobile, code))
(重要部分)结果:
M:py_tests>pytest

scripts/test_case_01.py::test_register[x2zx-10010] 注册手机号是: 10010 验证码是: x2zx
PASSED
scripts/test_case_01.py::test_register[x2zx-10086] 注册手机号是: 10086 验证码是: x2zx
PASSED
scripts/test_case_01.py::test_register[we2a-10010] 注册手机号是: 10010 验证码是: we2a
PASSED
scripts/test_case_01.py::test_register[we2a-10086] 注册手机号是: 10086 验证码是: we2a
PASSED

====================================================== 4 passed in 0.17s
可以看到,每一个手机号与每一个验证码都组合一起执行了,这样就执行了4次。那么如果有很多个组合的话,用例数将会更多。我们希望手机号与验证码一一对应组合,也就是只执行两次,怎么搞呢?
import pytest

mobile_list = ['10010', '10086']
code_list = ['x2zx', 'we2a']

@pytest.mark.parametrize('mobile,code', zip(mobile_list, code_list))
def test_register(mobile, code):
    """ 通过手机号注册 """
    print('注册手机号是: {} 验证码是: {}'.format(mobile, code))
M:py_tests>pytest

scripts/test_case_01.py::test_register[10010-x2zx] 注册手机号是: 10010 验证码是: x2zx
PASSED
scripts/test_case_01.py::test_register[10086-we2a] 注册手机号是: 10086 验证码是: we2a
PASSED

====================================================== 2 passed in 0.44s
pytest测试报告插件
想要生成测试报告,首先要有下载,才能使用。
pip install pytest-html
使用
在配置文件中,添加参数:
[pytest]
addopts = -s --html=report/report.html
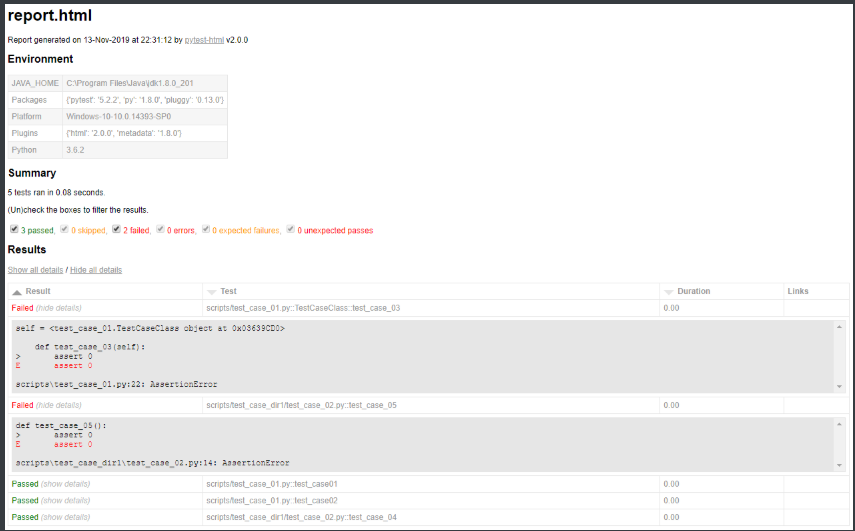
效果很不错吧!
控制测试用例执行的顺序
在之前,用例的执行顺序是从上到下依次执行:
import pytest

class TestCaseClass(object):
    def test_case_03(self):
        print('执行用例03.......')
        assert 1

def test_case01():
    print('执行用例01.......')
    assert 1  # 断成功

def test_case02():
    print('执行用例02.......')
    assert 1  # 断言成功
正如上例的执行顺序是3 1 2。
现在,来看看我们如何手动控制多个用例的执行顺序,这里也依赖一个插件。
下载
pip install pytest-ordering
使用
import pytest

class TestCaseClass(object):
    @pytest.mark.run(order=3)
    def test_case_03(self):
        print('执行用例03.......')
        assert 1

@pytest.mark.run(order=2)
def test_case01():
    print('执行用例01.......')
    assert 1  # 断言成功

@pytest.mark.run(order=1)
def test_case02():
    print('执行用例02.......')
    assert 1  # 断言成功
手动控制用例执行顺序的方法是在给各用例添加一个装饰器:
@pytest.mark.run(order=x) # x 是一个整数
那么, 现在的执行顺序是2 1 3,按照order指定的排序执行的。
如果有人较劲传个0或者负数啥的,那么它们的排序关系应该是这样的:
0 > 正数 > 没有参与的用例 > 负数
# 正数和负数就是按照大小关系排列的
失败重试
失败重试意思是指定某个用例执行失败可以重新运行。
下载
pip install pytest-rerunfailures
使用
需要在pytest.ini文件中, 配置:
[pytest]
addopts = -s --html=report/report.html --reruns=3
;addopts = -s --alluredir ./report/result
testpaths = ./scripts/
python_files = test_case_01.py
python_classes = Test*
python_functions = test_*
给addopts字段新增(其他原有保持不变)--reruns=3字段,这样如果有用例执行失败,则再次执行,尝试3次。
来看示例:
import pytest

def test_case01():
    print('执行用例01.......')
    assert 1  # 断言成功

def test_case02():
    print('执行用例02.......')
    assert 0  # 断言失败,需要重新执行

class TestCaseClass(object):

    def test_case_03(self):
        print('执行用例03.......')
        assert 1
结果:
M:py_tests>pytest
======================================================= test session starts ========================================================
platform win32 -- Python 3.6.2, pytest-5.2.2, py-1.8.0, pluggy-0.13.0
rootdir: M:py_tests, inifile: pytest.ini, testpaths: ./scripts/
plugins: allure-pytest-2.8.6, html-2.0.0, metadata-1.8.0, ordering-0.6, rerunfailures-7.0
collected 3 items

scripts	est_case_01.py 执行用例01.......
.执行用例02.......
R执行用例02.......
R执行用例02.......
R执行用例02.......
F执行用例03.......
.

============================================================= FAILURES =============================================================
___________________________________________________________ test_case02 ____________________________________________________________

    def test_case02():
        print('执行用例02.......')
>       assert 0  # 断言失败,需要重新执行
E       assert 0

scripts	est_case_01.py:19: AssertionError
------------------------------------ generated html file: file://M:py_tests
eport
eport.html ------------------------------------
=============================================== 1 failed, 2 passed, 3 rerun in 0.20s ===============================================
上面演示了用例失败了,然后重新执行多少次都没有成功,这是一种情况。
接下来,来看另一种情况,那就是用例执行失败,重新执行次数内通过了,那么剩余的重新执行的次数将不再执行。
import random
import pytest

def test_case01():
    print('执行用例01.......')
    assert 1  # 断言成功

def test_case02():
    print('执行用例02.......')
    status = random.randint(0, 2)
    if status:
        assert 1  # 断言成功,无需再重复执行了
    else:
        assert 0  # 断言失败,需要重新执行
class TestCaseClass(object):

    def test_case_03(self):
        print('执行用例03.......')
        assert 1
random模块帮助我们演示出在某次执行中出现失败的情况,而在重新执行的时候,会出现成功的情况,看结果:
M:py_tests>pytest
======================================================= test session starts ========================================================
platform win32 -- Python 3.6.2, pytest-5.2.2, py-1.8.0, pluggy-0.13.0
rootdir: M:py_tests, inifile: pytest.ini, testpaths: ./scripts/
plugins: allure-pytest-2.8.6, html-2.0.0, metadata-1.8.0, ordering-0.6, rerunfailures-7.0
collected 3 items

scripts	est_case_01.py 执行用例01.......
.执行用例02.......
R执行用例02.......
.执行用例03.......
.

------------------------------------ generated html file: file://M:py_tests
eport
eport.html ------------------------------------
==================================================== 3 passed, 1 rerun in 0.08s ====================================================
可以看到,用例02重新执行了一次就成功了,剩余的两次执行就终止了。
并发执行
一条一条用例的执行,肯定会很慢,来看如何并发的执行测试用例,当然这需要相应的插件。
下载
pip install pytest-xdist
使用
在配置文件中添加:
[pytest]
addopts =  -v -s --html=report/report.html -n=auto
;addopts = -s --alluredir ./report/result
testpaths = ./scripts/
python_files = test_case_01.py
python_classes = Test*
python_functions = test_*
就是这个-n=auto:
-
-n=auto,自动侦测系统里的CPU数目。 -
-n=numprocesses,也就是自己指定运行测试用例的进程数。
并发的配置可以写在配置文件中,然后其他正常的执行用例脚本即可。另外一种就是在终端中指定,先来看示例:
import pytest

def test_case01():
    print('执行用例01.......')
    assert 1  # 断言成功


@pytest.mark.skipif(condition= 2 > 1, reason='跳过用例')
def test_case02():
    print('执行用例02.......')
    assert 0  # 断言失败

class TestCaseClass(object):

    def test_case_03(self):
        print('执行用例03.......')
        assert 1

    def test_case_04(self):
        print('执行用例04.......')
        assert 1
结果:
M:py_tests>pytest .scripts	est_case_01.py -s -n auto
======================================================= test session starts ========================================================
platform win32 -- Python 3.6.2, pytest-5.2.2, py-1.8.0, pluggy-0.13.0 -- c:python36python.exe
cachedir: .pytest_cache
metadata: {'Python': '3.6.2', 'Platform': 'Windows-10-10.0.14393-SP0', 'Packages': {'pytest': '5.2.2', 'py': '1.8.0', 'pluggy': '0.13
.0'}, 'Plugins': {'allure-pytest': '2.8.6', 'forked': '1.1.3', 'html': '2.0.0', 'metadata': '1.8.0', 'ordering': '0.6', 'rerunfailure
s': '7.0', 'xdist': '1.30.0'}, 'JAVA_HOME': 'C:\Program Files\Java\jdk1.8.0_201'}
rootdir: M:py_tests, inifile: pytest.ini
plugins: allure-pytest-2.8.6, forked-1.1.3, html-2.0.0, metadata-1.8.0, ordering-0.6, rerunfailures-7.0, xdist-1.30.0
[gw0] win32 Python 3.6.2 cwd: M:py_tests
[gw1] win32 Python 3.6.2 cwd: M:py_tests
[gw2] win32 Python 3.6.2 cwd: M:py_tests
[gw3] win32 Python 3.6.2 cwd: M:py_tests
[gw0] Python 3.6.2 (v3.6.2:5fd33b5, Jul  8 2017, 04:14:34) [MSC v.1900 32 bit (Intel)]
[gw1] Python 3.6.2 (v3.6.2:5fd33b5, Jul  8 2017, 04:14:34) [MSC v.1900 32 bit (Intel)]
[gw2] Python 3.6.2 (v3.6.2:5fd33b5, Jul  8 2017, 04:14:34) [MSC v.1900 32 bit (Intel)]
[gw3] Python 3.6.2 (v3.6.2:5fd33b5, Jul  8 2017, 04:14:34) [MSC v.1900 32 bit (Intel)]
gw0 [4] / gw1 [4] / gw2 [4] / gw3 [4]
scheduling tests via LoadScheduling

scripts/test_case_01.py::test_case02
scripts/test_case_01.py::TestCaseClass::test_case_04
scripts/test_case_01.py::TestCaseClass::test_case_03
scripts/test_case_01.py::test_case01
[gw3] PASSED scripts/test_case_01.py::TestCaseClass::test_case_04
[gw0] PASSED scripts/test_case_01.py::test_case01
[gw2] PASSED scripts/test_case_01.py::TestCaseClass::test_case_03
[gw1] SKIPPED scripts/test_case_01.py::test_case02

------------------------------------ generated html file: file://M:py_tests
eport
eport.html ---
=================================================== 3 passed, 1 skipped in 2.23s
可参考我老师博客,更详细哦https://www.cnblogs.com/Neeo/articles/11832655.html
结果: