Docker学习笔记
Joey Zhao
概述
Docker中文文档 Docker概述-DockerInfo
安装
CentOS Docker 安装 | 菜鸟教程 (runoob.com)
#卸载旧版本
$ sudo yum remove docker
                  docker-client
                  docker-client-latest
                  docker-common
                  docker-latest
                  docker-latest-logrotate
                  docker-logrotate
                  docker-engine

#安装 Docker Engine-Community
#使用 Docker 仓库进行安装
#在新主机上首次安装 Docker Engine-Community 之前,需要设置 Docker 仓库。之后,您可以从仓库安装和更新 Docker。

#设置仓库
#安装所需的软件包。yum-utils 提供了 yum-config-manager ,并且 device mapper 存储驱动程序需要 device-mapper-persistent-data 和 lvm2。

$ sudo yum install -y yum-utils
  device-mapper-persistent-data
  lvm2

#使用官方源地址(比较慢)
$ sudo yum-config-manager
    --add-repo
    https://download.docker.com/linux/centos/docker-ce.repo
#阿里云
$ sudo yum-config-manager
    --add-repo
    http://mirrors.aliyun.com/docker-ce/linux/centos/docker-ce.repo

#安装 Docker Engine-Community
$ sudo yum install docker-ce docker-ce-cli containerd.io

#启动 Docker
$ sudo systemctl start docker

#通过运行 hello-world 映像来验证是否正确安装了 Docker Engine-Community 。
$ sudo docker run hello-world
常用命令
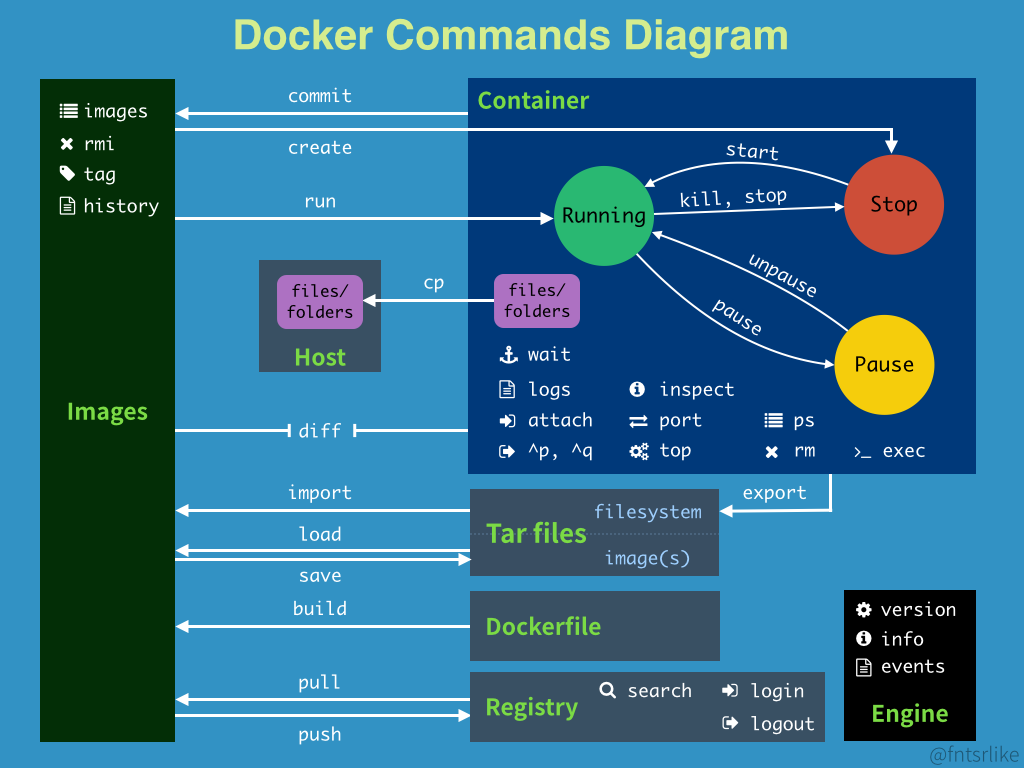
所有命令
[root@VM-4-3-centos ~]# docker --help

Usage:  docker [OPTIONS] COMMAND

A self-sufficient runtime for containers

Options:
      --config string      Location of client config files (default "/root/.docker")
  -c, --context string     Name of the context to use to connect to the daemon (overrides DOCKER_HOST env var and default context set with "docker context use")
  -D, --debug              Enable debug mode
  -H, --host list          Daemon socket(s) to connect to
  -l, --log-level string   Set the logging level ("debug"|"info"|"warn"|"error"|"fatal") (default "info")
      --tls                Use TLS; implied by --tlsverify
      --tlscacert string   Trust certs signed only by this CA (default "/root/.docker/ca.pem")
      --tlscert string     Path to TLS certificate file (default "/root/.docker/cert.pem")
      --tlskey string      Path to TLS key file (default "/root/.docker/key.pem")
      --tlsverify          Use TLS and verify the remote
  -v, --version            Print version information and quit

Management Commands:
  builder     Manage builds
  config      Manage Docker configs
  container   Manage containers
  context     Manage contexts
  engine      Manage the docker engine
  image       Manage images
  network     Manage networks
  node        Manage Swarm nodes
  plugin      Manage plugins
  secret      Manage Docker secrets
  service     Manage services
  stack       Manage Docker stacks
  swarm       Manage Swarm
  system      Manage Docker
  trust       Manage trust on Docker images
  volume      Manage volumes

Commands:
  attach      Attach local standard input, output, and error streams to a running container
  build       Build an image from a Dockerfile
  commit      Create a new image from a container's changes
  cp          Copy files/folders between a container and the local filesystem
  create      Create a new container
  diff        Inspect changes to files or directories on a container's filesystem
  events      Get real time events from the server
  exec        Run a command in a running container
  export      Export a container's filesystem as a tar archive
  history     Show the history of an image
  images      List images
  import      Import the contents from a tarball to create a filesystem image
  info        Display system-wide information
  inspect     Return low-level information on Docker objects
  kill        Kill one or more running containers
  load        Load an image from a tar archive or STDIN
  login       Log in to a Docker registry
  logout      Log out from a Docker registry
  logs        Fetch the logs of a container
  pause       Pause all processes within one or more containers
  port        List port mappings or a specific mapping for the container
  ps          List containers
  pull        Pull an image or a repository from a registry
  push        Push an image or a repository to a registry
  rename      Rename a container
  restart     Restart one or more containers
  rm          Remove one or more containers
  rmi         Remove one or more images
  run         Run a command in a new container
  save        Save one or more images to a tar archive (streamed to STDOUT by default)
  search      Search the Docker Hub for images
  start       Start one or more stopped containers
  stats       Display a live stream of container(s) resource usage statistics
  stop        Stop one or more running containers
  tag         Create a tag TARGET_IMAGE that refers to SOURCE_IMAGE
  top         Display the running processes of a container
  unpause     Unpause all processes within one or more containers
  update      Update configuration of one or more containers
  version     Show the Docker version information
  wait        Block until one or more containers stop, then print their exit codes

Run 'docker COMMAND --help' for more information on a command.
常用示例:
docker images
docker ps -a
docker search 镜像
docker pull 镜像
docker rmi -f 镜像
docker rmi -f $(docker images -aq)			# 删除全部镜像
docker rm -f 容器
docker rm -f $(docker ps -aq)				# 删除全部容器
docker run [OPTIONS] 容器 [命令] [ARG...]
	eg: docker run -it centos /bin/bash
    # 参数说明
    --name = "Name"  	# 容器名字    tomcat01    tomcat02    用来区分容器
    -d      			# 后台方式运行
    -it     			# 使用交互方式运行,进入容器查看内容
    -p  				# ip:主机端口:容器端口
    -p  				# 主机端口:容器端口(常用)
    -P
    -v					# 挂载数据卷 -v /主机目录:/容器目录[:(ro/rw)]
    	eg: docker run -it -v /home/test:/home centos /bin/bash
        -v  /容器内路径             # 匿名挂载
        -v  卷名:/容器内路径         # 具名挂载
        -v  /主机路径:/容器内路径     # 指定路径挂载
exit					# 退出关闭容器
Ctrl+P+Q				# 退出不关闭
docker inspect 容器
docker exec [OPTIONS] 容器 命令 [ARG...]	# 进入容器后开启一个新的终端,可以在里面操作
	eg: docker exec -it 容器 /bin/bash
docker attach [OPTIONS] 容器				 # 进入容器正在执行的终端,不会启动新的进程
docker cp 容器id:容器内路径 目的地主机路径	 # 拷贝文件到宿主机
docker start 容器
docker stop 容器
docker rename 容器原来名 要改为的名字
docker top 容器 [ps OPTIONS]
dockerfile
Docker中文文档 Dockerfile介绍-DockerInfo
基本结构
Dockerfile 由一行行命令语句组成,并且支持以 # 开头的注释行。
一般的,Dockerfile 分为四部分:基础镜像信息、维护者信息、镜像操作指令和容器启动时执行指令。
# This dockerfile uses the ubuntu image
# VERSION 2 - EDITION 1
# Author: docker_user
# Command format: Instruction [arguments / command] ..

# Base image to use, this must be set as the first line
FROM ubuntu

# Maintainer: docker_user <docker_user at email.com> (@docker_user)
MAINTAINER docker_user docker_user@email.com

# Commands to update the image
RUN echo "deb http://archive.ubuntu.com/ubuntu/ raring main universe" >> /etc/apt/sources.list
RUN apt-get update && apt-get install -y nginx
RUN echo "
daemon off;" >> /etc/nginx/nginx.conf

# Commands when creating a new container
CMD /usr/sbin/nginx
其中,一开始必须指明所基于的镜像名称,接下来推荐说明维护者信息。
后面则是镜像操作指令,例如 RUN 指令,RUN 指令将对镜像执行跟随的命令。每运行一条 RUN 指令,镜像添加新的一层,并提交。
最后是 CMD 指令,来指定运行容器时的操作命令。
下面是一个更复杂的例子
# Nginx
#
# VERSION               0.0.1

FROM      ubuntu
MAINTAINER Victor Vieux <victor@docker.com>

RUN apt-get update && apt-get install -y inotify-tools nginx apache2 openssh-server

# Firefox over VNC
#
# VERSION               0.3

FROM ubuntu

# Install vnc, xvfb in order to create a 'fake' display and firefox
RUN apt-get update && apt-get install -y x11vnc xvfb firefox
RUN mkdir /.vnc
# Setup a password
RUN x11vnc -storepasswd 1234 ~/.vnc/passwd
# Autostart firefox (might not be the best way, but it does the trick)
RUN bash -c 'echo "firefox" >> /.bashrc'

EXPOSE 5900
CMD    ["x11vnc", "-forever", "-usepw", "-create"]

# Multiple images example
#
# VERSION               0.1

FROM ubuntu
RUN echo foo > bar
# Will output something like ===> 907ad6c2736f

FROM ubuntu
RUN echo moo > oink
# Will output something like ===> 695d7793cbe4

# You᾿ll now have two images, 907ad6c2736f with /bar, and 695d7793cbe4 with
# /oink.
指令
• FROM
• MAINTAINER
• RUN
• CMD
• EXPOSE
• ENV
• ADD
• COPY
• ENTRYPOINT
• VOLUME
• USER
• WORKDIR
• ONBUILD
构建
docker build [选项] 路径
	eg: docker build -t myrepo/myapp /tmp/test1/
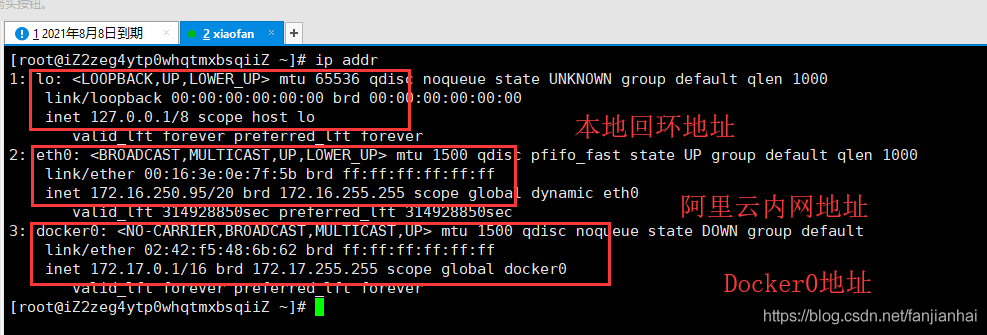
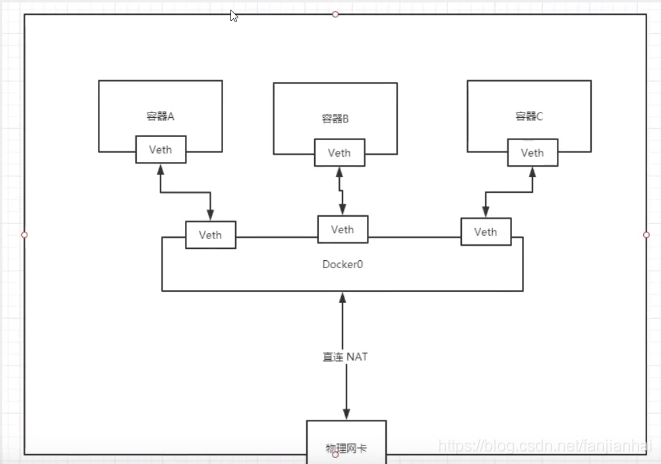
docker网络
网络模型
自定义网络
docker network ls
    bridge: 桥接模式,桥接 docker 默认,自己创建的也是用brdge模式
    none: 不配置网络
    host: 和宿主机共享网络
    container:容器网络连通!(用的少, 局限很大)
docker network create
	--driver bridge
	--subnet 192.168.1.0/24
	--gateway 192.168.1.1
	mynet
docker run -d -P --name 容器名 --net mynet 镜像
# 解除容器绑定的网络 网络名词mynetwork 容器名称 mycontainer
docker network disconnect mynetwork mycontainer
# 删除原先的网络
docker network rm mynetwork
# 重新创建容器网络
docker network create --subnet=192.168.1.0/24 mynetwork
# 为容器重新指定网络
docker network connect mynetwork mycontainer
# 重新启动容器
docker container restart mycontainer