一: 安装
memcahce像redis,mongodb一样都需要开启他们自己的服务端,我们下载Memcached_1.2.5.zip,然后放到C盘,修改文件
名为memcached。
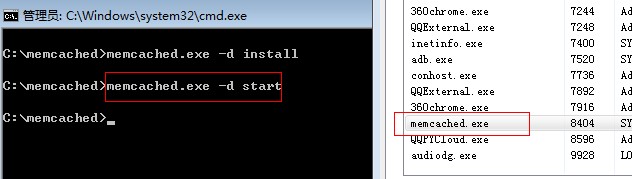
1:install
install可以说是万能通用命令,首先我们转到memcached目录,然后 memcached.exe -d install 即可。

2:start
现在我们只要启动start即可,要注意的就是memecache默认的端口是11211,当然我也不想重新指定端口了。
3:stop,uninstall
这两个就不截图了,一个是停止,一个是卸载,反正都是万能通用命令。
二:驱动程序
memcache的服务器我们就已经开启好了,由于在公司最近一直都在用php,算了还是用C#驱动吧,谁让这是.net
社区呢,下载C#驱动,既然是缓存服务器,只要有基本的CURD,我想应该就差不多了。

 1 using System;
 2 using System.Collections.Generic;
 3
 4 namespace BeIT.MemCached
 5 {
 6     class Example
 7     {
 8         public static void Main(string[] args)
 9         {
10             //通过配置文件初始化memcache实例
11             MemcachedClient cache = MemcachedClient.GetInstance("MyConfigFileCache");
12
13             //编辑(可以模拟session操作,缓存20分钟)
14             cache.Set("name", "一线码农", DateTime.Now.AddMinutes(20));
15
16             //获取
17             var result = cache.Get("name");
18
19             Console.WriteLine("获取name的缓存数据为: " + result);
20
21             //删除
22             cache.Delete("name");
23
24             Console.WriteLine("
成功删除cache中name的数据");
25
26             result = cache.Get("name");
27
28             Console.WriteLine("
再次获取cache中name的数据为:" + (result ?? "null") + "
");
29
30             //查看下memecahce的运行情况
31             foreach (KeyValuePair<string, Dictionary<string, string>> host in cache.Status())
32             {
33                 Console.Out.WriteLine("Host: " + host.Key);
34                 foreach (KeyValuePair<string, string> item in host.Value)
35                 {
36                     Console.Out.WriteLine("	" + item.Key + ": " + item.Value);
37                 }
38                 Console.Out.WriteLine();
39             }
40
41             Console.Read();
42         }
43     }
44 }
我们再定义下配置文件,既然memcache可以用于分布式,那就避免不了将cache分摊到几台服务器上去,可以看到,下面的
配置也是非常简单的,当然分配的法则自然是memcache自身的算法决定的,最后别忘了在另一台服务器上开放一个端口就它
就行了。
<?xml version="1.0" encoding="utf-8" ?>
<configuration>
  <configSections>
    <section name="beitmemcached" type="System.Configuration.NameValueSectionHandler" />
  </configSections>
  <appSettings>
  </appSettings>
  <beitmemcached>
    <add key="MyConfigFileCache" value="127.0.0.1:11211" />
    <!--<add key="MyConfigFileCache" value="127.0.0.1:11211,127.0.0.1:8888" />-->
  </beitmemcached>
</configuration>
下面是打包程序:BeITMemcached ,也可以到codegoogle去下载。