Binder算是android里面比较难懂的部分了,但是非常重要,基本上,当我们深入到进程交互的阶段,Binder都是一个绕不开的槛,所以我也希望帮助大家更浅显地了解到这个知识点。笔者想通过3篇博文简单介绍Binder,也仅仅是Java层,希望能够帮助到想了解Binder基本知识的开发者。
为什么需要Binder?
在提及Binder之前,我们先看看我们平时开发的app的状况。每个app就像孤岛一样,生活在系统分配给自己的虚拟机和内存空间,好处是安全,各个app不会互相影响到对方,IE一个网页的崩溃却会导致整个IE应用程序死亡(举个小栗子,IE不属于跨进程)。在这种情况下,必须有一种机制,提供安全高效的通信的功能,Binder就为此而生。所以,Binder是Android系统的一种IPC(进程间通信)方式。ActivityManagerService、WinderManagerService等系统服务的背后都是Binder。
为什么选择Binder?
以前学过Linux的朋友都知道,Linux本身就提供了很多种跨进程通信的方式,如
- Signals 信号量
- Pipes 管道
- Socket 套接字
- Message Queue 消息队列
- Shared Memory 共享内存
Android继承于Linux,想必更懂上面跨进程的机制(程序员又不傻,有现成好用的干嘛不复用呢),既然Android选择了Binder,想必是考虑到手机这一种独特的平台,需要适用一种更高效(手机内存省着用),更安全(防止应用被攻击、篡改)的烦方法。其实一种技术的运用,往往有更多的综合考量。有可能是那个年代,没有比这个技术更牛叉的了;有可能,是各家公司斗争协调出来的结果。
Binder 结构图
先通过两张Binder通用图介绍Binder是如何起作用的:
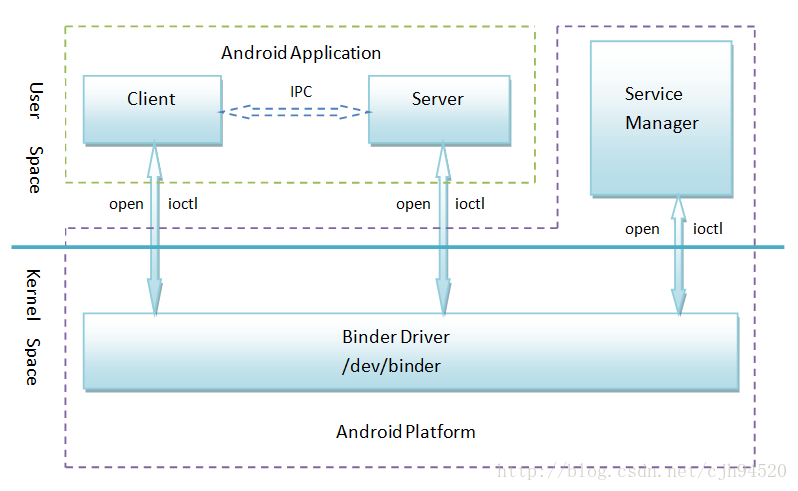
要运作Binder,需要4个角色通力合作:
- 客户端:获取服务端在Binder驱动中对应的引用,然后调用它的transact方法即可向服务端发送消息。
- 服务端:指Binder实现类所在的进程,该对象一旦创建,内部则会启动一个隐藏线程,会接收客户端发送的数据,然后执行Binder对象中的onTransact()函数。
- Binder驱动:当服务端Binder对象被创建时,会在Binder驱动中创建一个mRemote对象。
- Service Manager:作用相当于DNS,就想平时我们通过网址,然后DNS帮助我们找到对应的IP地址一样,我们在Binder服务端创建的Binder,会注册到Service Manager,同理,当客户端需要该Binder的时候,也会去Service Manager查找。
所以以上4者的运作基本上是:
1. 服务端创建对应Binder实例对象,然后开启隐藏Binder线程,接收来自客户端的请求,同时,将自身的Binder注册到Service Manager,在Binder驱动创建mRemote对象。
2. 客户端想和服务端通信,通过Service Manager查找到服务端的Binder,然后Binder驱动将对应的mRemote对象返回
3. 至此,整个通信连接建立完毕
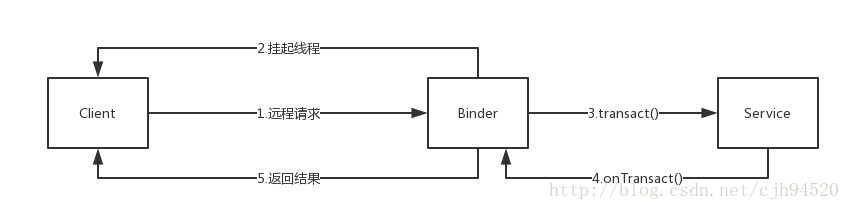
在建立完毕通信之后,客户端可以通过获取到的mRemote对象发生消息给远程服务端了,客户端通过调用transact()方法,将要请求的内容发送到服务段,然后挂起自己当前的线程,等待回复,服务端收到数据后在自己的onTransact()方法进行处理,然后将对应的结果返回给客户端,客户端收到数据,重新拉起线程,至此进程间交互数据完毕。
Binder 实战演练
下面通过实战,展示Binder如何成功实现跨进程通信,功能很简单,我们在服务端创建Binder,然后提供查询游戏价格的功能,然后客户端发起远程调用进行查询。
服务端代码
自定义Binder,需要在Service里面提供服务,我们先创建Service,然后在里面创建Binder
public class GameService extends Service { private Binder mBinder = new Binder() { }; @Nullable @Override public IBinder onBind(Intent intent) { return mBinder; } }
注意onBind()方法,这里return的是我们在Service创建的Binder对象,客户端接受到的对象就是他。Binder对象里面,我们需要重载几个方法,分别是onTransact(),getGamePrice()方法。
- onTransact() 方法是客户端发起调用后,服务端Binder所在进程接收到客户端发送的数据,通过这个方法去处理,根据响应码分发给具体的不同的方法去处理。
- getGamePrice()方法 是自定义方法,用于接收客户端传送过来的游戏名去查询对应的价格
private Binder mBinder = new Binder() { @Override protected boolean onTransact(int code, Parcel data, Parcel reply, int flags) throws RemoteException { if (code == 1) { String _arg0; _arg0 = data.readString(); int _result = getGamePrice(_arg0); reply.writeInt(_result); return true; } return super.onTransact(code, data, reply, flags); } public int getGamePrice(String name) { int price = -1; if ("逃生2".equals(name)) { price = 88; } else if ("饥荒".equals(name)) { price = 24; } return price; } };
- 1
- 2
- 3
- 4
- 5
- 6
- 7
- 8
- 9
- 10
- 11
- 12
- 13
- 14
- 15
- 16
- 17
- 18
- 19
- 20
- 21
- 22
- 23
这里为了方便起见,code(响应码)直接判断是否为1,是的话就取第一个数据,然后调用getGamePrice()方法查询价格,得到结果后通过reply封装结果,然后return true,表面成功接收并处理了结果。后面客户端会通过这个reply 去获取结果.
当然,别忘记了,设置Service,笔者在开发的时候将服务端和客户端写在同一个应用里面,所以需要主动将其中一个所在的进程改掉,这里直接将Service放到另一个进程,然后添加对应的隐式action
<service android:name="com.smartwork.bindertest.GameService" android:process=":remote"> <intent-filter> <action android:name="android.intent.action.bind.gameservice" /> </intent-filter> </service>
客户端代码
客户端要做的只有两步:
1.绑定服务
2.发起请求
我们先看第一步,绑定,这里我们在button的onClick()事件里面进行处理
mButton.setOnClickListener(new View.OnClickListener() { @Override public void onClick(View view) { String action = "android.intent.action.bind.gameservice"; Intent intent = new Intent(action); intent.setPackage("com.smartwork.bindertest"); bindService(intent, mServiceConnection, BIND_AUTO_CREATE); } });
注意 Android 5.0一出来后,其中有个特性就是校验Servuce Intent,如果发现这个intent compponent==null 而且 package ==null 而且版本大于等于5.0 ,会抛出Service Intent must be explitict的异常,也就是说从Lollipop开始,service服务必须采用显示方式启动。
private void validateServiceIntent(Intent service) { if (service.getComponent() == null && service.getPackage() == null) { if (getApplicationInfo().targetSdkVersion >= Build.VERSION_CODES.LOLLIPOP) { IllegalArgumentException ex = new IllegalArgumentException( "Service Intent must be explicit: " + service); throw ex; } else { Log.w(TAG, "Implicit intents with startService are not safe: " + service + " " + Debug.getCallers(2, 3)); } } }
继续回到上面的方法,其中最重要的方法是bindService(),第二个参数是ServiceConnection对象,这个方法接收绑定成功和断开的回调。
private IBinder mRemote = null; private ServiceConnection mServiceConnection = new ServiceConnection() { @Override public void onServiceConnected(ComponentName name, IBinder service) { mRemote = service; Toast.makeText(MainActivity.this, "绑定成功", Toast.LENGTH_SHORT).show(); } @Override public void onServiceDisconnected(ComponentName name) { mRemote = null; Toast.makeText(MainActivity.this, "远程服务链接已断", Toast.LENGTH_SHORT).show(); } };
拿到这个service是属于IBinder接口,也就是之前我们在服务端onBind()方法返回的Binder对象,之后我们就可以利用这个mRemote进行查询操作。
简单一点,直接在一个button里面写onClick()查询游戏价格:
mPriceButton.setOnClickListener(new View.OnClickListener() { @Override public void onClick(View view) { String gameName = "逃生2"; int price = -1; try { price = getPrice(gameName); } catch (RemoteException e) { e.printStackTrace(); } Toast.makeText(MainActivity.this, gameName + " price is : " + price, Toast.LENGTH_SHORT).show(); } });
最近逃生2很火啊,查查多少钱来着。发送请求需要封装一下数据,抽了个方法另外去实现。
private int getPrice(String name) throws RemoteException { android.os.Parcel _data = android.os.Parcel.obtain(); android.os.Parcel _reply = android.os.Parcel.obtain(); int _result; try { _data.writeString(name); mRemote.transact(1, _data, _reply, 0); _result = _reply.readInt(); } finally { _reply.recycle(); _data.recycle(); } return _result; }
mRemote.transact(1, _data, _reply, 0)这个语句最重要,传递的分别是响应码,封装好发过去的数据包(装上我们要查询的游戏名),需要接收的数据包,flags(flags:0:normal调用,同步方式,1:异步调用,发送数据结束后不等待调用结果返回)。当执行到这个方法之后,当前的线程会被挂起,然后跳到服务端所在的线程进行处理,得到结果后,当前线程才会重新被唤醒,然后_reply得到数据。
至此整个跨进程交互通过Binder得到了实现。
!!!
需要强调的是,在客户端远程调用服务的时候,这个时候客户端当前线程会被挂起,被调用的方法运行在服务端的Binder线程里面,如果该方法是耗时方法,而且当前线程属于UI线程,很可能会出现ANR的问题,所以需要注意这个远程调用,如果不明确,尽量避免在UI线程发起调用。另外onServiceConnected和onService也是运行在UI线程里面,需要注意避免耗时操作。
还需要注意一点,在Binder传输数据的时候,经历过序列化和反序列化,简单一点就是,就算你两个传递过去给服务端都是同一个对象,服务端都会认为是两个不同的对象,只是里面的数据一样而已。这也很好理解,客户端和服务端处于不同的进程,你发过去的对象必须经过序列化和反序列化,所以对于服务端,每次都感觉接收到新的对象。如果想解决这个问题:
请看XXX
好的,上面就是Binder最简单的用法了,基本上也能完成老大交代下来的工作了,但是辛(苦)勤(逼)的程序员是不会就这样就满足的。如果你不满足上面简单的实现,想深入了解怎样可以优化整个流程或者深入到源码理解具体的内部实现,请继续。。。
首先你要知道,我骗了你。(不要打我,不要打我脸/(ㄒoㄒ)/~~)。其实上面的例子中,客户端获取到的并不是Binder实现类对象,而是Binder的一个代理。意思就是,在跨进程访问中,获取到的IBinder接口的对象,一般是实现类的代理类,并不是本体,相对的,如果是在同一个进程请求,那么获取到的IBinder接口的对象,就是对应Binder的实现类。

基本上就是这样,而这个获取IBinder具体对象的逻辑发生在Native层,所以暂时不建议深追,先把java层的东西记住就好:其实也很好理解,当发现是同一个进程访问的时候,系统会直接返回这个Binder实现类,这样之后调用的方法就不用再经过跨进程IPC一系列的步骤,简单的应用类方法调用就是了,当发现是跨进程访问的时候,发给客户端就是一个Binder的代理类;发给客户端就是一个Binder的代理类;发给客户端就是一个Binder的代理类。OK重要的事情说了3遍。
好的,下面我们来看看具体可以怎么优化,
1. 在客户端我们知道,每次发送过去最重要的数据就是状态码和Parcel的数据包,我们可以直接抽象出一个代理类,包裹这个IBinder接口,然后以调用类的方法的形式进行访问,
2. 然后将我们想要的查询游戏价格的方法以接口的形式让这个代理类去实现
3. 每个方法对应一个响应码,以常量形式出现
public interface GameInterface { public static final int GET_PRICE_CODE = 1; //响应码 int getPrice(String name) throws RemoteException; }
public class GameBinderProxy implements GameInterface { private IBinder mRemote; GameBinderProxy(IBinder binder) { mRemote = binder; } @Override public int getPrice(String name) throws RemoteException { android.os.Parcel _data = android.os.Parcel.obtain(); android.os.Parcel _reply = android.os.Parcel.obtain(); int _result; try { _data.writeString(name); mRemote.transact(GET_PRICE_CODE, _data, _reply, 0); _result = _reply.readInt(); } finally { _reply.recycle(); _data.recycle(); } return _result; } }
- 1
- 2
- 3
- 4
- 5
- 6
- 7
- 8
- 9
- 10
- 11
- 12
- 13
- 14
- 15
- 16
- 17
- 18
- 19
- 20
- 21
- 22
- 23
这个构造方法还是在我们onServiceConnected()处调用:
@Override public void onServiceConnected(ComponentName name, IBinder service) { mRemote = new GameBinderProxy(service); Toast.makeText(MainActivity.this, "绑定成功", Toast.LENGTH_SHORT).show(); }
相对的服务端也进行优化:
public class GameBinderNative extends Binder implements GameInterface { @Override public int getPrice(String name) throws RemoteException { int price = -1; if ("逃生2".equals(name)) { price = 88; } else if ("饥荒".equals(name)) { price = 24; } return price; } @Override protected boolean onTransact(int code, Parcel data, Parcel reply, int flags) throws RemoteException { if (code == GET_PRICE_CODE) { String _arg0; _arg0 = data.readString(); int _result = getPrice(_arg0); reply.writeInt(_result); return true; } return super.onTransact(code, data, reply, flags); } }
- 1
- 2
- 3
- 4
- 5
- 6
- 7
- 8
- 9
- 10
- 11
- 12
- 13
- 14
- 15
- 16
- 17
- 18
- 19
- 20
- 21
- 22
- 23
- 24
public class GameService extends Service { private Binder mBinder = new GameBinderNative(); @Nullable @Override public IBinder onBind(Intent intent) { return mBinder; } }
OK ,这就很舒服,整个代码块干净了不少,其实优秀到七七八八了,要是硬要挑一下骨头的话,我们可以对客户端这个代理类再动动手脚,如果是跨进程访问的,就用代理包装一下BinderProxy,如果是同一个进程访问直接返回就可以了:
//这里返回的是GameInterface接口 public static GameInterface asInterface(android.os.IBinder obj) { if (obj == null) { return null; } if (obj instanceof Binder) { Log.d("chenjiahui", "asInterface: GameBinderNative : obj instanceof Binder"); return (GameInterface) obj; } else { Log.d("chenjiahui", "asInterface: GameBinderNative : obj instanceof GameBinderProxy"); return new GameBinderProxy(obj); } }
客户端
public void onServiceConnected(ComponentName name, IBinder service) { mRemote = GameBinderNative.asInterface(service); Toast.makeText(MainActivity.this, "绑定成功", Toast.LENGTH_SHORT).show(); }
重要的事情说三篇,onServiceConnected回调返回的IBinder service对象,==如果是跨进程访问的返回的是BinderProxy(Binder的代理类),同一进程访问返回的是Binder;如果是跨进程访问的返回的是BinderProxy(Binder的代理类),同一进程访问返回的是Binder;如果是跨进程访问的返回的是BinderProxy(Binder的代理类),同一进程访问返回的是Binder。==
OK,到这里,整篇文章差不多要结束了,因为我刚才教你的优化方法,就是AIDL。
AIDL是一个缩写,全称是Android Interface Definition Language,也就是Android接口定义语言。
这个是官方的说辞,以我的理解就是,帮助开发者更有效率地去实现这个Binder,因为用了AIDL之后生成了专门跨进程通信的模板,免除了一大堆统一的代码,用了AIDL之后,在服务端,关注具体跨进程方法的实现就可以,客户端更是不用写任何额外的代码,因为全部自动生成了。
AIDL 实操
我们试试打开Android Studio,然后新建一个aidl文件
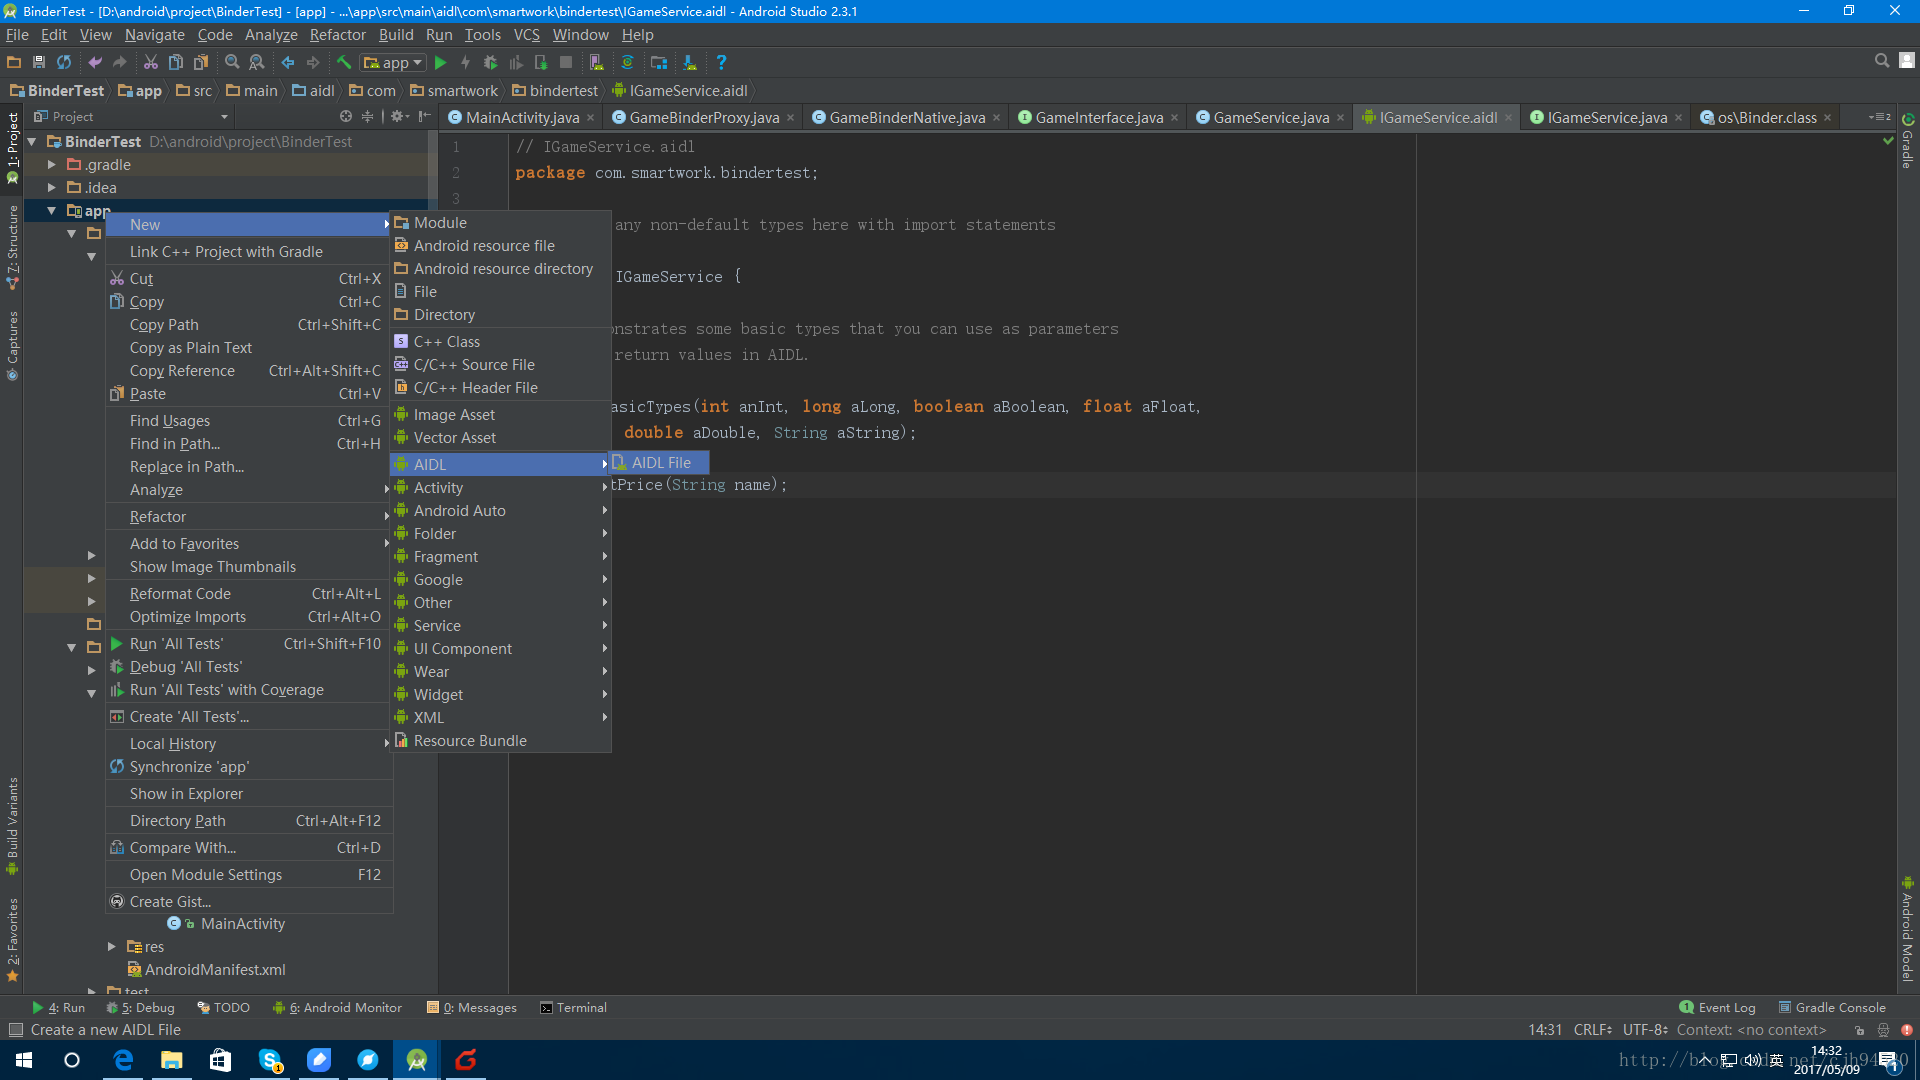
interface IGameService { /** * Demonstrates some basic types that you can use as parameters * and return values in AIDL. */ void basicTypes(int anInt, long aLong, boolean aBoolean, float aFloat, double aDouble, String aString); int getPrice(String name); }
好的,还是我们查询游戏价格的方法getPrice(),上面还有一个方法basicTypes(),没啥用,看google注释就是告诉我们aidl可以传的基础类型有哪些,当然还可以传parcelable的对象,这个放到第3篇文章讲吧(因为别的文章都说了很多了,看两三篇博文一下子就懂了)
写完这个IGameService接口后,我们clean 一下项目,打开目录看看有什么东西:
app/build/generated/source/aidl/debug or release / 包名 / IGameService
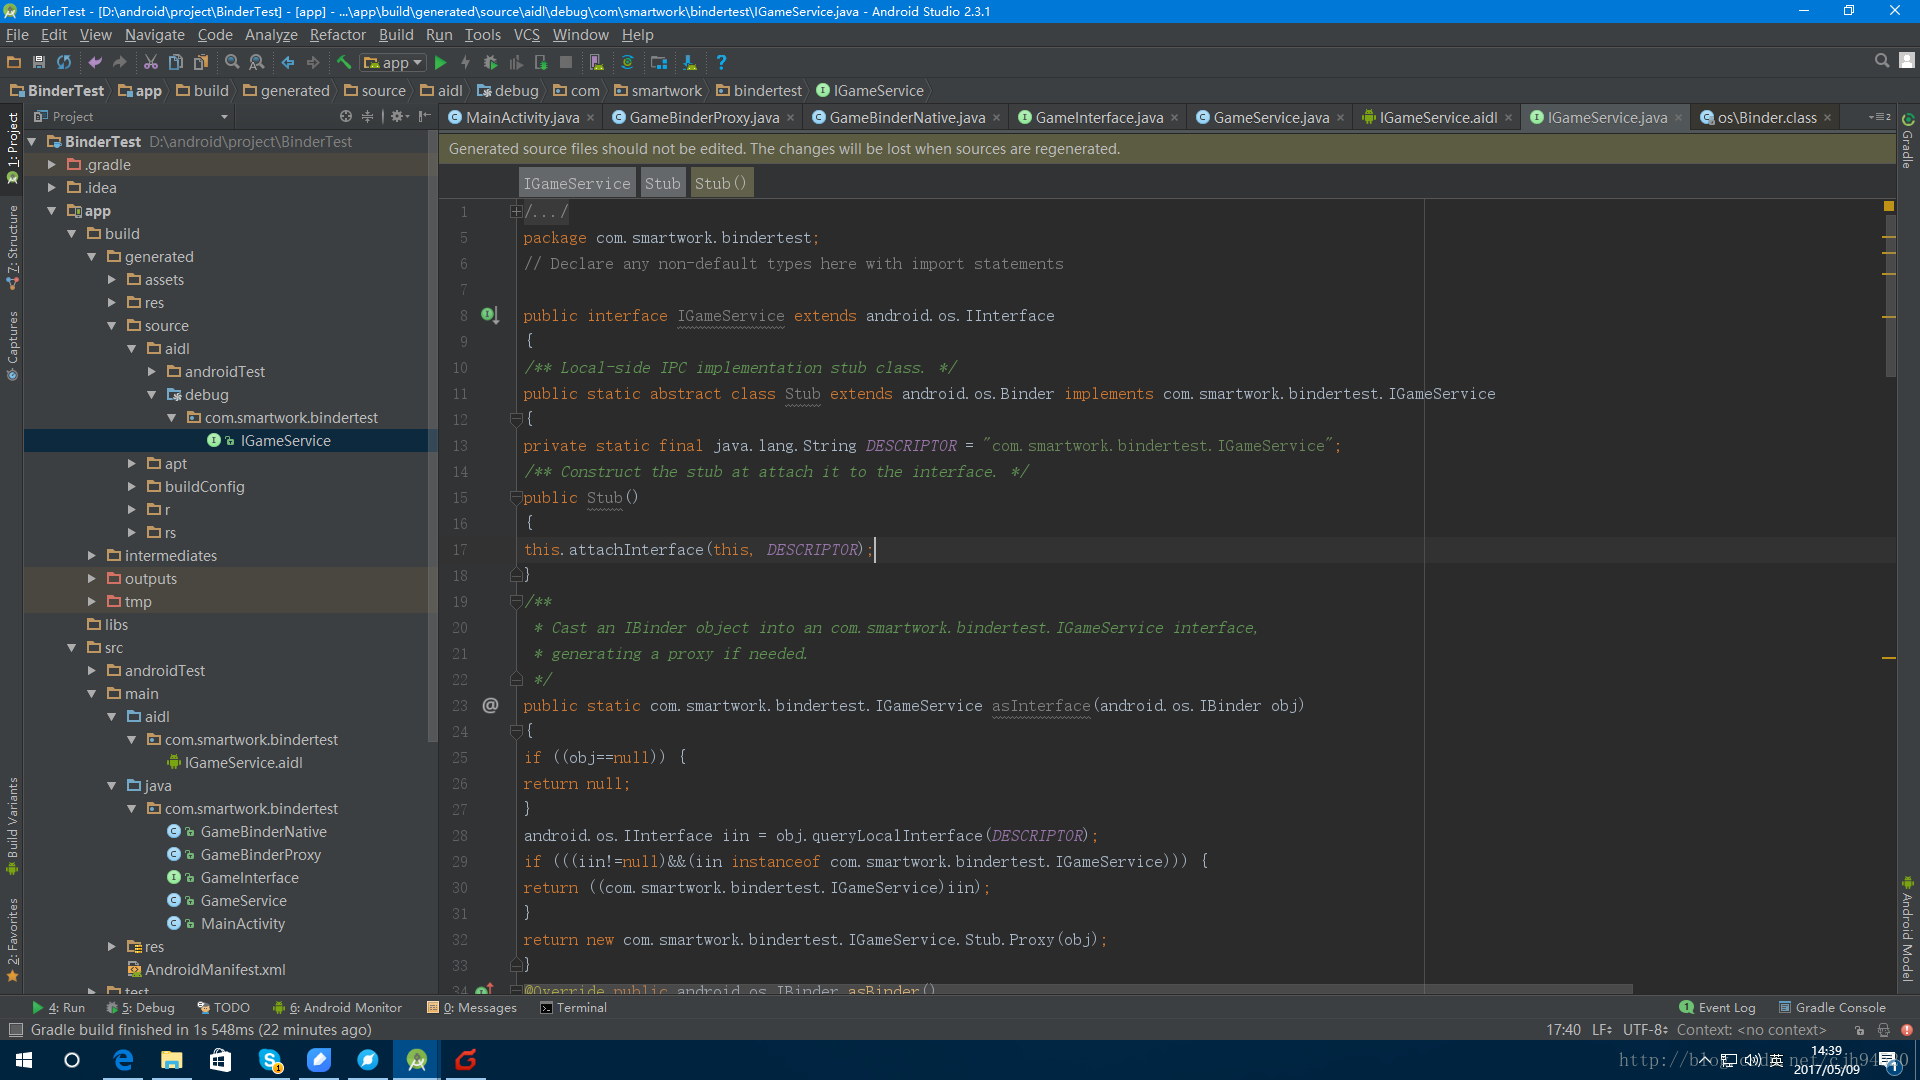
我把IGameService的代码抽出来先看个大概:
public interface IGameService extends android.os.IInterface { public static abstract class Stub extends android.os.Binder implements com.smartwork.bindertest.IGameService { public Stub() { this.attachInterface(this, DESCRIPTOR); } public static com.smartwork.bindertest.IGameService asInterface(android.os.IBinder obj) { if ((obj==null)) { return null; } android.os.IInterface iin = obj.queryLocalInterface(DESCRIPTOR); if (((iin!=null)&&(iin instanceof com.smartwork.bindertest.IGameService))) { return ((com.smartwork.bindertest.IGameService)iin); } return new com.smartwork.bindertest.IGameService.Stub.Proxy(obj); } @Override public boolean onTransact(int code, android.os.Parcel data, android.os.Parcel reply, int flags) throws android.os.RemoteException { switch (code) { case TRANSACTION_getPrice: { //省略了代码,就是我们之前写的那个!!! } } return super.onTransact(code, data, reply, flags); } private static class Proxy implements com.smartwork.bindertest.IGameService { private android.os.IBinder mRemote; Proxy(android.os.IBinder remote) { mRemote = remote; } @Override public android.os.IBinder asBinder() { return mRemote; } public java.lang.String getInterfaceDescriptor() { return DESCRIPTOR; } @Override public int getPrice(java.lang.String name) throws android.os.RemoteException { //省略了代码,就是我们之前写的那个!!! } } static final int TRANSACTION_basicTypes = (android.os.IBinder.FIRST_CALL_TRANSACTION + 0); static final int TRANSACTION_getPrice = (android.os.IBinder.FIRST_CALL_TRANSACTION + 1); } public int getPrice(java.lang.String name) throws android.os.RemoteException; }
- 1
- 2
- 3
- 4
- 5
- 6
- 7
- 8
- 9
- 10
- 11
- 12
- 13
- 14
- 15
- 16
- 17
- 18
- 19
- 20
- 21
- 22
- 23
- 24
- 25
- 26
- 27
- 28
- 29
- 30
- 31
- 32
- 33
- 34
- 35
- 36
- 37
- 38
- 39
- 40
- 41
- 42
- 43
- 44
- 45
- 46
- 47
- 48
- 49
- 50
- 51
- 52
- 53
- 54
- 55
- 56
- 57
- 58
- 59
- 60
- 先简单说下三者的结构,是一个interface接口,里面有一个抽象类Stub(这个Stub是交给服务端去具体实现的),然后抽象类Stub里面有一个内部类Proxy(听名字就知道是给Stub做代理的)
- 这3者对应之前我们优化的过程,对比着看,其实是一样的,只是google将他们三个放在一起了,刚看这个生产的java感觉特别乱,但是你跟之前的优化过程对比一看就会立马清晰很多了。
- 当然了,生成的这个java和我们之前优化的有点不同,就是多了android.os.IInterface这个接口,所以Stub里面的asInterface方法(也就是我之前说的那个,同一个进程Binder直接返回,不然就用代理类封装的方法)也有点不一样。
- asInterface是一个static方法,提供客户端调用,然后通过queryLocalInterface()这个方法判断是否同一个进程,因为假如是服务端所在的进程请求,获得的是Binder实现类,初始化的时候Stub()会调用attachInterface(),其实就是自己把自己存起来了,后面如果queryLocalInterface()的话就能返回到对象。但是跨进程访问,返回的是BinderProxy,这个时候queryLocalInterface()只能是null了。
public IInterface queryLocalInterface(String descriptor) { return null; }