最近租了一个阿里云云翼服务器,趁着自己还是一个学生,享受一下优惠。我租的是阿里云Ubuntu16.04版本的服务器,在搭建mysql的时候,一开始是可以运行的,由于某次手抽,把mysql的套接字文件不小心删除了,然后无论怎么卸载重装,都出现了这个问题:
- root@iZufkfljcZ:~# mysql -uroot -p
- Enter password:
- ERROR 2002 (HY000): Can't connect to local MySQL server through socket '/tmp/mysql.sock' (2)
我出现的问题是:找不到mysql.sock,如果你可以运行
find / -name mysql.sock但是,我执行了这条语句之后,并没有任何反应,没有找到mysql.sock文件。
在这之前,需要明白mysql.sock这个文件有什么用?
连接localhost通常通过一个Unix域套接字文件进行,一般是/tmp/mysql.sock。如果套接字文件被删除了,本地客户就不能连接。这可能发生在你的系统运行一个cron任务删除了/tmp下的临时文件。
如果你因为丢失套接字文件而不能连接,你可以简单地通过重启服务器重新创建得到它。因为服务器在启动时重新创建它。
如果和我一样,重启服务器还是没有任何变化,你可以先执行下面的语句:
# mysql -uroot -h 127.0.0.1 -p 如果套接字文件被一个cron任务删除,问题将重复出现,除非你修改cron任务或使用一个或使用一个不同的套接字文件,我的解决办法是重新指定一个不同的套接字,或者说,我现在没有mysql.sock文件,所以我要想办法生成一个。
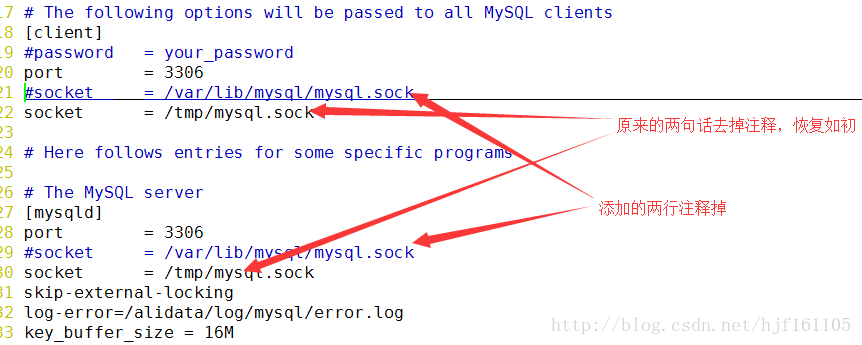
首先,更改my.cnf文件,我的服务器中的目录为/etc/my.cnf,如果没有的话可以用find去查找,

接下来就是保存退出,然后确保这个目录存在,并且将这个目录的权限修改一下
# chmod 777 /var/lib/mysql
- # service mysql restart
- # service mysqld restart
- root@iZufkfljcZ:~# service mysqld start
- Job for mysqld.service failed because the control process exited with error code. See "systemctl status mysqld.service" and "journalc
- tl -xe" for details.
这个时候,提示可以输入systemctl status mysqld.service去查看具体的失败原因,于是:
****************************************************************************************
root@iZufkfljcZ:~# systemctl status mysqld.service
● mysqld.service - LSB: start and stop MySQL
Loaded: loaded (/etc/init.d/mysqld; bad; vendor preset: enabled)
Active: failed(Result: exit-code) since 三 2017-12-20 10:38:30 CST; 45s ago
Docs: man:systemd-sysv-generator(8)
Process: 2154 ExecStart=/etc/init.d/mysqld start
(code=exited, status=1/FAILURE)
12月 20 10:38:29 iZufkfljcZ systemd[1]: Starting LSB: start and stop MySQL...
12月 20 10:38:29 iZufkfljcZ mysqld[2154]: Starting MySQL
12月 20 10:38:29 iZufkfljcZ mysqld_safe[2689]:Logging to '/var/log/mysql/error.log'.
12月 20 10:38:29 iZufkfljcZ mysqld_safe[2693]:Directory '/var/run/mysqld' for UNIX socket file don't exists.
12月 20 10:38:30 iZufkfljcZ mysqld[2154]: . * The server quit without updating PID file (/var/run/mysqld/mysqld.pid).
12月 20 10:38:30 iZufkfljcZ systemd[1]:
mysqld.service: Control process exited, code=exited status=1
12月 20 10:38:30 iZufkfljcZ systemd[1]:
Failed to start LSB: start and stop MySQL.
12月 20 10:38:30 iZufkfljcZ systemd[1]:
mysqld.service: Unit entered failed state.
12月 20 10:38:30 iZufkfljcZ systemd[1]:
mysqld.service: Failed with result 'exit-code'.
****************************************************************************************
根据提示可知,/var/run/mysqld目录不存在,也就是说mysqld服务重启需要这个目录,那就建一个吧:
- root@iZufkfljcZ:~# mkdir /var/run/mysqld
- root@iZufkfljcZ:~# chmod 777 /var/run/mysqld/
- root@iZufkfljcZ:~# service mysqld start
- root@iZufkfljcZ:~#
- root@iZufkfljcZ# ls /var/run/mysqld
- mysqld.pid mysqld.sock mysqld.sock.lock
- root@iZufkfljcZ:/var/run/mysqld# mysql -uroot -p -S /var/run/mysqld/mysqld.sock
- Enter password:
- Welcome to the MySQL monitor. Commands end with ; or g.
- Your MySQL connection id is 4
- Server version: 5.7.20-0ubuntu0.16.04.1 (Ubuntu)
-
- Copyright (c) 2000, 2017, Oracle and/or its affiliates. All rights reserved.
-
- Oracle is a registered trademark of Oracle Corporation and/or its
- affiliates. Other names may be trademarks of their respective
- owners.
-
- Type 'help;' or 'h' for help. Type 'c' to clear the current input statement.
-
- mysql>
这么一运行,发现好像可以了,那接下来好办了,我们把之前改的配置改回来就行了,之前的目录应该是/tmp/mysql.sock,我们可以建立一个软连接连上去就可以了,
- root@iZufkfljcZ:~# ln -s /var/run/mysqld/mysqld.sock /tmp/mysql.sock
- root@iZufkfljcZ:~# ls /tmp/
- mysql.sock
到此为止,我们的mysql应该已经完全修复了,那么我们再测试一下吧:
- root@iZufkfljcZ:/var/run/mysqld# mysql -uroot -p
- Enter password:
- Welcome to the MySQL monitor. Commands end with ; or g.
- Your MySQL connection id is 5
- Server version: 5.7.20-0ubuntu0.16.04.1 (Ubuntu)
-
- Copyright (c) 2000, 2017, Oracle and/or its affiliates. All rights reserved.
-
- Oracle is a registered trademark of Oracle Corporation and/or its
- affiliates. Other names may be trademarks of their respective
- owners.
-
- Type 'help;' or 'h' for help. Type 'c' to clear the current input statement.
-
- mysql>