简评:组件(component)是 React 的核心,了解它们有助于构建好的设计结构。
什么是组件(component)
组件运行你将 UI 拆分为独立的可重用的部分。和 JavaScript 函数类似,组件接收名为 props 的输入并返回 React 元素,它描述(声明)用户界面应该是什么样子的。这就是 React 被称为声明性 API 的原因,你只需要声明你希望得到的 UI ,之后 React 负责具体的细节。
组件 API
当安装 React 后,便可以使用 React 提供的 API,基本可以分成 5 种。
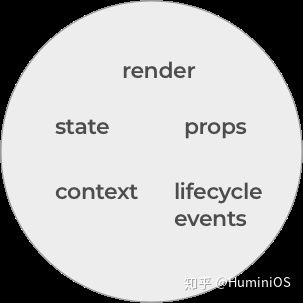
- render
- state
- props
- context
- lifecycle events
虽然组件可以使用所有的 API,但是通常一个组件只使用部分的 API,我们可以对使用不同 API 的组件进行细分,分成有状态(stateful) 和无状态(stateless) 两种组件。

- 有状态组件使用(render,state 和 生命周期相关事件)
- 无状态组件使用 (render,props 和 context)
这样将数据逻辑和 UI 表现层进行分离,通过组件之间划分职责可以创建更多可重用的组件,在构建可扩展的应用程序时尤为重要。
组件模式
通常组件模式有以下几种:
- Container
- Presentational
- 高阶组件(Higher order components 【HOC’s】)
- Render callback
container
容器组件(container component )负责获取数据然后渲染部分交给相应的子组件来负责。

容器是你的数据或逻辑层并利用 stateful API,使用生命周期事件你可以连接 state 到 redux 或 flux 的 storage 中。在容器组件的 render 方法中,你可以使用 Presentational 组件来渲染具体的样式。
注意:由于容器组件需要使用 stateful api ,所以容器组件需要定义成类而不能是一个纯函数。
我们来定义一个 组件 Greeting,他具有状态,生命周期 componentDidMount 事件 和 render 方法。
class Greeting extends React.Component {
  constructor() {
    super();
    this.state = {
      name: "",
    };
  }

  componentDidMount() {
    // AJAX
    this.setState(() => {
      return {
        name: "William",
      };
    });
  }

  render() {
    return (
      <div>
        <h1>Hello! {this.state.name}</h1>
      </div>
    );
  }
}
现在我们对 Greeting 进行改进,将其分离成容器组件(container component)和展示组件(presentational component)。
Presentational
Presentational components 使用 props,render,和 context (stateless API's) ,并且由于不需要使用生命周期相关api,我们可以使用纯函数来简化表述它们:
const GreetingCard = (props) => {
  return (
    <div>
      <h1>Hello! {props.name}</h1>
    </div>
  )
}
Presentational components 只从 props 获取数据和回调函数,props 由容器组件提供。

容器组件和展示组件各自将数据/逻辑和展示部分封装到各自的组件中:
const GreetingCard = (props) => {
  return (
    <div>
      <h1>{props.name}</h1>
    </div>
  )
}

class Greeting extends React.Component {
  constructor() {
    super();
    this.state = {
      name: "",
    };
  }

  componentDidMount() {
    // AJAX
    this.setState(() => {
      return {
        name: "William",
      };
    });
  }

  render() {
    return (
      <div>
       <GreetingCard name={this.state.name} />
      </div>
    );
  }
}
高阶组件(Higher order components【HOC’s】)
高阶组件是一个接收一个组件作为参数然后返回全新组件的函数。
这是一种强大的模式,我们可以对输入组件的 props 进行修改(增删改查)然后返回全新的修改后的组件,例如 react-router-v4 的 withRouter() 方法可以包装任何自定义组件,将 react-router 的 history,location,match 三个对象传入,不需要一级级传入。例如 Redux,你可以使用 connect({})() 方法来将展示组件和 store 中的数据进行连接。

代码演示:
import {withRouter} from 'react-router-dom';

class App extends React.Component {
  constructor() {
    super();
    this.state = {path: ''}
  }

  componentDidMount() {
    let pathName = this.props.location.pathname;
    this.setState(() => {
      return {
        path: pathName,
      }
    })
  }

  render() {
    return (
      <div>
        <h1>Hi! I'm being rendered at: {this.state.path}</h1>
      </div>
    )
  }
}

export default withRouter(App);
导出组件时,我使用 react-router-v4 的 withRouter() 来封装它。在 componentDidMount 这个生命周期中,我们使用 this.props.location.pathname 来更新我们的 state,由于我们使用了 withRouter 高阶组件,我们可以直接访问 this.props.locationlocation,而不需要直接将 location 作为 props 直接传入,非常方便。
Render callbacks
与高阶组件类似,render callbacks 或 render props 可以用来重用逻辑。

class Counter extends React.Component {
  constructor(props) {
    super(props);
    this.state = {
      count: 0,
    };
  }

  increment = () => {
    this.setState(prevState => {
      return {
        count: prevState.count + 1,
      };
    });
  };

  render() {
    return (
      <div onClick={this.increment}>{this.props.children(this.state)}</div>
    );
  }
}

class App extends React.Component {
  render() {
    return (
      <Counter>
        {state => (
          <div>
            <h1>The count is: {state.count}</h1>
          </div>
        )}
      </Counter>
    );
  }
}
在 Counter 类中,我们 render 中嵌入 this.props.childrn 并将 this.state 作为参数。在 App 类下面,我们可以将我们组件包装在 Counter 组件中。
Counter 组件的本质是暴露了 children 这个外部属性,将 children 具体的渲染细节交个 Counter 的使用者,使用的时候只需要将组件传入到 Counter 的 children 中,当然可以使用其他参数,如果 children 不够的话。例如实现一个聊天列表每条消息有头像和消息内容,具体头像是圆是方,具体消息内容是文字是图片,都交给了外部使用者。