# Classes and methods whitelist
core = {'': ['absdiff', 'add', 'addWeighted', 'bitwise_and', 'bitwise_not', 'bitwise_or', 'bitwise_xor', 'cartToPolar',
             'compare', 'convertScaleAbs', 'copyMakeBorder', 'countNonZero', 'determinant', 'dft', 'divide', 'eigen',
             'exp', 'flip', 'getOptimalDFTSize','gemm', 'hconcat', 'inRange', 'invert', 'kmeans', 'log', 'magnitude',
             'max', 'mean', 'meanStdDev', 'merge', 'min', 'minMaxLoc', 'mixChannels', 'multiply', 'norm', 'normalize',
             'perspectiveTransform', 'polarToCart', 'pow', 'randn', 'randu', 'reduce', 'repeat', 'rotate', 'setIdentity', 'setRNGSeed',
             'solve', 'solvePoly', 'split', 'sqrt', 'subtract', 'trace', 'transform', 'transpose', 'vconcat'],
        'Algorithm': []}

imgproc = {'': ['Canny', 'GaussianBlur', 'Laplacian', 'HoughLines', 'HoughLinesP', 'HoughCircles', 'Scharr','Sobel',
                'adaptiveThreshold','approxPolyDP','arcLength','bilateralFilter','blur','boundingRect','boxFilter',
                'calcBackProject','calcHist','circle','compareHist','connectedComponents','connectedComponentsWithStats',
                'contourArea', 'convexHull', 'convexityDefects', 'cornerHarris','cornerMinEigenVal','createCLAHE',
                'createLineSegmentDetector','cvtColor','demosaicing','dilate', 'distanceTransform','distanceTransformWithLabels',
                'drawContours','ellipse','ellipse2Poly','equalizeHist','erode', 'filter2D', 'findContours','fitEllipse',
                'fitLine', 'floodFill','getAffineTransform', 'getPerspectiveTransform', 'getRotationMatrix2D', 'getStructuringElement',
                'goodFeaturesToTrack','grabCut','initUndistortRectifyMap', 'integral','integral2', 'isContourConvex', 'line',
                'matchShapes', 'matchTemplate','medianBlur', 'minAreaRect', 'minEnclosingCircle', 'moments', 'morphologyEx',
                'pointPolygonTest', 'putText','pyrDown','pyrUp','rectangle','remap', 'resize','sepFilter2D','threshold',
                'undistort','warpAffine','warpPerspective','warpPolar','watershed',
                'fillPoly', 'fillConvexPoly'],
           'CLAHE': ['apply', 'collectGarbage', 'getClipLimit', 'getTilesGridSize', 'setClipLimit', 'setTilesGridSize']}

objdetect = {'': ['groupRectangles'],
             'HOGDescriptor': ['load', 'HOGDescriptor', 'getDefaultPeopleDetector', 'getDaimlerPeopleDetector', 'setSVMDetector', 'detectMultiScale'],
             'CascadeClassifier': ['load', 'detectMultiScale2', 'CascadeClassifier', 'detectMultiScale3', 'empty', 'detectMultiScale']}

video = {'': ['CamShift', 'calcOpticalFlowFarneback', 'calcOpticalFlowPyrLK', 'createBackgroundSubtractorMOG2',
             'findTransformECC', 'meanShift'],
         'BackgroundSubtractorMOG2': ['BackgroundSubtractorMOG2', 'apply'],
         'BackgroundSubtractor': ['apply', 'getBackgroundImage']}

dnn = {'dnn_Net': ['setInput', 'forward'],
       '': ['readNetFromCaffe', 'readNetFromTensorflow', 'readNetFromTorch', 'readNetFromDarknet',
            'readNetFromONNX', 'readNet', 'blobFromImage']}

features2d = {'Feature2D': ['detect', 'compute', 'detectAndCompute', 'descriptorSize', 'descriptorType', 'defaultNorm', 'empty', 'getDefaultName'],
              'BRISK': ['create', 'getDefaultName'],
              'ORB': ['create', 'setMaxFeatures', 'setScaleFactor', 'setNLevels', 'setEdgeThreshold', 'setFirstLevel', 'setWTA_K', 'setScoreType', 'setPatchSize', 'getFastThreshold', 'getDefaultName'],
              'MSER': ['create', 'detectRegions', 'setDelta', 'getDelta', 'setMinArea', 'getMinArea', 'setMaxArea', 'getMaxArea', 'setPass2Only', 'getPass2Only', 'getDefaultName'],
              'FastFeatureDetector': ['create', 'setThreshold', 'getThreshold', 'setNonmaxSuppression', 'getNonmaxSuppression', 'setType', 'getType', 'getDefaultName'],
              'AgastFeatureDetector': ['create', 'setThreshold', 'getThreshold', 'setNonmaxSuppression', 'getNonmaxSuppression', 'setType', 'getType', 'getDefaultName'],
              'GFTTDetector': ['create', 'setMaxFeatures', 'getMaxFeatures', 'setQualityLevel', 'getQualityLevel', 'setMinDistance', 'getMinDistance', 'setBlockSize', 'getBlockSize', 'setHarrisDetector', 'getHarrisDetector', 'setK', 'getK', 'getDefaultName'],
              # 'SimpleBlobDetector': ['create'],
              'KAZE': ['create', 'setExtended', 'getExtended', 'setUpright', 'getUpright', 'setThreshold', 'getThreshold', 'setNOctaves', 'getNOctaves', 'setNOctaveLayers', 'getNOctaveLayers', 'setDiffusivity', 'getDiffusivity', 'getDefaultName'],
              'AKAZE': ['create', 'setDescriptorType', 'getDescriptorType', 'setDescriptorSize', 'getDescriptorSize', 'setDescriptorChannels', 'getDescriptorChannels', 'setThreshold', 'getThreshold', 'setNOctaves', 'getNOctaves', 'setNOctaveLayers', 'getNOctaveLayers', 'setDiffusivity', 'getDiffusivity', 'getDefaultName'],
              'DescriptorMatcher': ['add', 'clear', 'empty', 'isMaskSupported', 'train', 'match', 'knnMatch', 'radiusMatch', 'clone', 'create'],
              'BFMatcher': ['isMaskSupported', 'create'],
              '': ['drawKeypoints', 'drawMatches', 'drawMatchesKnn']}

photo = {'': ['createAlignMTB', 'createCalibrateDebevec', 'createCalibrateRobertson',
              'createMergeDebevec', 'createMergeMertens', 'createMergeRobertson',
              'createTonemapDrago', 'createTonemapMantiuk', 'createTonemapReinhard', 'inpaint'],
        'CalibrateCRF': ['process'],
        'AlignMTB' : ['calculateShift', 'shiftMat', 'computeBitmaps', 'getMaxBits', 'setMaxBits',
                      'getExcludeRange', 'setExcludeRange', 'getCut', 'setCut'],
        'CalibrateDebevec' : ['getLambda', 'setLambda', 'getSamples', 'setSamples', 'getRandom', 'setRandom'],
        'CalibrateRobertson' : ['getMaxIter', 'setMaxIter', 'getThreshold', 'setThreshold', 'getRadiance'],
        'MergeExposures' : ['process'],
        'MergeDebevec' : ['process'],
        'MergeMertens' : ['process', 'getContrastWeight', 'setContrastWeight', 'getSaturationWeight',
                          'setSaturationWeight', 'getExposureWeight', 'setExposureWeight'],
        'MergeRobertson' : ['process'],
        'Tonemap' : ['process' , 'getGamma', 'setGamma'],
        'TonemapDrago' : ['getSaturation', 'setSaturation', 'getBias', 'setBias',
                          'getSigmaColor', 'setSigmaColor', 'getSigmaSpace','setSigmaSpace'],
        'TonemapMantiuk' : ['getScale', 'setScale', 'getSaturation', 'setSaturation'],
        'TonemapReinhard' : ['getIntensity', 'setIntensity', 'getLightAdaptation', 'setLightAdaptation',
                             'getColorAdaptation', 'setColorAdaptation']
        }

aruco = {'': ['detectMarkers', 'drawDetectedMarkers', 'drawAxis', 'estimatePoseSingleMarkers', 'estimatePoseBoard', 'estimatePoseCharucoBoard', 'interpolateCornersCharuco', 'drawDetectedCornersCharuco'],
        'aruco_Dictionary': ['get', 'drawMarker'],
        'aruco_Board': ['create'],
        'aruco_GridBoard': ['create', 'draw'],
        'aruco_CharucoBoard': ['create', 'draw'],
        }

calib3d = {'': ['findHomography', 'calibrateCameraExtended', 'drawFrameAxes', 'estimateAffine2D', 'getDefaultNewCameraMatrix', 'initUndistortRectifyMap', 'Rodrigues']}


white_list = makeWhiteList([core, imgproc, objdetect, video, dnn, features2d, photo, aruco, calib3d])
但是我们仍然可以通过轮廓分析的相关方法,去实现“基于opencv.js实现二维码定位”,这就是本篇BLOG的主要内容。
一、基本原理
主要内容请参考《OpenCV使用FindContours进行二维码定位》,这里重要的回顾一下。
使用过FindContours直接寻找联通区域的函数。典型的运用在二维码上面:

对于它的3个定位点 ,这种重复包含的特性,在图上只有不容易重复的三处,这是具有排它性的。
,这种重复包含的特性,在图上只有不容易重复的三处,这是具有排它性的。 那么轮廓识别的结果是如何展示的了?比如在这幅图中(白色区域为有数据的区域,黑色为无数据),0,1,2是第一层,然后里面是3,3的里面是4和5。(2a表示是2的内部),他们的关系应该是这样的:
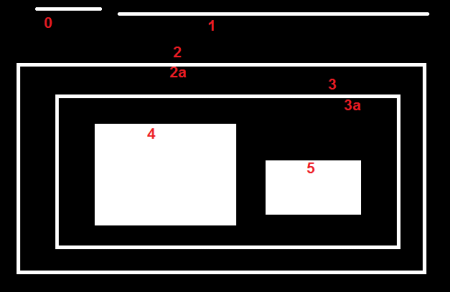

所以我们只需要寻找某一个轮廓“有无爷爷轮廓”,就可以判断出来它是否“重复包含”
值得参考的C++代码应该是这样的,其中注释部分已经说明的比较清楚。
#include "opencv2/highgui/highgui.hpp"
#include "opencv2/imgproc/imgproc.hpp"
#include <iostream>
#include <stdio.h>
#include <stdlib.h>
#include <math.h>
using namespace cv;
using namespace std;
//找到所提取轮廓的中心点
//在提取的中心小正方形的边界上每隔周长个像素提取一个点的坐标,求所提取四个点的平均坐标(即为小正方形的大致中心)
Point Center_cal(vector<vector<Point> > contours,int i)
{
    int centerx=0,centery=0,n=contours[i].size();
    centerx = (contours[i][n/4].x + contours[i][n*2/4].x + contours[i][3*n/4].x + contours[i][n-1].x)/4;
    centery = (contours[i][n/4].y + contours[i][n*2/4].y + contours[i][3*n/4].y + contours[i][n-1].y)/4;
    Point point1=Point(centerx,centery);
    return point1;
}
int main( int argc, char** argv[] )
{
    Mat src = imread( "e:/sandbox/qrcode.jpg", 1 );
    resize(src,src,Size(800,600));//标准大小
    Mat src_gray;
    Mat src_all=src.clone();
    Mat threshold_output;
    vector<vector<Point> > contours,contours2;
    vector<Vec4i> hierarchy;
    //预处理
    cvtColor( src, src_gray, CV_BGR2GRAY );
    blur( src_gray, src_gray, Size(3,3) ); //模糊,去除毛刺
    threshold( src_gray, threshold_output, 100, 255, THRESH_OTSU );
    //寻找轮廓
    //第一个参数是输入图像 2值化的
    //第二个参数是内存存储器,FindContours找到的轮廓放到内存里面。
    //第三个参数是层级,**[Next, Previous, First_Child, Parent]** 的vector
    //第四个参数是类型,采用树结构
    //第五个参数是节点拟合模式,这里是全部寻找
    findContours( threshold_output, contours, hierarchy,  CV_RETR_TREE, CHAIN_APPROX_NONE, Point(0, 0) );
    //轮廓筛选
    int c=0,ic=0,area=0;
    int parentIdx=-1;
    for( int i = 0; i< contours.size(); i++ )
    {
        //hierarchy[i][2] != -1 表示不是最外面的轮廓
        if (hierarchy[i][2] != -1 && ic==0)
        {
            parentIdx = i;
            ic++;
        }
        else if (hierarchy[i][2] != -1)
        {
            ic++;
        }
        //最外面的清0
        else if(hierarchy[i][2] == -1)
        {
            ic = 0;
            parentIdx = -1;
        }
        //找到定位点信息
        if ( ic >= 2)
        {
            contours2.push_back(contours[parentIdx]);
            ic = 0;
            parentIdx = -1;
        }
    }
    //填充定位点
    for(int i=0; i<contours2.size(); i++)
        drawContours( src_all, contours2, i,  CV_RGB(0,255,0) , -1 );
    //连接定位点
    Point point[3];
    for(int i=0; i<contours2.size(); i++)
    {
        point[i] = Center_cal( contours2, i );
    }

    line(src_all,point[0],point[1],Scalar(0,0,255),2);
    line(src_all,point[1],point[2],Scalar(0,0,255),2);
    line(src_all,point[0],point[2],Scalar(0,0,255),2);

    imshow( "结果", src_all );
    waitKey(0);
    return(0);
}
二、算法重点
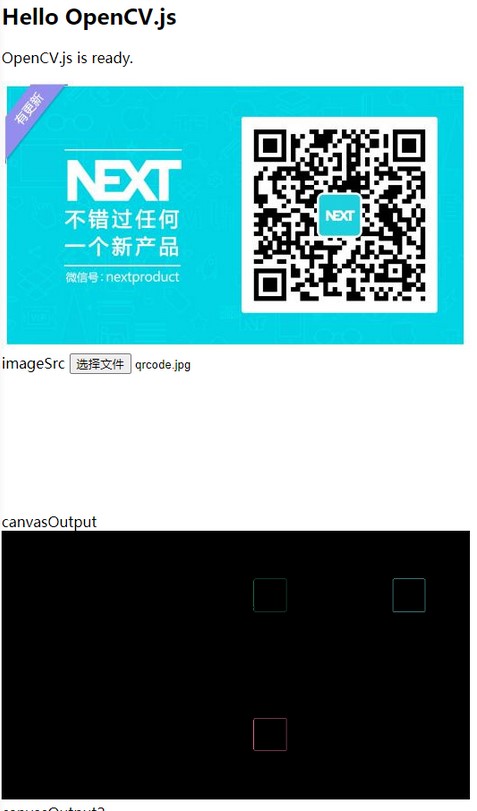
由于hierarchy这块是比较缺乏文档的,在转换为JS的过程中存在一定困难,最终得到了以下的正确结果:
<!DOCTYPE html>
<html>
<head>
<meta charset="utf-8">
<title>Hello OpenCV.js</title>
<script async src="opencv.js" onload="onOpenCvReady();" type="text/javascript"></script>
</head>
<body>
<h2>Hello OpenCV.js</h2>
<p id="status">OpenCV.js is loading...</p>
<div>
<div class="inputoutput">
<img id="imageSrc" alt="No Image" />
<div class="caption">imageSrc <input type="file" id="fileInput" name="file" /></div>
</div>
<div class="inputoutput">
<canvas id="canvasOutput" ></canvas>
<div class="caption">canvasOutput</div>
</div>
<div class="inputoutput2">
<canvas id="canvasOutput2" ></canvas>
<div class="caption">canvasOutput2</div>
</div>
</div>
<script type="text/javascript">
let imgElement = document.getElementById('imageSrc');
let inputElement = document.getElementById('fileInput');
inputElement.addEventListener('change', (e) => {
imgElement.src = URL.createObjectURL(e.target.files[0]);
}, false);
imgElement.onload = function() {
let src = cv.imread(imgElement);
let src_clone = cv.imread(imgElement);
let dsize = new cv.Size(800, 600);
// You can try more different parameters
cv.resize(src, src, dsize);cv.resize(src_clone, src_clone, dsize);
let dst = cv.Mat.zeros(src.rows,src.cols, cv.CV_8UC3);
cv.cvtColor(src, src, cv.COLOR_RGBA2GRAY, 0);
let ksize = new cv.Size(3, 3);
// You can try more different parameters
cv.blur(src, src, ksize);
cv.threshold(src, src, 100, 255, cv.THRESH_OTSU);
let contours = new cv.MatVector();
let contours2 = new cv.MatVector();
let hierarchy = new cv.Mat();
// You can try more different parameters
cv.findContours(src, contours, hierarchy, cv.RETR_TREE, cv.CHAIN_APPROX_NONE);
//轮廓筛选
let c=0,ic=0,area=0;
let parentIdx = -1;
debugger
for( let i = 0; i< contours.size(); i++ )
{
//let hier = hierarchy.intPtr(0, i)
if (hierarchy.intPtr(0,i)[2] != -1 && ic==0)
{
parentIdx = i;
ic++;
}
else if (hierarchy.intPtr(0,i)[2] != -1)
{
ic++;
}
else if(hierarchy.intPtr(0,i)[2] == -1)
{
ic = 0;
parentIdx = -1;
}
//找到定位点信息
if ( ic >= 2)
{
//let cnt = matVec.get(0);
contours2.push_back(contours.get(parentIdx));
ic = 0;
parentIdx = -1;
}
}
console.log(contours2.size());
//填充定位点
for(let i=0; i<contours.size(); i++)
{
let color = new cv.Scalar(255, 0, 0, 255);
cv.drawContours(src_clone, contours, i,color,1);
}
cv.imshow('canvasOutput', src_clone);
for(let i=0; i<contours2.size(); i++)
{
let color = new cv.Scalar(Math.round(Math.random() * 255), Math.round(Math.random() * 255),
Math.round(Math.random() * 255));
cv.drawContours(dst, contours2, i, color, 1);
}
cv.imshow('canvasOutput2', dst);
src.delete(); src_clone.delete();
dst.delete(); contours.delete(); hierarchy.delete();
};
function onOpenCvReady() {
document.getElementById('status').innerHTML = 'OpenCV.js is ready.';
}
</script>
</body>
</html>
其中绝大多数部分都和C++相似,不同的地方已经标红。它能够成功运行,并且得到正确的定位。(这里OpenCVJS的相关运行情况请参考官方教程)
三、研究收获
这次研究的关键节点, 是建立了Debug机制。在JS代码中加入debugger语句,并且开启F12,则在调试的过程中,可以查看各个变量的信息。

此外,非常重要的参考资料,就是OpenCV的官方教程。如果希望进一步进行研究的话,首先需要先收集掌握所有现有资料。
感谢阅读至此,希望有所帮助。