SVN服务器有2种运行方式:
1、独立服务器 (例如:svn://xxx.com/xxx);
2、借助apache (例如:http://svn.xxx.com/xxx);
为了不依赖apache,我选择第一种方式:独立的svn服务器。
SVN存储版本数据也有2种方式:
1、bdb;
2、fsfs。
由于bdb方式在服务器中断时,有可能锁住数据,所以还是fsfs方式更安全一点,我也选择这种方式。
具体部署:
1.下载subversion安装包
|
[root@server ~]# cd /usr/local/src |
2.编译SVN
首先检测系统有没有安装SSL:
| [root@server subversion-1.6.6]# find / -name opensslv.h [root@server subversion-1.6.6]# |
找不到,就执行如下命令进行安装:
| [root@server subversion-1.6.6]# yum install openssl [root@server subversion-1.6.6]# yum install openssl-devel |
安装之后用find / -name opensslv.h命令找到opensslv.h所在的目录,即下列--with-openssl=后面的路径,编译:
| [root@server subversion-1.6.6]# find / -name opensslv.h /usr/include/openssl/opensslv.h [root@server subversion-1.6.6]# ./configure --prefix=/usr/local/svn --with-openssl=/usr/include/openssl --without-berkeley-db |
注:以svnserve方式运行,不加apache编译参数。以fsfs格式存储版本库,不编译berkeley-db。
此时编译报如下错误:
| configure: WARNING: unrecognized options: --with-openssl configure: Configuring Subversion 1.6.6 configure: creating config.nice checking for gcc... no checking for cc... no checking for cl.exe... no configure: error: in `/usr/local/src/subversion-1.6.6': configure: error: no acceptable C compiler found in $PATH See `config.log' for more details. |
说明没有安装gcc相关库,使用如下命令安装gcc后再编译:
| [root@server subversion-1.6.6]# yum -y install gcc [root@server subversion-1.6.6]# ./configure --prefix=/usr/local/svn --with-openssl=/usr/include/openssl --without-berkeley-db |
最后出现下面WARNING,直接忽略即可,因为不使用BDB存储。
| configure: WARNING: we have configured without BDB filesystem support You don't seem to have Berkeley DB version 4.0.14 or newer installed and linked to APR-UTIL. We have created Makefiles which will build without the Berkeley DB back-end; your repositories will use FSFS as the default back-end. You can find the latest version of Berkeley DB here: http://www.sleepycat.com/download/index.shtml |
3.安装SVN
为避免出现以下错误
| error while loading shared libraries: libiconv.so.2: cannot open shared object file: No such file or directory |
先执行以下操作:
1)、编辑/etc/ld.so.conf文件,添加下面一行:
| /usr/local/lib |
2)、保存后运行ldconfig:
| /sbin/ldconfig |
注:ld.so.conf和ldconfig用于维护系统动态链接库。
安装
| [root@server subversion-1.6.6]# make && make install |
安装完成,执行以下命令测试:
|
[root@server subversion-1.6.6]# /usr/local/svn/bin/svnserve --version 版权所有 (C) 2000-2009 CollabNet。 下列版本库后端(FS) 模块可用: * fs_fs : 模块与文本文件(FSFS)版本库一起工作。 |
为了方便下操作,下面将SVN的BIN添加到PATH,编辑/etc/profile,添加:
| PATH=/usr/local/svn/bin:$PATH |
保存后,使其立即生效:
| source /etc/profile |
4.配置SVN
建立版本库目录,可建多个:
|
[root@server ~]# mkdir -p /home/svndata/repos #建立版本库 |
编辑/home/svndata/repos/conf/svnserve.conf,内容修改为:
| [general] anon-access = none auth-access = write password-db = /usr/local/svn/conf/passwd.conf authz-db = /usr/local/svn/conf/authz.conf realm = repos |
注意:对用户配置文件的修改立即生效,不必重启svn。
在/usr/local/svn/下面新建conf目录,并在/usr/local/svn/conf内新建passwd.conf和authz.conf文件:
|
mkdir conf |
添加用户及密码:
|
[root@server ~]# useradd wll |
编辑/usr/local/svn/conf/passwd.conf,添加如下代码并保存:
| [users] wll = 123456 |
配置svn用户访问权限,编辑usr/local/svn/conf/authz.conf,添加如下代码并保存:
|
[groups] 注意: |
建立启动svn的用户:
| [root@server ~]# useradd svn [root@server ~]# passwd svn |
允许用户svn访问版本库:
| [root@server ~]# chown -R svn:svn /home/svndata |
启动svn:
|
[root@server ~]# su - svn -c "svnserve -d --listen-port 9999 -r /home/svndata" 其中: |
5.将svn加入到开机启动
编辑/etc/rc.d/rc.local文件,加入如下启动命令:
| /usr/local/svn/bin/svnserve -d --listen-port 9999 -r /home/svndata |
如果想停止svn,则使用如下命令:
| killall svnserve |
如果想将svn作为服务,在/etc/rc.d/init.d/目录下新建名为svn的文件并设置权限为755,并添加如下代码:
| #!/bin/bash # build this file in /etc/rc.d/init.d/svn # chmod 755 /etc/rc.d/init.d/svn # centos下可以用如下命令管理svn: service svn start(restart/stop) SVN_HOME=/home/svndata if [ ! -f "/usr/local/svn/bin/svnserve" ] then echo "svnserver startup: cannot start" exit fi case "$1" in start) echo "Starting svnserve..." /usr/local/svn/bin/svnserve -d --listen-port 9999 -r $SVN_HOME echo "Finished!" ;; stop) echo "Stoping svnserve..." killall svnserve echo "Finished!" ;; restart) $0 stop $0 start ;; *) echo "Usage: svn { start | stop | restart } " exit 1 esac |
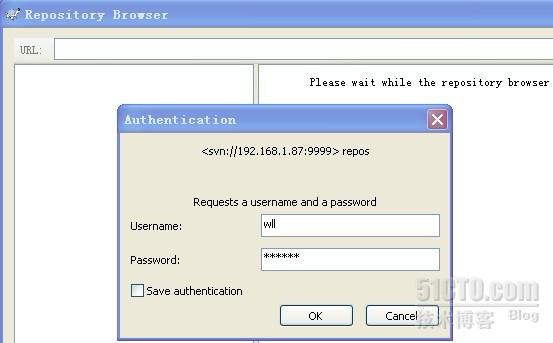
6.连接SVN
安装TortoiseSVN,重启系统。启动TortoiseSVN并在地址栏中输入
|
svn://192.168.1.87:9999/repos |
本文出自 “300second的运维小站” 博客,请务必保留此出处http://300second.blog.51cto.com/7582/780348