- 来源:http://www.codeproject.com/Articles/1608/Asynchronous-socket-communication
- 本地下载
- Download source files - 14 Kb
- Download demo project - 8 Kb
Introduction
This article shows how to create both ends of a TCP/IP socket connection between two or more applications. These application may be run, on the same machine, machines connected by a local area network or even machines communicating across the internet*. A key feature of this method is it does not your threads, instead using sockets in a non-blocking mode. In this example a server is created that listens for clients to connect. Once a client connects it is added to a list of active clients. If a client sends in a message it is broadcast to all connected clients in much the same way as a chat group would operate. Remoting would be a better way to do this, but we are here to learn about Sockets.
*Note, to communicate across the internet will require the server to have an IP address on the internet not hidden behind a proxy server as many ISPs do.
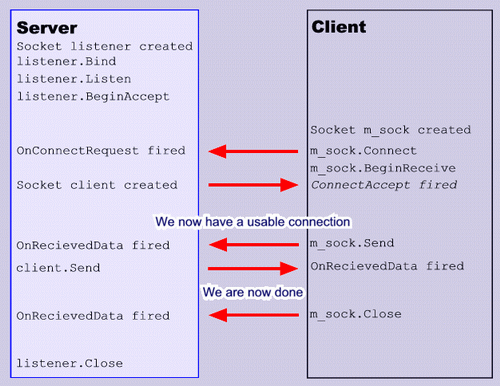
Sequence of events
Before a client can connect, the server must be listening. The following diagram shows the sequence of events that make up an asynchronous socket session.
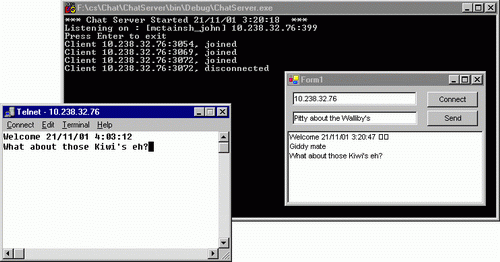
Running the sample
The sample code is divided into two application ChatServer that the clients connect to and ChatClient that connects to the client. Build the ChatServer first and test it using Telnet with the following command.
telnet {server machine IP address or machine name} 399
telnet 10.328.32.76 399
A message should appear on ChatServer indicating the address and the port number the client can connected on. Anything typed into the telnet window should echo back to all telnet windows connected to the server. Try making several concurrent connections from various machines. Do not use localhost or the 127.0.0.1 address as the server application is only listening on the address shown in the server start-up message.
Next run the ChatClient sample any try the same test using multiple instances of ChatClient and Telnet across various machines.
Why use sockets with .NET?
.NET uses sockets in may instances such as WebServices and Remoting, but in these instances the low level socket stuff is done for you and there is no need to use sockets directly. However, when interfacing to other non .NET systems sockets are a necessary and simple communication method. They can be used to communicate with DOS, Windows and UNIX systems. The low level sockets also allows you to avoid having to worry about registration, privileges, domains, user id's, password and other troublesome security issues.
ChatServer / Listener
The server listens for clients to connect when a connection is requested the server will accept the connection and return a welcome message. In the sample the connections are added to an array of active clients m_aryClients. As client connect and disconnect, this list will grow and shrink. It is not always possible to detect the loss of a connection, so in a production system there should be some form of polling to detect if the connection is still alive. When data is received on a listener it is broadcast to all connected clients.
Two methods of listening are discussed below one using polling the other events to detect connection requests.
Method 1 - Using polled TcpListener
Using the TcpListener class from System.Net.Sockets provides a simple method to listen for client connections and process them. The following code listens for a connection, accepts it and sends a welcome message with a time stamp. If another connection is requested the old one is lost. Note, the welcome message is returned in ASCII not UNICODE.
private Socket client = null;
const int nPortListen = 399;
try
{
    TcpListener listener = new TcpListener( nPortListen );
    Console.WriteLine( "Listening as {0}", listener.LocalEndpoint );
    listener.Start();
    do
    {
        byte [] m_byBuff = new byte[127];
        if( listener.Pending() )
        {
            client = listener.AcceptSocket();
            // Get current date and time.
            DateTime now = DateTime.Now;
            string strDateLine = "Welcome " + now.ToString("G") + "

";

            // Convert to byte array and send.
            Byte[] byteDateLine =
              System.Text.Encoding.ASCII.GetBytes(
              strDateLine.ToCharArray() );
            client.Send( byteDateLine, byteDateLine.Length, 0 );
        }
        else
        {
            Thread.Sleep( 100 );
        }
    } while( true );    // Don't use this.
}
catch( Exception ex )
{
    Console.WriteLine ( ex.Message );
}
Method 2 - Using Socket with event
A more elegant method is to setup an event to catch connection attempts. The ChatServer sample uses this method. Firstly the name and address of the server is identified with the following code.
IPAddress [] aryLocalAddr = null;
string strHostName = "";
try
{
    // NOTE: DNS lookups are nice and all but quite time consuming.
    strHostName = Dns.GetHostName();
    IPHostEntry ipEntry = Dns.GetHostByName( strHostName );
    aryLocalAddr = ipEntry.AddressList;
}
catch( Exception ex )
{
    Console.WriteLine ("Error trying to get local address {0} ", ex.Message );
}

// Verify we got an IP address. Tell the user if we did
if( aryLocalAddr == null || aryLocalAddr.Length < 1 )
{
    Console.WriteLine( "Unable to get local address" );
    return;
}
Console.WriteLine( "Listening on : [{0}] {1}", strHostName, aryLocalAddr[0] );
With the address identified we need to bind the listener to this address. Here we are listening on port 399. It is good practice to read the port number from from the Services file located in "C:WinNTSystem32driversetcServices". The following code binds the listener and begins to listen. An event handler is added pointing all connection requests to OnConnectRequest. The application can now go about its business without having to wait or poll for clients to connect.
const int nPortListen = 399;
// Create the listener socket in this machines IP address
Socket listener = new Socket( AddressFamily.InterNetwork,
                  SocketType.Stream, ProtocolType.Tcp );
listener.Bind( new IPEndPoint( aryLocalAddr[0], 399 ) );
//listener.Bind( new IPEndPoint( IPAddress.Loopback, 399 ) );
// For use with localhost 127.0.0.1
listener.Listen( 10 );

// Setup a callback to be notified of connection requests
listener.BeginAccept( new AsyncCallback( app.OnConnectRequest ), listener );
When a client requests a connection, the connection request event handler is fired as follows. The following code creates a client sends a welcome message and and re-establishes the accept event handler.
Socket client;
public void OnConnectRequest( IAsyncResult ar )
{
    Socket listener = (Socket)ar.AsyncState;
    client = listener.EndAccept( ar );
    Console.WriteLine( "Client {0}, joined", client.RemoteEndPoint );

    // Get current date and time.
    DateTime now = DateTime.Now;
    string strDateLine = "Welcome " + now.ToString("G") + "

";

    // Convert to byte array and send.
    Byte[] byteDateLine =
        System.Text.Encoding.ASCII.GetBytes( strDateLine.ToCharArray() );
    client.Send( byteDateLine, byteDateLine.Length, 0 );

    listener.BeginAccept( new AsyncCallback( OnConnectRequest ), listener );
}
This is expanded on in the sample code to allow the client socket to be kept in a list and monitored for received data and disconnections. Disconnections are detected on the client socket in the AsyncCallback event handler. The ChatClient details this mechanism below.
ChatClient
The ChatClient is a windows form application that connects to the server and displays messages that it receives and allow messages to be sent.
Connecting
The client connects connect to the server when the Connect button is pressed with the following code;
private Socket m_sock = null;
private void m_btnConnect_Click(object sender, System.EventArgs e)
{
    Cursor cursor = Cursor.Current;
    Cursor.Current = Cursors.WaitCursor;
    try
    {
        // Close the socket if it is still open
        if( m_sock != null && m_sock.Connected )
        {
            m_sock.Shutdown( SocketShutdown.Both );
            System.Threading.Thread.Sleep( 10 );
            m_sock.Close();
        }

        // Create the socket object
        m_sock = new Socket( AddressFamily.InterNetwork,
                 SocketType.Stream, ProtocolType.Tcp );

        // Define the Server address and port
        IPEndPoint epServer =
          new IPEndPoint(  IPAddress.Parse( m_tbServerAddress.Text ), 399 );

        // Connect to the server blocking method
        // and setup callback for recieved data
        // m_sock.Connect( epServer );
        // SetupRecieveCallback( m_sock );

        // Connect to server non-Blocking method
        m_sock.Blocking = false;
        AsyncCallback onconnect = new AsyncCallback( OnConnect );
        m_sock.BeginConnect( epServer, onconnect, m_sock );
    }
    catch( Exception ex )
    {
        MessageBox.Show( this, ex.Message, "Server Connect failed!" );
    }
    Cursor.Current = cursor;
}
If the connection already exists it is destroyed. A Socket is then created and an end point established. The commented out code allows for the simpler blocking connection attempt. BeginConnect is used to commence a non blocking connection attempt. Note, even if a non-blocking connection is attempted, the connection will block until the machine name is resolved into an IP address, for this reason it is better to use the IP address than the machine name if possible to avoid blocking. The following method is called once the connection attempt is complete, it displays connection error or sets up the receive data callback if connected OK.
public void OnConnect( IAsyncResult ar )
{
    // Socket was the passed in object
    Socket sock = (Socket)ar.AsyncState;

    // Check if we were sucessfull
    try
    {
        //    sock.EndConnect( ar );
        if( sock.Connected )
            SetupRecieveCallback( sock );
        else
            MessageBox.Show( this,
               "Unable to connect to remote machine",
               "Connect Failed!" );

    }
    catch( Exception ex )
    {
        MessageBox.Show( this, ex.Message, "Unusual error during Connect!" );
    }
}
Receiving data
To receive data asynchronously, it is necessary to setup an AsyncCallback to handle events triggered by the Socket such as new data and loss of connection. This is done using the following method;
private byte []    m_byBuff = new byte[256];    // Recieved data buffer
public void SetupRecieveCallback( Socket sock )
{
    try
    {
        AsyncCallback recieveData = new AsyncCallback( OnRecievedData );
        sock.BeginReceive( m_byBuff, 0, m_byBuff.Length,
                           SocketFlags.None, recieveData, sock );
    }
    catch( Exception ex )
    {
        MessageBox.Show( this, ex.Message, "Setup Recieve Callback failed!" );
    }
}
The SetupRecieveCallback method starts a BeginReceive using a delegate pointing to the OnReceveDatamethod that follows. It also passes a buffer for the receive data to be inserted into.
public void OnRecievedData( IAsyncResult ar )
{
    // Socket was the passed in object
    Socket sock = (Socket)ar.AsyncState;

    // Check if we got any data
    try
    {
        int nBytesRec = sock.EndReceive( ar );
        if( nBytesRec > 0 )
        {
            // Wrote the data to the List
            string sRecieved = Encoding.ASCII.GetString( m_byBuff,
                                                         0, nBytesRec );

            // WARNING : The following line is NOT thread safe. Invoke is
            // m_lbRecievedData.Items.Add( sRecieved );
            Invoke( m_AddMessage, new string [] { sRecieved } );

            // If the connection is still usable restablish the callback
            SetupRecieveCallback( sock );
        }
        else
        {
            // If no data was recieved then the connection is probably dead
            Console.WriteLine( "Client {0}, disconnected",
                               sock.RemoteEndPoint );
            sock.Shutdown( SocketShutdown.Both );
            sock.Close();
        }
    }
    catch( Exception ex )
    {
        MessageBox.Show( this, ex.Message, "Unusual error druing Recieve!" );
    }
}
When the above event is fired the receive data is assumed to be ASCII. The new data is sent to the display by invoking a delegate. Although it is possible to call Add() on the list to display the new data, it is a very bad idea because the received data will most likely be running in another thread. Note the receive callback must also be established again to continue to receive more events. Even if more data was received than can be placed in the input buffer, restabilising the receive callback will cause it to trigger until all data has been read.
The AddMessage delegate is created to decouple socket thread from user interface thread as follows;
// Declare the delegate prototype to send data back to the form
delegate void AddMessage( string sNewMessage );

namespace ChatClient
{
    . . .
    public class FormMain : System.Windows.Forms.Form
    {
        private event AddMessage m_AddMessage;
        // Add Message Event handler for Form
        . . .

        public FormMain()
        {
            . . .
            // Add Message Event handler for Form decoupling from input thread
            m_AddMessage = new AddMessage( OnAddMessage );
            . . .
        }

        public void OnAddMessage( string sMessage )
        {
            // Thread safe operation here
            m_lbRecievedData.Items.Add( sMessage );
        }


        public void OnSomeOtherThread()
        {
            . . .
            string sSomeText = "Bilbo Baggins";
            Invoke( m_AddMessage, new string [] { sSomeText } );
        }
        . . .
    }
}
Working in UNICODE
When data is received or is to be sent the data is held in an array of 8 bit bytes. This data must be encoded to a format suitable for .NET when received and a format suitable for the receiving application when sent. C# uses a multibyte character encoding internally so data must be converted to that when it is received and before it is sent out using the Encoding.ASCII or Encoding.UNICODE static methods as necessary.
Don't believe a packet sent is a packet received
When the receive data event is triggered the received data is held in the input buffer. During development a packet sent often corresponds to a single trigging of the receive event and one complete set of data in the receive buffer. This is definitely not the case in a production system. Data is not packet-ised and actually consists of a stream of individual bytes that may be broken up into may packets. Do not relay on receiving complete packets and develop your own tags to indicate start and end of packet.
Conclusion
Although fairly simple to use Sockets do require a fair amount of code to get working well. Where possible you should try to use WebServices or Remoting in there place. Professional ADO.NET Programming by Wrox is a good book on other stuff, check it out.
License
This article has no explicit license attached to it but may contain usage terms in the article text or the download files themselves. If in doubt please contact the author via the discussion board below.
A list of licenses authors might use can be found here