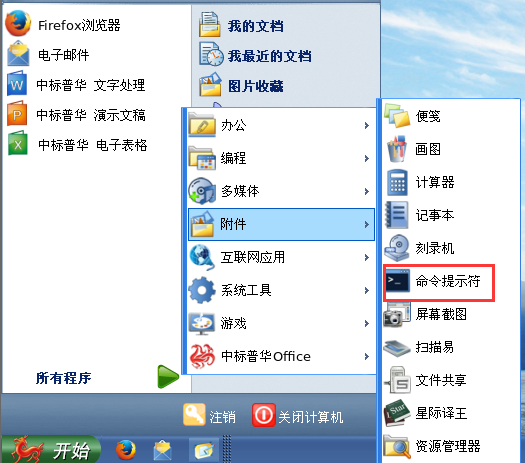
Linux(CentOS/RedHat)安装httpd
http://blog.csdn.net/java_pengjin/article/details/6910335
[root@localhost jianglili]# ls
Desktop
[root@localhost jianglili]# cd Desktop
[root@localhost Desktop]# tar -zxvf httpd-2.2.3.tar.gz
[root@localhost Desktop]# mkdir /usr/local/web/ da //创建目录
[root@localhost Desktop]# mkdir /usr/local/web/apache/ //创建目录
[root@localhost httpd-2.2.3]# ./configure --prefix=/usr/local/web/apache/ //安装 路径
[root@localhost httpd-2.2.3]# make //编译- 1
[root@localhost httpd-2.2.3]# make install //安装
[root@localhost httpd-2.2.3]# pwd //查看当前路径
/home/jianglili/Desktop/httpd-2.2.3
[root@localhost httpd-2.2.3]# cd /usr/local/
bin/ games/ lib/ sbin/ src/
etc/ include/ libexec/ share/ web/
[root@localhost httpd-2.2.3]# cd /usr/local/web/apache/
[root@localhost apache]# ls
bin cgi-bin error icons lib man modules
build conf htdocs include logs manual
[root@localhost apache]# cd bin
[root@localhost bin] source /etc/profile //加载环境变量
[root@localhost bin]# ./httpd
[root@localhost bin]# lsof -i:80
安装httpd2.2.3.1 失败 运行./httpd失败解决方法。
解决apache启动错误:Could not reliably determine the server's fully qualified domain name
http://blog.csdn.net/yyzhq/article/details/25418323
http://blog.csdn.net/yiluoak_47/article/details/22067185
http://blog.csdn.net/ldl22847/article/details/7606610
失败
http://cuisuqiang.iteye.com/blog/2068794
遇错
http://blog.csdn.net/yyzhq/article/details/25418323
[root@localhost httpd-2.2.3]
安装httpd2.4.1 失败
http://www.cnblogs.com/upwifi/archive/2013/02/26/2934228.html
查询IP:/sbin/ifconfig
[root@localhost Desktop]# /sbin/ifconfig //ip地址
看安装的程序?
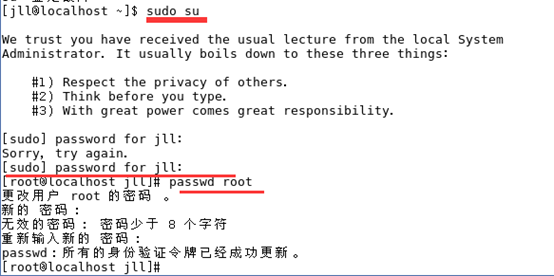
[jianglili@localhost ~]$ su root
Password:
[root@localhost jianglili]# cd /etc/rc.d/init.d/
[root@localhost init.d]# ls //查看安装的程序?
移动:mv 原目录/文件 新目录/文件
[root@localhost Desktop]# mv /home/jianglili/Desktop/webshell-master /usr/local/nginx/html/webshell-master
复制:cp -r 原目录/文件 新目录/文件
[root@localhost Desktop]# cp -r /home/jianglili/Desktop/webshell-master /usr/local/web/apache/htdocs/webshell-master //目标目录:webshell-master为新建
[root@localhost Desktop]# cp -r /home/jianglili/Desktop/webshell-master/webshell-master /usr/local/web/apache/htdocs/webshell-master
查找文件:find / -name
find / -name "httpd"
端口已被占用提示
(98)Address already in use: make_sock: could not bind to address [::]:80
(98)Address already in use: make_sock: could not bind to address 0.0.0.0:80
no listening sockets available, shutting down
Unable to open logs
查看端口情况:lsof -i:
[root@localhost httpd-2.2.3]# source /etc/profile
[root@localhost httpd-2.2.3]# lsof -i:80
注:当执行的命令提示:
bash: lsof: command not found
bash: service: command not found
均应先执行:
source /etc/profile
停止服务:./httpd -k stop
[root@localhost Desktop]# cd /usr/local/web/apache/
[root@localhost apache]# ls
bin cgi-bin error icons lib man modules
build conf htdocs include logs manual
[root@localhost apache]# cd bin
[root@localhost bin]# source /etc/profile
[root@localhost bin]# ./httpd -k stop(停止服务)
启动服务:./httpd -k start
Linux(CentOS/RedHat)安装nginx
http://www.2cto.com/os/201408/329177.html
[root@localhost nginx-1.10.1]# cd /usr/local/nginx/
[root@localhost nginx]# ls
conf html logs sbin
[root@localhost nginx]# cd sbin
[root@localhost sbin]# ls
nginx
[root@localhost sbin]# ./nginx
[root@localhost sbin]# lsof -i:80
COMMAND PID USER FD TYPE DEVICE SIZE/OFF NODE NAME
nginx 6293 root 6u IPv4 1920313 0t0 TCP *:http (LISTEN)
nginx 6294 nobody 6u IPv4 1920313 0t0 TCP *:http (LISTEN)
[root@localhost sbin]#
查询***版本:cat **/version
[root@localhost Desktop]# cat /usr/share/x**/version
卸载***:uninstall.sh
[root@localhost Desktop]# /usr/share/x**/scripts/uninstall.sh
重启***:restart
service x**d restart
检查***进程是否运行:ps -ef |grep
ps -ef |grep **
pidof ***
查询***端口是否运行:Lsof – i
Lsof – i:6361
列出所有规则:iptables –L
iptables –L
网页无法访问
关闭防火墙试试 service iptables stop
开启远程sshd
service sshd start
查询apache进程
ps -ef | grep apache
杀进程:pkill
pkill httpd
DDOS防护ICMP
tcpdump icmp
tcpdump icmp >icmp.output /*创建icmp.output,把结果放进去*/
cat icmp.01 | grep reply > icmp.01.aa
Ubu
1 ls
2 cd Desktop/
3 ls
4 pwd
5 ls
6 tar zxvf VMwareTools-9.6.2-1688356.tar.gz
7 ls
8 clear
9 cd vmware-tools-distrib/
10 ls
11 clear
12 ls
13 ./vmware-install.pl
14 sudo ./vmware-install.pl
15 clear
16 cd /media/
17 ls
18 cd jll/
19 ls
20 cd VMware Tools/
21 ls
22 cp VMwareTools-9.6.2-1688356.tar.gz /home/jll/Desktop/
1 exit
2 ls
3 cd Desktop
4 ls
5 ./X**3.0.1.2965_ubuntu_x64.bin
6 ifconfig
7 tar zxvf httpd-2.2.31.tar.gz
8 sudo passwd root
9 ifconfig
10 su root
11 exit
12 ks
13 ls
14 service x**d restart
15 lsof -i:6361
16 service x**d restart
17 ls
18 cd Desktop/
19 ls
20 d httpd-2.2.31
21 cd httpd-2.2.31
22 make
23 ls
24 ./configure
25 make
26 make install
27 cd /usr/local/apache2/
28 ls
29 cd bin
30 ls
31 ./httpd
32 ls
33 cd --
34 ls
35 cd Desktop
36 ls
37 cd /home/jll/
38 ls
39 cd /usr/local/apache2/conf
40 ls
55 apt-get install vim
56 vim httpd.conf
57 cd /home/jll/Desktop/
58 ls
59 ./X**3.0.1.2969_ubuntu_x86.bin
60 cd /usr/local/apache2/bin/
61 ls
62 ./httpd
63 cd__
64 cd_
65 cd __
66 cd --
67 ls
68 cd Desktop/
69 ls
70 ./X**3.0.1.2969_ubuntu_x64.bin
71 ifconfig
72 sudo passwd root
73 service x**d restart
74 ./X**3.0.1.2969_ubuntu_x64.bin
75 history
SSH启动没有反应
http://www.centoscn.com/CentosBug/osbug/2015/1106/6394.html
http://blog.csdn.net/yiluoak_47/article/details/22067185
8 sudo apt-get install g++
12 gcc -v
httpd-2.4.23.tar.gz安装
² apt-get install gcc
² apt-get install build-essential
² apr-1.5.2.tar.gz
wget http://**s.tuna.tsinghua.edu.cn/apache//apr/apr-1.5.2.tar.gz
16 chmod 777 apr-1.5.2.tar.gz r
18 tar zxvf apr-1.5.2.tar.gz
20 cd apr-1.5.2/
22 ./configure
23 make
24 make install
29 cd ..
² apr-util-1.5.4.tar.gz
31 wget http://**s.tuna.tsinghua.edu.cn/apache//apr/apr-util-1.5.4.tar.gz
33 chmod 777 apr-util-1.5.4.tar.gz
35 tar zxvf apr-util-1.5.4.tar.gz
36 cd apr-util-1.5.4/
39 ./configure --with-apr=/usr/local/apr
40 make
41 make install
42 cd ..
² pcre-8.36.tar.gz
43 wget http://ftp.exim.llorien.org/pcre/pcre-8.36.tar.gz
44 chmod 777 pcre-8.36.tar.gz
45 tar zxvf pcre-8.36.tar.gz
46 cd pcre-8.36/
47 ls
48 ./configure
(失败,则执行apt-get install build-essential)
49 make
50 make install
51 cd ..
² httpd-2.4.23.tar.gz
52 wget http://apache.fayea.com//httpd/httpd-2.4.23.tar.gz
53 chmod 777 httpd-2.4.23.tar.gz
54 ls
55 tar zxvf httpd-2.4.23.tar.gz
56 cd httpd-2.4.23/
57 ls
58 ./configure --enable-so --with-mpm=prefork
59 make
60 ls
² zlib-1.2.8.tar.gz
61 cd
62 rz
63 apt-get install lrzsz
64 rz
65 ls
66 chmod 777 zlib-1.2.8.tar.gz
67 ls
68 tar zxvf zlib-1.2.8.tar.gz
69 cd zlib-1.2.8/
70 ./configure
71 ls
72
73 vim Makefile
74 make
75 make install
76 cd ..
77 cd httpd-2.4.23/
78 cd ..
79 cd httpd-2.4.23/
80* ./configure --prefix=/usr/local/apache2 --with-apr=/usr/local/apr/bin/apr-1-config --with-apr-util=/usr/local/apr-util/bin/apu-1-config --with-pcre=/usr/local/pcre/bin/pcre-config --with-zlib-1.2.3=/usr/local/zlib-1.2.3 --enable-so
81 cd ..
82 cd /usr/local/apr/
83 ls
84 find /usr -name apr-util
85 cd ..
86 find -name apr-util
87 cd ,,
88 cd ..
89 find -name apr-util
90 history
./configure --prefix=/usr/local/apache2 --with-included-apr --with-apr=/usr/local/apr/bin/apr-1-config --with-apr-util=/usr/local/apr/bin/apu-1-config --with-pcre=/usr/local/pcre/bin/pcre-config --with-zlib-1.2.3=/usr/local/zlib-1.2.3 --enable-so
1 cd httpd-2.4.23/
2 ./configure
3 make
4 cd
5 find -name *pcre*
6 cd httpd-2.4.23/
8 ./configure --prefix=/usr/local/apache2 --with-apr=/usr/local/apr/bin/apr-1-config --with-apr-util=/usr/local/apr/bin/apu-1-config --with-pcre=/usr/local/pcre/bin/pcre-config --with-zlib-1.2.3=/usr/local/zlib-1.2.3 --enable-so
9 make
(出错提示E: Unable to locate package crypto,E: Unable to locate package libssl)
cp /usr/local/ssl/lib/libssl.so /usr/lib/
cp /usr/local/ssl/lib/libcrypto.so /usr/lib/
./configure --prefix=/usr/local/apache2 --with-apr=/usr/local/apr/bin/apr-1-config --with-apr-util=/usr/local/apr/bin/apu-1-config --with-pcre=/usr/local/pcre/bin/pcre-config --with-zlib-1.2.3=/usr/local/zlib-1.2.3 --enable-so
Make
Make install
56 cd /usr/local/apache2/bin/
57 ls
58 ./httpd
59 cd ..
60 ls
61 cd conf
62 ls
63 vim httpd.conf
64 cd ..
65 cd bin
66 ./httpd
Nginx1.0.15
yum install gcc gcc-c++
yum提示another app is currently holding the yum lock;waiting for it to exit
rm -f /var/run/yum.pid
nginx1.11.5 启动时报错
报错:error while loading shared libraries: libpcre.so.1: cannot open shared object file: No such file or directory
执行命令:ln -s /usr/local/lib/libpcre.so.1 /lib64/ or
执行命令:ln -s /usr/local/lib/libpcre.so.1 /lib/
之后启动:/usr/local/nginx/sbin/nginx
pidof nginx,成功
参考网站:http://www.2cto.com/os/201304/199770.html
rz
yum install lrzsz
yum提示不可用
cp -r /home/jll/Desktop/CentOS6-Base-163-Redhat-6-32位-yum固定源-完全可用.repo /etc/yum.repos.d/rhel-source.repo
将对应的yum源拷贝进去。
RHEL7.2 yum源配置
[root@localhost ~]# wget -O /etc/yum.repos.d/CentOS-Base.repo http://**s.aliyun.com/repo/Centos-7.repo
[root@localhost ~]# sed -i 's/$releasever/7/g' /etc/yum.repos.d/CentOS-Base.repo
[root@localhost ~]# yum clean all
[root@localhost ~]# yum list
apt-get安装nginx
http://blog.sina.com.cn/s/blog_7253e39301012hoa.html
查看所有运行进程
netstat -tupln
进入进程
cd /proc/31426
查看该进程详细
ll
Ssh停止 启动等
/etc/rc.d/init.d/sshd start = service sshd start
/etc/rc.d/init.d/sshd stop= service sshd stop
yum安装apache
安装:yum install httpd
启动:/etc/init.d/httpd start
修改端口
vim /etc/httpd/conf/httpd.conf
Listen 端口处修改即可
修改端口后启动报错
如端口80修改为 777
Permission denied: make_sock:
could not bind to address [::]:777
Permission denied:
make_sock: could not bind to address 0.0.0.0:777
no listening sockets
available, shutting down
Unable to open logs
解决方法:
前提是SELinux 类型必须是targeted的:
cat /etc/selinux/config|grep SELINUXTYPE;
也可以直接把selinux禁用掉;
直接修改/etc/selinux/config找到SELINUX=enforcing 修改为SELINUX=disable,然后reboot即可。
参考地址:http://blog.csdn.net/qzc295919009/article/details/43950125
error: Size of "void *" is less than size of "long"
安装httpd-2.2.23 ./configure 的时候报错如下
checking for void pointer length... yes configure: error: Size of "void *" is less than size of "long"
解决方法vi configure
if test "$ap_cv_void_ptr_lt_long" = "yes"; then
as_fn_error $? "Size of "void *" is less than
size of "long"" "$LINENO" 5
改为if test "$ap_cv_void_ptr_lt_long" != "yes";
then
as_fn_error $? "Size of "void *" is less than
size of "long"" "$LINENO" 5
保存重新编译
Yum安装nginx
Centos6安装执行
rpm -ivh http://nginx.org/packages/centos/6/noarch/RPMS/nginx-release-centos-6-0.el6.ngx.noarch.rpm
yum info nginx
yum -y install nginx
redhat5安装执行
rpm -ivh http://nginx.org/packages/rhel/5/noarch/RPMS/nginx-release-rhel-5-0.el5.ngx.noarch.rpm
yum info nginx
yum -y install nginx
Centos7安装执行
rpm -Uvh http://nginx.org/packages/centos/7/noarch/RPMS/nginx-release-centos-7-0.el7.ngx.noarch.rpm
rpm -ivh http://nginx.org/packages/centos/7/noarch/RPMS/nginx-release-centos-7-0.el7.ngx.noarch.rpm
yum info nginx
yum -y install nginx
http://www.2cto.com/os/201505/399008.html
http://jingyan.baidu.com/article/d169e18663d467436611d823.html
https://www.cyberciti.biz/faq/install-nginx-centos-rhel-6-server-rpm-using-yum-command/
CentOS Linux v6.x user type the following command:
wget http://nginx.org/packages/centos/6/noarch/RPMS/nginx-release-centos-6-0.el6.ngx.noarch.rpm
# rpm -ivh nginx-release-centos-6-0.el6.ngx.noarch.rpm
RHEL v6.x user type the following command:
# wget http://nginx.org/packages/rhel/6/noarch/RPMS/nginx-release-rhel-6-0.el6.ngx.noarch.rpm
# rpm -ivh nginx-release-rhel-6-0.el6.ngx.noarch.rpm
修改nginx端口
vim /etc/nginx/conf.d/default.conf
启动
service nginx start
yum安装mysql:
安装
yum install mysql mysql-server
启动
/etc/init.d/mysqld start
Redhat7 安装mysql:
http://www.cnblogs.com/linux130/p/5762531.html
. 下载mysql的repo源
$ wget http://repo.mysql.com/mysql-community-release-el7-5.noarch.rpm
2. 安装mysql-community-release-el7-5.noarch.rpm包
$ sudo rpm -ivh mysql-community-release-el7-5.noarch.rpm
安装这个包后,会获得两个mysql的yum repo源:
/etc/yum.repos.d/mysql-community.repo
/etc/yum.repos.d/mysql-community-source.repo
3. 安装mysql
$ sudo yum install mysql-server
Yum安装Tomcat
安装:yum -y install tomcat6 tomcat6-webapps tomcat6-admin-webapps tomcat6-docs-webapp tomcat6-javadoc
启动:service tomcat6 start
停止:service tomcat6 stop
http://liwenjia.blog.51cto.com/2656598/1408049
redhat7 yum安装tomcat
安装:yum -y install tomcat tomcat-webapps tomcat-admin-webapps tomcat-docs-webapp tomcat-javadoc
yum安装php
yum install php php-devel
重启apache使php生效
/etc/init.d/httpd restart
Tomcat安装
REDHAT6.0 安装:
http://blog.csdn.net/xiegh2014/article/details/43445413
1. 通过rpm命令查看Open JDK具体版本信息
# rpm -qa | grep java
如结果有类似如下记录:
tzdata-java-2012c-1.el6.noarch
java-1.7.0-openjdk-1.7.0.45-1.45.1.11.1.el6.x86_64
2. 通过rpm卸载JDK
# rpm -e --nodeps tzdata-java-2012c-1.el6.noarch
# rpm -e --nodeps java-1.7.0-openjdk-1.7.0.45-1.45.1.11.1.el6.x86_64
(卸载带有tzdata-java 和openjedk的记录)
此时已经卸载了Open JDK了。
3. 将jdk和tomcat安装包放在/opt/目录下
4. 解压jdk安装包
# tar zxvf jdk-8u121-linux-x64.tar.gz
5. 配置全局变量
# vim /etc/profile
在profile文件中添加以下内容:
# jdk8 settings
JAVA_HOME=/opt/jdk1.8.0_121
JRE_HOME=$JAVA_HOME/jre
PATH=$PATH:$JAVA_HOME/bin:$JRE_HOME/bin
CLASSPATH=:$JAVA_HOME/lib/dt.jar:$JAVA_HOME/lib/tools.jar:$JRE_HOME/lib
export JAVA_HOME JRE_HOME PATH CLASSPATH
保存,并执行 source /etc/profile 使配置生效
6. 解压/opt/目录下的apache-tomcat-7.0.75
7. 修改 /opt/apache-tomcat-7.0.75/bin/catalina.sh
vim /opt/apache-tomcat-7.0.75/bin/catalina.sh
在该文件的最顶端添加如下内容:
export TOMCAT_HOME=/opt/apache-tomcat-7.0.75
export CATALINA_HOME=/opt/apache-tomcat-7.0.75
export JRE_HOME=/opt/jdk1.8.0_121/jre
export JAVA_HOME=/opt/jdk1.8.0_121
保存并执行source /opt/apache-tomcat-7.0.75/bin/catalina.sh
8. 重新登录root并启动tomcat
/opt/apache-tomcat-7.0.75/bin/startup.sh 启动tomcat
/opt/apache-tomcat-7.0.75/bin/shutdown.sh 关闭tomcat
cannot restore segment prot after reloc: Permission denied
修改/etc/profile文件最后一行加入
JAVA_HOME=jdk路径
CLASSPATH=.:$JAVA_HOME/lib/tools.jar:$JAVA_HOME/lib/dt.jar
PATH=$PATH:$HOME/bin:$JAVA_HOME/bin:$JAVA_HOME/jre/bin
export PATH JAVA_HOME CLASSPATH
保存后输入Java或javac会出现“cannot restore segment prot after reloc: Permission denied”错误解决方案:
解决的办法是在root用户下,修改/etc/selinux/config 文件,
把SELINUX=enforcing 改成 SELINUX=disabled。
然后,保存关闭,重启机器就可以了。
打印出与tomcat相关的进程,排除grep本身进程
ps aux | grep tomcat | grep -v grep
Mysql安装
下载地址:https://dev.mysql.com/downloads/mysql/5.6.html#downloads
安装:http://www.cnblogs.com/bookwed/p/5896619.html
1、下载
下载地址:http://dev.mysql.com/downloads/mysql/5.6.html#downloads
下载版本:我这里选择的5.6.33,通用版,linux下64位
也可以直接复制64位的下载地址,通过命令下载:
wget http://dev.mysql.com/get/Downloads/MySQL-5.6/mysql-5.6.33-linux-glibc2.5-x86_64.tar.gz
2、解压
|
1 2 3 4 |
#解压 tar -zxvf mysql-5.6.33-linux-glibc2.5-x86_64.tar.gz #复制解压后的mysql目录 cp -r mysql-5.6.33-linux-glibc2.5-x86_64 /usr/local/mysql |
3、添加用户组和用户
|
1 2 3 4 |
#添加用户组 groupadd mysql #添加用户mysql 到用户组mysql useradd -g mysql mysql |
4、安装
|
1 2 3 4 5 6 7 8 9 10 11 12 13 14 15 16 17 18 19 20 21 22 23 24 25 26 27 28 29 30 |
cd /usr/local/mysql/<br>mkdir ./data/mysql chown -R mysql:mysql ./ ./scripts/mysql_install_db --user=mysql --datadir=/usr/local/mysql/data/mysql cp support-files/mysql.server /etc/init.d/mysqld chmod 755 /etc/init.d/mysqld cp support-files/my-default.cnf /etc/my.cnf #修改启动脚本 vi /etc/init.d/mysqld #修改项: basedir=/usr/local/mysql/ datadir=/usr/local/mysql/data/mysql #启动服务 service mysqld start #测试连接 ./mysql/bin/mysql -uroot #加入环境变量,编辑 /etc/profile,这样可以在任何地方用mysql命令了 export PATH=$PATH:/usr/local/mysql//bin<br>source /etc/profile #启动mysql service mysqld start #关闭mysql service mysqld stop #查看运行状态 service mysqld status |
#启动mysql
service mysqld start
#关闭mysql
service mysqld stop
#查看运行状态
service mysqld status
模糊匹配mysql相关的进程
ps aux | grep mysql | grep -v grep
redis安装
http://www.linuxidc.com/Linux/2015-05/117281.htm
安装:
wget http://download.redis.io/releases/redis-2.8.12.tar.gz
wget http://download.redis.io/releases/redis-3.2.8.tar.gz
tar xzf redis-2.8.12.tar.gz
cd redis-2.8.12
make
如错,则
make CFLAGS="-march=i686"
启动:
src/redis-server &
yum安装apache subversion
yum -y install subversion
修改端口后启动报错:permission
Yum安装的apache修改端口后报错:
http://infosec.blog.51cto.com/226250/1651214
查看selinux状态:
[root@guest-4-205 httpd]# sestatus
SELinux
status:
enabled
SELinuxfs
mount:
/selinux
Current
mode:
permissive
Mode from config file:
enforcing
Policy
version:
24
Policy from config file: targeted
修改selinux状态
修改/etc/selinux/config 文件
将SELINUX=enforcing改为SELINUX=disabled
然后重启机器。
增加selinux中http的端口
semanage port -l|grep http #查看SELinux下http相关端口
semanage port -a -t http_port_t -p tcp 72 #增加这个非标准端口即可
[root@guest-4-205 httpd]# /etc/init.d/httpd start
[root@guest-4-205 httpd]# /etc/init.d/httpd
status
httpd (pid 32061) is running...
Ubuntu的ftp匿名不可登录
vi /etc/vsftpd.conf
改成YES
重启FTP
防火墙增加端口
service iptables stop
vi /etc/sysconfig/iptables
在文件中添加
-A INPUT -m state --state NEW -m tcp -p tcp --dport 80 -j ACCEPT
service iptables start
bash: semanage: command not found
http://mangguo.org/linux-semanage-command-not-found/
执行:
$ yum provides /usr/sbin/semanage
或者:
$ yum whatprovides /usr/sbin/semanage
然后:
$ yum -y install policycoreutils-python
时间设置
Date 月日时分年.秒
date 031714002017.00
打印出与tomcat相关的进程,排除grep本身进程
ps aux | grep tomcat | grep -v grep
CentOS5系统yum源404
l 首先,挂载镜像
l 进入本地rpm路径:一般为/media/CentOS_5.0_Final/CentOS
cd /media/CentOS_5.0_Final/CentOS
l 查找应用是否存在,ls -l | grep –i 应用名称。如:vsftpd
ls -l | grep -i vsftpd
l 安装应用:rpm –i 应用名称。如:vsftpd
rpm -i vsftpd-2.0.5-10.el5.i386.rpm
注:①安装路径启动程序路径同yum一样。
②如安装BBB后,如遇 AAA is needed by BBB提示,则先安装AAA,再安装BBB。
CentOS5系统本地yum源配置
l 首先,挂载镜像,rpm路径:一般为/media/CentOS_5.0_Final/CentOS
l 其次,cd /etc/yum.repos.d,新建文件(名称随意),内容为:
[c5-media]
name=CentOS-$releasever - Media
baseurl=file:///media/CentOS_5.0_Final/ #挂载后iso中rpm的路径
gpgcheck=1
enabled=1 #开启本地源
gpgkey=file:///etc/pki/rpm-gpg/RPM-GPG-KEY-CentOS-5
l yum clean all
l yum makecache
l 安装应用。
如nginx,yum --disablerepo=/* --enablerepo=c5-media install nginx
如tomcat,yum --disablerepo=/* --enablerepo=c5-media install tomcat5
参见:http://blog.csdn.net/gumengkai/article/details/51457173
Debian安装
http://jingyan.baidu.com/article/c1a3101ea67bafde646deb73.html
安装完成后,①重新启动,网络就正确了。
安装完毕后,②配置apt-get源,要找到腿本版本相符合的源。
http://blog.sina.com.cn/s/blog_872a01b00102vmqg.html
- root@debian:~# vi /etc/apt/sources.list
首先屏蔽掉本地源
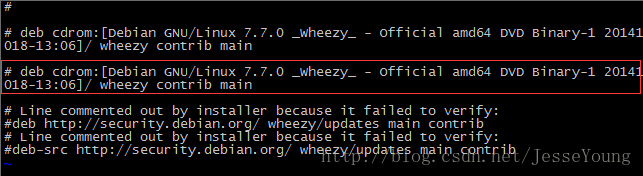
然后添加列表到sources.list文件里
Debian8.6可使用的源:
deb http://**s.ustc.edu.cn/debian
jessie main contrib non-free
deb-src http://**s.ustc.edu.cn/debian jessie
main contrib non-free
deb http://**s.ustc.edu.cn/debian
jessie-proposed-updates main contrib non-free
deb-src http://**s.ustc.edu.cn/debian
jessie-proposed-updates main contrib non-free
更新配置:root@debian:~# apt-get update
apt-get即可用。
Debian安装nginx
apt-get install build-essential
apt-get install gcc make
apt-get install libpcre+*
apt-get install zlib1g*
apt-get install libssl-dev
wget http://nginx.org/download/nginx-1.10.3.tar.gz
tar zxvf nginx-1.10.3.tar.gz
cd nginx-1.10.3
./configure
make
make install
/usr/local/nginx/sbin/nginx -c /usr/local/nginx/conf/nginx.conf
ps aux | grep nginx
Debian自身的apt-get无法成功
有可能是安装的名称同源中的名称不同。可使用如下两个命令
apt-cache search gcc
apt-get install gcc-4.8-base
Debian自身的apt-get无应用
可去https://www.debian.org/distrib/packages搜索对应的包(搜索,在页面中间),并wget下,然后dpkg -i 下载的包名。
E: Could not get lock /var/lib/dpkg/lock
sudo rm
/var/cache/apt/archives/lock
sudo rm /var/lib/dpkg/lock
http://www.2cto.com/os/201305/213648.html
fedora安装
http://jingyan.baidu.com/article/84b4f565eb2a9a60f6da3204.html
安装完成后,重新启动,网络就正确了。
中标麒麟
终端
Root
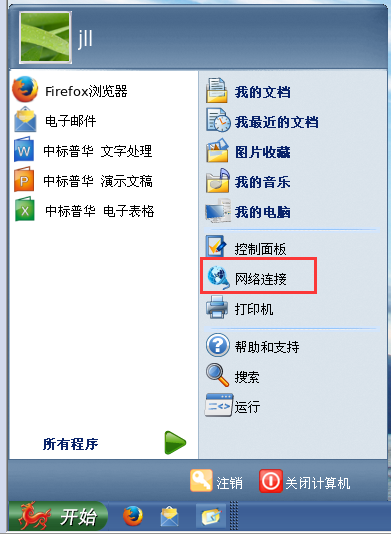
网络配置
如不能上网,则控制面板——如下设置后,重启。
Yum源配置
http://haha.tk/article/306.html (然而并没有解决问题)
源码安装nginx同centos一样
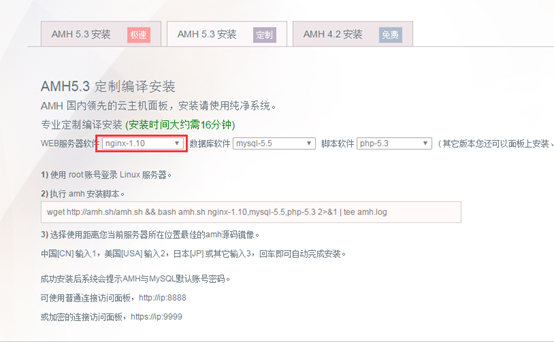
AMH
您当前系统无法正常工作,请排查解决:Access denied for user 'root'@'localhost' (using password: YES) Mysql链接出错,请配置/Amysql/config.php文件。
Mysql启动失败。
执行:chown -R mysql:mysql /usr/local/mysql/data
注:mysql根据实际情况命名,如本次为local目录下为mysql-5.5
则执行:chown -R mysql:mysql /usr/local/mysql-5.5/data
启动:amh mysql start
查看是否成功启动:ps aux | grep mysql | grep -v grep
启动后依然未解决问题
vim /usr/local/amh-5.3/web/Amysql/Config.php
依然失败。
AMH安装
VIM 替换
:n,$s/vivian/sky/g
Apt-get mysql
http://www.cnblogs.com/zhuyp1015/p/3561470.html
1. sudo apt-get install mysql-server
2. apt-get isntall mysql-client
3. sudo apt-get install libmysqlclient-dev
安装过程中会提示设置密码什么的,注意设置了不要忘了,安装完成之后可以使用如下命令来检查是否安装成功:
sudo netstat -tap | grep mysql
通过上述命令检查之后,如果看到有mysql 的socket处于 listen 状态则表示安装成功。
Ubuntu源码安装tomcat
先安装jdk。http://jingyan.baidu.com/article/eb9f7b6d8f82a6869364e8a7.html
将jdk放在/opt目录下
l tar zxvf jdk-8u121-linux-i586.tar.gz
l vim /etc/profile
l 添加如下内容
# jdk8 settings
JAVA_HOME=/opt/jdk1.8.0_121
JRE_HOME=$JAVA_HOME/jre
PATH=$PATH:$JAVA_HOME/bin:$JRE_HOME/bin
CLASSPATH=:$JAVA_HOME/lib/dt.jar:$JAVA_HOME/lib/tools.jar:$JRE_HOME/lib
export JAVA_HOME JRE_HOME PATH CLASSPATH
l 保存退出,下面输入以下命令配置默认JDK版本
sudo update-alternatives --install /usr/bin/java java /opt/jdk1.8.0_121/bin/java 300
sudo update-alternatives --install /usr/bin/javac javac /opt/jdk1.8.0_121/bin/javac 300
sudo update-alternatives --config java
l java -version 出现版本后证明成功。
安装tomcat。http://blog.csdn.net/xingjiarong/article/details/49386989
wget http://apache.fayea.com/tomcat/tomcat-8/v8.5.14/bin/apache-tomcat-8.5.14.tar.gz
将tomcat安装包放在/opt目录下
l tar -zxvf apache-tomcat-7.0.75.tar.gz
l cd apache-tomcat-7.0.75/bin
l vim startup.sh ,在最后一行之前输入以下内容,保存
JAVA_HOME=/opt/jdk1.8.0_121
JRE_HOME=$JAVA_HOME/jre
PATH=$PATH:$JAVA_HOME/bin:$JRE_HOME/bin
CLASSPATH=:$JAVA_HOME/lib/dt.jar:$JAVA_HOME/lib/tools.jar:$JRE_HOME/lib
TOMCAT_HOME= /opt/apache-tomcat-7.0.75
l vim shutdown.sh,在最后一行之前输入以下内容,保存
JAVA_HOME=/opt/jdk1.8.0_121
JRE_HOME=$JAVA_HOME/jre
PATH=$PATH:$JAVA_HOME/bin:$JRE_HOME/bin
CLASSPATH=:$JAVA_HOME/lib/dt.jar:$JAVA_HOME/lib/tools.jar:$JRE_HOME/lib
TOMCAT_HOME= /opt/apache-tomcat-7.0.75
l 启动:./startup.sh
注:部分系统需要修改catalina.sh,如启动不成功,可修改catalina.sh。
vim /opt/apache-tomcat-7.0.75/bin/catalina.sh
在该文件的最顶端添加如下内容:
export TOMCAT_HOME=/opt/apache-tomcat-7.0.75
export CATALINA_HOME=/opt/apache-tomcat-7.0.75
export JRE_HOME=/opt/jdk1.8.0_121/jre
export JAVA_HOME=/opt/jdk1.8.0_121
Ubuntu突然不能上网
http://blog.csdn.net/moreorless/article/details/5397427
ip r

可能是网关错误,需要添加静态网关
route add default gw 192.168.1.1
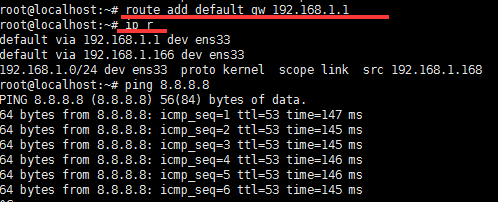
ip route del default via 192.168.1.166
ip route add default via 192.168.1.1
添加DNS
vim /etc/resolv.conf
nameserver 192.168.1.1
nameserver 8.8.8.8
(顶格写……)
Tomcat配置用户
编辑/opt/apache-tomcat-7.0.75/conf/tomcat-users.xml
在最后一行</tomcat-users>前加入:
<role rolename="tomcat"/>
<role rolename="role1"/>
<role rolename="manager-gui"/>
<role rolename="admin-gui"/>
<user username="tomcat" password="s3cret" roles="manager-gui"/>
<user username="tomcat" password="tomcat" roles="tomcat,manager-gui,admin-gui"/>
<user username="both" password="123456" roles="tomcat,role1"/>
<user username="role1" password="123456" roles="role1"/>
重启tomcat:
./catalina.sh stop
./catalina.sh start
浏览器访问tomcat:http://IP:8080,点击Manager App,用户名和密码均为tomcat,即可成功登陆。
Tomcat登录页面403错误
http://www.landui.com/help/show-5292
虚拟机映射
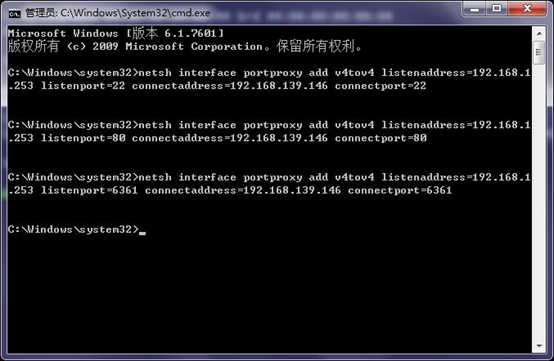
netsh interface portproxy add v4tov4 listenaddress=192.168.1.149 listenport=22 connectaddress=192.168.118.128 connectport=22
netsh interface portproxy add v4tov4 listenaddress=192.168.1.149 listenport=80 connectaddress=192.168.118.128 connectport=80
netsh interface portproxy add v4tov4 listenaddress=192.168.1.149 listenport=6361 connectaddress=192.168.118.128 connectport=6361
netsh interface portproxy add v4tov4 listenaddress=192.168.1.7 listenport=22 connectaddress=192.168.118.128 connectport=22
netsh interface portproxy add v4tov4 listenaddress=192.168.1.7 listenport=80 connectaddress=192.168.118.128 connectport=80
netsh interface portproxy add v4tov4 listenaddress=192.168.1.7 listenport=6361 connectaddress=192.168.118.128 connectport=6361
netsh interface portproxy add v4tov4 listenaddress=192.168.1.7 listenport=8080 connectaddress=192.168.118.128 connectport=8080
netsh firewall set opmode disable
映射解除
netsh interface portproxy delete v4tov4 listenaddress= 192.168.1.149 listenport=22
mysql远程
grant all privileges on *.* to root@localhost identified by '123' with grant option;
grant all privileges on *.* to root@"%" identified by '123' with grant option;
grant all privileges on *.* to admin@localhost identified by 'password' with grant option;
grant all privileges on *.* to admin@"%" identified by 'password' with grant option;
GRANT ALL PRIVILEGES ON *.* TO 'root'@'%' IDENTIFIED BY '123' WITH GRANT OPTION;
vim /etc/mysql/my.cnf
将bind-address = 127.0.0.1注释掉
通过进程号查看端口
netstat -tupln | grep pid号
apt-get install apache2报错
[Tue Jun 27 18:02:32.108438 2017] [core:warn] [pid 4327] AH00111: Config variable ${APACHE_LOCK_DIR} is not defined
[Tue Jun 27 18:02:32.108474 2017] [core:warn] [pid 4327] AH00111: Config variable ${APACHE_PID_FILE} is not defined
[Tue Jun 27 18:02:32.108483 2017] [core:warn] [pid 4327] AH00111: Config variable ${APACHE_RUN_USER} is not defined
[Tue Jun 27 18:02:32.108486 2017] [core:warn] [pid 4327] AH00111: Config variable ${APACHE_RUN_GROUP} is not defined
[Tue Jun 27 18:02:32.108494 2017] [core:warn] [pid 4327] AH00111: Config variable ${APACHE_LOG_DIR} is not defined
[Tue Jun 27 18:02:32.109860 2017] [core:warn] [pid 4327:tid 140609518602112] AH00111: Config variable ${APACHE_LOG_DIR} is not defined
[Tue Jun 27 18:02:32.109941 2017] [core:warn] [pid 4327:tid 140609518602112] AH00111: Config variable ${APACHE_LOG_DIR} is not defined
[Tue Jun 27 18:02:32.109947 2017] [core:warn] [pid 4327:tid 140609518602112] AH00111: Config variable ${APACHE_LOG_DIR} is not defined
AH00526: Syntax error on line 74 of /etc/apache2/apache2.conf:
Invalid Mutex directory in argument file:${APACHE_LOCK_DIR}
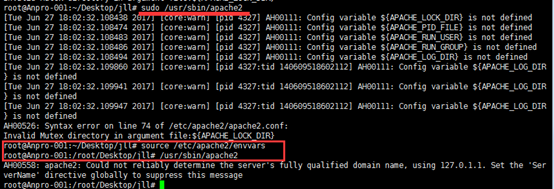
source /etc/apache2/envvars
/usr/sbin/apache2 -V
<?php
/**
* WordPress基础配置文件。
*
* 这个文件被安装程序用于自动生成wp-config.php配置文件,
* 您可以不使用网站,您需要手动复制这个文件,
* 并重命名为“wp-config.php”,然后填入相关信息。
*
* 本文件包含以下配置选项:
*
* * MySQL设置
* * 密钥
* * 数据库表名前缀
* * ABSPATH
*
* @link https://codex.wordpress.org/zh-cn:%E7%BC%96%E8%BE%91_wp-config.php
*
* @package WordPress
*/
// ** MySQL 设置 - 具体信息来自您正在使用的主机 ** //
/** WordPress数据库的名称 */
define('DB_NAME', 'wptwo');
/** MySQL数据库用户名 */
define('DB_USER', 'jll');
/** MySQL数据库密码 */
define('DB_PASSWORD', '123');
/** MySQL主机 */
define('DB_HOST', '127.0.0.1');
/** 创建数据表时默认的文字编码 */
define('DB_CHARSET', 'utf8mb4');
/** 数据库整理类型。如不确定请勿更改 */
define('DB_COLLATE', '');
/**#@+
* 身份认证密钥与盐。
*
* 修改为任意独一无二的字串!
* 或者直接访问{@link https://api.wordpress.org/secret-key/1.1/salt/
* WordPress.org密钥生成服务}
* 任何修改都会导致所有cookies失效,所有用户将必须重新登录。
*
* @since 2.6.0
*/
define('AUTH_KEY', 'n1lX,$6ZFWI_&={ I,D HB:JkEtFY, ;3JqAqPI%oe`MmE-hWfLmU_Yyzi:TASaU');
define('SECURE_AUTH_KEY', '&z[Z e__]KKwJZaadM_e)YV<$E[To_I]2Pr27.Wyn{u;uNW<(nr+1{opT:l9pY[X');
define('LOGGED_IN_KEY', '|xmL6Wv K?&eu/0[@NqME(i#B`Q:EAL^Q#+VXG0?/_z>>A(%o*UN#RFu>=y<k=R*');
define('NONCE_KEY', 'Y;GcH.|&aut@R#cU3w50,AYD6a[6Dr#A]r}_{V$r.QR7K7tKe9qeH|}]4V7DAThW');
define('AUTH_SALT', '1N?NO@72wrhS|I(E%bx=6KI.;T{C&!I%eWmT+6gwS.|$[E~,CbM&AUI01h|;y3Kc');
define('SECURE_AUTH_SALT', 'F,0x >Cl(Hen;&,Q%$8FUe^C^J};Ck*E[N`DQep>i&6]x5gdpZ];/2S|JaQ2b=9~');
define('LOGGED_IN_SALT', 'zhs-D{f|{&=tSE+%=~bBh#R7~yk6W^{!+ZiI2dsbU:-flE-TR7YSWcW7k55XXuUs');
define('NONCE_SALT', 'a|VOIm@c FT8XdpcJXmf}2*Vb9bqAc$qbw5;(m0t1J`HbH!>*R|b|HfE+B16Ec{+');
/**#@-*/
/**
* WordPress数据表前缀。
*
* 如果您有在同一数据库内安装多个WordPress的需求,请为每个WordPress设置
* 不同的数据表前缀。前缀名只能为数字、字母加下划线。
*/
$table_prefix = 'wptwo_';
/**
* 开发者专用:WordPress调试模式。
*
* 将这个值改为true,WordPress将显示所有用于开发的提示。
* 强烈建议插件开发者在开发环境中启用WP_DEBUG。
*
* 要获取其他能用于调试的信息,请访问Codex。
*
* @link https://codex.wordpress.org/Debugging_in_WordPress
*/
define('WP_DEBUG', false);
/**
* zh_CN本地化设置:启用ICP备案号显示
*
* 可在设置→常规中修改。
* 如需禁用,请移除或注释掉本行。
*/
define('WP_ZH_CN_ICP_NUM', true);
/* 好了!请不要再继续编辑。请保存本文件。使用愉快! */
/** WordPress目录的绝对路径。 */
if ( !defined('ABSPATH') )
define('ABSPATH', dirname(__FILE__) . '/');
/** 设置WordPress变量和包含文件。 */
require_once(ABSPATH . 'wp-settings.php');
压力测试工具ab(apache自带)
http://www.jb51.net/article/59469.htm
目录:一般在apache安装目录下/usr/local/apache/bin/ ab
启动:./ab
-n在测试会话中所执行的请求个数。默认时,仅执行一个请求。
-c一次产生的请求个数。默认是一次一个。
-t测试所进行的最大秒数。其内部隐含值是-n 50000,它可以使对服务器的测试限制在一个固定的总时间以内。默认时,没有时间限制。
ab -c 11 -n 100 -t 10 http://192.168.1.33/
吞吐率:Requests per second:
管理端访问不了服务器
确认IP
确认代理端是否运行
确认防火墙
确认web服务是否可以访问
确认服务器地址是否可以PING通
CC攻击:并行连接 访问受限webBench (不能安装本服务器上)
- 打开数据库:sqlite3 /usr/share/x**/systeminfo.db
- 测试工具webBench
- 放在linux目录下
- yum search ctags
- yum install ctags
- 进入所在目录
- unzip WebBench-master.zip
- cd WebBench-master
- make
- ./webbench -t 10 -c 10 http://192.168.1.33/
t 时间 c 客户端
CC攻击:不相关连接
路径:D:�1soft�2测试
- 安装
- 录入地址,进行访问(点击X可以清空记录),超过不相关并行连接数量后,会失败。

注:反复测试需要在所访问服务器上删除锁定记录和验证通过记录。
- vim /usr/share/x**/xm_redis/xm_redis.conf 查看复制redis的密码 之后:q退出
(# requirepass foobared
requirepass后面的即为密码
)
- /usr/share/x**/xm_redis/xm_redis_cli -p 39383 登录redis
- Auth 密码
- keys * 查看结果
- del cc_access_536979648 (删除锁定时间)
- del cc_middle_536979648(删除验证有效时间)
CC攻击:并行连接 http_load
下载地址:http://acme.com/software/http_load/
- 解压 tar -zxvf http_load-09Mar2016.tar.gz
- 进入安装
- cd http_load-09Mar2016
- make
- ./http_load
- vim url_file(将想访问的ip地址写在文件中) ——esc——:wq 保存退出
- . /http_load -parallel 20 -seconds 10 url_file
清理**的文件
iptables -F
iptables -X
修改配置文件
/usr/share/x**/conf/x**.conf

安全名片_数据库
数据库文件:/usr/share/x**/systeminfo.db
查看一下数据库表:select * from cfginfo
进入数据库:sqlite3 /usr/share/x**/systeminfo.db
关闭安全名片:update cfginfo set seg2="Close" where seg1="ML_linkState";
退出数据库:ctrl + D
数据库增加日志
进入数据库:sqlite3 /usr/share/x**/systeminfo.db
插入网络日志:insert into iptableslog( fi_server, se_server, src_ip, dst_ip, start_time, proto,log_number,last_time,sys_time,other)
values('ping', 'NULL', '192.168.1.1', '192.168.1.60', 1492248219,'ICMP', 11,1492248219,"2018/01/01 01:01:01","NULL");
退出数据库:ctrl + D
登录 注销账户
/usr/share/x**/bin/**r login 用户 密码
/usr/share/x**/bin/**r logout
原文件:https://wenku.baidu.com/view/a3464bbc326c1eb91a37f111f18583d048640f65