Hi Harshit S.
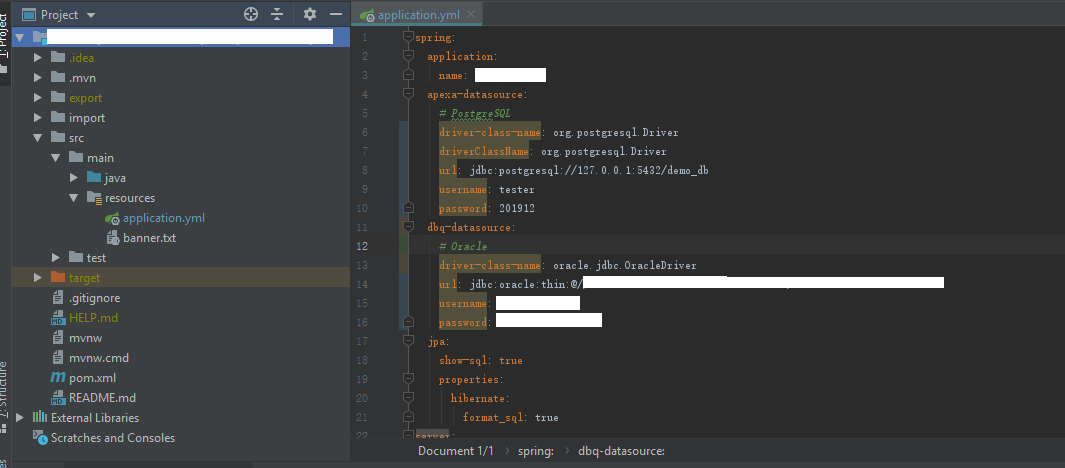
project structure:

multiple datasource config as follows:
step 1:

step 2:add a datasource configuration class
@Configuration
public class DataSourceConfig {
    // ape datasource config
    @Value("${spring.ape-datasource.driver-class-name}")
    private String apeDriverClassName;

    @Value("${spring.ape-datasource.url}")
    private String apeDBUrl;

    @Value("${spring.ape-datasource.username}")
    private String apeDBUsername;

    @Value("${spring.ape-datasource.password}")
    private String apeDBPassword;

    // DBQ datasource config
    @Value("${spring.dbq-datasource.url}")
    private String dbqDBUrl;

    @Value("${spring.dbq-datasource.username}")
    private String dbqDBUsername;

    @Value("${spring.dbq-datasource.password}")
    private String dbqDBPassword;

    @Value("${spring.dbq-datasource.driver-class-name}")
    private String dbqDriverClassName;

    @Primary
    @Bean(name = "apeDataSource")
    @Qualifier("apeDataSource")
    public DataSource apeDataSource() {
        HikariDataSource dataSource = new HikariDataSource();
        dataSource.setPoolName("ape pool");
        dataSource.setDriverClassName(apeDriverClassName);
        dataSource.setJdbcUrl(apeDBUrl);
        dataSource.setUsername(apeDBUsername);
        dataSource.setPassword(apeDBPassword);
        dataSource.setAutoCommit(true);
        dataSource.setMaximumPoolSize(20);
        return dataSource;
    }

    @Bean(name = "dbqDataSource")
    @Qualifier("dbqDataSource")
    public DataSource dbqDataSource() {
        HikariDataSource dataSource = new HikariDataSource();
        dataSource.setPoolName("DBQ pool");
        dataSource.setDriverClassName(dbqDriverClassName);
        dataSource.setJdbcUrl(dbqDBUrl);
        dataSource.setUsername(dbqDBUsername);
        dataSource.setPassword(dbqDBPassword);
        dataSource.setAutoCommit(true);
        dataSource.setMaximumPoolSize(20);
        return dataSource;
    }

}
Step3: add Jpa config class
@Configuration
@EnableTransactionManagement
@EnableJpaRepositories(
        entityManagerFactoryRef = "apeManagerFactory",
        transactionManagerRef = "apeTransactionManager",
        basePackages = {"com.cn.ano2ape.repository.ape"}
)
public class ApeJpaConfig {
    @Autowired
    @Qualifier("apeDataSource")
    private DataSource apeDataSource;

    @Autowired
    private JpaProperties jpaProperties;

    @Autowired
    private HibernateProperties hibernateProperties;

    @Primary
    @Bean(name = "apeEntityManager")
    public EntityManager entityManager(EntityManagerFactoryBuilder builder) {
        return apexaEntityManagerFactory(builder).getObject().createEntityManager();
    }

    @Primary
    @Bean(name = "apeManagerFactory")
    public LocalContainerEntityManagerFactoryBean apexaEntityManagerFactory(EntityManagerFactoryBuilder builder) {
        Map<String, Object> properties = hibernateProperties.determineHibernateProperties(jpaProperties.getProperties(), new HibernateSettings());
        return builder.dataSource(apeDataSource).properties(properties).packages("com.cn.ano2ape.model.ape").build();
    }

    @Primary
    @Bean(name = "apeTransactionManager")
    PlatformTransactionManager apexaTransactionManager(EntityManagerFactoryBuilder builder) {
        return new JpaTransactionManager(apexaEntityManagerFactory(builder).getObject());
    }
}
@Configuration
@EnableTransactionManagement
@EnableJpaRepositories(
        entityManagerFactoryRef = "dbqManagerFactory",
        transactionManagerRef = "dbqTransactionManager",
        basePackages = {"com.cn.ano2ape.repository.dbq"}
)
public class DbqJpaConfig {
    @Autowired
    @Qualifier("dbqDataSource")
    private DataSource dbqDataSource;

    @Autowired
    private JpaProperties jpaProperties;

    @Autowired
    private HibernateProperties hibernateProperties;

    @Bean(name = "dbqEntityManager")
    public EntityManager entityManager(EntityManagerFactoryBuilder builder) {
        return dbqEntityManagerFactory(builder).getObject().createEntityManager();
    }

    @Bean(name = "dbqManagerFactory")
    public LocalContainerEntityManagerFactoryBean dbqEntityManagerFactory(EntityManagerFactoryBuilder builder) {
        Map<String, Object> properties = hibernateProperties.determineHibernateProperties(jpaProperties.getProperties(), new HibernateSettings());
        return builder.dataSource(dbqDataSource).properties(properties).packages("com.cn.ano2ape.model.dbq").build();
    }

    @Bean(name = "dbqTransactionManager")
    PlatformTransactionManager dbqTransactionManager(EntityManagerFactoryBuilder builder) {
        return new JpaTransactionManager(dbqEntityManagerFactory(builder).getObject());
    }
}
end.