原理
http使用一次编译法编译安装,php独立服务fpm实现。
软件版本
在本次实验中,我们需要用到的软件版本如下:
apr-1.6.2
apr-util-1.6.0
httpd-2.4.28
mariadb-5.5.57
php-5.6.31
wordpress-4.8.1 ----博客搭建软件
xcache-3.2.0 ----加速软件
我们先用rz命令把所有的安装包上传至/root/src目录下,以方便我们的实验。
所有的安装包全部在官网下载,下面附上网址:
httpd官网:http://httpd.apache.org/
apr官网:http://apr.apache.org/
mariadb官网:http://mariadb.org/
php官网:http://php.net/
wordpress官网:https://cn.wordpress.org/
xcache官网:http://xcache.lighttpd.net/
实验前准备
提前安装好软件包组及其相关的包:
yum groupinstall  "development tools" -y
yum install openssl-devel
expat-devel
pcre-devel
bzip2-devel
libxml2-devel
libmcrypt-devel -y
一共是1个包组,6个包哦~大家不要少安,不然会报错的诺。
其中:
openssl-devel expat-devel pcre-devel http所依赖的包
bzip2-devel libxml2-devel libmcrypt-devel php所依赖的包
注意:需epel扩展源
一、编译安装httpd2.4
1、解包解压缩
我们分别把apr-1.6.2, apr-util-1.6.0 ,httpd-2.4.28 这三个包解压缩:
tar xvf apr-1.6.2.tar.gz
tar xvf apr-util-1.6.0.tar.gz
tar xvf httpd-2.4.28.tar.bz2
然后,我们把apr-1.6.2/和apr-util-1.6.0/文件夹移动到httpd-2.4.28/的指定文件夹中,并改名:
[root@centos6 src]# mv apr-1.6.2 httpd-2.4.28/srclib/apr
[root@centos6 src]# mv apr-util-1.6.0 httpd-2.4.28/srclib/apr-util
2、编译安装
准备工作都做好了,接下来就是编译安装了。
一样的,需要先进入到httpd-2.4.28/这个目录下。由于代码很长,希望大家仔细仔细再仔细,或者像小编一样分行写:
[root@centos6 src]# cd httpd-2.4.28
[root@centos6 httpd-2.4.28]# ./configure --prefix=/app/httpd24
--enable-so
--enable-ssl
--enable-cgi
--enable-rewrite
--with-zlib
--with-pcre
--with-included-apr
--enable-modules=most
--enable-mpms-shared=all
--with-mpm=prefork
[root@centos6 httpd-2.4.28]# make -j 4 && make install
至此,我们的编译安装成功,接下来,我们要修改一些配置。
3、安装后的相关设置
1)修改PATH路径
[root@centos6 httpd-2.4.28]# vim /etc/profile.d/lamp.sh
PATH=/app/httpd24/bin:/usr/local/mysql/bin/:/app/php/bin/:$PATH
顺便把后边的mysql和php的也一起设置进去
接着,运行下面的命令让其生效:
[root@centos6 httpd-2.4.28]# . /etc/profile.d/lamp.sh
2)设置开机自启
我们拷贝一个服务脚本,并对其内容进行修改就可以了:
[root@centos6 httpd-2.4.28]# cp  /etc/init.d/httpd  /etc/init.d/httpd24
[root@centos6 httpd-2.4.28]# vim  /etc/init.d/httpd24
文件里上面的内容不需要改动,我们只需要修改一下路径就可以了,也就是把
# Path to the apachectl script, server binary, and short-form for messages.
apachectl=/usr/sbin/apachectl
httpd=${HTTPD-/usr/sbin/httpd}
prog=httpd
pidfile=${PIDFILE-/var/run/httpd/httpd.pid}
lockfile=${LOCKFILE-/var/lock/subsys/httpd}
RETVAL=0
STOP_TIMEOUT=${STOP_TIMEOUT-10}
修改为:
# Path to the apachectl script, server binary, and short-form for messages.
apachectl=/app/httpd24/bin/apachectl
httpd=${HTTPD-/app/httpd24/bin/httpd}
prog=httpd
pidfile=${PIDFILE-/app/httpd24/logs/httpd.pid}
lockfile=${LOCKFILE-/var/lock/subsys/httpd24}
RETVAL=0
STOP_TIMEOUT=${STOP_TIMEOUT-10}
然后保存退出就可以了。
接下来,就可以把这个服务添加到服务列表里了:
[root@centos6 init.d]# chkconfig --add httpd24
[root@centos6 init.d]# chkconfig  httpd24  on
[root@centos6 init.d]# chkconfig --list httpd24
httpd24        	0:off	1:off	2:on	3:on	4:on	5:on	6:off
[root@centos6 init.d]# service httpd24 start
这样,我们的httpd2.4版本就可以通过service来控制了。
同时,我们要开启httpd服务。
至此,我们本步骤完成。
二、二进制安装mariadb-5.5.57
1、解包解压缩
tar xvfmariadb-10.2.9-linux-x86_64.tar.gz -C /usr/local/
因为我们是二进制安装,所以必须要指定解压缩的目录为/usr/local/
2、创建逻辑卷
首先,我们先添加一块硬盘,因为这个硬盘要存放数据库,所以尽量大一点,添加硬盘以后,需要输入命令来同步硬盘:
[root@centos6 src]# echo '- - -' > /sys/class/scsi_host/host2/scan
[root@centos6 src]# lsblk
NAME   MAJ:MIN RM   SIZE RO TYPE MOUNTPOINT
sr0     11:0    1   3.7G  0 rom  /mnt/boot
sda      8:0    0   200G  0 disk
├─sda1   8:1    0   300M  0 part /boot
├─sda2   8:2    0   3.9G  0 part [SWAP]
└─sda3   8:3    0 195.8G  0 part /
sdb      8:16   0   200G  0 disk
如果上面的命令中host2不能用的话就改成host0。
然后,我们来创建逻辑卷
[root@centos6 src]# pvcreate /dev/sdb  //创建pv
  Physical volume "/dev/sdb" successfully created
[root@centos6 src]# vgcreate vg_mysqldb /dev/sdb  //创建vg
  Volume group "vg_mysqldb" successfully created
[root@centos6 src]# lvcreate -n lv_mysqldb -l +100%FREE vg_mysqldb  //创建lv
  Logical volume "lv_mysqldb" created.
[root@centos6 src]# mkfs.ext4 /dev/vg_mysqldb/lv_mysqldb -L /data/mysqldb  //文件系统格式化
创建好了以后,我们来挂载:
[root@centos6 src]# mkdir /data/mysqldb  -p  //创建挂载点,就是存放数据库的地方
[root@centos6 src]# vim /etc/fstab  //设置开机挂载,增加一行
/dev/vg_mysqldb/lv_mysqldb /data/mysqldb ext4 defaults,acl 0 0
[root@centos6 src]# mount -a  //挂载
挂载完成以后,我们接着就可以创建用户了。
2、创建mysql用户
因为mysql用户是系统用户,所以我们创建的时候要加上-r
[root@centos7 src]# useradd -d /app/mysqldb -r -m -s /sbin/nologin mysql
-d 指定家目录
-r 创建系统用户
-m 系统用户时没有家目录的,该选项作用是强行指定家目录
-s 指定shell
创建用户以后,我们把/data/mysqldb/的所属人换成mysql
[root@centos7 src]# chown mysql /data/mysqldb/
3、查看文件
我们使用cd /usr/local/进入解开压缩包的目录,发现mariadb的目录名字不符合要求,所以我们可以直接修改名字,也可以创建一个软连接,创建软连接命令如下:
[root@centos7 mysql]# ln -s mariadb-10.2.8-linux-x86_64/ mysql
4、创建修改配置文件
进入mysql文件夹,查看support-files文件夹中的内容,发现里面有我们的配置文件,但是配置文件不应该在这个目录下,应该放在/etc/mysql/下,所以,我们要创建这个目录,并把配置文件复制进去,具体的操作如下:
[root@centos7 src]# cd /usr/local/mysql/
[root@centos7 mysql]# ls
bin                 include         README-wsrep
COPYING             INSTALL-BINARY  scripts
COPYING.thirdparty  lib             share
CREDITS             man             sql-bench
data                mysql-test      support-files
EXCEPTIONS-CLIENT   README.md
[root@centos7 mysql]# ls support-files/
binary-configure        my-medium.cnf        policy
magic                   my-small.cnf         wsrep.cnf
my-huge.cnf             mysqld_multi.server  wsrep_notify
my-innodb-heavy-4G.cnf  mysql-log-rotate
my-large.cnf            mysql.server
[root@centos7 mysql]# mkdir /etc/mysql
[root@centos7 mysql]# cp support-files/my-huge.cnf /etc/mysql/my.cnf
接下来,我们来修改配置文件:
[root@centos7 mysql]# vim /etc/mysql/my.cnf
[mysqld]
datadir = /app/mysqldb      //指定总目录,必须的
innodb_file_per_table = on  //让每一个表数据库都是一个文件,方便管理
skip_name_resolve = on      //忽略名字的反向解析,加快速度
5、执行脚本,创建系统数据库
首先,我们要确保我们在/usr/local/mysql这个目录下,只能在这个目录下执行脚本:
[root@centos7 mysql]# cd /usr/local/mysql
[root@centos7 mysql]# ./scripts/mysql_install_db --user=mysql --datadir=/data/mysqldb
执行脚本完成后就会在/data/mysqldb/生成mysql系统数据库
6、创建日志文件
[root@centos7 mysql]# touch /var/log/mysqld.log
[root@centos7 mysql]# chown mysql /var/log/mysqld.log
7、把服务脚本复制过去
[root@centos7 mysql]# cp support-files/mysql.server /etc/init.d/mysqld
[root@centos7 mysql]# chkconfig --add mysqld //设置服务在哪个运行级别,在哪个运行级别开启服务
[root@centos7 mysql]# chkconfig --list mysqld
复制完了以后,我们就可以开启服务了:
[root@centos7 mysql]# service mysqld start
因为我们提前创建了日志文件,所以我们的服务可以正常开启。
8、运行安全初始化脚本
我们在上个大步骤中,已经把所有的PATH变量都设置好了,所以现在我们可以直接运行我们的安全初始化脚本:
[root@centos7 mysql]# mysql_secure_installation


9、运行mysql,创建wordpress的数据库和管理员并授权
[root@centos6 mysql]# mysql -uroot -pcentos
Welcome to the MariaDB monitor.  Commands end with ; or g.
Your MariaDB connection id is 9
Server version: 5.5.57-MariaDB MariaDB Server

Copyright (c) 2000, 2017, Oracle, MariaDB Corporation Ab and others.

Type 'help;' or 'h' for help. Type 'c' to clear the current input statement.

MariaDB [(none)]> create database blogdb;
Query OK, 1 row affected (0.03 sec)

MariaDB [(none)]> grant all on blogdb.* to 'wpadm'@'172.17.251.66' identified by 'centos';
Query OK, 0 rows affected (0.00 sec)

MariaDB [(none)]> quit
Bye
这样的话,我们的数据库就安装完成。
三、安装php-5.6.31
1、解压缩
tar xvf php-5.6.31.tar.xz
2、进入目录进行编译安装
我们使用cd命令进入该目录,然后对php进行编译安装:
[root@centos6 src]# cd php-5.6.31/
[root@centos7 php-5.6.31]# ./configure
--prefix=/app/php
--with-mysql=/usr/local/mysql
--with-openssl
--with-mysqli=/usr/local/mysql/bin/mysql_config
--enable-mbstring
--with-freetype-dir
--with-jpeg-dir
--with-png-dir
--with-zlib
--with-libxml-dir=/usr
--enable-xml
--enable-sockets
--enable-fpm
--with-mcrypt
--with-config-file-path=/etc/php/
--with-config-file-scan-dir=/etc/php.d
--with-bz2
[root@centos7 5.6.31]# make -j 4 && make install
3、创建并编辑配置文件
首先,我们要复制配置文件到/etc目录下:
[root@centos7 php-5.6.31]# mkdir /etc/php
[root@centos7 php-5.6.31]# cp php.ini-production /etc/php/php.ini
[root@centos7 php-5.6.31]# cp sapi/fpm/init.d.php-fpm /etc/init.d/php-fpm
[root@centos7 php-5.6.31]# chmod +x /etc/init.d/php-fpm
记得一定要开启执行权限,不然这个服务打不开。
接着,我们来编辑php配置文件:
[root@centos6 php-5.6.31]# cd /app/php/etc/
[root@centos6 etc]# cp /app/php/etc/php-fpm.conf.default /app/php/etc/php-fpm.conf
[root@centos6 etc]# service php-fpm start
注意:在centos 7 中php-fpm.conf.default 和www.conf.default 这两个文件都需要cp,但centos 6把这两个文件合在php-fpm.conf.default 中了
接下来的这一步不用修改,如果你想根据自己的需要修改也是可以的:
[root@centos6 etc]# vim /app/php/etc/php-fpm.conf
pm.max_children = 50
pm.start_servers = 5
pm.min_spare_servers = 2
pm.max_spare_servers = 5  //和pm.start_servers 一致
pid = /app/php/var/run/php-fpm.pid
四、修改http的主配置文件,让其支持php
[root@centos6 conf]# vim /app/httpd24/conf/httpd.conf

//取消两行对模块的注释,默认被注释了
LoadModule proxy_module modules/mod_proxy.so
LoadModule proxy_fcgi_module modules/mod_proxy_fcgi.so

//修改下面行
DirectoryIndex index.php index.html

//加下面四行
AddType application/x-httpd-php .php
AddType application/x-httpd-php-source .phps
ProxyRequests Off
ProxyPassMatch ^/(.*.php)$ fcgi://127.0.0.1:9000/app/httpd24/htdocs/$1
至此,配置结束。
五、部署wordpress
1、解压缩并移动文件
首先,我们进行解压缩:
tar xvf wordpress-4.8.1-zh_CN.tar.gz
然后,把该文件夹中的文件全部移动到/app/httpd24/htdocs/这个目录下:
[root@centos7 src]# cd wordpress/
[root@centos7 wordpress]# ls
[root@centos6 wordpress]# rm -rf /app/httpd24/htdocs/*
[root@centos7 wordpress]# mv * /app/httpd24/htdocs/
接着,我们进入/app/httpd24/htdocs/这个文件夹,查看文件:
[root@centos7 wordpress]# cd /app/httpd24/htdocs/
[root@centos7 htdocs]# ls
a.php            wp-blog-header.php    wp-load.php
index.html       wp-comments-post.php  wp-login.php
index.php        wp-mail.php           license.txt
wp-config-sample.php  wp-settings.php  pma
wp-content       wp-signup.php         readme.html
wp-cron.php      wp-trackback.php      wp-activate.php
wp-includes      xmlrpc.php            wp-admin
wp-links-opml.php
我们可以看到这里面有一个wp-config-sample.php文件,我们复制一份并改名,接着编辑:
[root@centos7 htdocs]# cp wp-config-sample.php wp-config.php
[root@centos7 htdocs]# vim wp-config.php
我们只需要修改四行的内容,也就是我们上一步中设置的数据库账号的相关内容:
/** WordPress数据库的名称 */
define('DB_NAME', 'blogdb');

/** MySQL数据库用户名 */
define('DB_USER', 'wpadm');

/** MySQL数据库密码 */
define('DB_PASSWORD', 'centos');

/** MySQL主机 */
define('DB_HOST', '172.17.251.66');
2、测试登录
修改完成之后,我们直接浏览器登录测试就可以了:
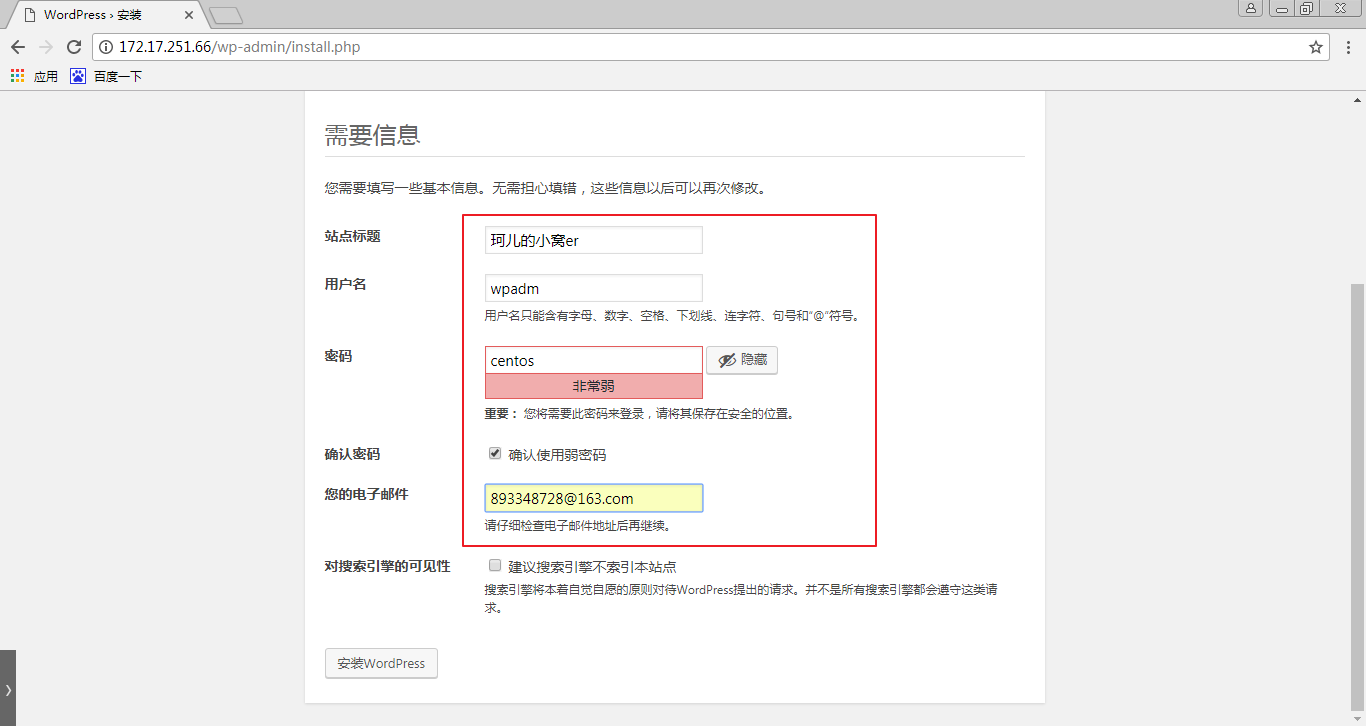
填写完相关的内容,然后点击左下角的安装wordpress
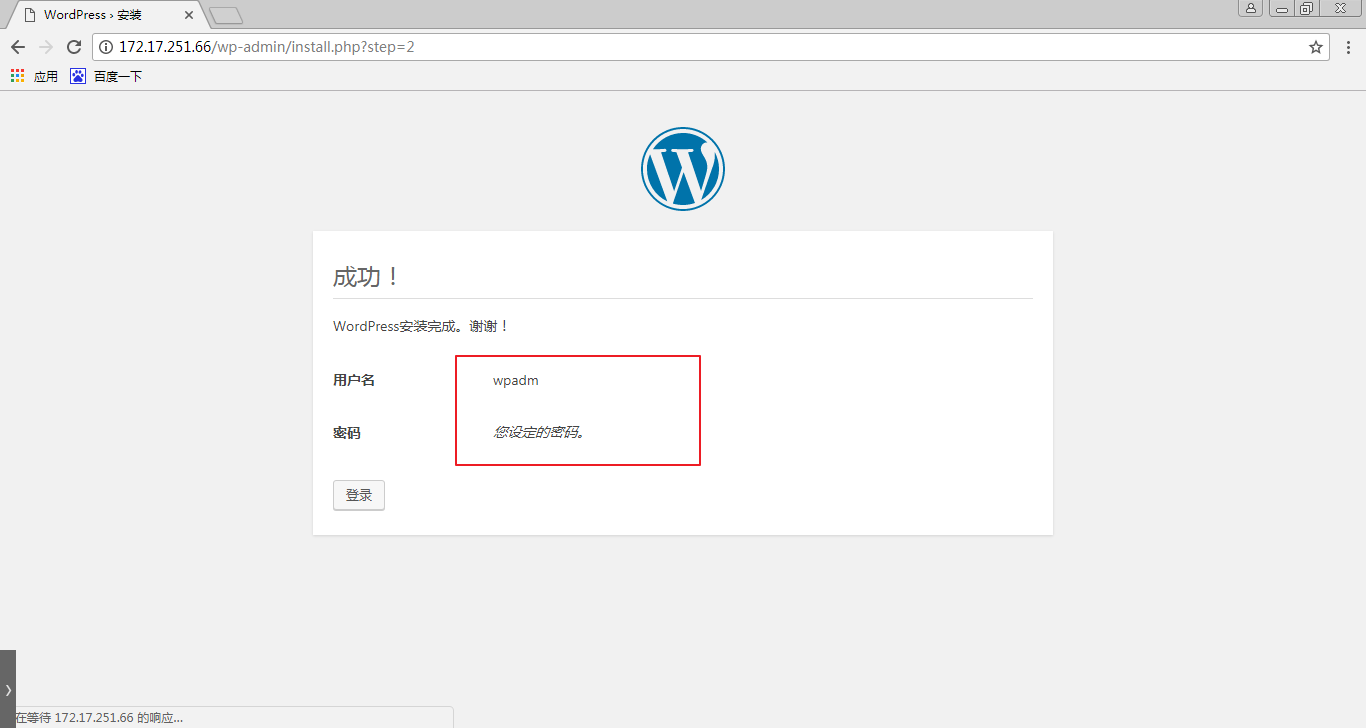
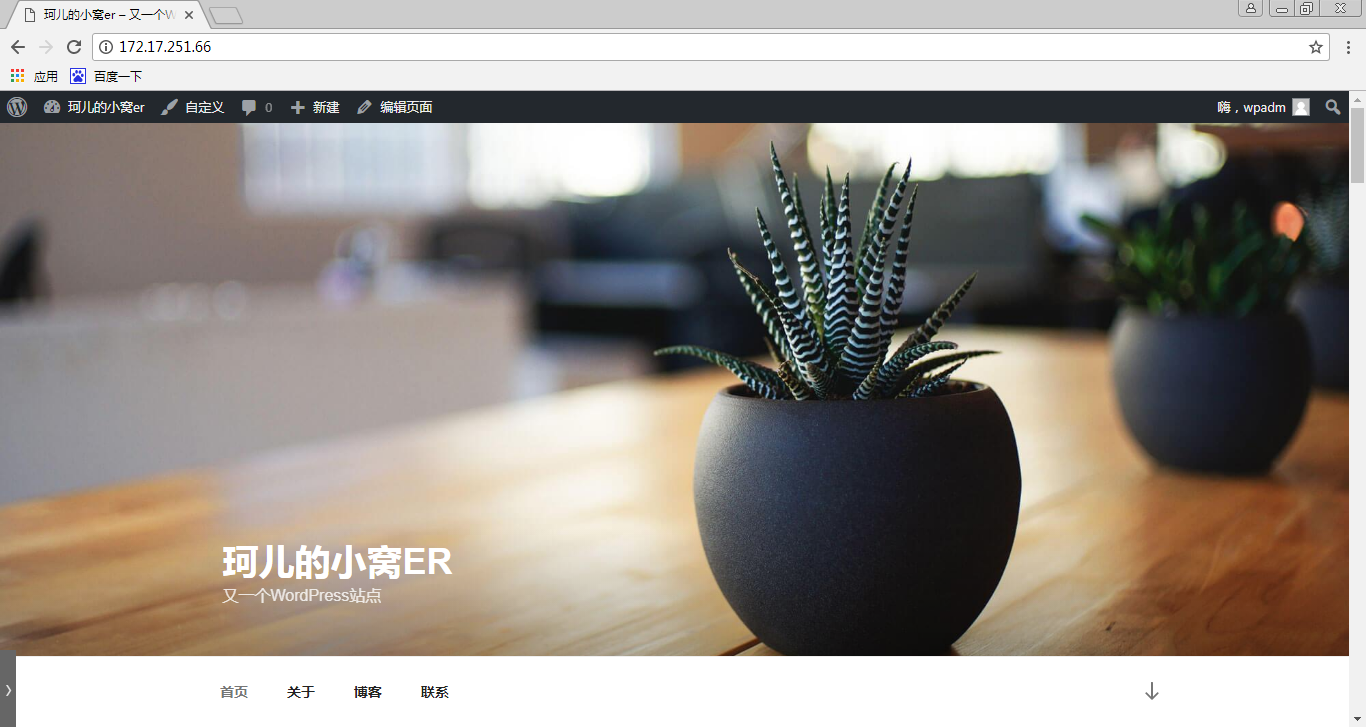
我们的博客就这么搭建好了,我们可以登录进去试试看:
3、 ab 测试性能
ab -c 10 -n 100 http://172.17.251.66/
速度大概在6.2左右。
六、编译安装xcache
1、解包解压缩
tar xvf xcache-3.2.0.tar.gz
2、编译安装
首先,我们进入该目录:
[root@centos6 src]# cd xcache-3.2.0
[root@centos6 xcache-3.2.0]# ls
AUTHORS             Makefile.frag       run-xcachetest
bin                 Makefile.frag.deps  tests
ChangeLog           mod_assembler       THANKS
config.m4           mod_cacher          util
config.w32          mod_coverager       xcache
COPYING             mod_decoder         xcache.c
devel               mod_disassembler    xcache_globals.h
gen_structinfo.awk  mod_encoder         xcache.h
htdocs              mod_optimizer       xcache.ini
includes.c          NEWS                xcache-test.ini
INSTALL             processor           xcache-zh-gb2312.ini
lib                 README
我们在目录中并没有找到configure脚本,所以我们要进行生成:
[root@centos6 xcache-3.2.0]# yum -y install php-devel  //安装包
[root@centos6 xcache-3.2.0]# phpize  //生成configure脚本
[root@centos6 xcache-3.2.0]# ls
acinclude.m4        htdocs              mod_optimizer
aclocal.m4          includes.c          NEWS
AUTHORS             INSTALL             processor
autom4te.cache      install-sh          README
bin                 lib                 run-tests.php
build               ltmain.sh           run-xcachetest
ChangeLog           Makefile.frag       tests
config.guess        Makefile.frag.deps  THANKS
config.h.in         Makefile.global     util
config.m4           missing             xcache
config.sub          mkinstalldirs       xcache.c
configure           mod_assembler       xcache_globals.h
configure.in        mod_cacher          xcache.h
config.w32          mod_coverager       xcache.ini
COPYING             mod_decoder         xcache-test.ini
devel               mod_disassembler    xcache-zh-gb2312.ini
gen_structinfo.awk  mod_encoder
接着,我们就可以进行编译安装了:
./configure --enable-xcache --with-php-config=/app/php/bin/php-config
make && make install
3、修改配置文件
首先,我们来复制一下文件:
[root@centos6 xcache-3.2.0]# mkdir /etc/php.d/
[root@centos6 xcache-3.2.0]# cp xcache.ini /etc/php.d/
[root@centos6 xcache-3.2.0]# ls /app/php/lib/php/extensions/
no-debug-non-zts-20131226
接着我们就可以对配置文件进行修改:
[root@centos6 xcache-3.2.0]# vim /etc/php.d/xcache.ini
因为是源码编译,xcache不是放在对应路径下,所以需要对其路径进行修改,也就是需要修改下面这一行:
extension = /app/php/lib/php/extensions/no-debug-non-zts-20131226/xcache.so
修改完成后,我们就可以启动服务了:
[root@centos6 xcache-3.2.0]# service php-fpm restart
启动服务以后,我们在对其进行性能测试:
ab -c 10 -n 100 http://172.17.251.66/
速度提升到了16,我们的加速器成功0.0
至此,我们的实验圆满完成。