1 同文件夹直接编译
1 同文件夹直接编译

# cmake needs this line
cmake_minimum_required(VERSION 2.8)

# Define project name
project(pixel_Giga)

# Find OpenCV, you may need to set OpenCV_DIR variable
# to the absolute path to the directory containing OpenCVConfig.cmake file
# via the command line or GUI
find_package(OpenCV REQUIRED)

# If the package has been found, several variables will
# be set, you can find the full list with descriptions
# in the OpenCVConfig.cmake file.
# Print some message showing some of them
message(STATUS "OpenCV library status:")
message(STATUS "    version: ${OpenCV_VERSION}")
message(STATUS "    libraries: ${OpenCV_LIBS}")
message(STATUS "    include path: ${OpenCV_INCLUDE_DIRS}")

if(CMAKE_VERSION VERSION_LESS "2.8.11")
  # Add OpenCV headers location to your include paths
  include_directories(${OpenCV_INCLUDE_DIRS})
endif()

# Declare the executable target built from your sources
add_executable(camera1 camera1.cpp openShare.cpp openShare.hpp)
# Link your application with OpenCV libraries
target_link_libraries(camera1 ${OpenCV_LIBS})

# Declare the executable target built from your sources
add_executable(camera2 camera2.cpp openShare.cpp openShare.hpp)
# Link your application with OpenCV libraries
target_link_libraries(camera2 ${OpenCV_LIBS})

# Declare the executable target built from your sources
add_executable(camera3 camera3.cpp openShare.cpp openShare.hpp)
# Link your application with OpenCV libraries
target_link_libraries(camera3 ${OpenCV_LIBS})

# Declare the executable target built from your sources
add_executable(camera4 camera4.cpp openShare.cpp openShare.hpp)
# Link your application with OpenCV libraries
target_link_libraries(camera4 ${OpenCV_LIBS})

# Declare the executable target built from your sources
add_executable(camera5 camera5.cpp openShare.cpp openShare.hpp)
# Link your application with OpenCV libraries
target_link_libraries(camera5 ${OpenCV_LIBS})

# Declare the executable target built from your sources
add_executable(camera6 camera6.cpp openShare.cpp openShare.hpp)
# Link your application with OpenCV libraries
target_link_libraries(camera6 ${OpenCV_LIBS})

# Declare the executable target built from your sources
add_executable(camera7 camera7.cpp openShare.cpp openShare.hpp)
# Link your application with OpenCV libraries
target_link_libraries(camera7 ${OpenCV_LIBS})

# Declare the executable target built from your sources
add_executable(camera8 camera8.cpp openShare.cpp openShare.hpp)
# Link your application with OpenCV libraries
target_link_libraries(camera8 ${OpenCV_LIBS})

# Declare the executable target built from your sources
add_executable(camera9 camera9.cpp openShare.cpp openShare.hpp)
# Link your application with OpenCV libraries
target_link_libraries(camera9 ${OpenCV_LIBS})

# Declare the executable target built from your sources
add_executable(camera10 camera10.cpp openShare.cpp openShare.hpp)
# Link your application with OpenCV libraries
target_link_libraries(camera10 ${OpenCV_LIBS})

# Declare the executable target built from your sources
add_executable(camera11 camera11.cpp openShare.cpp openShare.hpp)
# Link your application with OpenCV libraries
target_link_libraries(camera11 ${OpenCV_LIBS})

# Declare the executable target built from your sources
add_executable(camera12 camera12.cpp openShare.cpp openShare.hpp)
# Link your application with OpenCV libraries
target_link_libraries(camera12 ${OpenCV_LIBS})

# Declare the executable target built from your sources
add_executable(dispose1 dispose1.cpp openShare.cpp openShare.hpp)
# Link your application with OpenCV libraries
target_link_libraries(dispose1 ${OpenCV_LIBS})
2 同文件夹多个编译

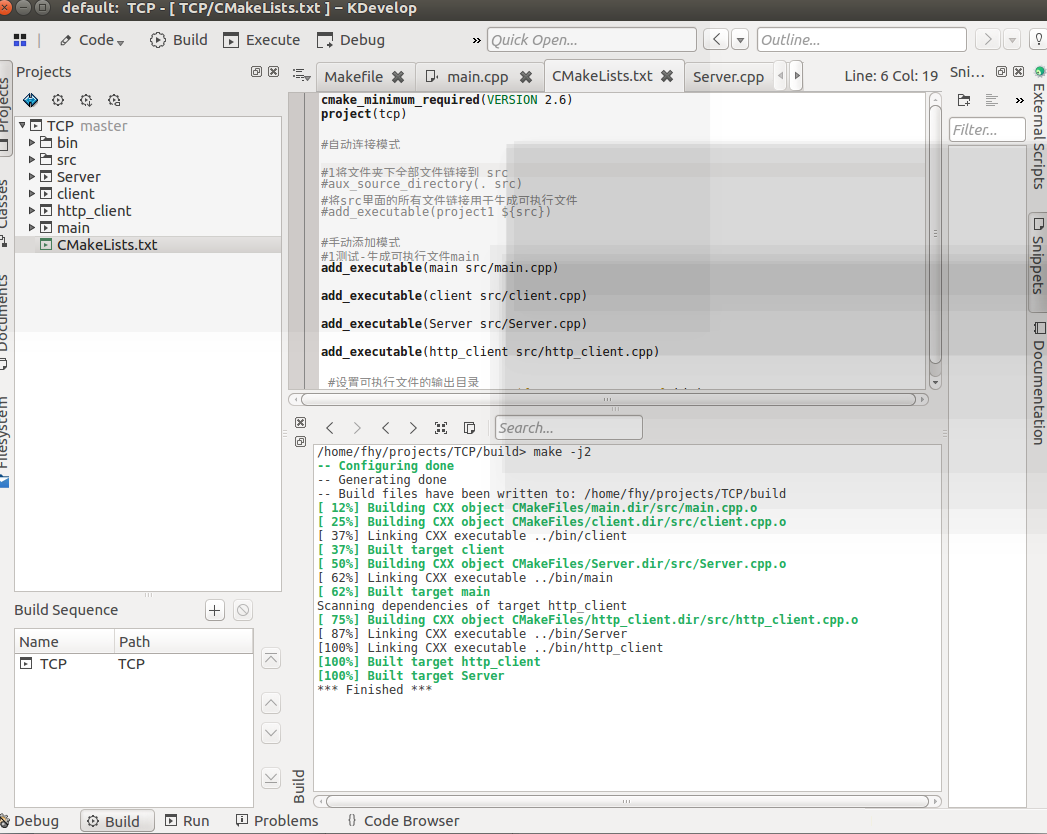
CMakeLists.txt
cmake_minimum_required(VERSION 2.6)
project(tcp)

#自动连接模式

#1将文件夹下全部文件链接到 src
#aux_source_directory(. src)
#将src里面的所有文件链接用于生成可执行文件
#add_executable(project1 ${src})

#手动添加模式
#1测试-生成可执行文件main
add_executable(main src/main.cpp)

add_executable(client src/client.cpp)

add_executable(Server src/Server.cpp)

add_executable(http_client src/http_client.cpp)

 #设置可执行文件的输出目录
SET(EXECUTABLE_OUTPUT_PATH ${PROJECT_SOURCE_DIR}/bin)
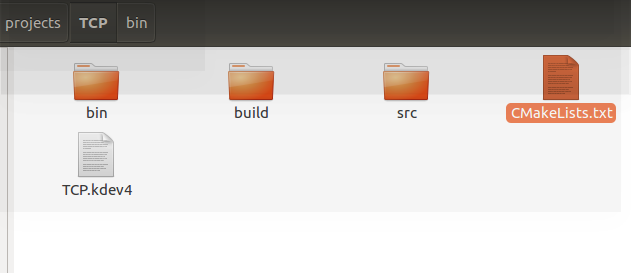
src源码地址

可执行文件夹


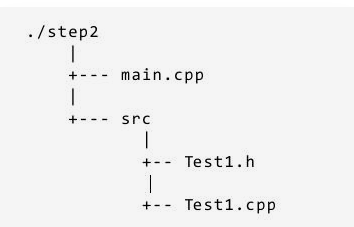
3 分文件夹间接编译


CMakeLists.txt
#1工程名字
PROJECT(main)
#2版本要求
CMAKE_MINIMUM_REQUIRED(VERSION 2.6)

#3-1该命令会把参数 <.当前文件夹> 中所有的源文件名称赋值给参数 <DIR_SRCS>
AUX_SOURCE_DIRECTORY(. DIR_SRCS)
#3-2包含src文件夹下的内容,会自动到该文件夹下寻找新的cmake
ADD_SUBDIRECTORY( src )

#0 指示变量 DIR_SRCS 中的源文件需要编译 成一个名称为 main 的可执行文件。
ADD_EXECUTABLE(main ${DIR_SRCS})

#-1 链接库
TARGET_LINK_LIBRARIES( main Test )
main.cpp
#include <iostream>
using namespace std;
#include "src/print_drc.cpp"
#include "src/print_src.cpp"

int main()
{

    print_drc();
    print_src();

    cout<<"hello world"<<endl;
    return 1;
}

CMakeLists.txt
#3-1该命令会把参数 <.当前文件夹> 中所有的源文件名称赋值给参数 <DIR_TEST1_SRCS>
AUX_SOURCE_DIRECTORY(. DIR_TEST1_SRCS)

#0 指示变量 DIR_SRCS 中的源文件需要编译 成一个名称为 main 的可执行文件。
#ADD_EXECUTABLE(main ${DIR_SRCS})
#0 指示变量 DIR_TEST1_SRCS 中的源文件需要编译 成一个名称为 main 的库。
ADD_LIBRARY ( Test ${DIR_TEST1_SRCS})
print_drc.cpp
#include <iostream>

using namespace std;

int print_drc()
{
    cout<<"1 这是来自直接目录下的测试!"<<endl;
    return 1;
}
print_src.cpp
#include <iostream>

using namespace std;

int print_src()
{
    cout<<" 2 这是来自src下的测试!"<<endl;
    return 1;
}
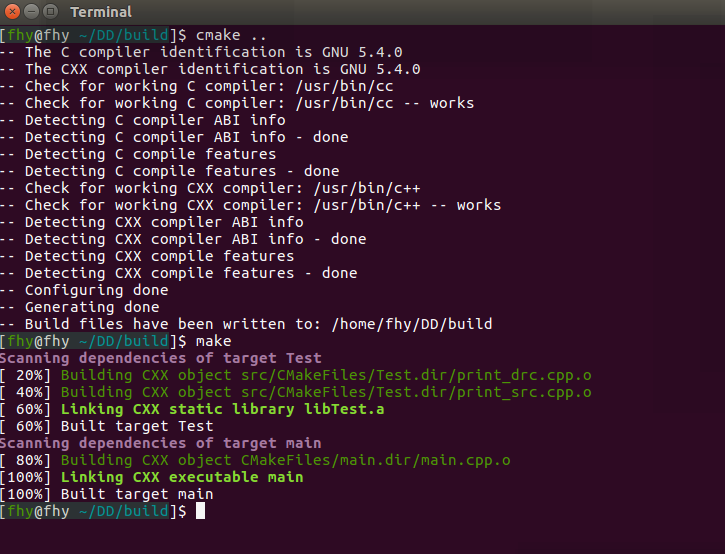
编译

cmake ..


make

运行
