https://circuits4you.com/2018/02/03/esp8266-nodemcu-adc-analog-value-on-dial-gauge/
ESP8266(NodeMCU)ADC表盘上的模拟值
这是它使用JavaScripts,ESP8266,CSS和HTML知识的高级教程。在此示例中,我们正在读取ADC的模拟值并将其显示在HTML网页上,该网页由ESP8266或NodeMCU Web服务器提供。要获得有关ESP8266中基本HTML页面创建的更多详细信息,请阅读此内容。
ESP8266只有一个adc频道。让我们开始阅读模拟并做一些很酷的事情
在刻度盘上进行ESP8266 NodeMCU模拟读取的步骤
步骤1:编写ESP NodeMCU代码,如下所示
此代码在ESP上创建Web服务器并连接到给定的wifi网络配置。根据您的wifi网络更改WiFi配置
代码分为多个部分让我们来了解什么是什么?
1.连接到WiFi网络
|
1
2
3
4
5
6
7
8
9
10
11
12
13
14
15
16
|
//Connect to wifi Network
WiFi.begin(ssid, password); //Connect to your WiFi router
Serial.println("");
// Wait for connection
while (WiFi.status() != WL_CONNECTED) {
delay(500);
Serial.print(".");
}
//If connection successful show IP address in serial monitor
Serial.println("");
Serial.print("Connected to ");
Serial.println(ssid);
Serial.print("IP address: ");
Serial.println(WiFi.localIP()); //IP address assigned to your ESP
|
2.在onRoot,onNotFound上创建Web服务器,最后读取ADC
Server Initializer有关此内容的更多信息,请参见此处
|
1
2
3
4
5
|
//Initialize Webserver
server.on("/",handleRoot);
server.on("/getADC",handleADC); //Reads ADC function is called from out index.html
server.onNotFound(handleWebRequests); //Set setver all paths are not found so we can handle as per URI
server.begin();
|
Web服务器主页位于root上。notFound Handler执行诸如向客户端发送javascripts,jQuery和Css文件之类的任务。 ESP重定向在这里解释
|
1
2
3
4
5
6
7
8
9
10
11
12
13
14
15
16
|
void handleWebRequests(){
if(loadFromSpiffs(server.uri())) return;
String message = "File Not Detected
";
message += "URI: ";
message += server.uri();
message += "
Method: ";
message += (server.method() == HTTP_GET)?"GET":"POST";
message += "
Arguments: ";
message += server.args();
message += "
";
for (uint8_t i=0; i<server.args(); i++){
message += " NAME:"+server.argName(i) + "
VALUE:" + server.arg(i) + "
";
}
server.send(404, "text/plain", message);
Serial.println(message);
}
|
上面的代码实际上首先解码未找到的URL,然后将这些参数传递给spiffs loader。ESP8266 SPIFFS在这里解释
|
1
2
3
4
5
6
7
8
9
10
11
12
13
14
15
16
17
18
19
20
21
22
23
24
|
bool loadFromSpiffs(String path){
String dataType = "text/plain";
if(path.endsWith("/")) path += "index.htm";
if(path.endsWith(".src")) path = path.substring(0, path.lastIndexOf("."));
else if(path.endsWith(".html")) dataType = "text/html";
else if(path.endsWith(".htm")) dataType = "text/html";
else if(path.endsWith(".css")) dataType = "text/css";
else if(path.endsWith(".js")) dataType = "application/javascript";
else if(path.endsWith(".png")) dataType = "image/png";
else if(path.endsWith(".gif")) dataType = "image/gif";
else if(path.endsWith(".jpg")) dataType = "image/jpeg";
else if(path.endsWith(".ico")) dataType = "image/x-icon";
else if(path.endsWith(".xml")) dataType = "text/xml";
else if(path.endsWith(".pdf")) dataType = "application/pdf";
else if(path.endsWith(".zip")) dataType = "application/zip";
File dataFile = SPIFFS.open(path.c_str(), "r");
if (server.hasArg("download")) dataType = "application/octet-stream";
if (server.streamFile(dataFile, dataType) != dataFile.size()) {
}
dataFile.close();
return true;
}
|
一旦你知道了所有编程技术,我们就可以转向实际的编程。
最终完整代码
将此代码复制并粘贴到arduino中。然后上传它
ESP8266(NodeMCU)ADC表盘上的模拟值
2018年2月3日ESP8266 esp,html,Javascript,NodeMCU,web服务器
这是它使用JavaScripts,ESP8266,CSS和HTML知识的高级教程。在此示例中,我们正在读取ADC的模拟值并将其显示在HTML网页上,该网页由ESP8266或NodeMCU Web服务器提供。要获得有关ESP8266中基本HTML页面创建的更多详细信息,请阅读此内容。
ESP8266只有一个adc频道。让我们开始阅读模拟并做一些很酷的事情
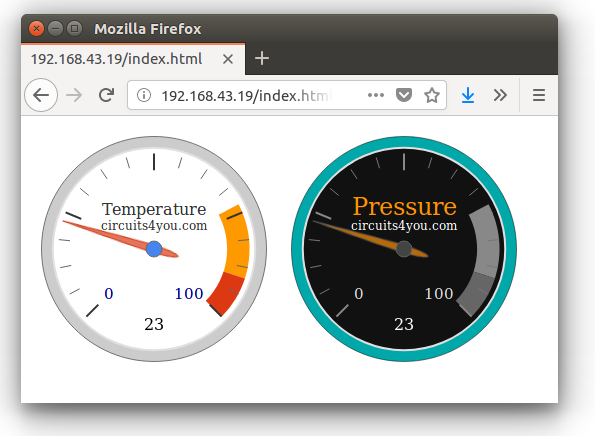
ESP8266-模拟读数表盘
在刻度盘上进行ESP8266 NodeMCU模拟读取的步骤
步骤1:编写ESP NodeMCU代码,如下所示
此代码在ESP上创建Web服务器并连接到给定的wifi网络配置。根据您的wifi网络更改WiFi配置
代码分为多个部分让我们来了解什么是什么?
1.连接到WiFi网络
//Connect to wifi Network
WiFi.begin(ssid, password); //Connect to your WiFi router
Serial.println("");
// Wait for connection
while (WiFi.status() != WL_CONNECTED) {
delay(500);
Serial.print(".");
}
//If connection successful show IP address in serial monitor
Serial.println("");
Serial.print("Connected to ");
Serial.println(ssid);
Serial.print("IP address: ");
Serial.println(WiFi.localIP()); //IP address assigned to your ESP
1
2
3
4
5
6
7
8
9
10
11
12
13
14
15
16
//Connect to wifi Network
WiFi.begin(ssid, password); //Connect to your WiFi router
Serial.println("");
// Wait for connection
while (WiFi.status() != WL_CONNECTED) {
delay(500);
Serial.print(".");
}
//If connection successful show IP address in serial monitor
Serial.println("");
Serial.print("Connected to ");
Serial.println(ssid);
Serial.print("IP address: ");
Serial.println(WiFi.localIP()); //IP address assigned to your ESP
2.在onRoot,onNotFound上创建Web服务器,最后读取ADC
Server Initializer有关此内容的更多信息,请参见此处
//Initialize Webserver
server.on("/",handleRoot);
server.on("/getADC",handleADC); //Reads ADC function is called from out index.html
server.onNotFound(handleWebRequests); //Set setver all paths are not found so we can handle as per URI
server.begin();
1
2
3
4
5
//Initialize Webserver
server.on("/",handleRoot);
server.on("/getADC",handleADC); //Reads ADC function is called from out index.html
server.onNotFound(handleWebRequests); //Set setver all paths are not found so we can handle as per URI
server.begin();
Web服务器主页位于root上。notFound Handler执行诸如向客户端发送javascripts,jQuery和Css文件之类的任务。 ESP重定向在这里解释
void handleWebRequests(){
if(loadFromSpiffs(server.uri())) return;
String message = "File Not Detected
";
message += "URI: ";
message += server.uri();
message += "
Method: ";
message += (server.method() == HTTP_GET)?"GET":"POST";
message += "
Arguments: ";
message += server.args();
message += "
";
for (uint8_t i=0; i<server.args(); i++){
message += " NAME:"+server.argName(i) + "
VALUE:" + server.arg(i) + "
";
}
server.send(404, "text/plain", message);
Serial.println(message);
}
1
2
3
4
5
6
7
8
9
10
11
12
13
14
15
16
void handleWebRequests(){
if(loadFromSpiffs(server.uri())) return;
String message = "File Not Detected
";
message += "URI: ";
message += server.uri();
message += "
Method: ";
message += (server.method() == HTTP_GET)?"GET":"POST";
message += "
Arguments: ";
message += server.args();
message += "
";
for (uint8_t i=0; i<server.args(); i++){
message += " NAME:"+server.argName(i) + "
VALUE:" + server.arg(i) + "
";
}
server.send(404, "text/plain", message);
Serial.println(message);
}
上面的代码实际上首先解码未找到的URL,然后将这些参数传递给spiffs loader。ESP8266 SPIFFS在这里解释
bool loadFromSpiffs(String path){
String dataType = "text/plain";
if(path.endsWith("/")) path += "index.htm";
if(path.endsWith(".src")) path = path.substring(0, path.lastIndexOf("."));
else if(path.endsWith(".html")) dataType = "text/html";
else if(path.endsWith(".htm")) dataType = "text/html";
else if(path.endsWith(".css")) dataType = "text/css";
else if(path.endsWith(".js")) dataType = "application/javascript";
else if(path.endsWith(".png")) dataType = "image/png";
else if(path.endsWith(".gif")) dataType = "image/gif";
else if(path.endsWith(".jpg")) dataType = "image/jpeg";
else if(path.endsWith(".ico")) dataType = "image/x-icon";
else if(path.endsWith(".xml")) dataType = "text/xml";
else if(path.endsWith(".pdf")) dataType = "application/pdf";
else if(path.endsWith(".zip")) dataType = "application/zip";
File dataFile = SPIFFS.open(path.c_str(), "r");
if (server.hasArg("download")) dataType = "application/octet-stream";
if (server.streamFile(dataFile, dataType) != dataFile.size()) {
}
dataFile.close();
return true;
}
1
2
3
4
5
6
7
8
9
10
11
12
13
14
15
16
17
18
19
20
21
22
23
24
bool loadFromSpiffs(String path){
String dataType = "text/plain";
if(path.endsWith("/")) path += "index.htm";
if(path.endsWith(".src")) path = path.substring(0, path.lastIndexOf("."));
else if(path.endsWith(".html")) dataType = "text/html";
else if(path.endsWith(".htm")) dataType = "text/html";
else if(path.endsWith(".css")) dataType = "text/css";
else if(path.endsWith(".js")) dataType = "application/javascript";
else if(path.endsWith(".png")) dataType = "image/png";
else if(path.endsWith(".gif")) dataType = "image/gif";
else if(path.endsWith(".jpg")) dataType = "image/jpeg";
else if(path.endsWith(".ico")) dataType = "image/x-icon";
else if(path.endsWith(".xml")) dataType = "text/xml";
else if(path.endsWith(".pdf")) dataType = "application/pdf";
else if(path.endsWith(".zip")) dataType = "application/zip";
File dataFile = SPIFFS.open(path.c_str(), "r");
if (server.hasArg("download")) dataType = "application/octet-stream";
if (server.streamFile(dataFile, dataType) != dataFile.size()) {
}
dataFile.close();
return true;
}
一旦你知道了所有编程技术,我们就可以转向实际的编程。
最终完整代码
将此代码复制并粘贴到arduino中。然后上传它
上传程序后等待你需要做更多的事情
第2步:将网页和jQuery,Javascripts和CSS上传到ESP8266 NodeMCU闪存
为此,请在草图文件夹中创建名为“ data”的文件夹,即保存上述.ino文件的位置。然后下载并解压缩这些文件 ESP8266-analog-gauge-data。
文件夹结构是带有数据文件夹的.ino文件。在数据文件夹中,您有这些文件index.html,style.css,jQuery.min.js,d3-gauge.js。
不将这些文件上传到ESP8266 NodeMCU Flash文件系统。这个怎么做 ?阅读此处加载文件需要一些时间。
第3步:测试
假设您已上传程序和SPIFFS文件。打开串行监视器并重置ESP。您将获得IP地址,在Web浏览器中打开它。确保您的ESP和笔记本电脑在同一网络中
你会得到漂亮的界面。正如我们在开始时所展示的那样。