两种模式的区别
- 队列模式:多个消费端时,消息只能被其中一个消费,不能消息共享
消息发送到队列后,如果消费端服务没有启动,可以启动后消费
- 主题模式:多个消费端消费,每个消费端都能消费到消息,消息共享
消息发送到队列后,消费端服务未开启,开启后消费不到原来的旧消息
通过connection创建一个或者多个Session。
Session是一个发送或者接收消息的线程,可以使用Session创建MessageProducer,MessageConsumer和Message
Session session = connection.createSession(false, Session.AUTO_ACKNOWLEDGE);
其中transacted为使用事务标识,acknowledgeMode为签收模式。
签收模式有三种:
Session.AUTO_ACKNOWLEDGE:为自动确认,客户端发送和接收消息不需要做额外的工作。哪怕是接收端发生异常,也会被当作正常发送成功。
Session.CLIENT_ACKNOWLEDGE:为客户确认,客户端接收到消息后,必须调用javax.jms.Message的acknowledge方法。jms服务器才会当作发送成功,并删除消息。
在这种情况下,签收发生在Session层面,签收一个已经消费的消息会自动签收这个Session所有已消费的收条。
Session.DUPS_OK_ACKNOWLEDGE :允许副本的确认模式。一旦接收方应用程序的方法调用从处理消息处返回,会话对象就会确认消息的接收;而且允许重复确认。Session 不必确保对传送消息的签收,它可能引起消息的重复,但是降低了session的开销,只有客户端能容忍重复的消息,才可使用。
ActiveMQ的服务端
activemq.xml配置文件中,支持五种协议

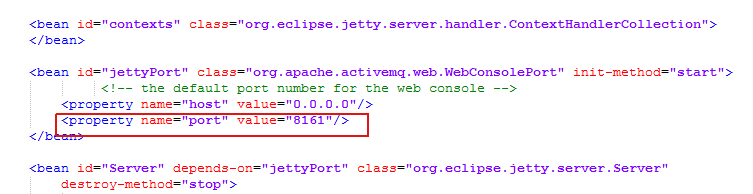
管理端口,默认8161
jetty.xml中配置
整合Spring测试demo
1、新建Maven项目,加入依赖
<?xml version="1.0" encoding="UTF-8"?>
<project xmlns="http://maven.apache.org/POM/4.0.0"
         xmlns:xsi="http://www.w3.org/2001/XMLSchema-instance"
         xsi:schemaLocation="http://maven.apache.org/POM/4.0.0 http://maven.apache.org/xsd/maven-4.0.0.xsd">
    <modelVersion>4.0.0</modelVersion>

    <groupId>test</groupId>
    <artifactId>activemq_test</artifactId>
    <version>1.0-SNAPSHOT</version>

    <dependencies>
        <dependency>
            <groupId>org.apache.activemq</groupId>
            <artifactId>activemq-all</artifactId>
            <version>5.15.9</version>
        </dependency>

        <!--spring整合activemq所需要的依赖-->
        <dependency>
            <groupId>org.springframework</groupId>
            <artifactId>spring-context</artifactId>
            <version>5.1.6.RELEASE</version>
        </dependency>
        <dependency>
            <groupId>org.springframework</groupId>
            <artifactId>spring-jms</artifactId>
            <version>4.3.6.RELEASE</version>
        </dependency>
        <dependency>
            <groupId>org.springframework</groupId>
            <artifactId>spring-test</artifactId>
            <version>5.1.6.RELEASE</version>
        </dependency>

        <dependency>
            <groupId>org.apache.activemq</groupId>
            <artifactId>activemq-core</artifactId>
            <version>5.7.0</version>
            <exclusions>
                <exclusion>
                    <artifactId>spring-context</artifactId>
                    <groupId>org.springframework</groupId>
                </exclusion>
            </exclusions>
        </dependency>
    </dependencies>
</project>
2、Prdoucer端配置文件:
producer.xml
<?xml version="1.0" encoding="UTF-8"?>
<beans xmlns="http://www.springframework.org/schema/beans"
       xmlns:xsi="http://www.w3.org/2001/XMLSchema-instance"
       xmlns:context="http://www.springframework.org/schema/context"
       xsi:schemaLocation="http://www.springframework.org/schema/beans http://www.springframework.org/schema/beans/spring-beans.xsd http://www.springframework.org/schema/context http://www.springframework.org/schema/context/spring-context.xsd">

    <context:annotation-config></context:annotation-config>

    <bean id="targetConnectionFactory" class="org.apache.activemq.ActiveMQConnectionFactory">
        <property name="brokerURL" value="tcp://127.0.0.1:61616"></property>
    </bean>

    <bean id="connectionFactory" class="org.springframework.jms.connection.SingleConnectionFactory">
        <property name="targetConnectionFactory" ref="targetConnectionFactory"></property>
    </bean>

    <bean id="destination" class="org.apache.activemq.command.ActiveMQQueue">
        <constructor-arg value="SpringActiveMQMsg"></constructor-arg>
    </bean>

    <!-- jms模板  用于进行消息发送-->
    <bean id="jmsTemplate" class="org.springframework.jms.core.JmsTemplate">
        <property name="connectionFactory" ref="connectionFactory"/>
    </bean>

    <bean id="producerService" class="spring.ProducerServiceImpl"></bean>
</beans>
3、创建生产者接口
public interface ProducerService {
    public void sendMessge(String message);
}
生产者实现
public class ProducerServiceImpl implements ProducerService {
    @Autowired
    JmsTemplate jmsTemplate;

    //@Resource(name = "queueDestination")
    @Autowired
    private Destination destination;

    public void sendMessge(final String message) {
        jmsTemplate.send(destination,new MessageCreator() {
            public Message createMessage(Session session) throws JMSException {
                return session.createTextMessage(message);
            }
        });

        System.out.println("发送消息" + message);
    }
}
将ProducerService配置到producer.xml中
<bean id="producerService" class="spring.ProducerServiceImpl"></bean>
4、新增生产者测试类
public class ProducerMain {

    public static void main(String[] args) {
        ClassPathXmlApplicationContext applicationContext = new ClassPathXmlApplicationContext("producer.xml");
        System.out.println("applicationContext:" + applicationContext);
        ProducerService producerService = (ProducerService) applicationContext.getBean("producerService");
        System.out.println("producerService:" + producerService);
        for (int i = 0; i < 50; i++) {
            producerService.sendMessge("test" + i);
        }
        applicationContext.close();
    }
}
5、运行测试类,查看ActiveMQ管理列表中是否有数据进入

控制台输出信息

6、配置消费端
consumer.xml
<?xml version="1.0" encoding="UTF-8"?>
<beans xmlns="http://www.springframework.org/schema/beans"
       xmlns:xsi="http://www.w3.org/2001/XMLSchema-instance"
       xmlns:context="http://www.springframework.org/schema/context"
       xsi:schemaLocation="http://www.springframework.org/schema/beans
       http://www.springframework.org/schema/beans/spring-beans.xsd
       http://www.springframework.org/schema/context
       http://www.springframework.org/schema/context/spring-context.xsd">

    <context:annotation-config></context:annotation-config>

    <bean id="targetConnectionFactory" class="org.apache.activemq.ActiveMQConnectionFactory">
        <property name="brokerURL" value="tcp://127.0.0.1:61616"></property>
    </bean>

    <bean id="connectionFactory" class="org.springframework.jms.connection.SingleConnectionFactory">
        <property name="targetConnectionFactory" ref="targetConnectionFactory"></property>
    </bean>

    <bean id="destination" class="org.apache.activemq.command.ActiveMQQueue">
        <constructor-arg value="SpringActiveMQMsg"></constructor-arg>
    </bean>

    <bean id="messageListener" class="spring.ConsumerMessageListner"></bean>

    <bean id="jmsContainer" class="org.springframework.jms.listener.DefaultMessageListenerContainer">
        <property name="connectionFactory" ref="connectionFactory"></property>
        <property name="destination" ref="destination"></property>
        <property name="messageListener" ref="messageListener"></property>
    </bean>

</beans>
7、创建消费者监听类
public class ConsumerMessageListner implements MessageListener {

    public void onMessage(Message message) {
        TextMessage textMessage = (TextMessage) message;
        try {
            System.out.println("接收到消息:" + textMessage.getText());
        } catch (JMSException e) {
            e.printStackTrace();
        }
    }
}
8、创建消费者测试类
public class ConsumerMain {
    public static void main(String[] args) {
        ClassPathXmlApplicationContext applicationContext = new ClassPathXmlApplicationContext("consumer.xml");
    }
}
9、运行测试类
查看管理列表数据是否被消费

控制台输出:
