环境:
192.168.16.130 git使用节点
192.167.16.145 git本地仓库
129.28.152.162 云端gi仓库
本地节点:
[root@localhost ~]# yum install git
下载git使用
root@localhost ~]# mkdir git_test
[root@localhost ~]# ls
anaconda-ks.cfg                                       n            redis-5.0.0.tar.gz  wen
git_test                                              n.pub        t
Mycat-server-1.6-RELEASE-20161028204710-linux.tar.gz  redis-5.0.0  w
[root@localhost ~]# cd git_test/
[root@localhost git_test]# git init
初始化空的 Git 版本库于 /root/git_test/.git/
[root@localhost git_test]# ls -a
.  ..  .git
创建并初始化
root@localhost git_test]# touch test
[root@localhost git_test]# ls
test
[root@localhost git_test]# git add .
[root@localhost git_test]# git commit -m 'v1'
[master(根提交) bc50efc] v1
 Committer: root <root@localhost.localdomain>
您的姓名和邮件地址基于登录名和主机名进行了自动设置。请检查它们正确
与否。您可以通过下面的命令对其进行明确地设置以免再出现本提示信息:

    git config --global user.name "Your Name"
    git config --global user.email you@example.com

设置完毕后,您可以用下面的命令来修正本次提交所使用的用户身份:

    git commit --amend --reset-author

 1 file changed, 0 insertions(+), 0 deletions(-)
 create mode 100644 test
touch文件
提交到暂存区
提交到仓库
root@localhost git_test]# git push -u git@129.28.152.162:root/test.git master
提交到云端仓库ssh 免密提交
[root@localhost git_test]# git push -u http://192.168.16.145/root/localhost.git  master
Username for 'http://192.168.16.145': root
Password for 'http://root@192.168.16.145':
Counting objects: 6, done.
Compressing objects: 100% (3/3), done.
Writing objects: 100% (6/6), 454 bytes | 0 bytes/s, done.
Total 6 (delta 0), reused 0 (delta 0)
To http://192.168.16.145/root/localhost.git
 * [new branch]      master -> master
分支 master 设置为跟踪来自 http://192.168.16.145/root/localhost.git 的远程分支 master。
提交到本地145仓库
云端配置
rz 上传 gitlab-ce-8.9.5-ce.0.el7.x86_64
yum install gitlab-ce-8.9.5-ce.0.el7.x86_64.rpm #yum 安装
vim /etc/gitlab/gitlab.rb
配置文件
external_url 'http://129.28.152.162'
更改为公网ip 地址
gitlab-ctl reconfigure

等待几分钟
ss -tnl
State       Recv-Q Send-Q      Local Address:Port                     Peer Address:Port
LISTEN      0      128             127.0.0.1:6379                                *:*
LISTEN      0      128             127.0.0.1:8080                                *:*
LISTEN      0      128                     *:80                                  *:*
LISTEN      0      128                     *:22                                  *:*
LISTEN      0      128                     *:10050                               *:*
LISTEN      129    128                     *:10051                               *:*
LISTEN      0      32                     :::21                                 :::*
LISTEN      0      128                    :::3000                               :::*
LISTEN      0      128                    :::10050                              :::*
LISTEN      0      128                    :::10051                              :::*


查看80 端口启动 ,没被http和nginx 占用
我这还有zabbix 的server和agent 在启动
web 网页访问ip

我已经过去了,拿截图说话吧
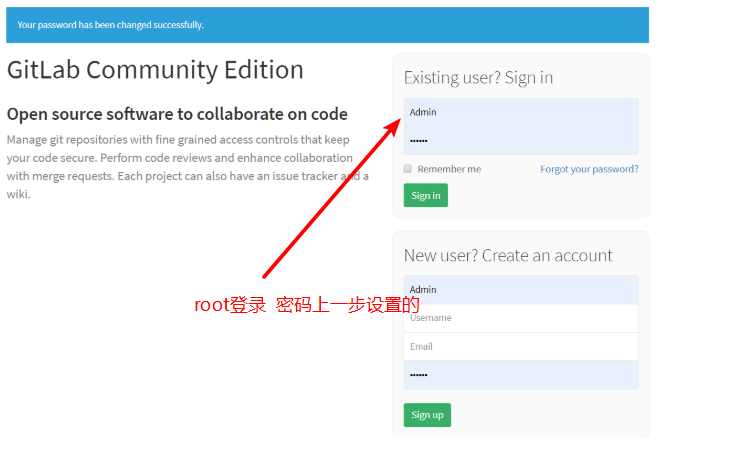
登录
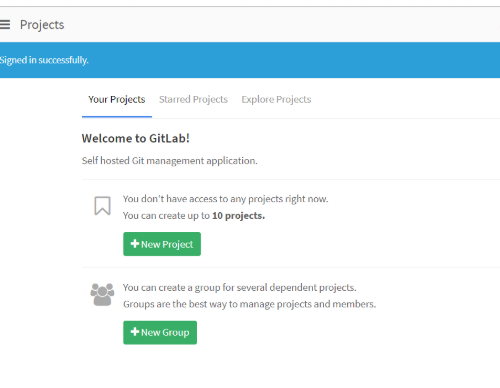
登录成功


root@localhost git_test]# vim test
[root@localhost git_test]# git add .
[root@localhost git_test]# git commit -m 'v3'
[master 4896692] v3
 Committer: root <root@localhost.localdomain>
您的姓名和邮件地址基于登录名和主机名进行了自动设置。请检查它们正确
与否。您可以通过下面的命令对其进行明确地设置以免再出现本提示信息:

    git config --global user.name "Your Name"
    git config --global user.email you@example.com

设置完毕后,您可以用下面的命令来修正本次提交所使用的用户身份:

    git commit --amend --reset-author

 1 file changed, 3 insertions(+)
[root@localhost git_test]# git push -u git@129.28.152.162:root/test.git master
Counting objects: 5, done.
Compressing objects: 100% (2/2), done.
Writing objects: 100% (3/3), 313 bytes | 0 bytes/s, done.
Total 3 (delta 0), reused 0 (delta 0)
To git@129.28.152.162:root/test.git
   4da5449..4896692  master -> master
分支 master 设置为跟踪来自 git@129.28.152.162:root/test.git 的远程分支 master。
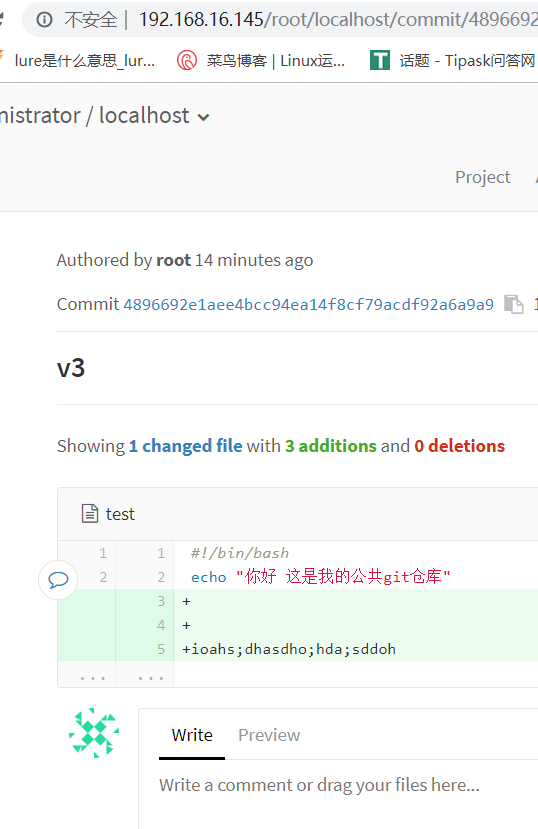
编辑测试文件 提交到云端
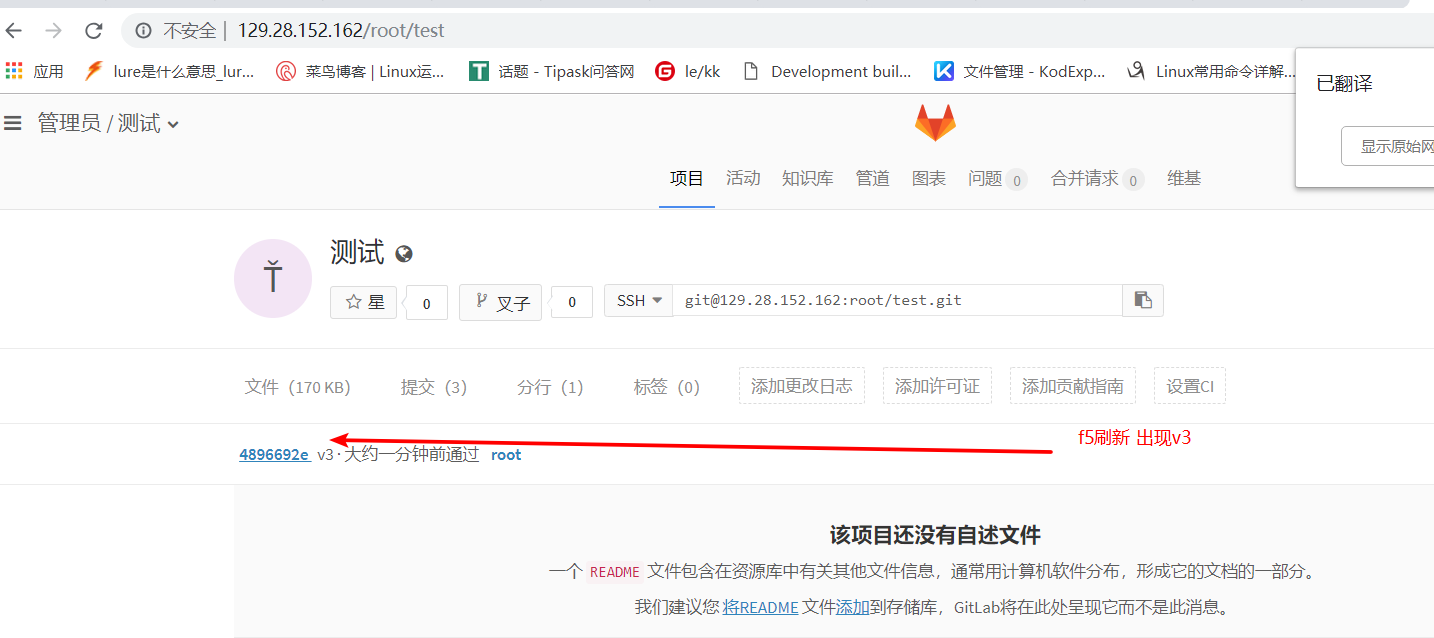


云端完成
本地搭建
rz 上传 gitlab-ce-8.9.5-ce.0.el7.x86_64


yum install gitlab-ce-8.9.5-ce.0.el7.x86_64.rpm     #yum 安装


vim /etc/gitlab/gitlab.rb
配置文件
external_url 'http://192.168.16.145'
更改为本地  ip 地址
gitlab-ctl reconfigure
初始化使配置生效

创建目录初始化
mkdir git_test   #创建
cd git_test/       #进入
git init              #初始化
touch test         #创建文件  #可以写入一些东西
git add .            #提交至暂存区
git commit -m 'v3'      #提交到仓库


可以使用本地git目录

 test
提交的时候选择本地ip
git push -u http://192.168.16.145/root/localhost.git  master    提交到网络本地仓库

输入账号密码
Username for 'http://192.168.16.145':
Password for 'http://root@192.168.16.145':


Counting objects: 5, done.
Compressing objects: 100% (2/2), done.
Writing objects: 100% (3/3), 313 bytes | 0 bytes/s, done.
Total 3 (delta 0), reused 0 (delta 0)
To http://192.168.16.145/root/localhost.git
   4da5449..4896692  master -> master
分支 master 设置为跟踪来自 http://192.168.16.145/root/localhost.git 的远程分支 master
提交成功

本地成功
ssh秘钥
ssh-keygen    生成
# cat /root/.ssh/id_rsa.pub  查看复制公钥
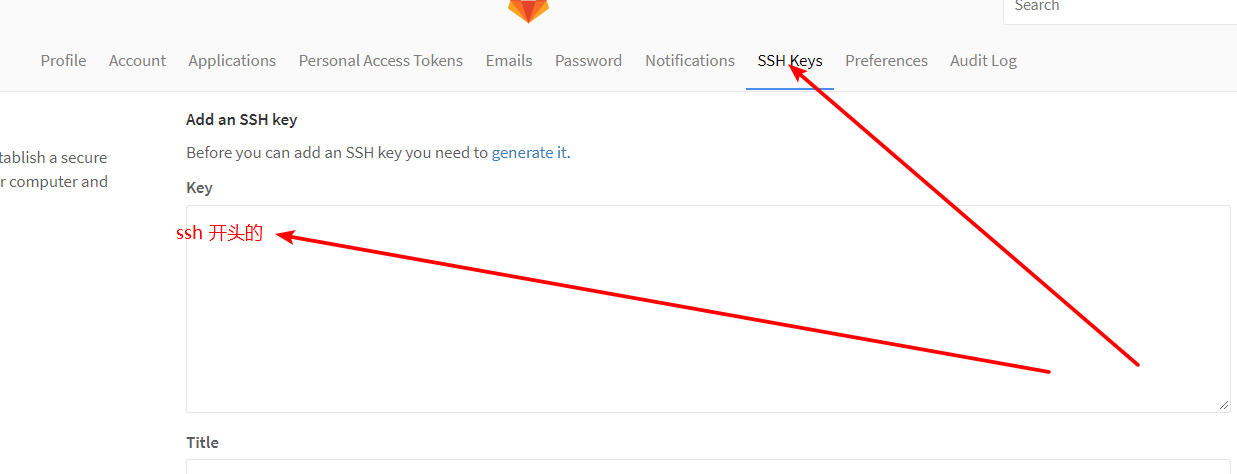
写入保存